What to Do About Root Rot and Heart Rot in Clivia? Growing Methods and Precautions
Clivia is a plant many families love to grow. As long as you grow clivia, whenever guests come over and see your clivia, they will praise it - provided the clivia is grown to look good. But when clivia is grown and suddenly develops root rot and heart rot, what should you do? You have already been caring for it very attentively. Let's take a look together with Women's Web:
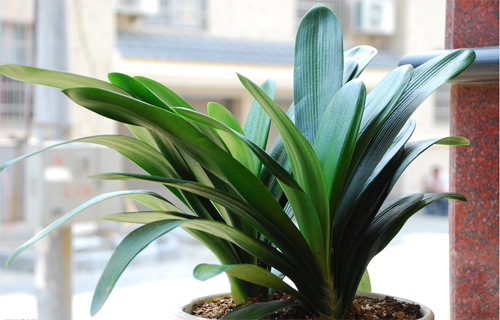
Clivia growing methods and precautions:
1. Soil
Fertile, loose neutral or slightly acidic humus soil is the most suitable seedbed for clivia. Soil selection is the number one key factor for clivia, and it is also one of the reasons many people fail to grow it well.
Potting soil formula: leaf mold (preferably oak leaves) 55%, river sand 15%, pine needles 15%, charcoal 10%, hemp seeds 5%.
a. Sift the soil and then sterilize it.
b. Fry the hemp seeds until fragrant and mix them evenly with the soil.
c. Add a layer of charcoal at the bottom of the pot to increase air permeability at the bottom and prevent water accumulation. (This portion of charcoal is not counted in the formula.)
d. Add a small handful of hemp seeds at the bottom of the pot as base fertilizer. (This portion of hemp seeds is not counted in the formula.) PS: Beginners can also directly buy special clivia soil for planting.
2. Light
Clivia likes partial shade. When growing clivia indoors, you need to manually adjust the effect of light on it. Clivia leaves are phototropic. If it is kept in one indoor spot for a long time, the leaves will definitely turn toward the direction of the sun. As far as its plant shape is concerned, it will be difficult to achieve the ornamental effect of forming a straight line when viewed from the side and looking like a fan when viewed from the front. Usually, during the day, my mom puts the pot in a sunny place. To make clivia grow beautifully and have ornamental value, you must not be lazy. Every week, change the direction of the side of the leaves facing the sun, so that the clivia can grow in an orderly, staggered manner. Because clivia leaves are opposite, if the light is too one-sided for a long time, they will become uneven. Ha, my mom said that when clivia is budding, she learned a trick from an old flower friend: place the clivia under sunlight at night to supplement light. Haha, such a flower fanatic~! PS: Methods for placing the flower pot indoors: a. Make the leaves parallel to the sunny window, and adjust in the opposite direction once a week. b. Make the leaves perpendicular to the sunny window. My mom said method b is quite good. Clivia must be placed in a north-south direction. If it is not in a north-south direction, the leaves will grow crooked. What should you do if the leaves grow crooked? You can align the two leaves and clip them together, or use a playing card to wrap around them so the leaves are not damaged. Normally, the leaves will be corrected in 15—20 days.
3. Temperature
As mentioned in the summary, the most suitable temperature is 15-25 degrees.
4. Watering
Clivia has fleshy roots and likes air but fears waterlogging. In addition, clivia leaves have a waxy layer, and in winter when temperatures are low, transpiration and evaporation of water are low. Therefore, do not water too much. Simply water together with fertilizing and keep the potting soil moist. The soil should not be too dry or too wet. Each watering must soak through, and after flower buds appear, water a bit more. About every 20 days, combine watering with one application of fermented soybean cake water, diluted fishy water, or water from soaking water chestnuts, combining watering and fertilizing. When room temperature is low, control watering to prevent the potting soil from becoming too wet. Potting soil that is too wet will cause root rot and plant death, but the potting soil must not be allowed to become too dry either.
5. Fertilizing
When clivia lacks nutrients, various problems appear, such as narrow new leaves and very pale color. In terms of nutrients, you should add the nutrients it needs according to the season. Clivia is generally fertilized in winter. Phosphorus fertilizer and potassium fertilizer are more beneficial for growing clivia. When topdressing, apply less nitrogen fertilizer. You must control the amount of fertilizer well, otherwise it is very easy to cause scorch-like symptoms at the leaf tips of clivia. Especially in winter, if spots appear on the leaves and the root system turns yellow, it is because too much fertilizer was applied. Ha, here are 2 ways to teach you how to get household phosphorus fertilizer and potassium fertilizer. You can choose eggshell powder and decomposed fishy water. These two are very good organic phosphorus fertilizers. Bran ash and cigarette ash can be used as potassium fertilizer when fertilizing clivia. Three months before flowering, apply liquid fertilizer mainly based on phosphorus and potassium fertilizer to promote flower stalk emergence and blooming.
6. Keeping Warm
The suitable temperature for clivia growth in winter is 15-20°C, and it is best not to go below 10°C. After the stalk emerges, the temperature should be kept at around 18°C, and the day-night temperature difference should preferably be around 10°C; otherwise, the flower stalk will bloom before reaching the proper height, and it is easy to form “stuck stalk.” When the outdoor temperature at night is below 10°C, clivia should be moved indoors. When the indoor temperature is below 10°C, in addition to covering the surface of the potting soil with a 1 cm thick layer of charcoal powder for warmth, the flower pot should also be placed in a sunny, warm spot indoors. When the indoor temperature is especially low, you can cover the flower pot with plastic film to raise the temperature, but the temperature inside the cover must not exceed 25°C. If it exceeds that, ventilate promptly to cool it down.
7. Extending the Flowering Period
Extending the flowering period: The flowering period of clivia is mostly from December to March of the following year. The method to extend the flowering period is to place it in a dark place when the flowers are about to open, appropriately control watering, and keep the temperature at 8-12°C. In this way, the flowering period can be extended by 10-20 days.
8. Protecting Leaves
Short, broad, thick, green, glossy, and upright leaves are the characteristics of healthy clivia. In addition to providing reasonable fertilizer and water, the leaf surface must be kept clean to improve photosynthetic efficiency. First, wash the leaves regularly, using clean water at the same temperature as the room to spray, rinse, or wipe away dust on the leaves; second, spray fungicide promptly to prevent leaf spot disease, leaf blight, and stem rot, ensuring the leaves remain green.
9. Repotting Time
The time and frequency of repotting and changing soil for clivia depend on the size of the seedling and the season. Mature clivia like these need to have their soil changed once a year. The best time to change the soil is spring and autumn, because clivia grows vigorously then and changing the soil will not affect plant growth. Take the clivia out of the pot, cut off rotten roots and old roots with no absorptive capacity, and remove spent soil. Spray Hushu Jiangjun inside and outside the leaves to disinfect, sterilize, keep warm, and protect against cold. After that, fill in 2-5 cm of nutrient soil, grab a handful of soil to fill the inside of the root ball firmly, then place the plant in the pot. When filling the pot with nutrient soil to half the pot height, gently press down along the edge of the pot with your hand, so that the roots all stand upright in the pot and are not easily bent. The key point of changing soil is to pack the root area firmly with soil. Otherwise, if there is no soil around the roots, water and nutrients cannot reach the roots, which can easily cause root rot and stuck stalks. After changing the nutrient soil, water thoroughly.
What to Do About Root Rot in Clivia?
During the cultivation of clivia, observe frequently. If root rot is found, treat it immediately. Take the plant out, remove the rotten roots, rinse the roots with 1% potassium permanganate water for disinfection, or apply some charcoal powder to the affected areas, and expose the roots to sunlight in a greenhouse for about 30 minutes. If more than 50% of the roots are rotten or all are rotten, after using the above method, use river sand to promote rooting. The rooting promotion temperature should be higher than usual, generally controlled at around 22-30°C. After about 2 months, new roots will grow, and then it can be transplanted into a pot with nutrient soil.
What to Do About Heart Rot in Clivia?
If the heart rot is not very serious, there is a chance of saving it. In this case, it is usually not the leaves in the very center that rot, but the tender leaves on both sides of the very center. If you discover this, immediately remove the rotten leaves, use toilet paper or cotton to absorb excess water, and then move it to a drier environment. After the center dries thoroughly (usually 2-3 days), resume normal care, but do not spray water on the plant, and also slightly control the humidity of the surrounding environment. If the heart rot is not very serious, after this treatment the central leaves will gradually grow out. However, if this situation is not treated promptly, it will become the second situation.
If the heart rot is relatively serious. If it is confirmed that it cannot be saved, decisively remove all the leaves on the side with fewer leaves, and the earlier the better. In this way, water will not accumulate in the center of the clivia and cause more serious damage. Moreover, removing some leaves can reduce plant consumption and help the plant use the remaining leaves and intact root system to quickly recover vitality and sprout new shoots. The specific method is: use your hands to pull off all the leaves on the side with fewer leaves one by one, exposing the top of the rotten pseudobulb, and use a clean, sterilized bamboo strip to remove the rotten part until the top of the pseudobulb is entirely white. Then withhold water for 2-3 days, and repot it with the original soil into a clay pot one size larger. The newly added potting soil must be loose and airy.
Usually, spray a suitable concentration of inorganic liquid fertilizer on the front and back of the leaves, such as urea and monopotassium phosphate, to use the remaining leaves to promote rapid root growth. At the same time, apply diluted liquid fertilizer to the pot to promote sprouting. (On the premise that the topdressing liquid fertilizer is diluted, it can be appropriately stronger during the growing period and should be more diluted during the dormant period. It may not be applied during the months with the highest temperatures. Flower friends can adjust this flexibly according to their region.) Once sprouting occurs, increase the amount of water and fertilizer and enter normal care. Because clivia treated in this way can, on the one hand, use old leaves for foliar fertilizer and, on the other hand, has a complete root system, it grows rapidly. Usually it can produce 1-2 shoots each year. A 2-year-old seedling can have 14-15 leaves and become a mature plant, at which point it can be divided and planted separately. According to my own experience, old leaves can be used for 3-4 years, and complete old roots are even more endlessly regenerative. This is also a good opportunity to mass-propagate the same clivia variety.
To grow a good-looking, sufficiently green clivia is really not easy. A little carelessness and you will grow a spotted clivia that is about to die. Master the above methods and grow a healthy clivia.
How to Grow Potted Clivia, Clivia Growing Methods and Precautions / Do Not Use Too Much Water
As for clivia, I believe all flower friends are familiar with it. Although it does not have the beauty of a peony, nor the emerald green of Dieffenbachia, its broad thick green leaves and fiery red flowers, with red and green enhancing each other, make it an ideal potted flower for beautifying the environment. In daily life, many people choose to grow clivia. So how do you grow potted clivia? Below are the clivia growing methods and precautions carefully compiled by the editor. If you want to grow it, you should not miss them~
1. How to Grow Potted Clivia: Watering Is Key
Growing clivia at home is the first choice of many flower friends. However, some people report that their clivia died while being grown. What is going on? In fact, this may be because too much water was given, because in the growing methods and precautions for clivia, watering is very important. How to grow potted clivia? Let's continue reading for the specific methods and precautions.
2. Clivia Growing Methods and Precautions
1. Potting Soil
How to grow clivia? Potting soil is the first thing to consider. Although many friends directly buy it from flower shops, repotting and changing soil are always necessary, so the requirements for clivia potting soil are also something we need to understand.
Regarding flower pots: Clivia is a famous flower, but the pot is not better the more exquisite it is; air permeability is the most important.
Regarding soil: At the bottom of the selected flower pot, it is best to use tile pieces as a base to help drain accumulated water. For the soil, you can use leaf mold, garden soil, and a small amount of river sand mixed evenly. Reference soil mix: leaf mold 50%, coarse sand 15%, charcoal and tile debris 20%, decomposed fertilizer 15%.
Precautions: Flower pot: Old flower pots used for many years have poor air permeability. They should be soaked and cleaned, then exposed to sunlight before use; Soil: Avoid sticky soil and alkaline soil, otherwise it will lead to poor growth and yellowing leaves.
2. Watering: Do Not Let Water Accumulate Too Much
No matter what flower you grow, watering is essential, and this is exactly what needs the most attention in clivia growing methods and precautions. Clivia roots are fleshy, and accumulated water in the flower pot can easily cause root rot, so watering must not be excessive. Grasp the principle: do not water until the soil is dry through, and when you water, soak it through.
Precautions: When watering clivia, be sure not to pour water on the leaves, to prevent the leaves from rotting. If you find dust on the leaves, wipe the leaf surface gently with a soft cloth; do not use large amounts of water to wash it. During the flowering period, use the root-watering method, but the flower pot must never retain water.
3. Fertilizing: Apply Thin Fertilizer Frequently
In clivia growing methods, fertilizing is also very important. Clivia likes fertilizer, but too much fertilizer will also cause trouble for clivia, so watering and fertilizing are best done at the same time. During the vigorous growth period, this can be done every 15-20 days. There are mainly three types of fertilizer: dry fertilizer, water fertilizer, and solid fertilizer.
Precautions: Clivia should be fertilized in spring and autumn with fermented solid fertilizer once a month and liquid fertilizer once a week, mainly nitrogen fertilizer. In winter and summer, it is best not to topdress, or in winter apply solid fertilizer once to clivia, with less nitrogen fertilizer and more phosphorus and potassium fertilizer. Just remember one principle: apply thin fertilizer frequently.
4. Light: It Must Not Be Too Strong
In clivia growing methods and precautions, although light is indispensable, the requirements are not strict. It is understood that clivia likes partial shade and fears direct light. If it receives strong light, transpiration will be greatly increased. At this time, if watering is improper, the leaves will become dull and scorched yellow, or even wilt.
Precautions: Because summer temperatures and soil temperatures are relatively high, it is easy for the root system to become disordered, leading to unbalanced nutrient absorption and phenomena such as neck stretching and leaf bolting. Therefore, when the light is strong, clivia should be moved to a shaded place and watered a bit more at the same time.
5. Temperature: It Must Not Be Too High
How to grow potted clivia? Suitable temperature is very important. Clivia fears high temperatures in summer. If the temperature exceeds 30°C, or if it is exposed to scorching sun, cooling measures should be taken and the clivia should be placed in a cool, low-temperature, ventilated, semi-shaded place.
Precautions: Although clivia fears high temperatures, it is also not cold-tolerant. If the temperature is too low, it will stop growing or even die. Therefore, in winter when sunlight is soft, it should be placed in a bright indoor spot. It can overwinter safely when room temperature is above 10°C.
3. Clivia Growing Precautions
Although there are already many precautions in the clivia growing methods above, to grow clivia well, there are still a few points we need to note, such as repotting and pruning. The clivia growing precautions are specifically as follows:
1. Pruning
In summer, be sure to cut off excess flower stalks of clivia. The normal flowering period of clivia is from New Year's Day to around Spring Festival. Flower stalks produced in summer cannot produce good flowers. If they are not cut off in time, they will consume nutrients and affect normal growth and flowering in winter and spring.
2. Repotting
In the precautions for growing clivia, repotting is also very important. In the second year, flower friends should change to a 15 cm clay pot, and afterward change to a clay pot one size larger every 2 years. Repotting should be done in spring and autumn, and a temperature of around 20°C is most suitable.
Clivia Growing Methods. What Are the Clivia Growing Methods and Precautions?
Clivia is a herbaceous plant in the Amaryllidaceae family, Clivia genus. The plant has opposite leaves and can absorb dust and pollutants from the air. Its growth period is long, up to 4-5 years, but its flowering period is also long, lasting 1-2 months, usually opening from December each year to March of the following year. The planting process and growing methods of clivia are very simple, but there are many key points to note. Below, the editor shares the clivia growing methods and precautions with everyone.
【Recommended Reading] Why Clivia Does Not Bloom, What to Do When Clivia Leaves Turn Yellow, What to Do About Clivia Root Rot
Clivia Growing Methods:
1. Soil:The original habitat of clivia is under large trees in high-altitude forests of southern Africa, with roots rooted in leaf litter layers accumulated over many years. For clivia care, loose and fertile neutral or slightly acidic humus soil should be used. The cultivation soil can be made by mixing 65% humus soil, 20% clean sand, and 15% fine stove ash. The relative humidity of the soil should be around 40%.
2. Fertilizing:For clivia, apply solid fertilizer once in winter, with less nitrogen fertilizer and more phosphorus and potassium fertilizer. Eggshell powder and decomposed fishy water are very good phosphorus fertilizers, while bran ash and cigarette ash are easily obtained potassium fertilizers. You can also apply a nitrogen, phosphorus, and potassium compound fertilizer to promote the sprouting of more new plants and leaves. Fertilizing must be done in the right amount. Never apply concentrated fertilizer or raw fertilizer that has not been fermented and decomposed, otherwise it can easily cause scorched or rotten leaf tips.
3. Soil:It should not be too dry or too wet. Each watering must soak through, and after flower buds appear, water a bit more. About every 20 days, combine watering with one application of fermented soybean cake water, diluted fishy water, or water from soaking water chestnuts, combining watering and fertilizing. When room temperature is low, control watering to prevent the potting soil from becoming too wet. Potting soil that is too wet will cause root rot and plant death, but the potting soil must not be allowed to become too dry either.
4. Temperature:The suitable temperature for clivia growth in winter is 15-20°C, and it is best not to go below 10°C. After the stalk emerges, the temperature should be kept at around 18°C, and the day-night temperature difference should preferably be around 10°C; otherwise, the flower stalk will bloom before reaching the proper height, and it is easy to form "stuck stalk."
Precautions for Growing Clivia:
1、Clivia likes a semi-shaded, cool environment, and absolutely avoid high temperatures, strong light, and dryness. The most suitable temperature is 15-25 degrees. Below 5 degrees, it begins to go dormant and stop growing. High temperatures are also unsuitable, and in summer attention should be paid to avoiding heat. Otherwise, the leaves will become narrow and long, affecting ornamental value, so cool it down in time.
2、During the growth period of clivia, keep the potting soil moist. During the high-temperature semi-dormant period, the potting soil should preferably be on the dry side, and water should often be sprayed on the leaf surface to achieve the purpose of cooling. Clivia likes fertilizer. Repot once every 2 to 3 years in spring and autumn, adding leaf mold to the potting soil. Rotate the pot frequently to prevent the leaves from leaning to one side.
【Related Recommendations】
· The Feng Shui Influence of Radermachera sinica on the Home · The Feng Shui Role of Golden Barrel Cactus
· What Are the Principles for Placing Plants in the Living Room According to Feng Shui · Appreciation of Lucky Four-Leaf Clover Pictures
· Why Do Succulents Turn Red? · Appreciation of Phalaenopsis Pictures
· Appreciation of Carnation Growing Pictures · Is Plectranthus amboinicus Toxic?
· How Often to Water Golden Barrel Cactus · What Are the Feng Shui Taboos for Home Plants