How to grow orchids? The correct methods for watering, transplanting and repotting
When it comes to orchids, many people like them, and they are quite beautiful, but no matter how you grow them yourself, they never thrive, and you always feel they are about to die. How do you grow orchids?
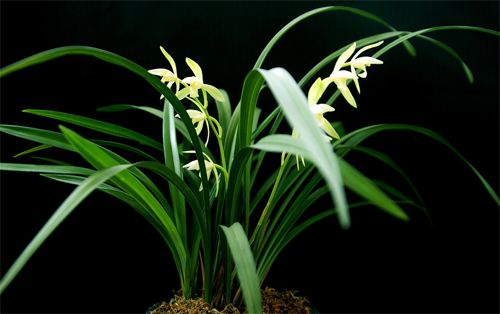
1. How to water orchids
Improper watering of orchids is the main cause of death. Some people usually spend a lot of time on care, are very afraid of the plant drying out, water frequently, and do not even realize that the plant's roots have already rotted.
How much to water depends on your care environment, the humidity, light and ventilation conditions, and the state of root growth. This is also the key reason why orchids are difficult to grow well.
These issues apply to most orchids, including Phalaenopsis and Cattleya. The simplest approach is to water based on how dry or wet the potting medium is. Every watering should be summed up well; whether you give water once every few days or once a week must be related to your home care environment!
2. The medium for growing orchids
Checking whether the orchid medium is dry or wet is an important indicator for watering. You can put your finger into the medium, pull it out and judge the degree of dryness or wetness of the medium, and whether it lacks water.
Sphagnum moss and bark are common media for growing plants, and they also make it very easy to judge whether the orchid medium is dry or wet.
Orchids grown in sphagnum moss and bark sometimes have no drainage holes. This is to prevent too much water from being lost during watering, which would be equivalent to not watering at all. Sphagnum moss has a water-retaining effect! For growing orchids, it is also quite recommended to use orchid pots.
3. The role of sphagnum moss
Sphagnum moss is like a sponge; it can keep the medium slightly moist for a long time. Therefore, orchids such as Phalaenopsis and Cattleya do not like overly wet environments but like slight moisture. They need to dry out thoroughly before watering, and after watering you need to wait longer before watering again, rather than watering too frequently.
Bark is also excellent for growing orchids, reducing the risk of orchid root rot. The rule for watering orchids must be mastered: it is best to water on the day before the medium is completely dry.
4. Differences among varieties
For example, slipper orchids (Paphiopedilum) and Lycaste like to enjoy a humid environment. They can grow very well in a moist environment, and their potting soil must not be allowed to dry out completely!
Choosing high-quality sphagnum moss and bark is more beneficial for orchid care, and watering is also easier to control.
5. Transplanting and repotting
The bark or good sphagnum moss used for growing orchids generally needs to be replaced once a year, and poor sphagnum moss needs to be replaced in a month! Bark gradually degrades through repeated watering and drying, so generally it needs repotting and transplanting once it does!
The withered bark can be used for composting, and the withered roots of orchids can also be used for composting.
6. Fertilizing orchids
For orchids, water-soluble liquid fertilizer is best. First choose the dosage yourself, and fertilize during the growing season. As for the dosage, follow the dosage on the liquid fertilizer instructions and add more water, diluting the concentration to 1/4 of the recommended dosage before fertilizing. This is what is meant by light fertilizer applied frequently.
The methods for growing orchids are introduced here. Hurry and follow these methods to make your orchids even more beautiful.
How to repot Michelia alba, and its four-season care and management / remove soil after it adapts
Michelia alba is an ornamental flowering plant with high ornamental value, and it can be seen in many regions of our country. However, to grow it well, there are many points that need attention, such as regular repotting, and care in different seasons cannot be careless. So how do you repot Michelia alba? And how should the four-season care and management of Michelia alba be done? Below, the editor will take everyone to learn about it.
I. How to repot Michelia alba
1. Repotting time
Regarding how to repot Michelia alba, the choice of time is very important. Generally, it is best to do it in March to April. If it is the first time potting, we can choose a flowerpot with a diameter of about 40 cm. In the process of growing Michelia alba, we generally repot it once every 2 years. If the plant is relatively large, repotting once every 3-4 years is also fine.
2. Repotting method
When we prepare to repot Michelia alba, we need to water the potting soil the day before, so that the potting soil can be separated more easily. When separating, we can use a shovel to cut around the perimeter, then slowly tip the flowerpot, and push the potting soil out through the ventilation holes. After taking it out, we prune it to some extent and then can transplant it into a new pot.
II. Precautions for repotting Michelia alba
When repotting Michelia alba, we should cover the drainage hole at the bottom with a tile, then lay some stones on top, which can help Michelia alba drain and breathe. In addition, when repotting it, the original soil should not be completely removed; let it slowly adapt to the new environment, and do not let it receive light immediately either. Let it rest for a period.
III. Four-season care and management of Michelia alba
1. Spring care
Spring is a relatively comfortable season for Michelia alba. The climate in this season is relatively suitable for its growth, so during care, moderate watering is enough. As for light, we can let it receive light all day, so that it will grow more vigorously and look lush and green.
2. Summer care
Summer is the season with the highest temperatures of the year. When growing Michelia alba in this season, it is best to keep it indoors in semi-shade, and the environment must be ventilated, so that it will grow very well. If it is grown outdoors, it is very easy for the leaves of Michelia alba to turn yellow because the light is too strong, so everyone should pay attention to this point.
3. Autumn care
The climate in autumn is similar to spring, and both are relatively suitable for the growth of Michelia alba. However, the autumn climate is drier than spring, so the watering frequency should be increased slightly. The light in this season is not too strong, and we can grow it outdoors and let it receive light all day.
4. Winter care
In winter, Michelia alba will enter a semi-dormant period. At this time, we can stop fertilizing it, but watering still cannot be stopped. We only need to appropriately reduce the amount and frequency of watering, and maintain the principle of not watering when not dry. When the temperature rises at noon each day, we also need to move it outdoors to receive a few hours of sunlight, which can increase its cold resistance.
Summary: After reading the above content, I believe everyone has some understanding of the question of how to repot Michelia alba. The editor has introduced the issues regarding the four-season care and management of Michelia alba here, hoping to bring everyone some effective help.
How to grow orchids? Orchid ecological habits and cultivation management techniques
How are orchids grown? Orchids have always had high ornamental value. To cultivate orchids, it is necessary to analyze the habits and growing environment of orchids, and at the same time pay attention to cultivation methods and later care. Let's learn orchid cultivation techniques together below.
1 Cultivation of orchids
1.1 Ecological habits of orchids
Orchids like warm and humid environments, and especially warm winters and cool summers are more suitable. When growing orchids, it is essential to avoid high temperatures and dryness. The growing site for orchids requires deep upper soil rich in humus, with fertile dark brown soil being the best, and it must have good water permeability and water retention.
1.2 Classification of orchids
There are very many varieties of orchids, about more than a thousand, and common types include Cymbidium kanran, Cymbidium faberi, Cymbidium bicolor, Cymbidium sinense, Dongfeng orchid, Cymbidium floribundum, and so on. To cultivate orchids scientifically, it is necessary to distinguish the types of orchids and understand them in a targeted way. This article mainly discusses the cultivation techniques for the varieties Cymbidium bicolor, Cymbidium sinense, and Dongfeng orchid.
1.3 Selection of orchid pots
Choosing a suitable orchid pot is very important for the growth of orchids. Glazed pots are finely made and very beautiful, fitting the temperament of orchids, and can be one of the choices; their drawback is insufficient breathability. Plastic pots have the advantages of being cheap and light, but their breathability is poor. Clay pots have very good ventilation, and for the growth of orchids, they should be a very good choice for orchid pots. Overall, what kind of orchid pot to choose mainly still depends on the actual situation.
1.4 Preparation of soil
Soil is the foundation for orchid growth. Scientifically prepared soil can allow orchids to grow healthily. Soil with good breathability and water drainage, and a pH value of 5.5-6.5, is most suitable for orchid growth. Orchid culture soil can be composed of one or more of the following substrates: ① Leaf mold substrate: this kind of soil can be prepared manually. The main preparation method is to pile fallen leaves together, add fertilizer, mud, water and other components, and after the processes of sealing, decomposing and sieving, leaf mold can be obtained; ② Bamboo root soil substrate: it is obtained from the roots of main clumps that have grown for many years. This kind of soil contains bamboo rhizomes, bamboo roots and rotted bamboo leaves, is rich in nutrients, and the soil is relatively loose; ③ Mountain soil substrate: it is generally obtained from mountain forests. Mountain forest soil contains the fallen leaves of various plants, and the soil is loose with good breathability. After choosing the culture soil, before use, the culture soil must be sterilized and disinfected, and the soil pH adjusted to a range of 5.6-6.5.
1.5 Preparation of orchid seedlings
The most suitable preparation period for orchids is around the time of Yushui. After the bought orchids are pruned and disinfected, they can be cultivated. The replanting work should be combined with the links of division propagation and repotting. Generally speaking, when taking out the orchids, ensure the soil has a suitable temperature of 20-28 °C, and try to ensure the leaves do not get wet. After taking them out of the ground, prune their rotten roots, broken roots and withered leaves. Place the pruned orchid roots in a 50% thiophanate-methyl 1000-fold disinfectant solution and let them sit for 10-15 min, then take them out and place them in a ventilated place to dry.
1.6 Cultivation of orchid seedlings
Cultivating or replanting orchids both require choosing a suitable season. Generally speaking, the Qingming period is the best time for cultivating and replanting orchids. The specific cultivation method is as follows:
① Choose a flowerpot of appropriate size, cover the drainage opening at the bottom of the pot with a tile, then use relatively loose materials such as ash and slag to fill the flowerpot, filling to a range between 1/3 and 1/2 of the flowerpot, and cover the top with nutrient soil;
② During the transplanting process, try to avoid the orchid roots touching the inner wall of the container, and ensure the root tendrils are in a naturally spread state; ③ Hold the orchid leaves with your hand, slowly fill soil around the orchid roots, and lift the orchid slightly upward to ensure the orchid roots spread naturally. At the same time, pay attention to adjusting the position and height of the orchid plant, until the plant is just above the pot surface;
④ For a well-planted orchid, spread small stones or sphagnum moss etc. on the surface of the soil, which is both attractive and can regulate moisture;
⑤ After the orchid is planted, the first watering should be thorough. When using a spray bottle to spray the leaf surface, pay attention to using even force, with small water droplets being best. After that, place the orchid in a water basin to soak, and you can use a spray bottle to moisten the leaf surface.
2 Management of orchids
2.1 Environment and planting site
Orchids like cool shade, and 10-25 °C is the most suitable temperature for orchid growth. Too high or too low a temperature will seriously hinder the growth of orchids. To avoid this situation, commonly used methods include building shade sheds, sprinkling water, and so on. The most suitable air humidity for orchid growth is 60%-80%. The humidity in a greenhouse generally does not meet the requirements, and humidity can be increased by sprinkling water and appropriate shading. The growing environment for orchids should be kept as far away as possible from industrial areas such as chemical plants. It is best to face the southwest direction, and also have a location with shelter, so as to avoid damage from strong light.
2.2 Water management
Spring water or clean water is the most suitable water source for orchid growth. In cities it is difficult to have spring water and clean water, so tap water can be left to stand for 2-3 d, and used after the chlorine in the water is removed. Watering should also depend on the specific growth condition of the orchid and the weather conditions, and must not be too frequent. In spring especially, watering must prevent excessive wetness; in summer, when temperatures are relatively high, sufficient moisture must be ensured; in autumn, neither dry nor wet is most suitable; in winter, water as little as possible, and choose sunny days to water as much as possible.
2.3 Fertilizer management
Orchids like fertile soil. If the quality of the base fertilizer is not good enough, topdressing should be carried out. Base fertilizer and topdressing both have fixed time distinctions. Generally speaking, the leaf mold and pig manure etc. added during cultivation are base fertilizer, while topdressing is additional fertilizer applied because the growth of orchids is restricted during the growth process due to insufficient quality of the base fertilizer. The specific fertilization time should depend on the orchid variety and climate. Because water evaporates slowly on cloudy days, it is not suitable to fertilize. At temperatures above 30 °C, water evaporates too quickly, so it is also not suitable to fertilize. Therefore, the best fertilizing season is spring and summer, the least suitable season for fertilizing is winter, and a small amount of fertilizer can be applied in autumn. There are two ways to fertilize: ① mix the fertilizer with the base fertilizer; ② fill water fertilizer into a container and apply the fertilizer to the flower roots by spraying, being careful not to let the leaf surface get fertilizer on it.
2.4 Prevention and control of pests and diseases
Compared with most ornamental plants, orchids have relatively fewer pests and diseases. The main diseases of orchids are brown spot disease and anthracnose. The main cause is that the potting soil is too wet and has not been exposed to sunlight for a long time. To prevent orchid pests and diseases, the following aspects of work need to be done well: ① when planting, choose disease-resistant varieties as much as possible; ② when caring for them indoors, ensure a pot spacing of 10-15 cm; ③ water appropriately, cut off diseased leaves in time, and appropriately spray a 40% fungicide 800-fold solution; ④ once orchids develop disease, increase ventilation, and additionally supplement by spraying a 50% carbendazim 800-1000-fold solution.
2.5 Protection of flowers and leaves
In daily care, orchid leaves should also be protected, and pollution should be dealt with promptly when found. Withered, yellow and diseased orchid leaves should be cut off in time. In addition, each orchid seedling does not need to keep too many flower buds; keeping one is enough. In the early stage after emerging from the soil there are relatively many flower buds, so pruning should be carried out, and only one high-quality flower bud needs to be kept. To prevent orchids from being pollinated and setting seed, they must be cut off before the flowers wither. If the purpose of cultivation is hybrid breeding, orchids need to be artificially pollinated.
The above is all the content of the orchid cultivation techniques to be discussed today. Interested flower grower friends are welcome to come to Huinong Network to learn!