How to grow Rhipsalis rosea? A care guide written for beginner flower lovers
Rhipsalis rosea is native to southern Brazil, where it grows as an epiphyte on tree trunks and forks in subtropical forests. It likes a warm, humid, semi-shaded environment, needs shading and good ventilation in summer; in winter keep the room temperature above 10°C and give it plenty of light. So how do you grow Rhipsalis rosea? Below, the editor brings you the growing methods for Rhipsalis rosea.
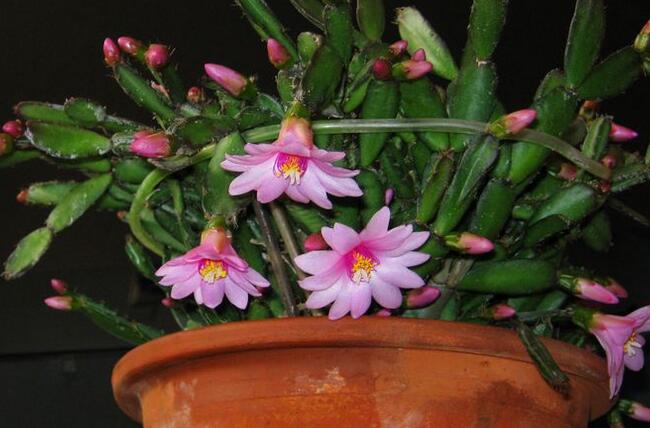
How to grow Rhipsalis rosea:
Rhipsalis rosea likes a warm, humid and semi-shaded environment. It is not cold-hardy, tolerates semi-shade, and fears waterlogging, so it is suitable for pot culture or basket culture. The optimum growing temperature for Rhipsalis rosea is 18-23°C, the optimum temperature during the flowering period is 10-15°C, and the winter temperature should not fall below 12°C. A fertile, loose, well-drained sandy soil is best, but the potting soil must not contain any calcareous material. Rhipsalis rosea can be grown indoors all year round; be careful to avoid direct sunlight. From January onward, keep it cool and give it light, but when the first flower bud appears, move it to a somewhat warmer environment to grow, and increase watering. This ensures the flowers bloom abundantly and beautifully.
Rhipsalis rosea is native to southern Brazil, where it grows as an epiphyte on tree trunks and forks in subtropical forests. It likes a warm, humid, semi-shaded environment, needs shading and good ventilation in summer; in winter keep the room temperature above 10°C and give it plenty of light.
It likes a warm, humid, semi-shaded environment and requires a certain amount of air humidity. In summer it should have good ventilation and be protected from scorching sun. It is suitable for growing in soil rich in humus, loose and fertile, with good drainage and aeration.
Care tips for Rhipsalis rosea:
Repotting: Repot once every two years. When repotting, cut back overly long or dense branches. Usually choose a 12-15 cm pot, or a 15-20 cm pot for a hanging basket, with 3-5 plants per pot.
Watering: Water once a week in spring and autumn to keep the soil moist. Provide appropriate shade in summer, and keep the soil moderately moist in winter; the specific number of waterings depends on the room temperature.
Fertilizing: Fertilize once a month, using a low-nitrogen fertilizer or a special succulent fertilizer.
Light: During the flowering period, ensure plenty of light and move the plant as little as possible, so as to avoid broken stems and fallen flowers.
Pests and diseases: Common pests and diseases include anthracnose and red spider mites. Once an affected plant is found, promptly remove the diseased leaves and spray a fungicide.
How to grow Schlumbergera and points to note - teaching you how to grow Schlumbergera
Schlumbergera, also known as crab claw cactus, is one of the potted plants that many people love. So what are the growing methods and points to note for Schlumbergera? Below, wed114 wedding website teaches you how to grow Schlumbergera correctly.
How to grow Schlumbergera and points to note - teaching you how to grow Schlumbergera
How to grow Schlumbergera:
1. Soil first for growing flowers
In the growing methods for Schlumbergera, the choice of soil is crucial, especially for beginner flower lovers: a pot of good soil is very important for whether the plant can be grown well. To grow Schlumbergera, you can use a relatively fertile mixed soil of leaf mold, peat and coarse sand, with the pH kept between pH 5.5-6.5.
2. Care environment
The growing environment for Schlumbergera requires semi-shade and humidity; in summer avoid scorching sun and rain, and in winter it needs warmth and plenty of light. The optimum growing temperature for Schlumbergera is 18-23°C, and the flowering temperature is best at 10-15°C, not exceeding 25°C, with 15°C being best to maintain; the winter temperature should not fall below 10°C. Schlumbergera is a short-day plant, so it can only bud and bloom under short-day conditions.
How to grow Schlumbergera and points to note - teaching you how to grow Schlumbergera
3. How to water
Watering has always been an endless topic, and there are always flower lovers who cannot get it right. When Schlumbergera lacks water, it will not die so easily, but when water accumulates, it easily dies. So when watering Schlumbergera, flower lovers must prefer going without over going too much, and not let their diligence run wild by watering constantly.
4. Propagating Schlumbergera
The most commonly used method for propagating Schlumbergera is cuttings. The method is very simple: just take a few segments of stems and insert them, and the survival rate is very high.
How to grow Schlumbergera and points to note - teaching you how to grow Schlumbergera
5. Managing the flowering period of Schlumbergera
The flowering period of Schlumbergera is a bit fussy: you need to control water and stop fertilizing. During the flowering period, Schlumbergera is especially sensitive to water; too much water easily causes bud drop, and in serious cases it can also rot the rootstock, causing the plant to die; too little water easily makes the flower segments wilt and prevents the buds from developing to maturity. The correct method is: keep the potting soil in a slightly moist state, so that it does not crumble when pinched by hand. You can spray with clean water at the same temperature as the room every day at noon, which can achieve twice the result with half the effort. If the potting soil is too dry, do not water it thoroughly all at once either; water gradually. Too much water at one time will cause the plant to drop buds and stem segments.
How to grow Schlumbergera and points to note - teaching you how to grow Schlumbergera
Points to note for Schlumbergera:
1. Do not move the position frequently. Once you find a suitable environment, keep it there all the time. Especially during the bud stage, you must not casually move the position of the flowerpot, as it very easily causes bud drop.
2. Although Schlumbergera likes a semi-shaded environment, it needs short-day conditions if you want it to bloom.
How to grow Jerusalem cherry? Growing methods and points to note for Jerusalem cherry / not afraid of strong light
As a beautiful indoor potted plant, flower lovers should be familiar with Jerusalem cherry. It bears fruit all year round, so it is also called four-season berry. In daily life, many people choose to keep a pot of Jerusalem cherry at home. So how do you grow Jerusalem cherry? For this, the editor has carefully compiled the growing methods and points to note for Jerusalem cherry, very comprehensive. Friends who want to grow it must take a look.
1. How to grow Jerusalem cherry - understand its habits
Jerusalem cherry likes a sunny, warm environment, and it tolerates high temperatures, showing no sunscald above 35°C, and it also tolerates direct light, so even under the big sun in summer it needs no shading. Therefore, when growing it indoors, place it in a bright place and take good cold-protection measures in winter. So how to grow Jerusalem cherry is very simple: just satisfy its growing habits. For specific requirements, let us continue reading below.
2. Growing methods and points to note for Jerusalem cherry
1. Potting soil requirements
For growing Jerusalem cherry in a pot, the first thing is naturally choosing the potting soil. Although the Jerusalem cherry bought at a flower shop comes with an existing pot and soil, if you want to grow it well, it is very necessary to choose a flowerpot and soil yourself again.
Flowerpot: just get a pretty one, but note that the size should be appropriate. Soil: although Jerusalem cherry does not have high soil requirements, if you want to grow it well, it is best to choose a fertile, loose, well-drained slightly acidic or neutral soil. When adding the soil, you can appropriately add a little base fertilizer to the soil.
2. Light
In the growing methods for Jerusalem cherry, light is indispensable. Jerusalem cherry likes light and is not afraid of strong light, so even under the big sun in summer, it can be placed outside.
Points to note: Jerusalem cherry needs plenty of light to grow, at least 4 hours of direct light per day, and it does not need shading. It is best to place it in front of a bright southeast-facing window or on a balcony.
3. Temperature
During the growth of Jerusalem cherry, temperature also needs to be regulated accordingly. Jerusalem cherry likes warmth and tolerates high temperatures; the most suitable growing temperature is between 18-25°C, so if you want it to grow well, it is best to maintain this temperature range.
Points to note: Jerusalem cherry is not cold-hardy. When the winter temperature is low, it should be kept indoors for care. Also, the ambient temperature must not be lower than 5°C, otherwise it will be frostbitten and cannot overwinter safely.
4. Watering
How to grow Jerusalem cherry - watering is naturally indispensable. It is understood that Jerusalem cherry is not drought-tolerant, but it fears waterlogging, so avoid standing water in the pot. When growing it indoors, everyone should water it appropriately and just keep the potting soil moist; it should not be too dry or too wet.
Points to note: When Jerusalem cherry is blooming, be careful to control watering, so as to avoid flower and fruit drop. Once the fruits have grown to the size of mung beans, you can resume normal watering.
5. Fertilizing
After watering, let us talk about fertilizing, which is also very important in the growing methods for Jerusalem cherry. Jerusalem cherry likes fertilizer; flower lovers can give it a dilute liquid fertilizer once every half month.
Points to note: Before the flowering period of Jerusalem cherry, apply some phosphorus fertilizer, which can make Jerusalem cherry produce abundant flowers and many fruits.
6. Pests and diseases
During the growing process, beginners often encounter some problems, such as when the temperature is high, the plant suffers from anthracnose, which harms the stems and leaves, and the condition is relatively serious. In addition, due to improper care, Jerusalem cherry can also be attacked by aphids. These will all seriously affect the ornamental value of Jerusalem cherry, so when pests and diseases are found, control should be carried out immediately. For this, everyone can refer to the pest and disease control for Jerusalem cherry.
Overall, Jerusalem cherry is still quite easy to grow, but if you want abundant flowers and many fruits, everyone needs to put in a bit more care and pay attention to water and fertilizer, so that Jerusalem cherry can bloom beautifully. The editor has introduced the growing methods for Jerusalem cherry up to here. Interested flower lovers might as well try growing one. Finally, may everyone's Jerusalem cherry bloom beautifully.