Detailed Guide to Rose Layering Propagation: How Long Until Roots Form After Layering
When it comes to roses, many people love growing them, and roses can also be propagated. Let's take a look at how rose layering propagation is done. How long does it take for rose layers to root:
How rose layering propagation is done:
1. Choose a propagation branch
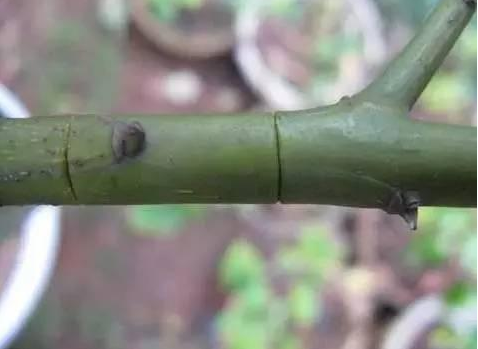
Of course, you should choose a woody rose branch that has grown for one or two years, as shown in the picture below. The cut is made at the lower end of a branch. You can see the selected branch being cut with a sterilized sharp knife. There are many ways to sterilize the knife: you can directly scorch it with fire, or spray it with a fungicide. Before cutting different roses, sterilize it as well to avoid cross-infection.
2. Cutting precautions
Ring barking is a very simple task; you only need to prepare a sharp knife. Some plants will bleed a lot of sap, so remember to wear gloves.
When cutting, cut all the way to the hard wood inside the tree, peel this ring of bark off, and all the bark in this section must be cleaned off until only woody hardwood is visible. Only in this way can you guarantee a 100% success rate for layering propagation.
3. Prepare soil and plastic wrap
For layering propagation, you can use various loose, breathable soils, and soil rich in humus is even better. Of course, you can also buy some sphagnum moss (that is, peat moss) from a flower shop or garden store, soak it in water, and then use it; its ability to promote rooting is also quite good.
Wrap it directly with plastic film. Be sure to choose transparent plastic film, otherwise you won't be able to see when roots form. Just wrap it directly around the cut area.
4. Tie with string and keep moist
After wrapping it tightly with string, you also need to make sure the layering propagation site is shaded. Do not let it be exposed to blazing sunlight; a little light is harmless.
Next, the wrapped soil should be moist but not soggy. After that, keep it shaded continuously and keep the wrapped soil or sphagnum moss moist. It must not be too dry, otherwise it will easily wither.
5. Proper watering and completing propagation
After that, keep checking whether the sphagnum moss or soil has dried out, replenish water in time, and keep it slightly moist.
After about 20 days, many roots begin to grow, and in less than a month the roots can fill the wrap. Once you know the roots have filled the plastic film, you can open it and cut directly 3~5 cm below the wrapped soil.
In this way, you get a rose with vigorous roots and an intact upper part. Once planted in soil, it is basically a surviving rose plant.
How long does it take for rose layers to root:
Rose layers generally root in just over ten days, but they must be allowed to complete root development before transplanting.
That's all for the introduction to the rose layering method and the rooting time. Hurry and try this rose propagation method.
Layering Propagation Methods and Precautions for Roses
Flower Bonsai Network introduction: Today, Flower Bonsai Network shares with you an article about layering propagation methods and precautions for roses. Using the layering method to propagate roses, you can propagate a complete rose in less than a month. Flower lovers who like roses, come and take a look.
Roses are very easy to propagate. The simplest method is to cut off branches and root them as cuttings, and the success rate is still relatively high. However, the propagation method below can have a success rate infinitely close to 100%. It is the simple high-branch layering propagation method. Of course, you need to learn how to do ring barking on roses. Don't think it is difficult; in fact, it is just a few simple steps.
1. Choose a propagation branch
Of course, you should choose a woody rose branch that has grown for one or two years, as shown in the picture below. The cut is made at the lower end of a branch. You can see the selected branch being cut with a sterilized sharp knife. There are many ways to sterilize the knife: you can directly scorch it with fire, or spray it with a fungicide. Before cutting different roses, sterilize it as well to avoid cross-infection.
(You can see that two cuts have already been made, cutting all the way to the woody hardwood inside)
2. Cutting precautions
Ring barking is a very simple task; you only need to prepare a sharp knife. Some plants will bleed a lot of sap, so remember to wear gloves.
When cutting, cut all the way to the hard wood inside the tree, peel this ring of bark off, and all the bark in this section must be cleaned off until only woody hardwood is visible. Only in this way can you guarantee a 100% success rate for layering propagation.
3. Prepare soil and plastic wrap
For layering propagation, you can use various loose, breathable soils, and soil rich in humus is even better. Of course, you can also buy some sphagnum moss (that is, peat moss) from a flower shop or garden store, soak it in water, and then use it; its ability to promote rooting is also quite good.
Wrap it directly with plastic film. Be sure to choose transparent plastic film, otherwise you won't be able to see when roots form. Just wrap it directly around the cut area.
4. Tie with string and keep moist
After wrapping it tightly with string, you also need to make sure the layering propagation site is shaded. Do not let it be exposed to blazing sunlight; a little light is harmless.
Next, the wrapped soil should be moist but not soggy. After that, keep it shaded continuously and keep the wrapped soil or sphagnum moss moist. It must not be too dry, otherwise it will easily wither.
5. Proper watering and completing propagation
After that, keep checking whether the sphagnum moss or soil has dried out, replenish water in time, and keep it slightly moist.
After about 20 days, many roots begin to grow, and in less than a month the roots can fill the wrap. Once you know the roots have filled the plastic film, you can open it and cut directly 3~5 cm below the wrapped soil.
In this way, you get a rose with vigorous roots and an intact upper part. Once planted in soil, it is basically a surviving rose plant.
Of course, you can also choose to propagate roses by cuttings. You can cut many branches, and there will always be a few that successfully sprout and root. The branches above were rooted in fine sand. Keep the river sand slightly moist, keep the environment warm and ventilated, and provide a little shade.
Flower Layering Propagation Method
Flower Layering Propagation Method
Layering propagation is a type of vegetative propagation. It is a propagation method in which a section of a parent plant's branch is wounded and buried in soil, and after it roots, it is cut away from the parent plant to become an independent new plant. This method is rather cumbersome to operate and has a low propagation coefficient, so it is mostly used for plants that are difficult to root by cuttings or grafting, and is sometimes used on some precious or rare flower varieties.
Layering propagation is also divided into the following types.
(1) Ordinary layering: Mostly used for vine flowers with relatively soft and slender branches, such as winter jasmine, honeysuckle, and Chinese trumpet creeper. When layering, bend the outer part of the parent plant into an arc, wound the protruding downward-bent part, then bury the wounded part in soil, and use a hook to secure the downward-bent part. After it roots, it can be cut away from the parent plant and transplanted separately.
(2) Mound layering: For some deciduous shrubs with strong clumping growth and relatively hard branches that are not easy to bend, such as redtwig dogwood, elm-leaved spirea, and yellow rose. In early summer, make a ring bark cut of about 1 cm at about 25 cm above the ground on the lower part of the branches, then mound soil around the parent plant, burying the lower half of the entire clump in soil, and keep the mound moist. After the barked area has fully rooted, before budding in early spring of the following year, dig away the mound, cut the branches away from the parent plant at the base, and transplant them as divided plants. If new buds are found to have sprouted, remove the mound immediately to prevent the young buds from turning yellow due to lack of sunlight.
(3) Horizontal layering: For some flowers with longer branches that root easily, such as climbing roses, this method can be used. This method is suitable in early spring. Press an entire branch of the plant into a shallow trench dug in advance, wound the branch at appropriate intervals and fix it horizontally in the trench, remove the downward-growing buds on the branch, and fill in soil. After it roots and sprouts, cut it apart one by one at the internodes, with each seedling retaining a section of the parent body.
(4) Wave layering: For some plants with long and soft branches or trailing plants, such as wisteria, this method can be used. In this method, one section of the branch is covered with soil while another section is not, repeated multiple times. Usually, wounding or ring barking is done below the pressed stem. New roots grow from the buried parts of the branch, while new shoots emerge from the unburied parts. After rooting, or at the end of the growing season, cut the branch into sections, with each section having new shoots and roots, so that multiple plants are formed from one branch.
(5) Air layering: For some evergreen flowering trees whose branches are difficult to root and not easy to bend, and whose branches are relatively soft and easy to peel, such as Michelia alba, Aglaia odorata, and Michelia figo. Generally, during the peak growing season, choose well-developed two-year-old branches, make a ring bark cut at an appropriate part, then use a plastic bag filled with peat soil, mountain soil, moss, etc., to wrap around the branch, water thoroughly, tie and secure the bag opening, and then supply water in time to keep the culture soil moist. After the branch roots, cut it away from the parent body from below the bag, remove the wrapping, plant it with the soil into a pot, and place it in a cool place for care. After a large number of new shoots sprout, gradually increase the light time.
In addition to ring barking the air layering site, you can also use the branch-twisting method, that is, use both hands to twist the pressed part so that the phloem and xylem at the air layering site separate, then apply some growth hormone to the wound, which can promote rooting.
(6) Air layering method: For flowers with hard branches that are not easy to bend, air layering can also be used. In this method, use plastic film to surround and tie tightly the lower part of the ring-cut wound, then turn the plastic film upward into a bag shape, fill the bag with coarse sand, water it fully, and then tie the upper opening tightly as well. Use a support to fix the layered branch, or hang it on a large branch with string. When the buds grow new shoots, separate it from the parent body from below and plant it into a pot to become a new plant.