The correct hydroponic method for Japanese aralia (Fatsia japonica) and the reasons its leaves turn yellow
The flower language of Japanese aralia is: wealth coming from all directions, gathering the vitality of the four corners, and rising to a higher level. It is very suitable for placing at home, has the effect of generating wealth, and is also suitable for use as a gift, and is very popular among people.
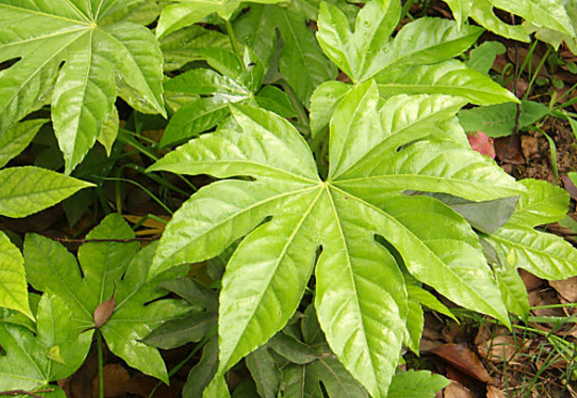
1. Hydroponic steps for Japanese aralia
Japanese aralia is a foliage plant, and as long as it is cared for normally, it can maintain about three years of ornamental value. Hydroponic Japanese aralia must be cultivated with care.
First, for hydroponic Japanese aralia, a suitable container must be chosen. Japanese aralia is a large-leaved plant, so in order to accommodate the growth of the leaves, a short round glass container should be selected, and that is enough.
Next is transplanting the Japanese aralia. Dig out the Japanese aralia planted in a soil pot, then wash the roots clean, cut off the fibrous roots at the base, and then place it in a bottle or vessel filled with clean water. Add a small amount of carbendazim aqueous solution for antisepsis and disinfection, and that is enough.
Finally, prepare the nutrient solution. After the aquatic roots have grown out, add an appropriate amount of nutrient solution, then add water for management and cultivation, and renew the nutrient solution once every month.
2. Hydroponic management of Japanese aralia
First, hydroponic Japanese aralia can be used for ornament. If managed well, it can be maintained for about 3 years, so during hydroponics the water should be changed once every day to ensure the cleanliness of the growing environment, so that the Japanese aralia will also continuously grow new leaves.
Second, during the hydroponic period, a nutrient solution should be applied once every month to keep the plant fresh and vivid. Note that it should be a nutrient solution specially for medicinal plants.
Finally, there is fertilization in hydroponic management. Fertilization should use low-concentration warm-temperature fertilizer. In hot weather, water should often be sprayed on the leaves, and attention should also be paid to shading to prevent direct sunlight.
What is going on with the leaves turning yellow
1. Improper care of Japanese aralia causes leaves to turn yellow
Too little light:
The intensity of light is one of the reasons affecting the leaf color of Japanese aralia. Japanese aralia itself has strong adaptability to light and can adapt to semi-shaded environments, and can also grow in full sun. However, it should be noted that when the light is strong, the leaf color of Japanese aralia will be relatively lighter, fading green and turning yellow, while in a semi-shaded environment, the leaves of Japanese aralia will be relatively darker green.
Therefore, in order to prevent the leaves of Japanese aralia from turning yellow, the light should be kept at a suitable intensity, with semi-shade being best. Apart from winter, when Japanese aralia needs full sun, at other times it is best to maintain it in semi-shade. If it is a variegated variety, the light is best kept bright.
Strong light exposure:
Strong sunlight exposure is a cause of the leaves of Japanese aralia turning yellow, because overly strong light will damage the leaves of Japanese aralia, making them scorched yellow, and in severe cases they will fall off.
The yellowed leaves of the Japanese aralia can be cut off, and then it can be placed in a semi-shaded place for care.
2. What is going on with yellow spots on the leaves of Japanese aralia
Besides the leaves turning yellow, sometimes Japanese aralia will also develop yellow spots on the leaves. The leaf blades, including the petioles and the stems of the plant, all have yellow or yellow-brown spots. This is mostly because the Japanese aralia has contracted diseases such as anthracnose. As a result, yellow spots appear on the leaves, continuously expand, and the leaves even become distorted.
If the yellow spots on the Japanese aralia are caused by pests and diseases, it is necessary to analyze the specific condition and carry out prevention and control.
How to grow Cape jasmine (Gardenia jasminoides): revealing why Cape jasmine leaves turn yellow and it does not bloom
Among flowers, Cape jasmine is undoubtedly one of the more familiar flowers to everyone. People very much like to grow it at home, but many peoplehow to grow Cape jasminedo not understand it well, resulting in many problems during cultivation, such as leaves turning yellow and failure to bloom. Today the editor will introduce to everyonehow to grow Cape jasmineandthe reasons why Cape jasmine leaves turn yellow and it does not bloom.
(Cape jasmineplanted in the courtyard, with a strong ornamental effect)
Cape jasmine grows the same in all four seasons, with evergreen leaf color, and when it blooms it is fragrant and elegant. The white flowers appear white, making it look especially clear and beautiful, and very likable. It is often used by people for pot cultivation in courtyards, balconies, and other places. It has strong environmental adaptability and can grow well in all these places. It has strong decorative and ornamental effects. Below, the editor will discusshow to grow Cape jasminebased on its various characteristics.
First, acidic soil cultivation. Cape jasmine needs scattered light, so it likes acidic soil. If the soil is alkaline, it will make it impossible for Cape jasmine to absorb iron well, thereby greatly affecting the formation of chlorophyll, further causing the flower branches to wither and even die; therefore its soil must be loose, fertile acidic soil, and some substances with such an effect can also be added to it.
(Cape jasminehas a very good decorative effect)
Second, place it in a cool place. Cape jasmine absolutely must not be placed in blazing sun exposure, otherwise the leaves will become scorched yellow, but this does not mean placing it in full shade, because it has a certain demand for light. It is best to place it where 60% light is maintained daily. In addition, after entering April, fertilization should be carried out twice a month.
Third, air humidity. Cape jasmine likes moisture, so the air must not be too dry. According to expert statistics, if the air humidity is lower than 70%, it will affect the normal opening of the flowers, but if it is too wet, it will also cause root and stem rot and yellowing leaves. Therefore, in addition to normal watering, clean water should also often be sprayed nearby. Another issue to pay special attention to is that water must not be poured too much, otherwise it will also affect growth. So how should Cape jasmine be watered?
a. When you see that the soil is dry, tap the flowerpot with your hand. If there is a hollow sound, it needs watering. Stop when the bottom of the flowerpot begins to leak water. The water used for watering is best added with some egg or soybean milk, as this is more conducive to growth.
(In full bloom,Cape jasmine, a different kind of beauty)
Fourth, key points for fertilization. Cape jasmine likes fertilizer, but too much fertilizer must not be added all at once. Be sure to apply thin fertilizer frequently. Never be lazy for convenience, otherwise the branches will become thick, the leaves large and dark green, and it will lose its own ornamental effect.
Fifth, temperature requirements. The growing temperature for Cape jasmine must not be too low, because it likes warmth. Generally speaking, the temperature during the growing period is best at 18 to 22 degrees, 5 to 10 degrees in winter, and if it is below minus 10 degrees it will suffer frost damage. The north must pay special attention to this.
Sixth, proper pruning. Cape jasmine very easily grows luxuriant branches and leaves, creating a feeling of being impenetrably dense and chaotic. This causes nutrients to be dispersed and the ornamental quality to deteriorate, so it needs to be pruned. When pruning, it is best to choose and keep 3 main branches, and at any time cut off new shoots sprouting from root suckers. After the flowers fade, the branches should be cut short in time, so that new branches will sprout below the cut. When the new branches grow three nodes, pinching should be carried out to prevent blind growth.
(Cape jasmine should beCape jasmineplaced in a sunny spot)
Seventh, disease prevention. Usually the diseases we see in Cape jasmine are of four kinds:
a. Iron deficiency, this is the most common kind. Iron deficiency will affect the formation of chlorophyll, then cause the leaves to lose green. At this time, ferrous sulfate water and low-concentration black alum water can be used, three times a month.
b. Magnesium deficiency, magnesium deficiency will cause the veins of the lower old leaves of Cape jasmine to turn yellow. At this time, a low-concentration magnesium sulfate solution should be sprayed.
c. Soil too wet or too dry, for this refer to point three.
d. Sun exposure, for this refer to point two.
Eighth, propagation methods. Cape jasmine generally has two propagation methods: cuttings and layering.
a. Cuttings, in the plum rain season use young branches 15 cm long, insert them in a seedbed, and they will root in 10-12 days.
b. In April select two-year-old branches, 20-25 cm long, press and bury them in soil, keep them moist, and they will root in about 30 days. In summer separate them from the mother plant, and in the following spring divide and plant them.
Reasons why Cape jasmine leaves turn yellow
First, improper watering
a. Overwatering: in this case the young leaves of Cape jasmine turn dull yellow and lusterless, but the old leaves show no obvious change. At this time, simply take the plant out of the pot and place it in a ventilated and cool place, and put it back after the soil dries.
b. Lack of water: the leaf tips or edges wither and dry, and the old leaves wither yellow and fall off from bottom to top, but in this case the new leaves grow relatively normally. At this time, water thoroughly and sufficiently.
(Cape jasmineleaves turning yellow, there are many reasons)
Second, improper light
a. Too much light: yellow spots appear on the sun-facing part of the leaves. At this time, simply move it to a shaded place for care and it will recover, and the newly grown leaves will no longer have yellow spots.
B. Insufficient sunlight: at this time the leaves will turn yellow and even fall off. Simply place it under the sun to supplement sunlight.
Third, improper fertilization
a. Overfertilization: it mainly shows brown at the tips of new leaves, the leaf surface is thick and lusterless, and the old leaves become scorched yellow and fall off. At this time, fertilization must be stopped immediately, and in severe cases the soil should also be flushed to reduce the concentration. b. Insufficient fertilizer: insufficient fertilizer will also cause the plant to turn yellow, for example, iron deficiency, when the leaves are pale yellow or white and the leaf veins remain green. At this time, spray 0.2%-0.5% ferrous sulfate water for prevention and control; magnesium deficiency, when the old leaves turn yellow first, then the new leaves turn yellow, and the leaf veins remain green. At this time, spray 0.7%-0.8% boron-magnesium fertilizer for prevention and control.
Fourth, too low temperature. Too low temperature will also cause leaf yellowing. Simply move it to a place with a higher temperature.
Reasons why Cape jasmine does not bloom
First, improper water and fertilizer. Once water and fertilizer are excessive, it will cause the plant to grow excessively. If reproductive growth does not have enough nutrients, it will affect flower bud formation, leading to no blooming or very few blooms. Some may bloom but even immediately fall off. During the flower bud differentiation period, special attention should be paid to the combination of phosphorus and potassium fertilizers, such as 0.2% potassium dihydrogen phosphate solution, which is beneficial to flower bud formation and bud bearing; if fertilization is too concentrated during the bud bearing period, and watering is suddenly more and suddenly less, it will also cause flowers and seedlings to drop.
(Cape jasminenever blooming, pay attention)
Second, unsuitable light. Cape jasmine likes shade, and special attention should be paid to overly strong light in summer and overly weak light in winter. Both too strong and too weak light will affect the blooming of Cape jasmine.
Third, high soil alkalinity. Cape jasmine likes acidic soil. If the soil for cultivating Cape jasmine has high salt and alkali content, it will cause the plant to become chlorotic, and ultimately affect blooming.
Fourth, no pruning or shaping,Cape jasmine branches are messy, and a large number of messy branches consume a large amount of nutrients, and the branches are too dense, affecting photosynthesis. These are all important reasons causing failure to bloom.
Fifth, severe pests and diseases,this I believe everyone can understand. Severe pests and diseases will inevitably cause flowers and buds to drop.
MethodsHow to grow narcissus Recommended cultivation methods for narcissus
More plants:
[Peace lily tree] [Dieffenbachia] [Chinese evergreen] [Japanese aralia] [Nandina] [Ivy] [Epiphyllum]
[Spider plant] [Winter jasmine] [Cymbidium] [Aglaia odorata] [Crinum lily] [Magnolia] [Peace lily] [Anthurium]
[Bird of paradise] [Hydrangea] [Dahlia] [Cineraria] [Clematis] [Lantana] [Pansy] [Daphne]
[Tulip] [Night-blooming jasmine] [Tuberose] [Hibiscus] [Kalanchoe] [Gerbera] [Mimosa] [Campanula]
[Water lily] [Lilium ‘Casa Blanca’] [Hydrangea] [Red maple] [Japanese maple] [Salvia] [Iris]
How to grow lucky bamboo (Dracaena sanderiana)? Cultivation methods, effects, and placement feng shui of lucky bamboo!
Introduction:We all know that lucky bamboo (Dracaena sanderiana) has a certain influence on home feng shui, and many people like to grow it at homelucky bamboo (Dracaena sanderiana),So how should lucky bamboo (Dracaena sanderiana) be grown? What cultivation methods and effects does it have?Below, let us followTubatueditor and take a look.
How to grow lucky bamboo (Dracaena sanderiana):
1. Place lucky bamboo (Dracaena sanderiana) in a ventilated, light-transmitting place indoors to facilitate photosynthesis and promote the formation and accumulation of organic matter.
2. In the early stage, change the water once every 10 days and rinse the dirt off the bamboo heads. After growth stabilizes, water evaporation will cause the water volume to decrease. As long as the water quality does not change, do not change the water. Frequent water changes will also cause withered leaves. You can add
some water on the original basis.
3. Remove withered branches promptly and change the water in time to avoid other bamboo branches becoming infected.
4. After growing for a period of time, the bottom end of the bamboo will take root. When there are too many roots, they should be pruned. In fact, these roots have
little effect on the growth of lucky bamboo. Cutting off old roots is more beneficial to growth.
5. If the weather is cold, pay attention to cold protection and do not let cold wind blow directly on it.
6. Lucky bamboo likes a moist environment. When the air is too dry, it will cause the leaf tips to wither and scorch. At this time, water should often be sprayed on the branches and leaves
. If conditions permit, it is best to spray a small amount of flower fertilizer solution on the leaf surface every month.
7. A maintenance agent can be used appropriately.
Lucky Bamboo Growing Methods: Lucky Bamboo Thrives in Both Water and Soil
What to Do When the Leaves of the Lucky Bamboo Turn Yellow?
The most common problem in the care of Lucky Bamboo is yellowing leaves. There are mainly two
reasons why Lucky Bamboo develops yellow leaves. First, water quality problems during hydroponic cultivation. When leaves turn yellow, check the water quality first, mainly to see whether the roots are fresh. If
root rot is caused by water quality, cut off the rotten roots and replace with cooled boiled water. Second, yellowing leaves caused by environmental conditions. You should promptly
check the environmental conditions of the placement location, such as light that is too dim, stuffy heat without ventilation, dry air, etc., all of which can cause leaves to turn yellow. But
if the placement location has light that is too strong, it will likewise cause leaves to turn yellow. If it is caused by light, first cut off the yellow leaves; if
there are rotten roots, cut them off as well, then create a clean, temperature-appropriate, cool, moist environment with good diffused light for it
. If root rot is caused by poor water quality, first cut off the yellow leaves. When symptoms are not severe, it is best to change the water frequently and place it
in a ventilated position with fairly ample sunlight for restorative care. When symptoms are severe, appropriately spray pesticide or add
a small amount of fungicide to the water tray. When bamboo stems rot, untie the binding bands of the Lucky Bamboo, pick out the rotten Lucky Bamboo, and rebind
the materials that are in good growing condition. Also pay attention to management so that they gradually recover.
Lucky Bamboo Growing Methods:
Lucky Bamboo was invented by people in Taiwan, China. The stems of Lucky Bamboo are cut short and bound into a "pagoda" shape for appreciation.
In terms of care, the main issues are water changing and water level height, adjustment of air humidity, lighting, and nutrient supply.
Do not change the water too frequently. At a room temperature of about 20°C, changing the water once every 3-5 days is sufficient. At a temperature of about 28°C,
change the water about once every 2 days.
The water level is generally 1.5-2.0 cm, and it should not be too deep or lack water.
If indoor air humidity is too low, the leaves will lose their luster and growth will be affected. Therefore, frequently spray water on the leaves and stems to increase
humidity, but the water quality should be pure and the water temperature should be the same as room temperature, preferably tap water that has been left to stand.
The lighting environment should preferably be semi-shaded. Do not expose it to direct sunlight or deep shade, otherwise no matter how well other care measures are done, it will be in vain
. Nutrient supply mainly involves adding special fertilizer for soilless cultivation or special fertilizer for hydroponics to the water. A compound fertilizer mainly based on nitrogen fertilizer is sufficient
. In addition, prevent cold wind from blowing on it and keep it away from air conditioning, heating, etc.
Lucky Bamboo Growing Methods: Lucky Bamboo Thrives in Both Water and Soil
The Role of Lucky Bamboo (Lucky Bamboo):
Lucky Bamboo, also known as Lucky Pagoda and Step by Step Higher, has as its main material Lucky Bamboo of the Liliaceae family and Dracaena genus. The stems of Lucky Bamboo are taken
as the main material, cut into stem sections of unequal lengths, and these stem sections are arranged with the inner ones long and the outer ones short, decreasing layer by layer, and bound into three-, five-, and seven-
layer pagoda shapes to form Lucky Bamboo. Its shape is exquisite, rich in bamboo charm and full of vitality, and it implies wealth and good fortune, so it is deeply
welcomed by consumers. Lucky Bamboo is easy to manage, has very few pests and diseases, is easy to cultivate, and symbolizes great good fortune. Lucky Bamboo is suitable as a small
sized potted plant, used to decorate bedrooms, studies, living rooms and other places. It can be placed on a desk, coffee table, or tabletop. It is wealthy and elegant, exquisite and unique
, with very good ornamental value.
Feng Shui Placement of Lucky Bamboo:
Correct placement of Lucky Bamboo can help improve personal spirituality and insight. Through Lucky Bamboo that bears body weight,
more energy can be stimulated. Placing a pot of five-layer Lucky Bamboo with leaves removed and stems exposed in an appropriate place in the bedroom can enhance the bedroom owner's
prospects and academic fortune.
1. Place it at the annual Wenchang position for official rank, career, and studies;
2. Place it at the Nine Purple Celebration position to help with joyous events, marriage, and family happiness and harmony;
3. Placing it on a desk, computer desk, or office desk can bring good fortune and open luck;
4. Placing it above the refrigerator, in the kitchen, or in the bathroom can dissolve negative energy;
5. Placing it under a beam or beside a pillar can dissolve the negative energy of beam and pillar shapes;
6. Hang it at the main entrance (inside or outside the main entrance door, where its vitality helps promote smooth family fortune);
7. Placing it in a stairwell can remove flowing negative energy;
8. Placing it on the left and right sides of the main entrance can greatly help family fortune;
9. Place it at the diagonal corner of the living room from the main entrance (the house's innate wealth position) to help attract and absorb wealth fortune.
Pictures of Lucky Bamboo (Lucky Bamboo):
Lucky Bamboo Growing Methods: Lucky Bamboo Thrives in Both Water and Soil
Lucky Bamboo Growing Methods: Lucky Bamboo Thrives in Both Water and Soil
Further Reading:
How to Choose Balcony Plants in Decoration Feng Shui?
Decoration Feng Shui: What Plants Should Be Placed for Different Main Entrance Orientations?
More Plants:
[Peace Lily][Dieffenbachia][Chinese Evergreen][Japanese Aralia][Nandina][Ivy][Epiphyllum]
[Spider Plant][Winter Jasmine][Cymbidium][Aglaia][Crinum Lily][Magnolia][Peace Lily][Anthurium]
[Bird of Paradise][Hydrangea][Dahlia][Cineraria][Clematis][Lantana][Pansy][Daphne]
[Tulip][Night-blooming Jasmine][Tuberose][Hibiscus][Kalanchoe][Gerbera][Mimosa][Campanula]
[Water Lily][Casa Blanca Lily][Hydrangea][Red Maple][Japanese Maple][Salvia][Iris]