What are the correct methods for propagating a banyan tree (Ficus) in water?
In subtropical regions such as South China and Southwest China, people often use banyan trees to beautify their courtyards, and the aerial roots hanging down from the canopy create a tropical rainforest atmosphere. Banyan trees can be large or small, and small stump bonsai can decorate the home.
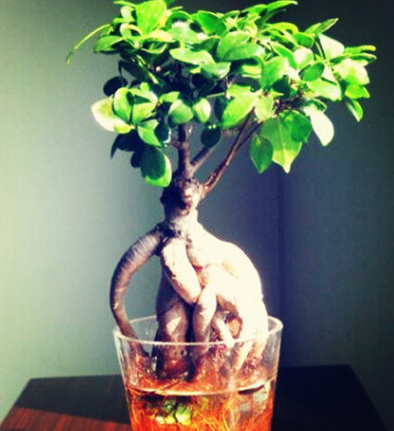
How to correctly water-cultivate a banyan tree
Preparation for water cultivation of banyan trees
1. Prepare materials
First, buy a small banyan tree at the flower market; a small-leaf banyan (Ficus microcarpa) will do. When choosing, pay attention that the trunk should be straight, the branches should be evenly distributed, and the green leaves should be fresh and clean with no dried tips.
Find a cylindrical glass container with a diameter of about 10 cm and a height of 3 cm, wash it clean, and set it aside for later use.
Find a large cola bottle, cut off the neck portion, and use it as a planting holder, making it stable.
2. Wash the plant clean
After buying the small-leaf banyan and bringing it home, break the flowerpot; do not be reluctant to do so, as this can avoid damaging the roots. Gently shake off the soil around the roots, rinse the roots under clean water, and at the same time cut off the rotted parts, achieving a neat and clean banyan tree.
Of course, after rinsing, you can also soak it in clean water for a period of time to thoroughly remove the mud from the roots.
3. Water cultivation environment
Keep the temperature above 25°C for about 2 weeks. During this period, place the water-cultivated banyan tree in a cool, ventilated place and change the water every day. When many white roots grow from the original roots, these are water roots, and your water cultivation has succeeded in the first step.
After rooting, there is no need to change the water every day. Often check the water level in the glass container to ensure that the water covers two-thirds of the root system. In addition, you can fill a large cola bottle with water and use it after letting it sit for half a day, allowing the tap water to fully release gas and reducing the chlorine in it.
4. Fertilizing water-cultivated plants
The flowerpot for a water-cultivated banyan bonsai is relatively shallow, so water must be added frequently, and of course nutrients are also indispensable. From April to October is the growing period of the banyan tree. Each month, put about 30 g of nitrogen-phosphorus-potassium compound fertilizer into the flowerpot; professional nutrient solution can also be used. Spray the leaves once every half month with potassium dihydrogen phosphate liquid fertilizer.
Precautions for water cultivation:
For a water-cultivated banyan tree, because it lacks the nourishment of soil, if poor growth is found after 3~5 years, it can be converted back to soil cultivation, and according to the growth condition of the banyan tree, it can be water-cultivated again.
Forms of banyan tree water cultivation:
1. Rock-attached water cultivation
Choose a stone with good water absorption and let the roots of the banyan tree cling to the stone, with the roots growing along the crevices of the stone. After 1~2 years, the root system and the stone will tightly combine. In the third year, from April to May, repot it, add water and fertilizer in time, and in this way a tree stump above a stream stone is formed.
2. Flat-root water cultivation
Choose a relatively short banyan tree, or a small bonsai that has already taken shape, spread the roots flat in a claw shape, and plant it in a shallow pot. During maintenance, continuously prune the roots to let them grow flat.
What are the propagation methods for banyan trees?
1. Cutting propagation of banyan trees
Banyan tree cuttings are generally taken in spring. Cut 1~2-year-old branches into lengths of 5~15 cm, with each section containing 3~4 nodes. Remove the lower leaves and keep only one upper leaf. If the leaf is relatively large, it can be tied into a tube shape with fine string.
Insert the prepared branches into the soil, with one-third of the length entering the soil. After cuttings are taken, cover with plastic film to retain moisture, keep the temperature at 25°C, and roots and sprouts will form in 30~45 days. After rooting, they can be potted and planted.
2. Layering propagation of banyan trees
At home, the layering method can also be used for propagation. Bury part of a branch in the soil, press it firm, and water it. The operation is simple, and roots generally form in about 30 days. Choose a two-year-old branch, peel the smooth part of the branch with a width of 1~1.5 cm, then wrap it with moist peat or moss, and finally wrap it with plastic film. After tying it firmly, poke some small holes in the film. After roots grow, it can be potted.
3. Grafting propagation of banyan trees
The common grafting method for banyan trees is green-branch grafting. Choose vigorous branches that are still growing and have not yet stopped growing, and choose a relatively attractive rootstock for grafting. Before grafting, stop watering to reduce bleeding during the grafting process.
When grafting, the scion should be 2~3 cm long, and the lower end should be cut into a V shape. Cut the top of the rootstock, with the blade cutting downward to make a cut of about 1 cm, and insert the scion. Then tie it tightly with plastic film, water thoroughly, and place it in a ventilated, bright place. Uncover the film once a day for ventilation. Generally, after about 45 days, it can survive and the binding can be loosened.
Water cultivation methods for Aeonium: what are the propagation methods?
Aeonium can also be called Guanyin lotus or stone lotus, and it is a very suitable ornamental potted plant. So what are the water cultivation methods for Aeonium? What are the propagation methods for Aeonium?
Water cultivation methods for Aeonium:
Lotus-seat grass, stone lotus
Aeonium likes a warm, dry, and sunny environment. In winter, the temperature should be kept at around 10°C, and Aeonium can overwinter safely. Healthy growth of Aeonium requires sufficient light, and it is slightly tolerant of semi-shade. If it is too shaded, growth will be poor, causing the plant shape to become loose, the leaf color to be dull, and it to lack vitality.
It can be used as a mini ornament to decorate dining tables, windowsills, and children's bookshelves.
Flower language: diligence, elegance, versatility
Water cultivation methods
1. Directly take the potted plant out of the pot, wash the roots, and then cultivate it in water.
2. Pick one leaf or one section of stolon, insert it into river sand, and new roots will sprout in about 15-20 days. After small plants grow, it is suitable to cultivate them in water in a mini container.
3. It is not tolerant of moisture, so the plant should be cultivated in water away from the water, as long as the root system extends into the water.
4. In hot summer and severe cold winter, maintain it with clean water; in spring and autumn, cultivate it with a low-concentration nutrient solution.
5. Be careful to place it in a place with better light. If the plant is placed in a hidden place for a long time, it is prone to leggy growth and sparse leaves.
What are the propagation methods for Aeonium:
1. Propagation methods
Actually, artificial cultivation of Aeonium is very simple, as long as it is cared for carefully. But many flower lovers still say their Aeonium died, and they do not know how to propagate it, so I will briefly introduce the propagation methods of Aeonium. There are three propagation methods for Aeonium, and the most commonly used is cuttings. In addition, there are sowing and division. But generally, the cutting method is used. This is because using cutting propagation can not only propagate quickly, but also meet large-scale production needs. Generally, as long as the environmental temperature is above 20°C, leaf cuttings can be used for propagation, and it can be done almost all year round.
2. Cutting propagation
Green-branch cutting method
Green-branch cutting propagation of succulent Aeonium is generally done in spring and autumn. But if cuttings are propagated indoors, it can be done all year round. First, cut off a side branch with a leaf rosette at the top, then remove the part below the leaves. After the cut surface is slightly dry, insert it into moist sandy soil. Generally, roots will form in about 20 days. Also note that the cutting medium must not be too wet, otherwise the cut area will turn yellow or even rot, and then it will not survive. Generally, when the roots are two or three cm long, it can be potted.
Leaf cuttings
The leaf cutting method for Aeonium is generally carried out in spring and summer, about between April and June. The leaves we collect must be complete and mature, and it is best to place them in a cool place to air-dry for two or three days. Then take cuttings. When taking cuttings, be sure to place the front side of the leaf facing up, lay it on moist sandy soil, and do not cover it with soil. Then place it in a cool, ventilated place. Generally, in about 10 days, small leaf rosettes will grow from the base of the leaf, and new roots will also grow out. Remember not to water too much.
All right, friends, do you all understand clearly now, and know how Aeonium is propagated?
Water cultivation propagation methods for gardenia
There are many propagation methods for gardenia. I have always used water cultivation. Although Baidu Baike says it can be done all year round except winter, the best period is still summer, with a temperature between 30~35°C, when water cultivation roots fastest.
To water-cultivate gardenia, first select branches. The quality of the branches directly determines the quality of the plant's growth.
When breaking branches from the tree, you can do a rough selection first, leaving the main stem longer so that it is easier to trim after returning, and it is best to choose branches with side branches. Use 10~12 cm one-year-old branches and keep 2~4 leaves.
Cut the tip of the branch into a horse-ear shape, soak it in a 0.1% potassium permanganate solution for 4~6 hours, then take it out and insert it into clean water. The length entering the water should be 1/3 of the total length of the cutting. Use a brown bottle as the container and change the water once every 1~2 days; you can also drill small holes in a wooden board or foam board, insert the cuttings into the holes, and then let them float on the water surface. Among them, 2/3 of the cutting length needs to remain above the floating body, and 1/3 is inserted into the water.
After new roots grow, move it from a darker place to a bright place. When the roots grow to 1.5~2 cm and a single plant has 6~7 roots, it can be transplanted into a pot or planted in the ground.