Hydroponic Methods for White Butterfly (Syngonium) and Causes of Yellowing Leaves with Solutions
White Butterfly (Syngonium podophyllum) likes to grow in high-temperature, high-humidity, loose and fertile slightly acidic soil. It has strong adaptability and can adapt to different light environments. In strong light, the stems and leaves take on a slightly purplish hue, with larger and paler leaves; the flower meaning of White Butterfly is purity and simple beauty.
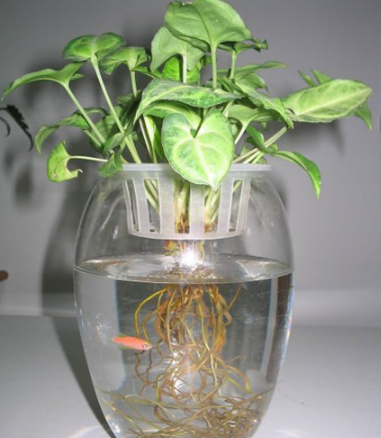
How to properly grow White Butterfly hydroponically
1. Choosing a container for hydroponic White Butterfly
Growing White Butterfly hydroponically requires a suitable container. Generally, glass vessels are used, though plastic or ceramic vessels also work. Some pebbles can be placed in the container to stabilize the plant.
2. Hydroponic methods for White Butterfly
Growing White Butterfly hydroponically is actually very simple. The method is to select branches of White Butterfly that have aerial roots and place them directly in water for cultivation. Generally, White Butterfly has strong vitality and roots relatively quickly, with new roots sprouting in about 10 days.
In addition, you can also convert a potted plant to hydroponic cultivation. Simply use the root-washing method: take the potted White Butterfly out, wash the roots clean, cut off one-third of the root system, and it is ready for hydroponic cultivation. Generally, new roots will grow in about one week.
It should be noted that if propagating by hydroponic cuttings, it is best to do so when the temperature is above 10°C.
3. Hydroponic care for White Butterfly
White Butterfly is a shade-loving plant. When growing it hydroponically, it is best to place it in a shaded area for care, such as somewhere by a window without direct light. During cultivation, the water needs to be changed regularly and the container cleaned.
Changing the water can replenish some minerals and nutrients. You can add some nutrient solution and clean the dirt in the water to keep it growing healthily. To maintain relatively high air humidity, you can also mist the leaves of White Butterfly, which also enhances its ornamental effect.
Hydroponic White Butterfly will continue to grow. Once it grows long, graceful vines, you can train them along a wall, which actually makes it grow in a more sculptural shape.
Causes of Yellowing Leaves in White Butterfly and What to Do
1. Overwatering causes yellowing leaves in White Butterfly
Overwatering White Butterfly can cause its leaves to turn yellow. The characteristic is that the old leaves show no obvious change, while the young leaves gradually turn yellow. When overwatering occurs, immediate action is needed to control the water.
2. Drought causes yellowing leaves in White Butterfly
Yellowing leaves caused by lack of water and drought: the characteristic is that old leaves turn dry and yellow first from top to bottom. If the water shortage persists for a long time, the entire plant will turn yellow and may even die. Water should be given promptly.
3. Over-fertilizing causes yellowing leaves in White Butterfly
Yellowing leaves caused by fertilizer when the concentration is too high or fertilizer is applied too frequently; the characteristic is that the young leaves are relatively thick and glossy, and the leaf surface appears uneven. In such cases, fertilizer should be reduced in a timely manner and water should be given.
4. Under-fertilizing causes yellowing leaves in White Butterfly
Insufficient fertilizer leads to low fertilizer concentration, and the intervals between fertilizing may be too long, thus causing the leaves of White Butterfly to turn yellow;
The characteristic is that yellowing first appears on young leaves and tender stems. When this is observed, fertilizer should be applied promptly, otherwise the entire plant will develop yellow leaves and may even wither and die. If the plant is deficient in fertilizer, never use a large amount of fertilizer at once, to avoid damaging the root system.
What to Do When Hydroponic Lucky Bamboo Leaves Turn Yellow: What to Do When Hydroponic Lucky Bamboo Leaves Turn Yellow
●▂● More great content ?Wintersweet (Chimonanthus praecox)
?What is wall coating
?What to Do When Pothos Leaves Turn Yellow
?What is the flower meaning of cornflower
If you want to learn more, please click to enter >>>Soft furnishing design
......................................................................................................
Lucky Bamboo (Dracaena sanderiana) symbolizes great fortune and prosperity. People take the auspicious meaning of Lucky Bamboo and plant it at home. There are 4 common varieties of Lucky Bamboo: Golden Heart Lucky Bamboo, Silver Heart Lucky Bamboo, Silver Edge Lucky Bamboo, and Golden Edge Lucky Bamboo. Generally, Lucky Bamboo has two cultivation methods: soil culture and hydroponics. Hydroponic Lucky Bamboo looks more attractive and is more convenient to cultivate, so many households choose hydroponics. During cultivation, a commonly encountered problem is what to do when hydroponic Lucky Bamboo leaves turn yellow.
There are many situations in which Lucky Bamboo leaves turn yellow, but they basically come down to three aspects: water, light, and fertilizer. Since the question is how to solve the problem of yellowing leaves in hydroponic Lucky Bamboo, the first consideration is naturally whether the water amount is appropriate. Too much or too little water can cause yellowing leaves. Overwatering causes new leaves to turn dull yellow and lose their luster, while old leaves remain normal with no change, the stems are yellow-green, and new leaves and shoots grow poorly. This is caused by overwatering. At this time, the Lucky Bamboo should be taken out and placed in a ventilated, shady spot. After it has dried appropriately, put it back in the container, and note that the water level in the container should not be too high.
Yellowing caused by lack of water is different from yellowing caused by overwatering. Lack of water causes old leaves to turn dry and yellow from the bottom up and then fall off, but the growth of new leaves is less affected and they can almost grow normally. At this time, water promptly, and make sure to water thoroughly and sufficiently. If it is not a water issue, then consider whether it is a light issue. Both exposure to intense sunlight and insufficient light can cause leaves to turn yellow.
Lucky Bamboo is a shade-loving plant. Strong direct sunlight easily causes its leaf tips and leaf margins to dry out and turn yellow. When yellow spots appear on the sun-facing parts of the leaves, it should be moved promptly to a cool, ventilated place. Being shade-loving does not mean Lucky Bamboo does not need sunlight. Being in a shaded environment for a long time with insufficient light will also cause leaves to turn yellow and fall off. In that case, simply move it to a place with suitable light. The causes of yellowing leaves in hydroponic Lucky Bamboo are diverse; for example, excessive or insufficient fertilizer can also cause leaves to turn yellow.
Summary:When dealing with the problem of yellowing leaves in hydroponic Lucky Bamboo, you should not analyze only a single cause unilaterally; you should analyze from multiple angles. Sometimes the placement is wrong, which affects both light and water evaporation, thereby affecting the water amount. Furthermore, you should judge the specific cause based on the color type and location of the yellowing leaves. Do not handle it carelessly, otherwise the problem of yellowing leaves in hydroponic Lucky Bamboo will not be solved at all.
▓ Recommended Reading
?Growing Sunflowers ?Couple Accessories ?Types of Combs ?Meaning of Four-Leaf Clover ?Green Light Forest Cross-Stitch
?Aloe for Acne ?White Impatiens ?Aquarium Fish Tank ?Activated Carbon Crafts ?How to Grow Phalaenopsis Orchids
Hydroponic Flower Techniques and Cultivation
Hydroponic flowers use modern bioengineering technology, employing physical, chemical, and bioengineering means to domesticate ordinary plants and flowers so they can grow in water for the long term, forming a new generation of high-tech agricultural projects. With hydroponic flowers, flowers fill the room with fragrance above while fish swim freely below. They are hygienic, environmentally friendly, and labor-saving, so hydroponic flowers are also called "lazy person's flowers." Through the implementation of original factory-style modern biological improvement technology, flowers originally adapted to terrestrial environments are rapidly adapted to aquatic environments through short-term scientific domestication, improvement, and cultivation. I. Technical Requirements for Hydroponic FlowersFrom the perspective of the plant growth cycle, there are two technical stages in hydroponic flower technology that require attention: the first is the seedling cultivation stage, that is, the water propagation process; the second is the care stage of the finished plant, that is, the hydroponic process in which the user performs personal operations. Through the work of the above two stages, following correct cultivation rules and paying attention to issues that should be noted during cultivation, we can see beautiful, clean, elegant, and healthy hydroponic flowers entering thousands of households.
1. Establishment and methods of water propagation seedling beds
The water propagation seedling bed must be leak-proof. It is often made of concrete, or built with bricks along the edges and covered with plastic film. The width is 1.2-1.5 m, and the length depends on the scale. It is best to build a stepped seedling bed, which is conducive to water flow and increases the oxygen content in the water. Electric heating wires for water supply and warming are laid at the bottom of the bed to keep the water temperature stable at the optimal rooting temperature of 21-25°C. Water propagation can be carried out in all four seasons. The water temperature is controlled at around 25°C by a control instrument; too high or too low is unfavorable for rooting. During water propagation, plant seedlings should be inserted shallowly, with water or nutrient solution at 5-8 cm in the bed. However, to keep the plant seedlings stable, clean sand can be placed at the bottom; this method can also be called sand-water propagation. Alternatively, holes can be drilled in styrene foam boards, or a grid can be set up above the water surface, and the plant seedlings can be inserted into the board and placed in the water. During the rooting process, a water pump is used to circulate water at regular times every day to keep the oxygen in the water sufficient.
2. Preparation of commonly used nutrient solutions for water propagation seedlings
Water propagation uses water as the medium, and the medium does not contain the nutrient elements needed for plant growth. Therefore, necessary nutrient solutions must be prepared for plant rooting and the growth of seedlings before transplanting. The selection of nutrient solution formulas for different plants is the key to successful water propagation. Different plants have different nutrient solution formulas. Here is a widely used nutrient solution formula.
The world's most famous Morard nutrient solution formula:
Solution A: calcium nitrate 125 g, ferrous sulfate 12 g. Add the above to 1 kg of water.
Solution B: magnesium sulfate 37 g; ammonium dihydrogen phosphate 28 g; potassium nitrate 41 g; boric acid 0.6 g; manganese sulfate 0.4 g; copper sulfate 0.004 g; zinc sulfate 0.004 g. Add the above to 1 kg of water.
1) Preparation process of the nutrient solution
① Weigh each fertilizer separately and place them in clean containers or plastic film bags, or on plastic film bags spread flat on the ground, for later use.
② When mixing and dissolving fertilizers, strictly pay attention to the order. Ca2+ must be separated from SO42- and PO43-, that is, calcium nitrate cannot be mixed with fertilizers other than potassium nitrate, such as magnesium sulfate and other sulfates, ammonium dihydrogen phosphate, etc., to avoid calcium precipitation.
③ For Tank A fertilizer dissolution order, first dissolve ferrous sulfate with warm water, then dissolve calcium nitrate, stirring while adding water until uniformly dissolved; for Tank B, first dissolve magnesium sulfate, then add ammonium dihydrogen phosphate and potassium nitrate in sequence, add water and stir until completely dissolved, add boric acid after dissolving it with warm water, and then add the remaining trace element fertilizers separately. Stir Tank A and Tank B liquids evenly and set aside.
④ When using the nutrient solution, first take 10 mL of Tank A stock solution and dissolve it in 1 kg of water, then add Tank B stock solution to this 1 kg of water, and it is ready to use.
2) Adjusting the pH of the nutrient solution
The pH of the nutrient solution directly affects the existing state, transformation, and availability of nutrients in the nutrient solution. For example, phosphates easily precipitate under alkaline conditions, affecting utilization; manganese, iron, etc. in alkaline solutions will also cause deficiency symptoms due to reduced solubility. Therefore, adjusting the pH (i.e., pH value) of the nutrient solution cannot be ignored.
The pH value can be measured by the mixed indicator colorimetric method, determining the pH value of the nutrient solution according to the characteristic that the indicator shows different colors in nutrient solutions with different pH values. Nutrient solutions are generally prepared with well water or tap water. If the pH value of the water source is neutral or slightly alkaline, then the prepared nutrient solution pH will be close to that of the water source; if not, it must be adjusted. When adjusting the pH value, first dilute strong acids and strong bases with water. When the nutrient solution is alkaline, phosphoric acid or sulfuric acid is mostly used to neutralize it; when acidic, sodium hydroxide is used to neutralize it, then add drop by drop to the nutrient solution while continuously measuring with pH test paper until neutral.
3. Issues to note during hydroponic cultivation
(1) When preparing nutrient solutions, do not use metal containers, and even more so do not use them to store nutrient solutions. It is best to use glass, enamel, or ceramic vessels.
(2) If tap water is used when preparing the nutrient solution, the tap water must be treated, because tap water mostly contains chlorides and sulfides, which are harmful to plants, and some bicarbonates will also hinder the root system's absorption of iron. Therefore, when using tap water to prepare nutrient solutions, a small amount of sodium ethylenediaminetetraacetate or humate compounds should be added to treat the chlorides and sulfides in the water. If peat is used as the substrate in hydroponic flower technology, the above shortcomings can be eliminated. If the groundwater quality is poor, unpolluted river water or lake water can be used for preparation.
(3) Generally, the cultivation water in the container should be replaced once every one to two months. Tap water can be used, but note that the tap water should be left to stand for a period before use, to keep the root temperature stable.
(4) Hydroponic flowers are mostly shade-loving and neutral flowers suitable for indoor cultivation, and they have their own requirements for light. Shade-loving flowers such as ferns, Orchidaceae, and Araceae plants should be moderately shaded; medium-sized flowers such as Monstera deliciosa, Schefflera octophylla, and poinsettia are not strict about light intensity and generally prefer ample sunlight, but can also grow normally under shade. Ensuring the temperature for normal flower growth is very important; flower roots grow well within the range of 15-30 degrees.
(5) Attention should be paid to identifying the root color of flowers to judge whether they are growing well. When light, temperature, and nutrient solution concentration are appropriate, the whole root or root tip is white. Please note that excessive nutrient solution is strictly prohibited, and shortening the time interval for adding nutrient solution is strictly prohibited.
(6) During the growth of hydroponic flowers, if water droplets are found seeping from leaf tips, the water surface height should be appropriately lowered to expose more roots to the air and reduce the proportion of soaking in water.
4. Hydroponic technology and flower varieties
Carnation, asparagus fern, African daisy, tulip, hyacinth, chrysanthemum, calla lily, gloxinia, cyclamen, Chinese rose, gladiolus, orchid, lucky bamboo, Ficus microcarpa, Brazilian wood, Green Giant, Schefflera octophylla, as well as bonsai flowers (such as Fukien tea, orange jasmine), and other flowers all have very good hydroponic results.
Flowers that can generally be grown hydroponically also include Monstera deliciosa, Aglaia odorata, Clivia miniata, camellia, Chinese rose, jasmine, rhododendron, golden plume, lucky bamboo, violet, Phalaenopsis, fuchsia, five-needle pine, banana shrub, rubber tree, Brazilian iron, Begonia species, ferns, palm family plants, and more. There are also various foliage plants, such as Araceae plants including clustered Alocasia, silver-wrapped taro, anthurium, Guangdong spider plant, silver-edged lucky bamboo; Sedum species such as lotus palm and hibiscus palm, and other types such as Clivia miniata, paphiopedilum, crab claw orchid, lucky bamboo, dangling pineapple, silver ragwort, Brazilian wood, English ivy, coleus, and more than a hundred kinds.
II. How to Convert Soil-Cultivated Flowers into Hydroponic Flowers
In order to reduce costs and meet market supply, directly using ordinary soil-cultivated seedlings and transplanting them into hydroponic containers is a superior approach. The specific method is as follows:
1. Planting large seedlings
Removing from the pot: tap the sides of the flower pot gently with your hand, and after the soil loosens, remove the entire plant from the pot. Removing soil: first gently remove excess soil with your hands (you can rinse directly with water until clean). Washing: rinse the soil or substrate stuck to the roots with water. Cutting the planting basket: if the plant head is too large but the planting basket holes are too small, the holes in the planting basket need to be enlarged to facilitate planting. Adding nutrient solution: add the prepared nutrient solution to the container. Planting large seedlings: insert the plant's root system through the planting basket, being careful not to damage the roots. Fixing: secure with sponge, hemp stone, or river stones (other fixing materials also work). Finished product: check whether the finished product is properly secured.
2. Planting small seedlings
Planting small seedlings is much simpler than planting large seedlings. The main steps are as follows: Potted seedlings: small seedlings generally do not exceed 8 cm. Washing small seedling roots: take the small seedlings directly out of the pot, rinse the roots in water once, and be careful not to damage the roots. Planting small seedlings: insert the root system directly through the holes of the planting basket and fix it with stones.
3. Mixing the nutrient solution
Users can purchase and prepare according to the formula provided in this article from chemical reagent stores. At the same time, they can also use fertilizers such as urea for preparation research according to local fertilizer sources, and use them in production after gaining experience. The preparation principle for other fertilizers is to control the total concentration at 0.1-0.2%.
4. Key points for transplanting flowers
For hydroponic flowers, the water level must be well controlled; it should be low rather than high. It is enough for the roots to be in the water, or even less (maintain an adaptation period of one month, then increase the water amount later). During hydroponic cultivation, when water droplets appear at the leaf tips of the flowers, the water level should be appropriately lowered, and direct sunlight should be avoided at the beginning.
5. Judging nutrient deficiency symptoms
In hydroponic flower technology for flowering plants, if a certain nutrient element is lacking, physiological disorders will occur, affecting growth, development, and flowering, and in severe cases even leading to death. Therefore, nutrient adjustment of the nutrient solution should be carried out promptly.
Nitrogen deficiency: plants grow slowly, leaf color turns yellow, and in severe cases leaves fall off.
Phosphorus deficiency: often appears abnormally dark green, sometimes with gray spots or purple spots, delaying maturity.
Potassium deficiency: in dicotyledonous plants, leaves first show slight chlorosis, then scattered dark necrotic spots appear; in monocotyledonous plants, cells at the leaf tips and margins necrose first, then expand downward.
Calcium deficiency: significantly inhibits bud development and causes root tip necrosis; plants are short and have dark, wrinkled leaves.
Magnesium deficiency: chlorosis first occurs between the veins of old leaves, flowering is delayed, light spots form, later turning white, and finally brown.
Iron deficiency: obvious chlorosis symptoms appear between the veins, and in severe cases they become scorch-like, similar to magnesium deficiency, except that it usually occurs on younger leaves.
Chlorine deficiency: leaves first wilt, then become chlorine-deficient or necrotic, and finally turn bronze.
Boron deficiency: causes physiological disorders and shows various symptoms, but mostly the death of apical meristems of stems and roots.
When the above nutrient deficiency symptoms appear, they should also be carefully investigated. Because some may not necessarily be caused by nutrient deficiency; they may be due to inappropriate pH, or may be caused by the simultaneous deficiency of several elements. Be sure to clarify the situation and prescribe the right remedy.