Benefits of hydroponic plants over potted plants: easy to care for and easy to keep alive
Modern society is an era that emphasizes efficiency, where everything is required to be fast, so more and more people love growing hydroponic plants at home. Hydroponic plants have a high survival rate and also solve many of the troubles brought by potted plants. So what exactly are the benefits of hydroponic plants? Let's take a look.
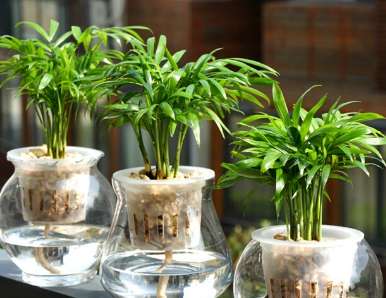
1. Purifies the air and benefits health
Scientific research shows that plants can absorb harmful gases and attach them to the surface of their leaves, and the root systems of hydroponic plants in particular have even stronger adsorption capacity. They can incorporate harmful gases and dust into their metabolic processes and remove their toxicity during substance transformation. Because of their plant characteristics and their ability to bind with minerals, hydroponic plants have a particularly good filtration effect on improving indoor air, specifically including:
(1) Adsorbing obvious harmful substances: hydroponic plants mainly absorb harmful substances through their roots. Some plant species can remove up to 90% of formaldehyde, benzene or carbon monoxide from indoors.
(2) Absorbing nicotine: Now, people have already recognized which plants can best control which harmful substances. For example, pothos (Epipremnum aureum) used in a smoking room can clean the air very well, because its leaves and roots can noticeably absorb and fix more nicotine.
(3) Absorbing formaldehyde: Weeping fig (Ficus benjamina) can also absorb large amounts of this toxic gas attached to its leaves very effectively. Within 1-2 days, it can make 90% of the harmful substances enter its metabolic process, thereby producing sugars, energy and other clean natural substances.
2. Clean and hygienic, with few pests and diseases
Hydroponic plants eliminate the trouble of finding soil and managing various potting soil mixes for soil-based potted plants, and they suit the high-efficiency, fast-paced characteristics of modern society.
3. Releases moisture and maintains air humidity.
If an office can be greened to a large extent, you often no longer need artificial air conditioning. Large areas of hydroponic plants are the most effective temperature regulators and help create ecologically beneficial air purification indoors. Growing hydroponic plants in large workspaces can noticeably reduce employee illness rates. The dry air produced by ordinary air conditioning harms people's respiratory tracts, but after bringing in green plants, the number of illness cases can be reduced by about 40%.
4. Beautifies the environment and pleases the mood
Hydroponic plants are elegant in style and highly ornamental. Hydroponic flowers can be enjoyed for their leaves, stems and flowers, and also for their ever-changing root systems, which increases the decorative appeal of the flowers. You can use the endlessly varied forms and colors of flowers and freely arrange and lay out several kinds of flowers to achieve an artistic effect similar to flower arranging.
5. Easy to maintain and easy to care for
Every plant needs five basic growth factors to grow healthily and luxuriantly. They are: light, air, suitable temperature, water and nutrients. If any one of them is missing, the plant will quickly wither and die, and no amount of other components can make up for it. But soilless cultivation plants already have three of these factors themselves:
(1) Air: Place small granular expanded clay pebbles with good breathability around the plant roots to ensure balanced air flow around the roots.
(2) Water: The water level hole is set according to the plant's water needs, and the container can maintain a certain water reserve, thus saving the trouble of constantly watering.
(3) Nutrients: Hydroponic plants come with enough fertilizer to sustain plant growth when purchased, so they can survive on their own for as long as three months.
(4) Light and suitable temperature: Only these two factors depend on external conditions.
Therefore, if you want to kill a hydroponic plant, it is not an easy thing to do. Types of hydroponic plants: pothos (Epipremnum aureum), arrowhead plant (Syngonium podophyllum), Swiss cheese plant (Monstera deliciosa), peace lily (Spathiphyllum), anthurium, Guangdong evergreen (Aglaonema), aloe, lucky bamboo, dwarf umbrella tree (Schefflera arboricola), pennywort (Hydrocotyle vulgaris), water bamboo, and so on.
Introduction to hydroponic methods for 8 common potted plants! They can survive without much care
In recent years, as living standards have continued to improve, people increasingly like to grow some potted plants at home. They can not only purify the air and green the environment, but also soothe the mood and enrich life. However, the commonly used soil cultivation method involves rather troublesome and unhygienic tasks such as repotting and changing soil, so many friends like hydroponic potted plants, which are convenient to care for and also clean and hygienic. Below, the editor will introduce hydroponic methods for some common potted plants. Let's take a look.
Image: Ivy
1. Hydroponic method for ivy
First, take the ivy out of the pot, wash the roots by placing the soil ball into water, and carefully remove the soil from the roots. Be careful not to break the root system, because damaged roots are not good for later hydroponic growth. After the plant is prepared, place it into a hydroponic container and set it upright. The water only needs to cover 2/3 of the roots. In the early stage of hydroponics, pay attention to changing the water frequently, preferably once every 1 or 2 days with clean water, so as to keep the water clean and prevent the lower ends of the branches from rotting. After about 10 days, the ivy will grow tender white aerial roots. After new roots grow, you should likewise change the water frequently. After about another 2 or 3 weeks, the hydroponic ivy will show a lush growth trend. After the ivy grows normally, you can add a few drops of nutrient solution to the water each time you change it. Before the hydroponic ivy has rooted, do not give it light; place the hydroponic ivy in a place with diffused light or shade, and the temperature must be suitable, neither too hot nor too cold. After rooting, supplement light appropriately, and diffused light is enough. Do not think that hydroponic ivy only needs timely watering; every so often, spray and wash the branches and leaves once with clean water to increase air humidity and keep the leaves clean and emerald green. In the hot summer season, try to grow it with clean water.
Image: Pothos
2. Hydroponic method for pothos
When doing hydroponics, choosing good material is very important. Choose healthy, strong branches and stems with aerial roots. Such branches and stems can quickly adapt to the water environment after being placed in clean water and can grow water roots in 10 days. Be careful that the part placed in the water does not have leaves, otherwise it will affect water quality. Choose a potted plant with a good plant shape and growth. After separating the plant from the pot soil, wash the soil off the roots, and be sure not to damage the roots and stems. Cut off the excess old roots and place it directly in clean water; it will root very easily. In the first few days of hydroponics, change the water frequently, once every two or three days. The water temperature should be close to room temperature. After roots grow in water, reduce the frequency of water changes to once a week. After new leaves grow, change the water once every 10 days, and spray nutrient solution on the leaves at the right time to make the leaf surface emerald green and glossy. The root system of hydroponic pothos is very important. Pay attention to cleaning and trimming it often. If the root system is too long, cut it short in time to reduce nutrient loss. If the root system rots, also clean it in time, remove the rotten roots, disinfect with potassium permanganate solution, and then resume care. The disinfected roots need extra care, changing the water once every 2 days, and after recovery the frequency of water changes can be reduced. Hydroponic pothos needs to receive sufficient diffused light to grow robustly. Usually place it in a place with enough diffused light, and ensure it receives several hours of light every ten days, so as to keep the leaves emerald green and glossy. Pothos likes a humid environment. When the air is dry, often spray water on the leaves to increase humidity, which can also help clean the leaves.
Image: Spider plant
3. Hydroponic method for spider plant
Spider plant roots are white and plump, very suitable for viewing. The most important point is that there is no interference from soil, so even in the hot and stuffy summer, spider plant can grow in a cool environment. Therefore, for hydroponic spider plant, try to choose a transparent glass container, so you can enjoy both the leaves and the roots, and it is convenient to observe the hydroponic condition and adjust in time. Take the soil-grown spider plant out of the pot and rinse the soil off the roots with a gentle stream of water. Use scissors to cut off old roots and rotten roots, keep the whitish fibrous roots, and clean up diseased leaves and residual leaves to make the spider plant look completely refreshed. Then soak the plant roots in potassium permanganate solution for 10 minutes to disinfect. Rinse the leaves with a gentle stream of water to wash off soil and dust from the leaves, and be careful not to damage the leaf surface during the process, ensuring the leaves remain intact. Put the treated spider plant into a hydroponic container. For a professional hydroponic container (with a hydroponic basket), fix the spider plant and then use stones to secure it, ensuring the plant stays upright; for an ordinary glass vessel, place the plant upright and let the leaves lean near the bottle wall. During fixing, avoid damaging the root system, and let the roots spread around the container. Pour water along one side of the bottle wall, with the water covering 1/3 of the plant roots.
Image: Maidenhair fern
4. Hydroponic method for maidenhair fern
First, wash the roots of the soil-grown maidenhair fern clean and disinfect with potassium permanganate. Then find a container, add clean water, and mix in nutrient solution in the appropriate ratio (nutrient solution can be bought on the market), or fix it at the mouth of the container or on the water surface with something. Maidenhair fern is suitable for planting on coral stone. Just place the coral stone directly in water, and after it survives it will grow very well. Coral stone can be bought at stores in flower and bird markets that make rockeries; there are many styles, so you can choose one. Before using coral stone, soak it in water to remove salt. In order to let the stone grow moss, it cannot be kept indoors for a long time; give it appropriate sunlight. During hydroponics, do not let the water submerge the crown of the maidenhair fern. During care, replenish water in time, and change the water once every 5-10 days.
Image: Peperomia
5. Hydroponic method for peperomia
Hydroponic peperomia itself needs a certain period of adaptation, usually carried out in April-May in spring. After hydroponics, place it in a cool place to recover, and after a week it can adapt to normal growth. Choose a soil-grown plant with a good plant shape. After taking it out of the pot, wash the soil off the roots, then cut off old roots and dead leaves. Put the plant roots, note that it is the roots, into a 0.05% concentration potassium permanganate solution and soak for 10 minutes. To make it convenient to fix the plant, you can put a small amount of colored stones or expanded clay pebbles into the hydroponic container to secure the root system. After placing the plant into the hydroponic container, add water to cover 1/2-2/3 of the root system, and during this process it is best not to let the leaves be submerged in water. At the beginning of hydroponics, change the water once a day, clean off the sticky substances produced on the root system, and then replace with clean water. After about 10 days, new roots will grow. After roots grow, change the water once every 2-3 days. The water used for peperomia is usually tap water, and well water is generally not used. Compared with other hydroponic plants, peperomia needs fewer nutrients and basically does not need fertilizing. Water that is too nutrient-rich instead easily causes microorganisms to breed in the water, which is not good for plant growth. So just change the water on time and ensure the water has sufficient oxygen.
Image: Peace lily
6. Hydroponic method for peace lily
Peace lily can be grown in soil or hydroponically. Hydroponic peace lily is simple to do and can be completed in a few steps. First is removing it from the pot: take the soil-grown plant out of the pot, clean off the old soil from the roots, and wash it with clean water. Cut off aged and rotten roots; next is planting: fix the plant in a planting basket to secure it. Then add a small amount of stones to the hydroponic container. For ordinary hydroponics, if you choose a narrow-mouth bottle, you can directly use stones to secure it without needing a planting basket; then add water: the hydroponic container must have sufficient water. Changing from soil cultivation to hydroponics requires a certain adaptation process, so there should be some distance between the roots and the water to let the roots breathe, ensuring only 1/3 of the roots enter the water. The growth temperature for hydroponic peace lily is 5°C—30°C, and it can grow normally within this range. Place the plant in a bright place without direct sunlight for care. Do not expose it directly to strong sunlight.
Image: Pennywort
7. Hydroponic method for pennywort
Choose pennywort with roots. At the same time, for the sake of appearance, friends can choose pennywort with different heights. Put the pennywort into a prepared container, then press down the roots of the pennywort with small stones, and add water to the pennywort. Just two simple steps, isn't it very easy? But if you want the pennywort to grow well, there are also some small tips! You do not need to change the water especially frequently; if you change it too often, it is not good for the pennywort either. Basically, just ensure there is enough water in the basin, and change it once a week. In summer, you can change the water more frequently to avoid mosquitoes laying eggs in it. Pennywort likes sunlight. With sufficient sunlight, it can grow quickly and does not need fertilizing. Be careful to let it receive more than 4 hours of sunlight per day on average. As for fertilizing, there is nothing too particular; you can appropriately add some nutrient solution, such as a quick-acting fertilizer——Hyponex No. 2, or a slow-release fertilizer——Magic Fertilizer, and so on. If you keep goldfish at home, pouring the water changed from the goldfish tank into the pennywort basin can make the pennywort grow better.
Image: Hyacinth
8. Hydroponic method for hyacinth
After buying the bulb, its surface will have a purple protective layer, or even a small amount of soil. We need to clean it thoroughly so as not to affect the water quality of hydroponics. First rinse the bulb clean under a gentle stream of water, then peel off the purple outer skin until the white part is exposed. In addition, the roots should also be cleaned up. Before the bulb reaches your hands, it must have traveled across the ocean, and there is no telling how much mold it carries (of course, you cannot see it), so cut off the old roots at the bottom as well. Old roots generally look black and dirty, while the new roots grown in water are white and beautiful. After the hyacinth bulb is washed white, it is still not completely clean, and it also needs disinfection. Mix carbendazim with water as prepared, soak the bulb for 15-20 minutes, take it out, blot the water with a paper towel, and let it dry naturally in a cool place. After one day it can be planted. For hydroponic hyacinth, you only need to place the bulb in a container. Generally, the bulb is 2-5 mm away from the water surface. The amount of water cannot be too much, and before rooting you must ensure the root system has enough space to grow and breathe. For hydroponics, everyone can choose a glass cup with a diameter similar to the bulb, though a container with a hydroponic basket is best.
[Editor's conclusion]Ivy, pothos, maidenhair fern and others are common potted plants in daily life and are very suitable for hydroponics. The above introduced hydroponic methods for 8 potted plants, hoping to help everyone!
Introduction to 7 plants suitable for hydroponics! They can survive with just a little water
With the improvement of living standards, more and more people like to grow some potted plants at home. They can not only soothe the mood, but also green the environment. However, the traditional soil cultivation method sometimes feels very troublesome, as watering, fertilizing, repotting, changing soil and so on are all rather tedious. In that case, it would be better to grow a few plants hydroponically. Below is an introduction to some plants suitable for hydroponics. They are not troublesome, can live with just a little water, and are especially easy to grow.
Image: Hoya
1. Hoya
Hydroponic method:Select healthy branches, disinfect them, let them dry in the shade, then insert them into water ~ after they root, place them in a place with good light for care.
Hydroponic care:(1) Spray water on the leaf surface often, first to increase air humidity, and second to keep the leaf color more beautiful; (2) Change the water often, once a week in summer and once every 2 weeks in winter.
Image: Cyclamen
2. Cyclamen
Hydroponic method:Take the cyclamen out of the pot, wash the root system, and then place it into a container full of water, but note that the water level must be below the corm.
Hydroponic care:Watch the water level. If the water level becomes lower, add water. Then place it in a place with good light for care, and that is enough. Isn't it very easy?
Image: Amaryllis
3. Amaryllis
Hydroponic method:During hydroponics, the water level should be based on covering half of the amaryllis bulb. If you want the amaryllis to bloom, just change the hydroponic container to a small one.
Hydroponic care:In the first half month of hydroponics, change the water once every 2-3 days, and afterward change it once every 4-5 days. In addition, always maintain the water level.
Image: Bromeliad
4. Bromeliad
Hydroponic method:Take the bromeliad out of the pot, wash it clean, and then place it into water. In addition, because the root system of bromeliad is not well developed, it is best to use a planting basket and secure it with expanded clay pebbles or the like.
Hydroponic care:(1) Pay attention to spraying more water on the leaves of the bromeliad to increase air humidity; (2) Change the water about once a week, and when changing the water, fill the leaf cup of the bromeliad with water.
Image: Dragon tree
5. Dragon tree
Hydroponic method:For hydroponic dragon tree, the most important point is changing the water, which is the key to whether it survives. Just after cuttings are inserted, change the water every other day until the root system grows.
Hydroponic care:After the dragon tree has adapted, change the water once a week in summer, and in winter change it once every half a month to 1 month.
Image: Cactus
6. Cactus
Hydroponic method:After taking the cactus out of the pot and washing the roots, completely cut off the dead roots, then place it in a cool, ventilated place for 2-3 days to dry. After the wound is dry, soak a small amount of the root system in water.
Hydroponic care:In summer, change the water about once a week, and in winter once every 2-4 weeks. Remember that the water level must not completely submerge the cactus root system.
Image: Arrowhead plant
7. Arrowhead plant
Hydroponic method:Cut off branches with aerial roots and directly throw them into water to grow; they can root in about 10 days. Then take the potted arrowhead plant out of the pot, wash the roots, cut off one third of the root system, and then grow it hydroponically; it can grow new roots in about 1 week. Hydroponics should be carried out when the temperature is above 10°C.
Hydroponic care:(1) Spray water on the leaf surface every day to increase air humidity; (2) Change the water in time, about once every 1-2 weeks; (3) Place it in a place with more diffused light for care.
[Editor's conclusion]Hydroponic plants are not only attractive, but also clean and easy to manage. Friends who are tired of soil cultivation can give them a try. The above introduced 7 plants suitable for hydroponics, hoping to be helpful to everyone!