Detailed explanation of the method and principle of rooting flower cuttings in sponge
Sponge is super common in daily life, and it has many uses, it's just that you don't know about them. How to use sponge to root flower cuttings? What is the principle behind rooting flower cuttings in sponge:
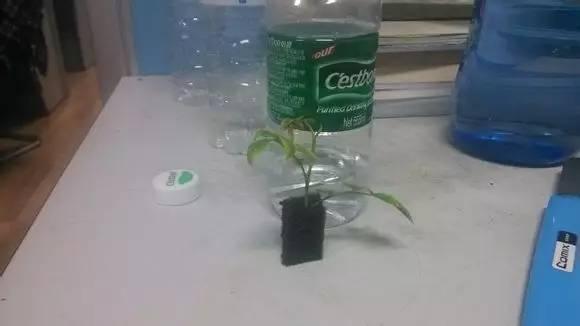
How to use sponge to root flower cuttings:
1. Prepare sponge blocks
First prepare the sponge blocks, cut them into rectangular prisms yourself, preferably dark-colored; gray and black are even better, as they can give the roots and stems of the cuttings a dark environment, which is favorable for rooting. You can use a screwdriver to poke a small hole the size of the cutting's diameter.
2. Insert the cuttings
Choose one-year-old softwood cuttings, cut off all the lower leaves of the cutting, cut the bottom incision at an angle, dip it in a little rooting powder, and insert it into the perforated sponge to a depth of 2~3 cm, with the sponge about 5~6 cm long.
3. Prepare bottles
You can prepare some plastic bottles and cut off the top 1/4, so you can easily put the cuttings in. Add some clean water inside; the water level should not be too high, preferably at half the height of the sponge, that is, water 2~3 cm deep is enough.
4. Placement location:
After that, place the cuttings in a spot with indirect scattered light and good ventilation, keep it ventilated, check frequently whether the water level has dropped, and replenish the water in time.
5. Summary of rooting cuttings
Inserting the bottom of the cutting into the sponge can create an environment that is relatively favorable for developing fine roots, and the sponge does a great job of protecting the root system. The roots can also easily grow out of the sponge, so there is no need to worry that it will restrict root growth. Moreover, sponge is very cheap and easy to obtain in daily life, so why not give it a try?
The principle of rooting cuttings in sponge:
Sponge has a very strong water-loving nature and can keep the cuttings moist. Of course, sponge is also highly breathable, and the small holes inside it protect the tender buds that have just grown from the cuttings.
That's all for the introduction to the method and principle of rooting cuttings in sponge. Have you learned something new now? It turns out sponge has such a great use.
How to root herbaceous flowers with sponge
What the Flower Bonsai Network editor shares with you today is an article on the illustrated method of rooting herbaceous flowers with sponge. Let's take a look.
Rooting herbaceous flowers with sponge★
Sponge itself has a very strong water-absorbing capacity and can hold plants in place very well. When plant cuttings are rooting, they do not need much nutrients in the early stage, so using water-absorbing sponge for cuttings instead of soil can reduce bacterial infection of the cuttings, or rot of the cuttings caused by improper operation.
Materials to prepare: water-absorbing sponge, cuttings, water, seedling tray, cutting knife
1. Prepare the seedling tray, then cut the sponge a little smaller than the seedling tray, and use a knife to divide the sponge evenly into pieces about 3cm*3cm in size. Note that you do not need to cut all the way through at the bottom, so the sponge can lie flat in the seedling tray without tipping over.
2. Insert the prepared cuttings into the prepared sponge, pour in an appropriate amount of water; the amount of water added must soak the entire sponge.
3. Cover the seedling tray with its lid, then place the seedling tray in a bright place. In one to two weeks, the cuttings can root. During this period, make sure the sponge remains moist at all times.
4. When we see sturdy roots in the sponge body, we can take the sponge body out and plant it directly into a flower pot. The sponge will gradually decompose over time.
How to root pothos with sponge
Flower Bonsai Network introduction: What the Flower Bonsai Network editor brings you today is an article on how to root pothos with sponge. Let's take a look.
Sponge is a common item in daily life, but did you know it is also a powerful tool for growing flowers? We can use it to root pothos, Chinese roses, and so on, and we can also use it to hydroponically grow vegetables. Today, taking the simplest pothos cutting as an example, we will teach you how to master the amazing skill of using sponge to grow flowers.
The principle of rooting cuttings in sponge
Judging from the characteristics of sponge, sponge absorbs water and can retain moisture. It has many gaps inside, and even after soaking in water it still has ample space to allow oxygen to enter. Therefore, sponge has very good water retention and breathability. Thus it can maintain good breathability.
From these two points of view, sponge can promote rooting of cuttings and can also prevent the cuttings from rotting during propagation.
Using sponge to root pothos
Materials to prepare:
A soilless culture medium with a sponge texture; this will work better. If you do not have it, ordinary sponge can also be used;
Cuttings for propagation, generally several sections of healthy pothos stems;
Sharp scissors;
Tweezers, a container, and clean water.
Steps for rooting pothos cuttings:
1. Soak the sponge in water for about half an hour to let it fully absorb water.
2. Cut off a section of pothos stem that is growing vigorously and free of pests and diseases. Note that both the scissors and the cut end of the stem need to be disinfected, as this helps increase the survival rate of pothos cuttings.
3. Poke several holes in the sponge, then use tweezers to insert the pothos stem into the sponge, generally to a depth of about 2~3cm.
4. After propagation, the pothos can be placed in a ventilated, shaded place and left to root. Note that no fertilization is needed; keep it moist, and if necessary spray water on the leaves every two weeks.
5. Generally, 3~4 weeks after propagation, the bottom of the sponge will be full of small white fibrous roots, which shows that the pothos propagation has succeeded. After it roots, cultivate it in water for one week, and then it can be transplanted.