How to Make a Firethorn (Pyracantha) Bonsai and a Detailed Guide to Prices
Firethorn bonsai is something many people love to grow, and it really does look beautiful. How is a firethorn bonsai made? How much does a firethorn bonsai cost:
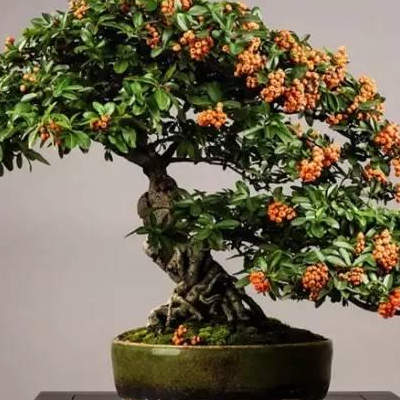
How to make a firethorn bonsai:
(1) Branch-layering time
Generally speaking, September each year is the best time to layer branches of a firethorn bonsai. This is because by September the plant has basically completed the growth of its flowers and leaves and is in a relatively mature state; layering at this time allows it to grow a particularly graceful form the following year. This period is also relatively cool, which better matches the growth characteristics of firethorn.
(2) Branch-layering process
The branch-layering process for a firethorn bonsai is mainly divided into three stages: shoot selection, substrate, and layering. There are two methods for the layering steps. One is to place it in a moist spot, which keeps it moist; after 1 month it can be planted in a soil pot. The other is to insert it directly into a flower pot and keep it at 20-25°C; after one month it will grow into a naturally growing form.
(3) Shaping
After the branch-layering work is completed, in March of the following year use a 1-cun-sized flower pot, add suitable soil, and let it grow freely. By May use a 4-cun flower pot, and by August or September it can be shaped.
Firethorn bonsai price:
The price of a firethorn bonsai is not high. As a bonsai with extremely strong ornamental value, it also offers good value for money. Generally speaking, firethorn bonsai prices range from a few dozen yuan to over a hundred yuan, and consumers can choose according to personal preference and the form of the bonsai.
That is all for the introduction to how to make a firethorn bonsai and its price. Get a firethorn bonsai at home right away.
Making and Managing Tree Bonsai
Making and Managing Tree Bonsai
Tree bonsai takes trees as the main subject. Because the materials used differ, it is usually divided into two major categories: "tree scenery" and "stump scenery." Tree scenery is made by using young trees as material and subjecting them to artistic processing, so it is often called "cultivation from youth." The Yang school, Chuan school and many other bonsai schools mostly use this method to make tree bonsai. Young trees are obtained through sexual or asexual propagation, such as sowing, cuttings, grafting, layering, division and other methods, and are cultivated for 2-3 years or a few years more into small trees. Stump scenery, by contrast, comes from the mountains and wilds, collecting old tree stumps, strange tree stumps and dead tree stumps formed after many years of woodcutting or the influence of other natural causes.
A relatively complete tree bonsai, after processing, usually has such features as a curved (thick) trunk, curved branches, fine leaves and exposed roots. Curved trunk: whether it is the slanting-trunk style, the lying-trunk style, the waterside style or the cliff style, the trunk mostly has one or several bends that are not on the same plane (a few are on the same plane) and have varying degrees of curvature; curved is considered beautiful, though straight-line treatment can of course also be considered, because straight lines still objectively exist in nature. A straight-line trunk is strong and powerful, with the grandeur of a towering tree and an upright, magnanimous air; as long as it is handled properly, in some cases its bearing is not necessarily inferior to a curved trunk. For example, the trunk of the Guest-Greeting Pine on Huangshan is not all that curved; the three-dimensional picture formed by its upright trunk as the main axis together with the laterally curved, drooping branch pads is still very harmonious in spatial structure. A thick trunk, whether straight or curved, is also an important feature, because only a thick trunk can show the "antique elegance and rugged strength" of a tree. Of course, "thick" must be determined by the needs of the composition. Usually it should be considered in terms of the ratio of tree height to trunk thickness, not thickness in form alone. Curved branches: the ancients said, "No branch is straight for even a cun"; the curving of branches also imitates the drooping, curved state of old branches on ancient trees in nature, though straight-branch styles such as crab-claw branches and deer-horn branches also have their beauty. Fine leaves: bonsai tree species should preferably be small-leaved types, so that the proportion between branches and leaves is harmonious and can show a lush, dense and naturally lifelike appearance. Exposed roots: this is the beautiful state of old and ancient trees, so almost all tree bonsai adopt the technique of exposing the roots. Tree bonsai is a summary and miniature of the beautiful tree scenes in nature.
The cultivation, making and management of tree bonsai is meticulous work that is both artistic and horticultural-scientific. A tree bonsai of noble taste and lasting appeal often requires several years or even decades of careful cultivation before it takes shape. As in the creation of Lingnan bonsai, "a cun of branch grows for several years; only when the fine scene is complete have ten autumns passed."
The making and maintenance management of tree bonsai usually includes the following aspects: tree species selection, cultivation of the tree blank, processing and shaping, potting and scene arrangement, and maintenance management. Maintenance management includes: temperature management, light management, water management, fertilizing, pruning and shaping, repotting and soil changing, pest and disease control, and so on.
I. Tree species selection
China is rich in plant resources. There are also many materials suitable for making bonsai. Generally, those with dense branches, fine leaves, tolerance to pruning, tolerance to transplanting, strong adaptability, long life, suitability for shaping and beautiful form are preferred. Our ancestors were very good at using plant resources. During the Jiaqing period of the Qing Dynasty (1796-1820), Su Ling of Wuxi, in his book Penjing Oulu, divided bonsai plants into the Four Great Schools, the Seven Sages, the Eighteen Scholars and the Four Elegants of Flowers and Plants (see the introduction for details). At present, one to two hundred bonsai tree species have been discovered in China, generally divided into the following categories:
1. Pine and cypress category
Five-needle pine, black pine, Buddhist pine (Podocarpus macrophyllus), Huangshan pine, Chinese juniper, prostrate juniper, golden larch, Japanese cedar, dawn redwood, pond cypress, Chinese fir, Garluo wood, sparrow-tongue Buddhist pine, deodar cedar, Masson pine, true juniper, Mongolian pine, Huashan pine, lacebark pine, Japanese red pine, cypress, and so on.
2. Foliage category
Chinese boxwood, fish-scale boxwood, trident maple, red maple, silk-cotton tree, Fujian tea (Carmona retusa), Chinese plum yew (Sageretia thea), tiger thorn, orange jasmine, Chinese elm, ginkgo, sweetgum, trident maple, red maple, zelkova, holly, small privet, Chinese mosquito fern (Distylium chinense), Chinese privet, water privet, holly, red nanmu, mountain orange, small-leaved banyan, Chinese hackberry, aucuba, oleaster, phoenix-tail bamboo, arhat bamboo, Buddha-belly bamboo, black bamboo, dwarf palm bamboo, sago palm, and so on.
3. Flowering category
Camellia, golden pheasant bush (Caragana), sasanqua camellia, plum blossom, crape myrtle, ornamental peach, Chaenomeles speciosa, azalea, winter jasmine, Hall crabapple, Midget crabapple, osmanthus, pomegranate, June snow (Serissa japonica), Tanchun (Jasminum floridum), gardenia, wintersweet, and so on.
4. Fruiting category
Firethorn, fruiting pomegranate, nandina, finger citron, kumquat, Chinese holly, golden bullet tree (Diospyros cathayensis), hawthorn, Ardisia japonica, American persimmon, persimmon, goji, bottle-orchid (Rohdea), peach, calamondin, Chinese quince, and so on.
5. Vine category
Ivy, wisteria, Chinese trumpet creeper, star jasmine, honeysuckle, and so on.
II. Tree cultivation
The trees for tree bonsai mainly come from two sources: one is obtained by raising seedlings, and the other is collecting tree stumps from the mountains and wilds. The former uses sowing, cuttings, grafting, division, layering and other methods for seedling raising. This method belongs to cultivation from youth; the trunk can be bent and shaped, but because the tree is small and the trunk thin, it takes a long time to form a large bonsai. The latter is digging up tree stumps; old trees, strange trees and large stumps of unusual form can be selected, and they can be cultivated and processed into shape fairly quickly, but the trunk form is already set and often cannot be shaped according to the composition requirements, so it can only be handled according to the material. The transition in thickness between the trunk and side branches is not natural enough, and several more years of cultivation are still needed before the thickness transition between the trunk and side branches becomes natural.
Tree stump collection and cultivation techniques. The time for collecting tree stumps should generally be arranged after deciduous trees in winter have shed their leaves and entered dormancy, up to before the trees bud in the following spring. Some cold-sensitive southern tree species are best dug in March to April in spring, when the temperature turns warm. Stumps collected in early winter can be heeled in; in the north they can be kept cold, and in the Yangtze River basin they can also be collected in winter during mild, thawing weather. After collection, protective measures must be taken during transport or storage to prevent the stump roots from losing water and drying out. When collecting tree stumps in the mountains and wilds, one should choose old tree root stumps formed after many years of woodcutting or destruction by other natural factors. In dense forests, straight-trunked, tall trees are not suitable as bonsai stump material. When collecting a stump, first decide on the tree species, then look at the age of the stump head, with older being superior. Forms that are aged, antique, vigorous and twisted are good. Also pay attention to the form of the trunk and roots and the surface texture; of course, do not blindly pursue bizarre forms. The size of the stump should generally not be excessively large; it should be easy to process and shape and suitable for pot culture and indoor and outdoor display. Some stumps, although having certain defects, can be improved and compensated for through cultivation and shaping, and these can also be dug up. Stump diggers should have many years of practical experience and be good at judging the quality of stump heads in order to collect superior stumps. If one wants to obtain fine specimens, one cannot get them without climbing peaks and crossing rocks. When digging tree stumps, bring tools such as a pick, shovel, saw, shears, baskets and bags, and rope. Before selecting a stump, study it carefully and consider it thoroughly, to avoid changing one's mind halfway through digging and causing unnecessary waste of labor. First remove or shorten the treetop and overly long or superfluous branches on the stump, leaving the shortened trunk and main branches, then dig around the root stump. Dig carefully; after exposing the main and side root systems, cut off the main and side roots, keeping as many side roots as possible. The size of the root plate to be kept depends on the thickness of the stump's trunk and must also be considered suitable for potting; usually the size of the root plate is 2-4 times the diameter of the trunk. But when cutting in the field it should be larger, because at planting time a little more will be cut off the top of the root plate to ensure the cut is fresh and favorable for rooting. The dug-out stump must be kept fresh to prevent water loss and withering; it is usually put into a basket and filled with moss to maintain humidity. It can also be put into a plastic bag and shaded from direct sunlight to retain moisture. A stump kept fresh in this way will not have its survival affected even after 10-15 days of transport. For evergreen tree species with weak sprouting ability, such as pines, pearl boxwood and cypress, the branches and leaves cannot all be cut off; some branches and leaves must be retained, and the roots must be kept with soil to ensure survival. For tree species with strong sprouting ability, such as Chinese holly, mountain gardenia, nandina and most deciduous trees, cutting off all branches and leaves and leaving only the trunk will not be a problem. Some people, after digging up a stump, plant it locally for one year and transport it back for planting only after it has survived.
Tree stumps collected from the mountains and wilds have already had their root systems damaged; the vast majority have only main roots and side roots, with no absorbing root system. Therefore, the process of planting a stump until it produces new absorbing roots is actually a cutting process, similar to root cuttings in cutting propagation, so some people call this process "raising the embryo." If the technique of root cutting propagation is used to "raise the embryo," the survival rate will certainly be very high. The method of raising the embryo is the same as the root cutting propagation method.
After the root stump is collected and transported back, as long as the main and side root systems have not dried out, there is a chance it will survive. First trim the main and side roots flat with a saw or knife, cutting off the overly long parts of the root system. The size of the root plate retained should be suitable for potting, and the cuts should be smooth to favor rooting. Plant it in a clay pot or nursery bed, and water thoroughly the first time after planting. Wrap the trunk in straw or moss, or cover it with plastic sheeting to retain moisture. Provide shade until the new absorbing root system has formed. Other management is the same as for cutting propagation. When new shoots grow to 2-3 cm long, carry out bud thinning; according to the shaping requirements, remove new shoots in unsuitable positions or in overly dense areas, ensuring the retained shoots grow robustly. Bud thinning can be done in 2-3 rounds. One to two months after sprouting, new roots may appear; gradually reduce the shading time and increase morning and evening light. After the hottest summer days have passed and autumn arrives, the shading can be gradually removed. At this time strengthen management to promote growth. The stump is cultivated for about 1-2 years, after which it can be processed and shaped; for deciduous tree species such as Chinese elm, Sageretia thea and trident maple, the new branches of the current year can be used for shaping. Young tree shaping is usually carried out after 2-5 years of cultivation.
III. Shaping techniques
Tree bonsai shaping is the process of applying a series of artistic treatment methods to young trees or the root stumps (tree stumps) of old trees, turning them into miniaturized (reduced) large trees, ancient trees and giant trees. It is the process of miniaturizing the essence of trees in nature into a small pot.
In nature there are many beautiful trees. For example, the Guest-Greeting Pine and the Hanging Pine on Huangshan, the ancient cypresses in Beijing's Zhongshan Park, the lacebark pines of Jietai Temple, the four ancient cypresses "Clear, Strange, Ancient and Odd" on Dengwei Mountain in Suzhou, the intertwined pines of Mount Tai, and the ancient ginkgo of Shita Temple in Yangzhou all resemble natural bonsai; this is the work of nature. Therefore, bonsai creators should take nature as their teacher and be good at absorbing beneficial nourishment from nature, so that their artistic talent can develop and grow. This is what ordinary people mean by needing to "have hills and valleys in the chest and forests and springs filling the belly."
Tree bonsai shaping generally includes four aspects: trunk shaping, branch-pad shaping, base treatment, and pot selection, scene accenting and stand matching. The first is the trunk first, that is, treating the trunk for uprightness or slanting (planting upright or slanting), curvature or straightness (curved trunk or straight trunk), and texture (peeling or carving). The second is branch pads afterward; after the trunk is treated, begin treating the branch pads. When wiring pads, first wire the top pad, then work downward to the base pad (sometimes first wire the lower base pad, then work upward). Within the same branch pad, first wire the main branch, then the side branches, then the fine branches, from coarse to fine. The third is base treatment, carrying out root exposure, root guiding, stone attachment and other treatments. The fourth is pot selection, scene accenting (accent stones, accessories, moss dots) and stand selection.
When shaping a tree bonsai, one must also first choose the viewing side. The viewing side is the side facing the viewer that provides the main picture for appreciation. Within the viewing side, the posture and texture of the visible trunk portion, the forms, number and distribution of the visible branch pads, and the side of the base, pot surface, accent stones, scenery and stand should all be the finest parts of the bonsai, and the viewing range (viewing area) should also be the largest part (commonly called the large face).
On the two side faces of the viewing area, the viewing range is smaller; although they are not the main viewing side, they can still be appreciated, and this effect of scenery changing with each step truly offers another kind of charm. The reverse side of the viewing side is the back. It is generally not for appreciation, and shaping does not demand much of it, because tree bonsai is usually also placed against a wall, that is, what people commonly call a landscape painting made with the wall as paper, so it is generally not used for viewing.
The best time for shaping is usually, for deciduous trees, during the growing season before the new shoots have fully lignified, because at this time the branches are relatively soft, easy to bend and not easy to break. Evergreen tree species are best shaped in autumn and winter; if done during the budding growth season, it is easy to damage new buds and new shoots.
1. Trunk shaping
(1) Shaping the trunk of young trees (tree scenery): the trunk of a young tree is relatively thin and the wood relatively soft, so it has a certain plasticity. Under artificial treatment, it can form various changes of shape, and these changes are usually controlled by the four factors of uprightness, slanting, straightness and curvature. The trees used for processing are usually upright and straight, or basically upright and straight. Slanting means tilting the upright trunk (main trunk) in any direction; as the slant angle increases, the trunk's slant increases; slant it further and the trunk lies down on the pot surface in a horizontal state; if the slanting trunk continues to fall downward, it becomes a hanging state. The other is trunk bending, which means bending the trunk in any direction and winding it into several bends. Usually the two factors of slanting and bending appear simultaneously on one trunk, that is, while slanting and drooping, bending is also formed. In the vast majority of cases in tree bonsai, the two factors of slanting and bending simultaneously and comprehensively affect the trunk (and of course the branches as well), which is how today's various bonsai forms have come to be. Such as the curved-trunk style, the lying-trunk style, the cliff style and so on. Straight and curved, upright and slanting are two corresponding pairs of factors. In nature, most trees seen (their trunks and branches) are straight rather than curved, or upright rather than slanting. Only those old trees, ancient trees and strange trees, through the action of natural factors, show some degree of slanting and curving. So when shaping, bending and slanting the trunk all originate from an ancient phenomenon in nature; it is just that in the artistic shaping of tree bonsai, the various artistic schools further concentrate, refine, summarize, exaggerate and elevate the curvature and slanting of trees in nature, making this natural beauty even more artistically vital.
In most cases, the overall slanting (or hanging) direction of the trunk is parallel to the viewing side, that is, perpendicular to the viewer's (or creator's) line of sight. This is what is commonly called the trunk slanting to the left or right, because only in this way can the special momentum emitted when the trunk slants be displayed before the viewer, and this picture is the viewing side.
The degree of trunk slanting should be determined according to the needs of the composition. An upright trunk, growing straight without bending or curving, usually expresses a tall, upright or gracefully standing posture. Slanting increases the trunk's sense of movement, and as the degree of slanting (that is, the angle) increases, the sense of movement also strengthens. The greater the degree of slanting, the greater, more perilous and more unusual the sense of movement produced. A thoroughly straight trunk (or branch) expresses the spirit of being strong and powerful, towering and upright, while a curved trunk (or branch) expresses a soft, graceful posture. Bends differ in size, shape (that is, degree of curvature) and position and number on the trunk. Usually the bends on the trunk gradually become smaller from bottom to top, that is, the lower bends are larger and the upper ones smaller. The degree of curvature of the bends affects the momentum of the tree bonsai, so it should be determined according to the needs of the theme. Apart from the Chuan school's "paired turns" and the Hui school's swimming-dragon bend, where the various bends on the trunk are on one plane, that is, bending back and forth left and right, generally the various bends on the trunk should not be on the same plane but should vary, to increase the liveliness of the picture. The number of bends can be many or few, possibly one or possibly several, and should also depend on the needs of the picture and echo the size, shape and position of the bends.
No matter what form of tree bonsai it is, its trunk is the result of the combined action of the four factors of uprightness and slanting, straightness and curvature, which produce changes of movement and stillness, balance and unusualness, stability and peril, and hardness and softness in the trunk (or branches). When making a tree bonsai, attention must be paid to adjusting these changes well. Whether the trunk shaping of a tree bonsai is good or not mainly depends on whether the relationships are handled well, such as seeking the unusual within the balanced, combining hardness with softness, seeking stillness within movement, having movement within stillness, and having stability within peril. If one studies further, the form and texture of the trunk are also two factors affecting trunk shaping. They also have a connection with uprightness, slanting, straightness and curvature, comprehensively affecting the momentum of the trunk. In some cases, form and texture can enhance the effect of the picture and strengthen the momentum produced by the four factors of uprightness, slanting, straightness and curvature.
Methods for bending the trunk include palm-fiber tying, metal-wire tying, notch bending, twisting, and so on.
For a relatively thick trunk (trunk body), if it is to be bent, in order to prevent breakage during bending, it is usually necessary to wrap the trunk with hemp cloth or cloth and the like, and a strip of hemp fiber or cloth can be added to the outer side of the bend to increase toughness. If the trunk is even thicker and bending is even more difficult, a groove can be cut with a chisel on the side of the trunk at the part to be bent, with a depth of 2/3 of the xylem, and then wrap it with hemp cloth or cloth as above. For bending, palm fiber thread can be used, or metal wire; for even thicker trunks (trunk bodies), new techniques such as iron top rings and hanging rings can be used to bend the trunk. If the cut groove is carefully managed, it will gradually heal after 2 months. For relatively thick ones, the notch-bending method can also be used to bend the trunk; before bending, first make a horizontal cut on the back of the bend, reaching 1/3 deep into the xylem, then bend it to split open (Figure 5-1).
(2) Stump scenery shaping: usually the trunk of a tree stump is relatively thick and cannot be bent directly, so the trunk can only be appropriately slanted to increase the tree's momentum. Of course, carving techniques can also be used to adjust the form and make it more rugged and antique. When shaping the trunk (trunk body), first choose the viewing side according to the needs of the theme. Turn the side that meets the picture requirements toward the creator for people to appreciate. The viewing side of the trunk should be the side that is best in form and texture, or the side that after modification can become the best.
The so-called modification: first, taking momentum for the trunk; momentum is the tree's momentum, and taking momentum means planting the tree stump into a pot, which may be upright, side-lying or lying down. The upright shows still momentum, while the slanting shows moving momentum; the momentum shown by the trunk affects the momentum of the whole tree. The posture of the trunk plays a leading role in the picture and governs the momentum of the whole picture. Slanting means tilted; slanting has different degrees, and its momentum also has different degrees. As for what posture the trunk adopts, besides being closely related to its form and texture, one must also consider the form, number and attachment positions on the trunk of the main and side branches (branch pads), as well as the trunk's form and texture, and make an overall consideration. In short, the best picture must be presented before people's eyes. Second is carving: usually part of the trunk is carved and chiseled away, or the original decayed part of the trunk is processed and tidied, so that it shows the aged state of natural dead wood and makes the tree more aged and antique. To express the picture of a withered tree meeting spring and of withering and flourishing arising together, the method of peeling bark is also adopted, peeling off part of the bark on the trunk to expose the xylem and express the strong character of a tree that has gone through vicissitudes. There is also the method of peeling off all the bark from the treetop portion, exposing the white xylem treetop to indicate a dead-topped old tree; the form of a tree with peeled bark is called a "shari trunk," meaning the white bone after peeling.
2. Branch-pad shaping
A branch pad is a pad formed by branches and leaves, described in detail in the previous chapter. The distribution of branch pads on the trunk and the way branch pads are attached to the trunk are usually of two types:
The first is the left-right branching type. Tree bonsai in formalized style generally branch to the left and right, with branch pads distributed on the two sides of the trunk, that is, the left and right of the trunk. There are also a few formalized styles that, besides left and right branching, divide one to several more branch pads behind the trunk.
The second is the type where the tree divides into four branches. Tree bonsai in naturalistic style belongs to the type where the tree divides into four branches, that is, the branch pads are distributed in staggered fashion front, back, left and right on the trunk, also called branching in four directions.
(1) Attachment positions of branch pads on the trunk: in the curved-trunk style, branch pads are mostly attached on the protruding part of the back of the bend, rarely distributed inside the bend; even if in some cases branches need to be placed inside the bend, they should be slightly offset to the side, or the branch pads should be arranged above or below the bend. In tree bonsai with straight-trunk shaping, the branch pads should be naturally distributed in the four directions of the trunk, staggered up and down, left and right. This form mainly requires being natural and appropriate, with no trace of artificiality.
The size of branch pads and their distribution on the trunk: the size of branch pads mainly depends on the needs of the theme to be expressed. The ratio of the branch pad diameter to the trunk diameter should be coordinated. Generally speaking, the diameter of the largest branch pad on the trunk (referring to the left-right diameter or the longest diameter) is 2-10 times the trunk diameter; for some tree bonsai cultivated from youth, the top pad diameter can be 22 times the trunk, and the picture still looks very natural.
Generally speaking, the branch pad at the lower part of the trunk has the largest diameter, and the pads at each level gradually decrease from bottom to top, but there are also exceptions. This depends on what theme the picture expresses. When the lower branch pads are large and gradually decrease upward, the vertical cross-section of the tree crown formed is a triangle. If the difference in diameter between the next lower level of branch pads and the level above is called the level difference, then a large level difference forms a relatively wide obtuse triangle crown, expressing a relatively broad crown. A small level difference forms a relatively narrow acute triangle, expressing a relatively pointed, narrow crown, with the tree tall and upright. Equal or similar level differences form a cylindrical crown, mostly expressing a tranquil picture (Figure 5-2).
(2) Forms of branch pads: the forms of branch pads mostly adopt the round-pad shape of formalized styling and natural shapes.
The first is the round-pad shape, where the branch pads are round, oval and so on. First wire the main branch into 2-3 bends, then wire the side branches at each level on the main branch into 1-2 bends respectively, distributed on both sides of the main branch and side branches. Except for Yang school bonsai, the above wired main and side branches do not necessarily have to be very strictly wired on one plane; it is enough that they are basically on one plane. Then, by pruning the fine branches on the side branches, make the branch pad into a relatively round pad; its form can be a cloud-head style (cloud cluster) or a flat round-pad style. The round pad generally assumes a horizontal state or a slightly drooping state, and is not suitable for slanting upward. Drooping indicates old trees and ancient trees and increases the tree's sense of movement. For a round pad in a horizontal state, when first wired it is better to let it droop a little, because after the binding is loosened the pad will still grow upward to a horizontal state.
The second is the natural shape: the branch pad is composed of naturally branching main and side branches at all levels. This style mainly uses pruning; through pruning, the buds below the cut are used to change and control the direction of the branches, making them bend naturally, and combining with keeping or discarding branches to control the form of the branch pad. This style adopts means such as short cutting combined with selection and retention, and thinning pruning to carry out shaping; its form is extremely like nature, as if made by heaven.
Number of branch pads: the number of branch pads on the trunk is very strict in some formalized styles. Modern bonsai is more free and does not necessarily adhere to a certain rule, but attention must be paid to the density relationships in the picture. The branch pads on the trunk are evenly distributed, but must not be overly even; there must be density and sparseness. In some places it should be so dense that no wind can pass through, and in some places so sparse that a horse can run through. That is to say, in the distribution of branch pads in the picture, where it should be dense it must be dense, and where it should be sparse it must be sparse; dense and sparse should alternate, ingeniously coordinated, varied and graceful, preventing the branch pads from being evenly distributed from bottom to top and from left to right. At the same time, one must also prevent the branch pads from being distributed too sparsely or too densely. Handle the density relationship well.
Sometimes, because the tree grows vigorously, with luxuriant branches and leaves, so green it seems about to drip, the branch pads become connected to one another, and the originally sparse parts of the picture are invaded by dense parts, becoming only dense and not sparse, or less sparse, causing the density and sparseness to fall out of balance. At this time, because the branch pads are connected to one another, the picture formed lacks variation and is stiff rather than lively, giving people a feeling of depression and gloom.
3. Palm-fiber method and metal-wire method
The traditional pruning and tying method of Chinese bonsai is the palm-fiber method, that is, using palm fiber to tie the trunk or branches into bends. The Yang school, Chuan school, Su school and Tong school all adopt the palm-fiber tying method. Each school has created many pruning and tying methods, usually called "palm methods"; for example, the Yang school has as many as 11 palm methods. Modern times use metal wire instead of palm fiber to tie branches and trunks; in Japan, aluminum wire and copper wire are also used to wrap branches and trunks for shaping. Compared with palm fiber, metal wire shaping is simple, fast, free and flexible, and easy to master. But because the color and form of metal wire differ greatly from branches and trunks, a bonsai that has been bent with metal wire cannot be appreciated immediately; one must wait several years until the metal wire is removed before it can be enjoyed. From the current situation, the metal-wire tying method is still effective for factory-style production in nurseries. On the contrary, the color and form of palm fiber are similar to branches and trunks, and the palm fiber used is all very fine, interspersed among branches and leaves, often not attracting attention; therefore after palm-fiber tying, the tree bonsai can be appreciated immediately. However, the palm-fiber tying method is highly technical and not easy to learn. Nevertheless, as a professional bonsai worker, strict training in the palm-fiber tying method is still very important and indispensable. It plays a very important role in cultivating the qualities of a bonsai worker.
(1) Palm-fiber tying method: palm fiber is a very tough fibrous thread extracted from palm bark. Palm bark grows on the trunk of the palm tree and can be peeled from the trunk of a mature palm tree. Its tensile strength and resistance to wear and rot are all very strong, making it extremely suitable for tying the trunks and branches of trees. Since ancient times, Chinese tree bonsai have all used palm-fiber tying when shaping, and this method is called the "palm-fiber tying method." The palm-fiber tying methods of different bonsai schools are not completely the same; each has its own relatively complete and effective tying technique, and this technique is called the "palm method." In the palm-fiber tying method, the first step is to twist palm fiber into palm thread; for the finest branches, one palm fiber makes one palm thread, that is, tying with one palm fiber. For thicker trunks and branches, palm thread twisted from two to several palm fibers is used. When tying, fix one end of the palm thread at the bottom of the bend (the base), also called the lower anchor point. Then cross the two palm threads back and forth a few times, then use one strand to tie the other end of the palm thread at the top of the bend (the top), also called the upper force point, and tie a slip knot. Then use the hand to press and bend the trunk or branch in the predetermined direction and curvature to the predetermined position, then tighten the palm thread and tie a dead knot to secure it; thus one bend is completed. The top and bottom of the bend are the upper and lower force points. Whether the positions of the force points are chosen correctly is very important, because they determine the size of the bend (the length of the chord), the direction of the bend, the shape of the bend (whether natural and smooth or stiff and rigid), as well as the influence on the next bend and its position in the whole picture. Because the thickness of the trunk or branch differs (including the thickness of each part of the same trunk or branch) and the wood of the trunk or branch differs, and the number, size and position of the nodes and scars growing on the trunk or branch differ, this increases the difficulty of tying. If one wants to bend and tie the trunk of a tree or numerous branches to fixed predetermined positions, one must have skilled technique and be able to freely use various palm methods. Yang school bonsai ties the various side branches and fine branches on one main branch onto one horizontal plane, which should be said to be a very difficult task.
Modern tree bonsai tends toward free forms, and the technique of coarse tying and fine pruning can be used to make bonsai. Even if one's tying skill is not up to standard, the "fine pruning" method can still be used to make up for it, and a certain artistic effect can often still be achieved. However, as a bonsai artist, one still has to go through a strict training process; being able to skillfully master various palm-fiber tying techniques is beneficial for improving one's qualities and creating bonsai of a deeper level.
(2) Metal-wire method: metal wires include copper wire, aluminum wire and lead wire. Lead wire is easy to buy on the market and very cheap, but it rusts easily; copper wire and aluminum wire do not rust easily, but are more expensive. The thickness of the metal wire used is usually about 1/3 to 1/5 of the thickness of the branch or trunk being bent, and the length is about 1.2 to 1.5 times the length of the branch or trunk to be tied. Stop watering one day before shaping, to make the branches soft and not easy to break when bending. Especially for deciduous trees, watering must be stopped one day before bending. Pomegranate and maple trees have thin bark on branches and trunks and are easily injured when tied, so before tying, wrap paper, hemp cloth or old cloth around the outside of the metal wire to prevent injury to the tender bark.
① Trunk metal-wire shaping method: when bending the trunk with metal wire, first plant the tree slanting in the pot, place the metal wire close to the back of the trunk (that is, the back of the viewing side), insert it into the pot down to the bottom, and fix the metal wire in the soil; it must be firmly secured. Then wind the metal wire; the angle between the metal wire and the trunk is generally 450, otherwise the metal wire will be too dense or too sparse. In addition, the metal wire must be close to the trunk, but not too loose or too tight. The other end of the metal wire is wound and fixed onto a small branch at the tip of the trunk. After the metal wire is wound, the trunk can be bent; first bend the first curve, and while bending, gently twist along the winding direction to prevent the metal wire from loosening away from the trunk, until this curve is completed. Bend the second curve in the same way, ... until the top tip (making the top).
② Branch-pad metal-wire shaping method: first bend the main branch; fix one end of the metal wire on the trunk at the base of the main branch, taking care that it does not loosen. Then wind the metal wire in the same way as for the trunk, until the tip of the main branch. The issues to note when winding are the same as for the trunk metal-wire winding method. After the metal wire is wound, bend the first curve, and while bending, gently twist along the winding direction to prevent the branch from breaking. After the first curve is completed, bend the second curve, ..., then use the same method to bend the side branches at each level on the main branch, forming a branch pad.
When shaping the branch pads of stump scenery (tree stumps), first compose the picture according to the form of the tree stump, then determine the number, form, size and attachment positions of the branch pads according to the needs of the composition, select and retain the main branches and thin out the superfluous branches. Thicker branches can be wrapped on the outside with hemp cloth, cloth strips and the like to prevent tearing. Shanghai school bonsai uses simple mechanical means such as hanging rings to pull and bend branches, which is a good method. For stump scenery branch-pad shaping, the metal-wire method is used; the method and steps are the same as the branch-pad metal shaping method introduced above (Figure 5-3).
For tree bonsai that have undergone metal-wire shaping, as the tree grows the metal wire will sink into the cortex of the branches and trunk. The metal wire must be removed in time before it sinks in; this is called loosening the binding. After loosening, some branches and trunks spring back and return to their original form; at this time they need to be wrapped and tied with metal wire again, until they no longer spring back after loosening. Evergreen trees and some fast-growing tree species, because they grow rapidly, need the binding loosened after 3-4 months during the vigorous growth season; pines and cypresses grow more slowly, and the metal wire usually needs to be removed only after about a year.
4. Root shaping (base treatment)
Root shaping has the following four types.
(1) Exposed roots, also called raised roots, that is, lifting part of the thick main and side root system at the upper part of the root system out of the soil surface. Its purpose is first to show its aged, antique quality, and second to make part of the roots hang and claw out, revealing the beauty of their posture. The methods are as follows:
① Lifting method: also called the repotting method. This method combines repotting with planting the root system a little higher year by year, then washing away part of the soil with water, gradually exposing the upper root system above the soil surface. When necessary, the exposed root system should also be treated according to the picture requirements. For example, overly dense or superfluous roots should be removed, or the distribution of thick roots appropriately adjusted.
② Sand cultivation method: plant the tree into a relatively deep pot, fill the lower part with fertile soil and the upper part with river sand, guide the plant's absorbing root system into the lower part, then remove the upper river sand year by year to expose the thick part of the main and side root system, then move it into an ordinary pot, and the upper roots are thus exposed. Root tidying is the same as above.
③ Sleeving method: this method is suitable when the height of the flower pot is insufficient; add tiles or other materials, such as thin wooden boards or plastic sheets, around the upper part of the flower pot to increase the pot's height. When planting the tree, fill with soil, or fill the lower part with soil and the upper part with river sand; when the tree's absorbing root system extends into the bottom, gradually remove the upper soil or river sand and take away the tiles and other objects to expose the upper root system. The sleeve-removal method created by Shanghai bonsai is the same as this.
(2) Guiding aerial roots: for banyan trees and other tree species that easily produce aerial roots, aerial roots can be artificially induced. The method is: first, at the part of the branch where aerial roots are desired, tie a circle with metal wire to cut off the channel through which the plant transports nutrients downward. Let nutrients gather here. Then tie a gauze strip outside the metal ring and let it hang down to the pot surface, then place a bowl of clear water on the pot surface, soak one end of the gauze in the clear water; the water seeps upward through the gauze to the metal ring, creating a very humid environment and prompting the growth of drooping aerial roots there. Also note that before the metal ring sinks into the cortex, it must be cut away in time to avoid sinking into the cortex and affecting tree growth and appreciation.
(3) Guiding roots: when shaping young trees, cut off the main root to promote the growth of side roots and make them extend laterally, so as to suit cultivation in a relatively shallow pot. If the tree is larger and the root system relatively thick, the root system can be fixed with metal wire, with the shape determined according to the shape of the pot, and planted into a relatively shallow pot. The root system can also be spread out horizontally, laid on a long wooden board and fixed, then planted into the soil together with the wooden board, so that the root system extends in a horizontal state; the root system cultivated by this method can be suitable for planting into a shallow pot only 1-2 cm deep. Shanghai school bonsai also uses this method.
(4) Stone attachment: stone attachment means attaching the tree's root system in the crevices of a stone, or threading the root system through holes in the stone, forming the form of a tree growing while embracing the stone and passing through the stone, which is the "stone-attached style." When shaping, select the plant material and stone material well. The plant material should have developed, slender side roots. The stone material should have a good form with a certain momentum, good texture, and many crevices and holes.
Fix the tree's root system in the crevices or thread it through the holes and bury it in the soil, then adopt the root-raising method to gradually expose the root system of the stone-attached part together with the stone material above the soil surface, and plant it into a suitable pot vessel, thus forming a stone-attached bonsai.
5. Pot selection, scene accenting and stand matching
(1) Pot selection: after the tree bonsai has been shaped or basically completed, an appropriate pot must be chosen. The pot should echo the tree in shape, size, color and other aspects, and should play a good role in setting off the main subject, so that the artistic characteristics of the main subject's shaping radiate doubly. It must not overshadow the main subject, and must not concentrate the viewer's attention only on the pot.
First, the size of the pot must be appropriate. One consideration is the plant's growth characteristics: if the selected pot is too large and holds too much water, it affects plant growth, and in serious cases root rot can occur from long-term water accumulation. The other consideration is the composition of the picture: the relationship between the size of the pot and the tree must be coordinated; the pot cannot be too large, nor too small, forming a top-heavy effect. Generally speaking, the pot's mouth diameter should be smaller than the range of the tree crown. For forest style, a shallower pot is preferable, and the pot area should be slightly larger, to express a certain spatial range. For the straight-trunk style, a relatively shallow pot is preferable; for curved-trunk, slanting-trunk and lying-trunk styles, a pot of medium depth is preferable. For the cliff style, a deep cylindrical pot is preferable. Next, the shape of the pot may be square, rectangular, round or oval. The pot used must also echo the tree's shaping. For example, for tree bonsai expressing a momentum such as rugged strength and uprightness, pots with straight lines, that is, square or rectangular pots, should be used, to express strength and power. For tree bonsai expressing a soft posture, pots mainly with curved lines, that is, round or oval pots, should be used, to express a soft, graceful beauty. For the slanting-trunk style, a rectangular or oval relatively shallow pot is preferable; for forms such as forest style, combined planting style and stone-attached style, a rectangular or oval shallow pot is preferable. The color of the pot should be soft; generally it should be dark rather than gaudy, and should also coordinate with the spirit expressed by the tree. For example, for pine and cypress bonsai that are evergreen through the four seasons, a dark-colored purple-clay pottery pot should be used, so as to better show its rugged, antique momentum; red plum, firethorn and Chaenomeles speciosa can be paired with a white pot or light blue pot. The texture of the pot should also be noted: generally tree bonsai should use purple-clay pottery pots, miniature bonsai should use glazed pottery pots or purple-clay pots, and large bonsai can use stone pots. For general flowering and fruiting bonsai, a clay pot can be used with an outer glazed pot. The selection and matching of the pot body is also an art; in specific application, many rules cannot be fixed and unchanging, and one should still consider comprehensively according to the conception and constantly innovate in practice.
(2) Scene accenting: scene accenting has four contents: accent stones, attached stones, moss dots and accessories.
① Accent stones: some tree bonsai can be arranged with some stone material to form a picture with a mountain-and-wild charm. The stones must be arranged according to the requirements of the composition; they cannot be like grazing sheep, scattered all over the mountains and fields without any pattern. The stone material should be chosen so that its color, texture and volume size coordinate with the tree, and its form must not be bizarre. When arranging stones, one must consider the relationships of principal and subordinate, density and sparseness, substance and emptiness, and echo. The number of stones should be arranged in a unified way according to the needs of the picture, generally preferably an odd number; stones can stand, lie, stack, or be half buried and half exposed. Like jagged rocks among the mountains and protruding stones in the forest, just as Gong Anjie of the Ming Dynasty once said in Painting Formulas: "Stones must be several pieces in a clump, large stones interspersed with small stones, yet they must be connected; the faces should preferably point in one direction, and they should also look toward one another in size." This is also a principle for arranging stones among mountains and forests. When arranging stones, attention must be paid to the rules of alternating large and small, uneven heights, suitable gathering and scattering, distinguishing near and far, winding and twisting, and appearing and disappearing from time to time, in order to achieve the ideal artistic effect.
② Attached stones: some tree bonsai may have certain defects, such as a relatively large crown and a relatively thin trunk (main trunk), with the upper and lower parts insufficiently coordinated, giving a top-heavy feeling, or the tree being relatively tall and too straight, with more hardness and less softness, not natural enough. If one to several stones are attached beneath the tree, the picture becomes balanced and natural, softness is added to hardness, and ugliness is turned into beauty.
③ Moss dots: after the tree bonsai is made, lay moss plants on the surface of the pot soil to represent weeds among the mountains, adding living matter and making the picture more lively, a sheet of glossy green.
④Accessories: Sometimes, to suit the theme or enhance the natural atmosphere of the scene, tree bonsai can be fitted with accessories inside the pot, such as pavilions, terraces, towers, chambers, animals, or human figures. Accessories come in porcelain, ceramic, stone, and wood. The accessories chosen must take the theme of the work into account. They should echo the styling form of the tree, and the size, quantity, and color of the accessories must also consider the composition needs of the overall picture, forming a unified whole. Accessories are usually placed on the pot surface or among the accent stones, set out during exhibitions or viewing; in normal times they may be omitted for ease of management.
(3) Display stands: After a tree bonsai has been styled, had its pot selected, and been accented with scenery, it still needs a stand; only then is a perfect work complete. The stand is an integral part of the bonsai, forming a picture together with the scenery and the pot, so choosing a stand must also consider the needs of the picture, echoing the scenery and the pot.
[Bonsai World] Such beautiful miniature bonsai - see how they are made!
Xiaxi Flower and Tree Market (ID: xxhmsc)
We will keep providing you with the latest nursery stock supply and demand information and price inquiries, and every day send you hot topics in the industry, variety appreciation, market trends, and related commentary
Styling techniques for miniature bonsai
Miniature bonsai are mainly composed of flowers, grasses, and trees, accented with small pieces such as rocks, and are increasingly used in garden design, garden landscaping, and home viewing. Miniature bonsai emphasize small, compact forms and delicate, unique styling, with even greater attention to the connotation of overall artistic beauty. The various display pieces of each small bonsai group need to show different forms and pay attention to the overall layout. With elegant clustering and scattering and a prominent theme, ultimately achieving the maker's artistic conception and aesthetic taste - this is where the vitality of miniature bonsai art lies.
The making of miniature bonsai mainly has four steps:
Material selection. To make miniature bonsai, one generally chooses materials with fine branches and small leaves that are easy to keep alive after potting, and that have peculiar roots and trunks, gorgeous flowers and fruits, and are easy to shape. Commonly chosen are five-needle pine, small-leaf Buddhist pine, true cypress, black pine, Chinese box, bamboo fern, fine-leaf holly, June snow (Serissa), asparagus fern, Chinese plum yew, and nandina. The above tree species can be obtained by cuttings, sowing, and division. To achieve a finished shape quickly, one can also search the hills and wilds for root stumps such as goji, peashrub, kumquat, wisteria, lycopodium, and firethorn; after obtaining the raw material, it can be artistically styled and then planted in a pot.
Styling. One should "conceive the idea before applying the brush," holding the form of an ancient tree in mind. Styling should be highly generalized; common methods include the palm-fiber binding method, aluminum wire winding method, branch-breaking method, climbing-and-binding method, and inverted-hanging method, among which the aluminum wire winding method is relatively simple for shaping. Generally, tree shaping is best done in the morning. In specific operation, select aluminum wire of appropriate diameter according to the thickness of the branch or trunk to wind around it, then bend the branch or trunk into the desired form. When winding with aluminum wire, it must fit closely against the bark, with moderate spacing, and the winding direction should preferably be at 45 degrees to the diameter of the branch or trunk. After 1 to 2 years, once the trunk has basically set its shape, the aluminum wire can be removed. For those unnecessary messy branches, they should be shortened or removed.
Potting. When shaping, the tree should be transplanted from a clay pot into a purple clay pot or glazed pot. The shape, size, and luster of the pot must match the tree. Generally, tall cylindrical pots suit cascade style; oval or shallow rectangular pots are suitable for planting upright or slanting trunk styles; round pots can display low, twisted plants; polygonal shallow pots are suitable for planting tall-trunk styles. In addition, the pot stand should also harmonize with the shape and color of the flower pot, blending into a complete artistic structure. The ancients had a famous saying for appreciating potted plant art: "first the tree, second the pot, third the flower stand."
Maintenance. The maintenance of miniature bonsai is especially necessary, thorough, and meticulous. The pot soil should often be kept moist, alternating between dry and wet, or watered by the pot-soaking method. In midsummer, place it in shade and use a fine-nozzle watering can to spray water on the plant to maintain a moist environment. During the growth period, apply thin fertilizer frequently, generally once every ten days or so. Fully rotted soybean cake water, hoof slice water, and the like can be used. A complete-element compound chemical fertilizer can also be applied, and the best fertilization method is also the pot-soaking method.
Scion collection, transport, and storage. When collecting scions, choose branches with plump leaf buds, no pest or disease damage, and healthy growth. For long-distance transport, spread absorbent cotton on the bottom of the box, moisten it with water, and after transporting to the seedling-raising site, insert them on a sand bed in a shady place or in a ground cellar, keeping them moist; they can be used for five to seven days.
Key points of bonsai technique:
No branch is an inch straight; one inch, three bends.
Where sparse, a horse can pass; where dense, wind cannot penetrate.
One branch shows twists and turns, two branches divide into long and short, three branches speak of gathering and scattering, many branches have both exposed and hidden parts.
Straight, long positions should be hidden rather than exposed; straight, curved positions should be exposed rather than hidden.
Plum bonsai would rather be broken than bent, rather slanting than straight.
Bonsai is a wordless poem, a three-dimensional painting, a living sculpture.
The day the scene is complete, the effort lies in ten years!
Fear not cutting the wrong branch; fear placing it in the wrong position.
Build up branches and truncate the trunk.
A zhang for mountains, a chi for trees, a cun for horses, a fen for people.
Distant mountains have no trees; near things are large, far things are small.
Creating forms from nature surpasses the painter's craft; the terrain within a foot connects far into the void.
Dragons come and go across thirty thousand qing; clouds and rain crisscross twelve peaks.
A clear seat frees one from vulgarity; in leisure it brings a cool breeze in summer.
On a bleak night when waters fall among the mountains, drunk in dreams of rivers and lakes within a single leaf.
Remove the strong and keep the weak; remove the coarse and keep the fine.
Judge accurately, cut ruthlessly.
Glancing left and right with two and a half bends; cloud head, rain feet, and a beauty's waist.
Do not water if not dry; when watering, it must soak through.
Alternate dry and wet; apply thin fertilizer frequently;
A landscape tree without roots is like a planted stick; for a pavilion, look at its tip; for a bonsai, look at its feet.
In spring, rub off misplaced buds,
In summer, prune strong and weak branches;
In autumn, top-dress fertilizer,
In winter, prune all branches.
Miniature bonsai is one of the bonsai schools prevalent today. It uses small pots, has exquisite conception, and is beautiful in shape, adorning the home with abundant vitality.
Source: Bonsai World. Check the latest nursery stock market prices instantly.