When does the Aspidistra bloom? A detailed guide to hydroponic growing
Aspidistra (cast iron plant) is a plant many people love to grow, and it really does look beautiful. When does the Aspidistra bloom? How do you grow Aspidistra hydroponically:
When does the Aspidistra bloom:
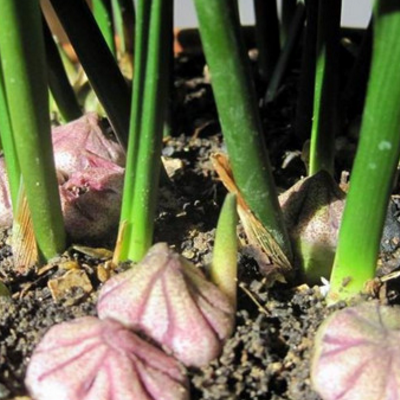
Aspidistra blooms between March and April (under natural conditions), but if grown at home, the temperature changes through the four seasons differ from nature; with temperatures higher than usual for the same period, it generally blooms earlier. However, Aspidistra grown at home rarely blooms, which is also related to the environment, and it cannot be forced.
How to grow Aspidistra hydroponically:
1. Choosing containers
Choose a suitable container according to the form of the Aspidistra - a bottle, basin, or vat. The hydroponic container should look like it complements and enhances the Aspidistra. In short, whether purchased or homemade, it should look appropriate and elegant. Do not just grab any container and use it haphazardly, as this will affect the image of the Aspidistra and the overall aesthetics.
2. Removing soil and washing the roots
Everyone knows that soil is organic matter, and after switching to hydroponics it becomes inorganic. So before going hydroponic, all the organic matter attached to the root system must be washed off completely, to avoid affecting growth after the switch and to prevent pest and disease infection.
The specific root-washing method is: dig the plant out of the pot, hold the stems with your right hand, gently support the root system with your left hand, and with your right hand gently pat and shake the roots so the soil completely separates from the root system. Then soak the roots in clean water for 15-20 minutes, gently massage and wash the roots with your hands, changing the clean water 2-3 times, until the roots are completely clean. Not a speck of soil must remain - this is a key step in growing Aspidistra hydroponically and must not be neglected.
3. Trimming the roots
After the soil is washed clean, trim appropriately according to the plant's growth condition. Cut off old roots, diseased roots, and yellowing leaves. Because the roots of hydroponic Aspidistra are also a focal point for viewing, you should consider the beauty of their form when tidying the root system. After trimming, wash once more to rinse away the root hair debris left by trimming, so it does not get into the water and cause contamination.
4. Disinfecting the roots
After washing the roots, the roots also need to be disinfected. Prepare a 0.1% potassium permanganate aqueous solution, soak the Aspidistra for 10-15 minutes, then take it out and rinse once with clean water. Note that the root disinfection time must not be too long or too short, and the potassium permanganate solution must not be too concentrated or too dilute.
5. Going hydroponic
If it is a glass vase, because glass is thicker and has some weight, you can smooth out the Aspidistra's roots and carefully place it into the vase, making sure the plant stands upright; you can put some stones at the mouth of the vase to hold it in place. Then add water to 2/3 of the vase, spreading the roots out.
If it is a plastic vase, because it is lighter, placing an Aspidistra in it may make it top-heavy, so when growing hydroponically first add a certain weight of small stones to the bottom of the vase, then plant the Aspidistra into the vase as described above.
If it is a basin, vat, or other growing container, or another flowerpot without a drainage hole, you must consider the issue of securing the roots in the water when using it.
Aspidistra generally only blooms from March to April, so pay attention to the hydroponic method.
An introduction to the hydroponic method for Aspidistra, and the points to note when growing it hydroponically
When Aspidistra is mentioned, how well do you know it? Aspidistra is a fine foliage plant, with emerald-green and broad leaves. Aspidistra is evergreen year-round and will bloom; it is an excellent indoor ornamental plant and can also be grown hydroponically. Today I will walk everyone through the hydroponic method for Aspidistra.
Hydroponic method
1. Choosing containers
Choose a suitable container according to the form of the Aspidistra - a bottle, basin, or vat. The hydroponic container should look like it complements and enhances the Aspidistra. In short, whether purchased or homemade, it should look appropriate and elegant. Do not just grab any container and use it haphazardly, as this will affect the image of the Aspidistra and the overall aesthetics.
2. Removing soil and washing the roots
Everyone knows that soil is organic matter, and after switching to hydroponics it becomes inorganic. So before going hydroponic, all the organic matter attached to the root system must be washed off completely, to avoid affecting growth after the switch and to prevent pest and disease infection.
The specific root-washing method is: dig the plant out of the pot, hold the stems with your right hand, gently support the root system with your left hand, and with your right hand gently pat and shake the roots so the soil completely separates from the root system. Then soak the roots in clean water for 15-20 minutes, gently massage and wash the roots with your hands, changing the clean water 2-3 times, until the roots are completely clean. Not a speck of soil must remain - this is a key step in growing Aspidistra hydroponically and must not be neglected.
3. Trimming the roots
After the soil is washed clean, trim appropriately according to the plant's growth condition. Cut off old roots, diseased roots, and yellowing leaves. Because the roots of hydroponic Aspidistra are also a focal point for viewing, you should consider the beauty of their form when tidying the root system. After trimming, wash once more to rinse away the root hair debris left by trimming, so it does not get into the water and cause contamination.
4. Disinfecting the roots
After washing the roots, the roots also need to be disinfected. Prepare a 0.1% potassium permanganate aqueous solution, soak the Aspidistra for 10-15 minutes, then take it out and rinse once with clean water. Note that the root disinfection time must not be too long or too short, and the potassium permanganate solution must not be too concentrated or too dilute.
5. Going hydroponic
If it is a glass vase, because glass is thicker and has some weight, you can smooth out the Aspidistra's roots and carefully place it into the vase, making sure the plant stands upright; you can put some stones at the mouth of the vase to hold it in place. Then add water to 2/3 of the vase, spreading the roots out. If it is a plastic vase, because it is lighter, placing an Aspidistra in it may make it top-heavy, so when growing hydroponically first add a certain weight of small stones to the bottom of the vase, then plant the Aspidistra into the vase as described above. If it is a basin, vat, or other growing container, or another flowerpot without a drainage hole, you must consider the issue of securing the roots in the water when using it.
The above is the hydroponic method for Aspidistra that I have put together. I hope it can help the many flower lovers out there, and please keep following Duorou Huapu to learn more about flower care.
Points to note for hydroponic plants and flowers over the winter
Winter is here, and our plants and flowers will face a test. Based on my experience, the mortality rate of hydroponic plants in winter is higher than at other times, and almost all hydroponic plants are less cold-resistant than potted plants. So to protect our plants and flowers we must start now. Below is a brief introduction to some methods; you can start putting them into practice according to your own situation.I. Climate overview In November, the weather in northern regions already feels cold, with strong cold air from time to time, occasionally accompanied by early frost; rainfall is also much lower or stops, and the temperature drops day by day, gradually moving toward winter. II. Temperature for hydroponic flowers Many friends ask me: "What do you think is the minimum for hydroponic plants?" I thought about it for a long time and could not come up with a clear answer, and can only say: my hydroponic plants can withstand 5°C, and below 5°C my hydroponic plants also struggle. (This refers to most green foliage plants.) But to raise a plant's cold resistance, we need to do some cold-resistance training for the plants ahead of winter.
III. Cold-resistance training for hydroponic plants Since it is training, first let me explain two points: 1. The word "training" describes a process; if you cannot keep it up, it cannot be called training; 2. The word "training" implies a certain limit - only without going to excess can it produce good results. Cold-resistance training methods for hydroponic plants: (1) Move the hydroponic plants to a sunny spot and strengthen the light. Be careful to shield the container with newspaper to prevent a sudden rise in water temperature, algae, and the "light pruning phenomenon" from affecting the plants; round containers must also be guarded against the "magnifying glass" phenomenon burning the plant roots. Add nutrient solution regularly every week; for the nutrient solution, choose a flowering-type nutrient solution as much as possible, apply less nitrogen fertilizer and more phosphorus and potassium, so as to accumulate nutrients and improve cold resistance. (2) Move the plants to a place with ample light, to help the flowers photosynthesize and accumulate ample nutrients, improving the plants' cold resistance. (3) Cold-resistance training means putting the plants outdoors or opening the windows when the autumn temperature drops, letting the plants go through a process of temperature change so they physiologically develop adaptation to low temperatures. When training plants, you must, under conditions the plants can tolerate, let the plants be exposed to lower temperatures as much as possible, so they gradually adapt to a low-temperature environment, which helps them overwinter. During the day, ventilate more and open the windows to keep consistent with the outside temperature; you can open the windows from morning to afternoon, but close them at night. Do not over-train; plants cannot adapt to ever-lower temperatures without limit, and cold-resistance training cannot let plants break through their own cold resistance. Trained plants are only slightly more frost-tolerant than untrained ones. Do not mistakenly think that once your plants have been through cold-resistance training they are no longer afraid.
(4) The above training is all carried out under relatively normal temperature conditions. If a plant being trained suddenly encounters a sharp drop in temperature, it should temporarily be moved to a sunny spot and the windows closed; once the temperature rises slightly and stabilizes, continue training. If you keep forgetting to close the windows, a large temperature drop may well cause leaf drop. Remember, cold wind must never blow directly on the plants. Cold-resistance training is mainly for plants that do not go dormant or are semi-dormant in winter; plants that go dormant in winter do not need training. (5) The water temperature when changing the water should not differ too much, otherwise the roots will suffer physiological imbalance, affecting the hydroponic plant roots' absorption of water and nutrients, and also causing leaf drop. (6) You must move them indoors at the right time, to a warm place or near a heater; in the first week after moving indoors, also open the doors and windows so the plants have a slight adjustment period. Never over-train to the point of cold damage, and do not put them near a heater too early, to prevent moving indoors too early from affecting nutrient accumulation or consuming nutrients too early, which is bad for hydroponic plants overwintering, or for growing well the following year. As for timing, it is roughly before Frost's Descent that they should be moved indoors to overwinter. (7) Move the plants indoors before the frost to prevent frost damage. (8) Some plants do not need training at all and will basically die during the training process. For example, Anthurium, Caladium, and other heat-loving plants should be moved indoors by November at the latest; any later and they will freeze to death.
IV. Fertilizer and water management for hydroponic plants In October, once a week; the plants are still at the end of their growing period. In November, add less, 1-2 times a month; most plants are about to stop growing. From December onward until early spring, do not add nutrients; for most flowers, in this season the temperature is very low and most plants are in a dormant or semi-dormant state, so generally no fertilizing is needed. The water level gradually lowers. In northern regions, after all the flowers are moved indoors, the heating is sometimes very hot, making the room very dry; pay attention to spraying water to maintain humidity. V. Statistics on the cold resistance of hydroponic plants Strong cold resistance: sago palm, Aspidistra, hyacinth, calla lily, Rhapis excelsa, cyclamen, nasturtium, clivia, Strelitzia, Pilea cadierei, etc. Average cold resistance: Alocasia, pothos, spider plant, turtle back (Monstera), Philodendron bipinnatifidum, etc. Low cold resistance: Anthurium, Caladium, Epiphyllum, Epiphyllum hybrid, cactus, etc.
VI. Several methods for cold resistance of hydroponic plants 1. Wrapping method Use double-layer plastic bag film to cover the flower together with the vase; you can DIY it yourself, using wire to make a frame and plastic bags as the film, or other better methods. Place it in a spot indoors with ample light. At the warmer times around noon each day, promptly remove the cover for ventilation. Suitable for high-end plants; the artificial "microclimate" helps maintain humidity, keeps out dust, prevents cold, and makes the branches and leaves fresher and more lovely. 2. Pruning method For the hydroponics of most woody plants, pick off yellow leaves, prune old leaves, and shorten long branches. The main purpose is to prevent tender branches and old or yellow leaves from consuming the nutrients the plant has accumulated. 3. Potting method For many plants that root quickly and grow quickly, you can put them into pots to overwinter, reducing watering or not watering, and not fertilizing. Next year, switch back to hydroponics. 4. Clustering method Hydroponic plants are usually placed anywhere; for winter, you can gather them all together, giving up temporary aesthetics in exchange for their lives. When placing them, gather them in a sunny spot, a spot with ample light. And note some little tricks: put sun-loving ones in the front row, shade-loving ones in the back row, small ones in the front, large ones in the back; this saves space and also allows centralized heating, which helps with unified management and keeping warm. (In some areas without heating, there is no need to install an air conditioner in every home.)
5. Cold-resistance training method (mentioned above, not repeated here) Plants suitable for hydroponics in this season: By temperature: Maintain around 05°C: Green Giant (Philodendron), Rhapis excelsa, golden-spotted ivy (Scindapsus), Chamaedorea elegans, English ivy, white calla lily, colored calla lily, rubber tree, geranium, variegated Schefflera, sword fern, maidenhair fern, etc. For the more difficult ones you can try: Cordyline, Norfolk Island pine, Asparagus fern. Maintain around 10°C: Besides the above, money tree, clivia, dragon blood tree, bromeliad, fishtail palm, pothos, Philodendron bipinnatifidum, spider plant, turtle back (Monstera), Alocasia, Syngonium, Strelitzia, etc. Maintain around 15°C: Besides the above, poinsettia, cyclamen, cineraria, variegated Dieffenbachia, croton, bird's nest fern, Fittonia, snake plant, variegated peperomia, etc. For the more difficult ones you can try: Anthurium, cactus. VII. Clinical symptoms of hydroponic plants in winter Generally, hydroponic plants will show symptoms large and small when overwintering, such as: wilting leaves, leaf drop, withered branches, fruit drop, flower drop; but as long as they can get through the cold winter, that is a victory.