How to propagate Japanese late cherry by cuttings, and in which month does it bloom?
Japanese late cherry, this is something many people know about, and a huge number of people like it, so how do you propagate Japanese late cherry by cuttings? Which month does it bloom:
How to propagate Japanese late cherry by cuttings:
1. Selection and treatment of cuttings. Cut healthy, vigorous branches, about 15 cm long, with the upper end bearing a new shoot of the current year, and the lower end being a one-year-old branch. Before propagating Japanese late cherry by cuttings, remove the lower leaves and keep only the upper leaves. Then place the basal 2, 3 cm of the cutting into a 1000 ppm naphthaleneacetic acid solution, at the basal 2-3 cm portion; after dipping, it must be inserted immediately.
2. Cutting method. Build a seedbed 20 cm high and 1 m wide with bricks, spread 2, 3 cm of river sand on the bottom layer of the seedbed, then fill in 15 cm of vermiculite. Install 1 centrifugal sprinkler every 1 m, or attach a sprayer wand to a tap water pipe to spray. In early May, a shade shed needs to be set up, and branches should be used around it as a fence to block wind; a plastic shed cover can also be set up over the seedbed. Insert the cuttings vertically in rows into the vermiculite, keeping a plant spacing of 2 cm and a row spacing of 4 cm; the suitable cutting depth is between 6-8 cm. After cutting is completed, water thoroughly.
3. Post-cutting management. Spray the leaf surface frequently, especially at noon when the temperature is high, when the number of sprays needs to be increased. The relative humidity of the air needs to be kept above 90%, while the moisture of the vermiculite should be kept at about 60%. This index must be reached before rooting, especially before callus tissue forms. In early May, a shade shed needs to be set up to prevent sun exposure. When the temperature inside the plastic shed is above 35°C, open both ends of the shed for ventilation, and seal it again after the temperature drops to 27°C. If the weather is hot, water can be sprayed outside the plastic shed, which cools the temperature while also avoiding excessive watering that causes the vermiculite water content to become too high.
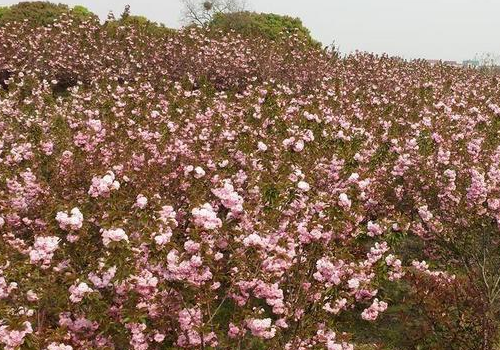
Which month does Japanese late cherry bloom:
Japanese late cherry, like most cherry blossoms, blooms in spring. Its flowering period is in April——May, but the flowers of Japanese late cherry do not live long, so they appear especially beautiful.
The cutting time and blooming months of Japanese late cherry are introduced here, now you understand, right!
Cutting propagation of Japanese late cherry
Cutting time
It can be done from April to July, and the survival rate of cuttings is highest during the full blooming period of cherry blossoms.
Selection and treatment of cuttings
Cut healthy, vigorous branches, about 15 cm long, with the upper end bearing a new shoot of the current year, and the lower end being a one-year-old branch. Before propagating Japanese late cherry by cuttings, remove the lower leaves and keep only the upper leaves. Then place the basal 2, 3 cm of the cutting into a 1000 ppm naphthaleneacetic acid solution, at the basal 2-3 cm portion; after dipping, it must be inserted immediately.
Cutting method
Build a seedbed 20 cm high and 1 m wide with bricks, spread 2, 3 cm of river sand on the bottom layer of the seedbed, then fill in 15 cm of vermiculite. Install 1 centrifugal sprinkler every 1 m, or attach a sprayer wand to a tap water pipe to spray. In early May, a shade shed needs to be set up, and branches should be used around it as a fence to block wind; a plastic shed cover can also be set up over the seedbed. Insert the cuttings vertically in rows into the vermiculite, keeping a plant spacing of 2 cm and a row spacing of 4 cm; the suitable cutting depth is between 6-8 cm. After cutting is completed, water thoroughly.
Post-cutting management
Spray the leaf surface frequently, especially at noon when the temperature is high, when the number of sprays needs to be increased. The relative humidity of the air needs to be kept above 90%, while the moisture of the vermiculite should be kept at about 60%. This index must be reached before rooting, especially before callus tissue forms.
In early May, a shade shed needs to be set up to prevent sun exposure. When the temperature inside the plastic shed is above 35°C, open both ends of the shed for ventilation, and seal it again after the temperature drops to 27°C. If the weather is hot, water can be sprayed outside the plastic shed, which cools the temperature while also avoiding excessive watering that causes the vermiculite water content to become too high.
The role of Japanese late cherry, care knowledge for Japanese late cherry, classification of Japanese late cherry
Floral Bonsai Network introduction: What Floral Bonsai Network editor shares with you today is an article about the role of Japanese late cherry, care knowledge for Japanese late cherry, and classification of Japanese late cherry, let's take a look.
Japanese late cherry is a kind of cherry blossom. It blooms beautifully and is suitable for ornamental viewing. So besides this ornamental role, does Japanese late cherry have any other uses?
Japanese late cherry is a famous ornamental plant. The flower buds have the medicinal value of "relieving cough and dispelling wind."
Ornamental role of Japanese late cherry
When cultivating Japanese late cherry, its most prominent role is probably its ornamental value.
Japanese late cherry has large flowers and is fragrant; when it blooms, the whole tree is covered in flowers, giving a feeling of flourishing beauty. Generally speaking, planting beautiful Japanese late cherry in groups can fully bring out its ornamental role.
Japanese late cherry has several varieties; when cultivated in patches, whether in scenic gardens, courtyards, or beside roads, Japanese late cherry can play a role in beautifying the environment and create a different natural landscape.
Medicinal role of Japanese late cherry
Besides being ornamental, Japanese late cherry also has certain medicinal effects.
The medicinal part of Japanese late cherry is mainly its flower buds. The flower buds of Japanese late cherry have cough-relieving and wind-dispelling effects; after being used as medicine, they can treat some respiratory diseases such as cough and tracheitis. The effect is relatively significant.
Edible role of Japanese late cherry
Japanese late cherry not only blooms beautifully, has strong ornamental value, and can be used as medicine, it also has an edible role. The edible part of Japanese late cherry is its many flowers.
The fresh flowers of Japanese late cherry can be used as an added material for some processed foods, made into cherry blossom cakes or cherry blossom pastries; the resulting foods are also quite delicious.
In addition, it can also be made into cherry blossom wine for people to drink; cherry blossom wine has the effect of softening blood vessels and regulating qi and blood.
Care knowledge for Japanese late cherry
Cultivation techniques for Japanese late cherry
Japanese late cherry has large flowers, double petals, bright colors, a fragrant scent, and a long flowering period, and is an excellent variety among cherry blossoms. Its graft propagation produces seedlings slowly and the operation is cumbersome, while hardwood cuttings are also difficult to root. Using vermiculite as the substrate and inserting one-year-old branches with tender shoots during the full blooming period gives a very high survival rate.
Seedling raising method
Substrate
Use expanded vermiculite as the substrate, maintain pH 6.2; at night the temperature of the vermiculite seedbed is 2°C to 3°C higher than that of a soil bed, while at noon the temperature is 1°C to 2°C lower than that of a soil bed, indicating that the vermiculite seedbed has a small day-night temperature difference, large accumulated temperature, and good insulation effect, which is beneficial to root growth. In production, granular vermiculite is preferred because it has good permeability and is beneficial to rooting. Powdery vermiculite becomes sticky and has poor air permeability. When raising seedlings, do not mix soil into the vermiculite, otherwise root rot easily occurs.
Cutting time
It can be done from April to July, and the survival rate of cuttings is highest during the full blooming period of cherry blossoms, when the plant is in the peak period of physiological activity and roots easily. Cuttings inserted on April 28 did not need to recover after transplanting on June 28; 5 days later they sprouted new buds of 0.5 cm, and after 4 years of cultivation the tree was full of flowers.
Selection and treatment of cuttings
(1) Selection of cuttings: Cut 15 cm long branches from a healthy, vigorous mother tree, with the upper end bearing a new shoot of the current year and the lower end being a one-year-old branch. The leaves on the new shoot can produce nutrients, and the one-year-old branch has already become woody, making cuttings easy to survive. Most 3- to 6-year-old branches used for cuttings rot and die. The survival rate of cuttings is related to age; the older the branch, the weaker its physiological function and the harder it is to survive.
(2) Treatment of cuttings: Before insertion, remove the leaves on the part inserted into the vermiculite and keep the upper leaves. Treat the cuttings by quick dipping in 1000 ppm naphthaleneacetic acid. That is: insert the basal 2 to 3 cm of the cutting into a 1000 ppm naphthaleneacetic acid solution, then immediately take it out for insertion, dipping and inserting as you go.
Cutting method
Build a seedbed 20 cm high and 1 m wide (length depends on the number of cuttings) with bricks, spread 2 to 3 cm of river sand on the bottom layer of the seedbed, then fill in 15 cm of vermiculite. Install 1 centrifugal sprinkler every 1 m, or connect a sprayer wand to a tap water pipe for spraying. In early May, set up a shade shed, use branches around it as a fence to block wind, and for heat and moisture retention a plastic shed cover can also be set up over the seedbed. Insert the cuttings vertically in rows into the vermiculite, with a plant spacing of 2 cm and a row spacing of 4 cm, and water thoroughly after insertion. A cutting depth of 6 to 8 cm is suitable, because according to observation, the temperature at a depth of 5 cm is on average 2°C to 4°C higher than at a depth of 10 cm, and most callus tissue and adventitious roots grow at 6 to 8 cm.
Post-cutting management
Spray frequently; keeping the leaf surface moist is the key to survival. At noon when the temperature is high, the number of sprays should be even greater and the interval should be shorter. At night and in the morning when there is dew, spraying can be omitted; keep the relative humidity of the air above 90%, and the moisture of the vermiculite at 58% to 60%. This index must be reached before rooting, and even more attention should be paid before callus tissue forms. In early May, a shade shed should be set up to prevent exposure to the hot sun. When the temperature inside the plastic shed exceeds 35°C, open both ends of the shed for ventilation, and seal it again after the temperature drops to 27°C. If the weather is too hot, water can be sprayed outside the plastic shed, which can both cool the temperature and avoid excessive watering that causes the vermiculite water content to become too high.
Transplanting time and method
When the roots of the cuttings grow to 6 to 8 cm, transplant them in time. If transplanted too late, the roots of the cuttings will turn brown and rot, and the leaves will gradually turn yellow. This is because vermiculite can only retain heat, retain moisture, and provide aeration, playing a role in promoting rooting, but it has no nutrients to supply the cuttings for continued growth. In addition, for cuttings with few roots or only callus tissue and no roots, they should remain in the seedbed and be transplanted after the roots have grown well.
Creating an environment suitable for the continued growth of the cuttings is the key to ensuring survival after transplanting. Choose a fertile plot that does not accumulate water, make a north-south oriented bed 8 m long and 0.3 m wide, mix in sandy loam and deep plow 30 cm, then cover with 2 cm of sandy loam. Level the bed surface, plant one row per bed, with a plant spacing of 30 cm. Place the root system of the cutting together with the surrounding vermiculite into the planting hole, and cover the hole fully with sandy soil. Do not press hard, to prevent breaking the tender roots. Then water the bed surface thoroughly, and set up a 1.2 m high shade shed above it. Spray 2 to 3 times a day to keep the leaf surface moist, and water the ground frequently, alternating between dry and wet. Seedlings transplanted this way do not need to recover, have a high survival rate, and grow normally.
Effect of IBA treatment
Research results show that treating the middle and basal segments of current-year branches on 1-year-old Japanese late cherry trees with IBA can extremely significantly increase the rooting rate of the cuttings, and also extremely significantly improve the quality of the cutting seedlings (reflected here by the rate of strong seedlings); the rooting rate and strong seedling rate of the basal segment are better than those of the middle segment. For greenwood cuttings of Japanese late cherry, when treated with IBA, it is suitable to choose the basal segment of current-year branches from 1-year-old trees as cuttings.
Planting and cultivation
1. Seed cultivation - few seeds
2. Branch cutting rooting - Prunus plants are difficult to root from cuttings, possibly related to the accumulation of inert substances in dormant branches
3. Non-test-tube rapid propagation technology
Disease control of Japanese late cherry
Disease control
Root nodule disease
When the disease occurs, tumor-like growths appear on the roots of the plant, varying in shape and size, brown to dark brown in color, with a rough surface that often appears cracked; the affected parts are on the ground or near the ground at the root crown or at the junction of the rootstock and scion. After being attacked, the plant often shows poor growth and stunted size.
Control method: Dig up the affected plant, rinse off the soil, soak the roots in a 1% copper sulfate solution for 5-8 minutes, rinse after soaking, and then replant; cut off the tumor-like growths, apply 0.1% mercuric chloride solution to the wounds, and then replant.
Anthracnose
In the early stage of the disease, round lesions appear on young leaves; after the lesions heal, they can form holes. After June, the leaves become hard, and the lesions on the leaf surface are rough, brown, irregular lesions. When the disease is severe, it can cause a large amount of leaf fall and also cause bud blight.
Control method: Alternately spray with 70% mancozeb wettable granules at 1000 times dilution, or 50% carbendazim wettable granules at 500 times dilution, or 50% tebuconazole wettable granules at 1000 times dilution, spraying 3-4 times in succession, with an interval of 7-10 days each time; during the disease period, do not spray the leaves of the plant.
Brown spot shot hole disease
When the disease occurs, small gray-brown round spots initially appear on the leaves, and as the disease develops they gradually form round spots about 3 cm in diameter; the lesion boundaries are clear, purple-brown on the outside and white-brown in the center, with concentric rings; after the lesions die and fall off, irregular holes form.
Control method: After the disease occurs, spray 50% Kasugamycin and Copper at 1000 times dilution for control, once every 10 days, continuously spraying 3-4 times, which can effectively control the disease.
Variety classification of Japanese late cherry
In Japan, horticultural classification groups wild species collectively as "mountain cherry," while artificially bred and naturally mutated ones are called "Sato cherry." Common cherry blossom varieties in Chinese gardens mainly include:
Yunnan early cherry(P.majestica)
Native to Yunnan. Flowering period from late February to early March. Flowers appear before leaves, deep red flowers, about 25 petals, flower diameter about 2.5 cm, flowers in a half-open state, drooping, sepals red. Young leaves tea-brown.
Somei Yoshino(Prunus x yedoensis)
An important cultivated variety of Japanese cherry blossom, a hybrid of Oshima cherry and Edohigan cherry, inheriting respectively the large flowers of the former and the habit of blooming before leafing out of the latter. Flowering period in mid-March, single-petaled flowers, light pink, 4-5 flowers forming a raceme, with hairs on the sepals and pedicels. The tree form is tall, reaching 10-15 m.
Oshima cherry(P.lannesiana var.speciosa)
A representative of wild cherry blossoms, the tree height can reach 15 m. Flowering period in mid-March, flowers and leaves appear together. Flowers white, single-petaled, opening in corymb form. The calyx tube is long bell-shaped, the sepals are lanceolate, the edges are serrated, and the flower is overall hairless. Many cherry blossom horticultural varieties are derived from Oshima cherry.
Kanzan(P.lannesiana Sekiyama)
A variety of Japanese late cherry, widely planted in China. Flowering period at the end of March or early April, flowers and leaves appear together. Flowers deep red, flower diameter about 6 cm, about 30 petals, 2 pistils leaf-like, therefore unable to set fruit, pedicels thick and long. Young leaves tea-brown. Branchlets numerous and curved upward.
Peony cherry(flowers red, pink)
Amayadori(flowers white)