Detailed Guide to Kale Planting Methods and Cultivation Techniques
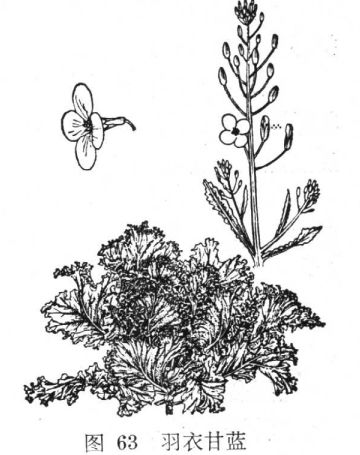
[Aliases] Leaf peony, peony cabbage, flowering cabbage. [Family and genus] Brassicaceae, Brassica. [Morphology] A biennial overwintering herb, plant height 30--40 cm (up to 120 cm including the inflorescence), upright and unbranched, the stem base lignified. Leaves oblong-obovate, broad and large, up to 20 cm long, covered with a white bloom. Leaf stalks thick and winged, overlapping on the short stem, the leaf stalk scars triangular, leaf margins finely wavy and crinkled. Raceme terminal, with 20-40 small flowers, flowering in April. Silique slender and cylindrical, seeds spherical, thousand-seed weight 1.6 grams.
[Varieties, forms and cultivars] Divided into two major groups: red-purple-leaved and white-green-leaved. The former has leaves in the heart that are purple-red, pale purple-red
or lilac, with the stem portion purple-red; the latter has leaves in the heart that are white or pale yellow, with the stem portion
green. The seeds of the former are red-brown, those of the latter yellow-brown. (This article is selected from "Agricultural Encyclopedia"
[Origin and distribution] Native to Western Europe.
[Habits] Cold-tolerant, fond of sunny locations and fertile soil.
[Propagation] Sown in the open seedbed in mid-month, germination is rapid and uniform, but care must be taken to shade at midday.
[Cultivation] After the seedlings have been transplanted once or twice, plant them out in the garden at a spacing of 30 cm, and apply dilute fertilizer water frequently to encourage them to bush out and colour up early. If grown as pot plants, they can be planted on the ridge at planting time, and in November dug up and potted into 7-8 inch pots. After potting, if the weather is clear and dry, they should be slightly shaded; once new fibrous roots have formed, fertilize to help them recover their vigour. Potting should not be too late, otherwise too many basal leaves drop off, which spoils the appearance.
Alternatively, the soil can be repeatedly patted until very firm, placed in a 3-inch pot, a small hole dug in the middle, and 2--3 seeds sown; after germination keep one plant. Growth is slow, and by winter the plant can only cover the mouth of the pot while its leaves colour up as usual, making it suitable for desktop enjoyment.
For seed plants, when they bolt and flower the following spring, stakes should be set up in good time to protect them and prevent them being blown over by the wind.
[Seed collection] This species crosses easily, so a certain distance should be kept between cultivars. At harvest, cut the plants down when most of the siliques on the inflorescence have turned yellow, dry them, allow the seeds to fully after-ripen, and then thresh them.
[Uses] The whole plant can be used as fodder. Because it is cold-tolerant and has brightly coloured leaves, it is an important material for winter flower beds, and can also be grown in pots for ornament.
Kale Planting Tips and Pest and Disease Control
Kale belongs to the genus Brassica in the family Brassicaceae. It is a biennial herbaceous plant and a garden variety of edible cabbage. It is usually grown in scenic areas and has particularly high ornamental value, and many people like it. Some people also want to grow kale at home, but they do not understand its planting techniques, nor do they know how to prevent pests and diseases during cultivation, so the kale they grow always turns out rather poorly. Today, the editor will take everyone through some specialised knowledge related to kale cultivation.
Kale Planting TipsKale prefers a cool climate and is extremely cold-tolerant, able to endure brief frosts, but it is also fairly heat-tolerant. When planting it, be sure to grow it in soil with plenty of sunlight and keep the soil fertile; it grows fastest when the temperature is between 20 and 25 degrees. In addition, kale has a particularly high demand for water and must not be allowed to dry out, but water must not be allowed to accumulate in the field either, otherwise the kale will suffer even more and its growth will be harmed.
Kale Pest and Disease Control1. Aphids
Kale is a plant with strong vitality and its planting method is fairly simple, but during cultivation attention must be paid to pest and disease control, especially aphids, which are extremely prolific and can reproduce many times in a year. Once these aphids appear, they can gather on the tender stems and leaves of kale and suck their sap. The best way to deal with this is to spray chemicals: spraying 40% omethoate can bring the pest and disease under clear control.
2. Leaf roller moth
The leaf roller moth, also called the leaf roller, is one of the most common diseases of kale. Once it occurs, it rolls up the kale leaves with silk and hides inside to eat the kale leaves. To reduce the occurrence of this pest, in winter all the dead grass and fallen leaves in the growing area should be destroyed, cleaning up the overwintering insects as far as possible. When large numbers of leaf roller moths appear on the kale leaves, dichlorvos emulsifiable concentrate or phoxim emulsion should also be sprayed promptly.
Sharing Kale Planting Techniques
Introduction: In our lives there are many kinds of vegetables, and among them kale is a vegetable with a very showy appearance. Kale looks just like a flower, and it is even more beautiful than many flowers. Kale can not only be used as a vegetable for everyone, but also as an ornamental plant. Kale takes on a purple colour and is very beautiful, and because it is fairly large it gives people a very grand sense of beauty. Below, the editor will introduce kale planting techniques for everyone.
Kale Planting Techniques:
1. Open-field spring sowing: raise seedlings under protection in mid-to-late February, seedling age 35-40 days, plant out in the open field from late March to early April, and begin harvesting about 25-30 days after planting, that is, from mid-to-late April to early May.
2. Open-field autumn sowing: sow and raise seedlings under shade and rain protection in late June. Seedling age about 30 days, plant out from late July to early August, and begin harvesting from mid-to-late August to early September.
3. Winter-spring solar greenhouse cultivation: sow from late July to late August, plant out from late September to mid-October, harvest from late October to March of the following year.
4. Spring improved cold-frame cultivation: sow from early to mid January, plant out from early to late February, harvest from late March to June.
Key cultivation points:
1. Raising seedlings and transplanting: choose the seedling-raising site according to the growing season. For spring cultivation, seedlings are generally raised in a solar greenhouse from early January to late February, with the temperature kept at 20-25 degrees after sowing. Water little during the seedling stage, and carry out appropriate intertillage and loosening of the soil to prevent the seedlings from growing leggy. About 25 days after sowing, when the seedlings have 2-3 leaves, prick them out; when the seedlings have 5-6 leaves, plant them out. For open-field cultivation in summer and autumn, raise seedlings from early to late June; as the temperature is higher, a shade frame should be set up over the seedbed to protect against rain, and attention should be paid to drainage.
2. Planting out: kale is tolerant of poor soil and of fertilizer; it can grow on poor land, but the product quality is poor and it ages easily. Therefore, to obtain a high-quality product, it is best to choose a sandy loam or loam rich in humus, loose and fertile. Make small raised beds 100-120 cm wide, and determine the planting-out time according to the range for each season.
3. Field management: after watering at planting, carry out intertillage; after 5-6 days water to help the seedlings establish, and when the soil is slightly dry, intertill and loosen the soil to raise the ground temperature and promote growth. Thereafter keep the soil constantly moist, and do not let water accumulate in summer. Apply additional fertilizer appropriately during the growing period, and apply fertilizer once after each harvest. Pay attention to controlling cabbage caterpillars, aphids and black spot disease.
4. Harvesting: from sowing to harvest takes about 55-65 days, and from planting out to harvest 25-30 days. When 10-20 outer leaves have unfolded, the tender leaves can be harvested for eating; each plant can yield 5-6 tender leaves per harvest, leaving the heart leaves to continue growing for successive harvests. Generally harvest once every 10-15 days. In late spring and summer, with good management and no cabbage caterpillar damage, harvesting can continue into early winter. In autumn and winter the flavour is better after a slight frost. In the hot summer season the leaves become tough, somewhat more fibrous and poorer in flavour, so they should be picked earlier, while the tender leaves harvested in cool seasons such as early spring, late autumn and winter have better quality and flavour.
The above is the sharing of relevant kale planting technique knowledge that the editor has introduced for everyone. Kale is a vegetable of the same type as cabbage and white cabbage; it tastes very good and is fairly sweet. Kale also has high nutritional value, and its nutritional content is very high. Kale is a biennial herbaceous plant and a variant of cabbage. When planting kale, many points require attention, such as watering, pest removal, and shading from sun and rain.