What to Do When Jasmine Leaves Turn Yellow? 7 Great Tips to Bring Jasmine Back to Life
Although jasmine is an extremely easy flower to grow, this is only relatively true, because once it is improperly cared for, or you neglect it for a long time, jasmine can also fall ill, after which symptoms such as yellowing leaves, reddening leaves, or even complete leaf drop will appear. So what should you do when jasmine leaves turn yellow? Actually, there is no need to worry, because you only need to find the cause of the yellowing jasmine leaves and then solve it!
I. What to Do When Jasmine Leaves Turn Yellow
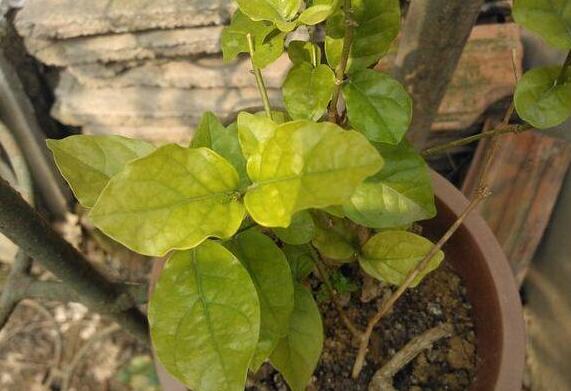
In daily life, many flower lovers think that mastering the methods of growing jasmine is enough, but this understanding is actually wrong, because in certain situations your jasmine leaves will turn yellow, and at that point flower lovers need to handle it properly. So what should you do when jasmine leaves turn yellow? Below, the editor will give a detailed introduction covering 7 aspects including soil, watering, light, and temperature.
II. Causes of Yellowing Jasmine Leaves and Solutions
1. Soil on the alkaline side
Soil is an important factor causing jasmine leaves to turn yellow. The soil for jasmine should be acidic soil. If the soil is weakly alkaline, it will cause the leaves to go from yellow to green, or even drop off; in addition, long-term watering with relatively alkaline water will also cause poor plant growth and yellowing, withered branches and leaves.
Solution: (1) You should use acidic nutrient soil for growing it; (2) You can add ferrous sulfate solution or alum fertilizer water to increase the soluble iron element in the soil and solve the problem.
2. Insufficient or excessive light
Jasmine is a light-loving flower, so jasmine should be placed in a spot with sufficient scattered sunlight for care. Once it is placed in a shaded area, yellow leaves, withered tips, and even leaf drop will quickly appear; in addition, in the hot summer, it must not be directly exposed to the sun, as this will make the potting soil too dry and easily cause the leaves of the potted plant to turn yellow and wither.
Solution: (1) Ensure jasmine has sufficient light conditions; (2) In summer, it must not be placed directly under the sun for exposure; at this time it can be moved back indoors, and then taken out again after the strong midday sun has passed.
3. Too much or too little watering
Too much or too little watering is also one of the causes of yellowing jasmine leaves. When watered too much, the potting soil remains wet for a long time, which causes root suffocation and rot due to lack of oxygen, and the plant cannot absorb nutrients, causing the leaves to turn yellow or even wither and die. When watered too little, the old leaves will gradually drop from top to bottom, but the new leaves grow normally; with insufficient nutrient supply, the leaves will also turn yellow.
Solution: When encountering the above phenomena, pay attention to the appropriateness of the watering amount, keep the potting soil moist, and do not let water accumulate. However, the best watering plan for jasmine is to alternate between dry and wet, and do not let the potting soil always be soggy.
4. Temperature too low
Jasmine is a flower that loves a warm environment and is not cold-tolerant. If it encounters low temperatures, its normal internal physiological metabolism will be disrupted, causing the leaves to turn yellow.
Solution: You can adjust the microclimate of the environment, add plastic film, or move it to a warmer place for care and management.
5. Fertilizer too concentrated or too little
Although jasmine needs more fertilizer, improper fertilization is also one of the causes of yellowing jasmine leaves. When fertilizer is too concentrated or undecomposed organic fertilizer is applied, it will cause root burn, resulting in yellowing and withered branches and leaves; when too little fertilizer is applied, the plant's roots will ball up and be unable to absorb nutrients, causing the leaves to turn yellow.
Solution: In this case, part of the potting soil should be removed and replaced with new potting soil. In daily management, it is better to apply light fertilizer frequently, and do not try to fill it up all at once.
6. Long-term failure to repot
When grown in a pot, if jasmine is not repotted for a long time, its leaves will also turn yellow due to insufficient nutrients.
Solution: When repotting jasmine, the soil can use relatively fertile humus soil, such as pine needle soil and so on.
7. Damage from pests and diseases
Damage from pests and diseases is also one of the causes of yellowing jasmine leaves. When harmed by pests such as red spiders and scale insects, yellowing and withering of branches and leaves will also occur.
Solution: Pay attention to ventilation and increase air humidity for prevention. When pests appear, spray pesticide promptly for control. As for which specific pesticide to use, there is a special introduction in the pest and disease control section for jasmine, so I will not say more here.
Friendly Analysis of Yellowing Jasmine Leaves
(1) If the leaves of jasmine gradually turn yellow during the growth period, it is mostly caused by the water used for watering or the potting soil being on the alkaline side;
(2) If the leaves suddenly turn yellow, it is often caused by root rot due to excessive watering or overly concentrated fertilizer;
(3) If the leaf edges are yellow and hard, it may be due to insufficient watering and fertilizing or long-term failure to change the soil, resulting in nutrient deficiency. Overall, as for what to do when jasmine leaves turn yellow, flower lovers should, according to the actual situation, identify the symptoms, check carefully, and treat the root cause.
II. Causes of Reddening Jasmine Leaves and Treatment
In the process of growing jasmine, because of improper care, jasmine often falls ill. In addition to yellowing leaves, reddening leaves can also occur. According to the editor's research, the causes of reddening jasmine leaves are mainly the following three:
1. It is placed in an improper indoor location and is exposed to cold wind, catching a chill.
2. Watering was forgotten, and the potting soil has been too dry for a long time.
3. During overwintering, it is usually watered too much, and the potting soil is often too wet. These can all cause partial or massive leaf drop.
How to Handle Jasmine with Reddened Leaves and Complete Leaf Drop
For a potted jasmine that has already lost all its leaves, observe it carefully. As long as the branches are still green, after "Qingming" move it outdoors and place it in a warm spot with half shade and half sun, prune away some dead branches, and suspend fertilizing. Water when the potting soil is dry, and let it get rained on when it rains. In this way, as the temperature gradually rises, before long, new branches and leaves will grow again from the leaf buds on its green branches or from the base.
How to Grow Jasmine, Jasmine Growing Methods and Precautions / More Sunlight
Jasmine, needless to say, everyone must have seen it. It is a relatively common potted flower in daily life, and its greatest feature is undoubtedly its pure white flower color. How to grow jasmine is generally the same as with other plants, but in the process of growing it, the points that need attention are different. The following is a very comprehensive guide to jasmine growing methods and precautions compiled by the editor. You might as well try growing it according to what is said inside.
I. How to Grow Jasmine, Sunlight and Watering
Generally speaking, the growing methods for jasmine are relatively simple compared with flowers such as Phalaenopsis and peonies, but if you want to grow jasmine well and extend its flowering period, you still need to put in some effort. Light, watering, temperature, and soil are all things we need to pay attention to. Next, let us discuss them in detail.
II. Jasmine Growing Methods and Precautions
1. Loose soil
In jasmine growing methods, the most important thing to pay attention to is soil. Jasmine is especially sensitive to soil permeability, so choosing loose soil is more suitable. For a flower like jasmine whose root system is relatively underdeveloped, it is easier to grow.
Precautions: Potting soil on the alkaline side will cause leaves to turn yellow. When the leaves turn yellow, you can apply a thin alum fertilizer water once every 5-7 days. Before long, the yellowing leaves on the plant can turn from yellow to green and gradually return to normal. After that, combined with fertilization, apply a thin alum fertilizer water once every 7-10 days, which can keep the leaves fresh and green and growing normally.
Soil selection: Mix and prepare 5 parts leaf mold (or peat soil), 4 parts garden soil, and 1 part cake fertilizer residue. When potting, place a small amount of bone meal at the bottom of the pot as base fertilizer. It is best to repot once every year or every other year, replacing it with new culture soil. After repotting, water thoroughly, and pay attention to loosening the soil. Keep the temperature between 22-24°C, which can accelerate the sprouting of new buds.
2. Sufficient light
Jasmine is a light-loving flower. During the growth period, it prefers relatively strong direct light. During the bud-setting and flowering period, if it receives more than 8 hours of sunlight per day, the buds will be plump and white. So as long as it is daytime, flower lovers should place it outdoors so it can receive sufficient light, but in midsummer do not place it under direct sun exposure.
Precautions: If light is insufficient, jasmine branches and leaves will grow leggy, the leaf color will be pale, the branches will be thin, there will be few flowers, and the fragrance will be faint. Therefore, to ensure sufficient light, placing jasmine on a balcony or rooftop is a good choice.
3. Water frequently
Since it is suitable to choose loose soil for planting jasmine, and such soil has good drainage, you need to pay attention when watering. When watering, you must water thoroughly, until water just seeps out from the bottom of the pot. But this does not mean it is enough. Flower lovers should water at least 2 times a day, preferably once in the morning and once in the evening.
Precautions: Once watering is insufficient, jasmine will not grow well, and symptoms of yellowing and sparse leaves will appear, so flower lovers must water frequently. As for when to water, there are two methods: (1) Look at the potting soil and follow "see dry, see wet," checking whether the potting soil is dry enough to be pale or wet enough to become mud; (2) Tap the flower pot with your finger and listen to the sound. A crisp, pleasant sound means the potting soil is already dry, while a dull, muffled sound means the potting soil still contains water.
4. Temperature: 25°C-35°C
Jasmine is a long-day, somewhat sun-loving plant, and grows best at 25°C-35°C. It fears cold and cannot withstand freezing at low temperatures. Below 3°C, its tender branches and leaves will suffer cold damage. At a minimum temperature of 0°C with slight frost, most of the leaves will drop; at around minus 3°C, the branches are at risk of freezing damage. Therefore, jasmine must be placed in a warmer place to grow.
Precautions: When the temperature drops to 5°C-10°C, jasmine should be moved indoors and placed at a sunny window; when the temperature is below 0°C, the potted flower should be moved away from the window at night to prevent cold wind from blowing in through window cracks and freezing the jasmine; when freezing occurs indoors, at night you should also use a polyethylene film bag to cover the potted flower together with the bottom and tie the bag opening tightly, then place the potted flower in a warmer place. To avoid the risk of jasmine being suffocated, you can also poke a few small holes in the bag.
5. Reasonable fertilization
Jasmine loves fertilizer and is suitable for growing in fertile, loose, well-structured sandy loam and loam with a pH of 5.5-7. However, during the flowering period, less nitrogen fertilizer should be applied, because the effect of nitrogen fertilizer is to promote leaf growth. Too much nitrogen fertilizer will make jasmine branches and leaves grow very luxuriantly but simply not bloom, so nitrogen fertilizer is more suitable for use during the seedling stage. During the flowering period, applying organic fertilizer will be more effective, as it can promote flowering and extend the flowering period.
Precautions: Sometimes jasmine will show the phenomenon of only growing leaves and not blooming. The main reasons are, first, insufficient light, and second, too much nitrogen fertilizer. Because jasmine needs at least 6 hours of sunlight every day, at the same time pinch off the tips of branches that do not bloom; second, use less nitrogen fertilizer and more phosphorus fertilizer.
6. Prune frequently
In jasmine growing methods, learning to prune is a very important part. Necessary and appropriate pruning of jasmine can not only ensure the storage of jasmine's own nutrients, benefiting the growth of new branches and the sprouting of new flower buds, but also ensure a beautiful tree shape. You can also use the robust pruned branches for cuttings propagation, ensuring what is needed for replacing old jasmine with new.
Precautions: In suitable weather, jasmine grows very quickly and its branches and leaves are luxuriant. If the new branches grow too quickly and too long, they should be cut off about 10CM from the branch tip to encourage more side branches to grow.
7. Reasonable repotting
For jasmine that has already been planted for more than 2 years, repotting is relatively necessary. At this time, the roots of jasmine have already become tangled and disordered, and their ability to absorb water and air has greatly declined. Simply loosening the soil can no longer solve the actual problem. Changing to a larger flower pot and reusing loose soil can let jasmine regain a second spring.
Precautions: When jasmine planted in a pot grows from small to large and its root system fills the entire pot, the plant needs to be moved from a small pot to a large pot. Generally, before jasmine sprouts, prune the root system and then move it into a larger pot.
8. Pest and disease control
Jasmine is a flower not easily harmed by pests, but if you want it to bloom well, it is still necessary to take some necessary preventive measures. Red spider is one of the more common pests when growing jasmine. The corresponding insecticide is easy to buy, so I will not elaborate. The specifics are introduced in the pest and disease control section for potted jasmine.
Precautions: When spraying the liquid medicine, do not only spray the leaves and flowers of jasmine; the soil must also be sprayed, otherwise the pest problem will not be treated thoroughly. For leaves that have already been infected, they should be removed promptly.
Unusual Tips for Flower Growing, Friends Who Love Growing Flowers Come Take a Look (Part Two)
My Unusual Flower-Growing Tip No. 16: Segment the Roots by Cutting to Rejuvenate an Old Tree
It is said that all things in heaven and earth have a certain lifespan, and plants are certainly no exception. Although we cannot change this trend, through certain methods we can still extend their lives. Below is one method~~~
The so-called "life root" means that life lies in the roots, and this is especially true for plants. When the roots are strong, the plant is strong; when the roots age, its life is also nearing its end. Therefore, if we want to extend the life of a plant, we must think about the roots. During the spring growth period, scrape away the potting soil, cut off 1/3 of the entire tree root, and then cover it with potting soil again. At the place where the old roots were cut, fine new roots will soon grow. Treat it the same way next year and the year after, so after three years, it is equivalent to the entire root system having been renewed. Compared with old roots, new roots have significantly stronger ability to absorb water and fertilizer. In this way, restoring an old tree to youth is a matter of course.
In addition, after cutting off the old roots, you can replace 1/3 of the soil with new soil. After three years, the potting soil is equivalent to having been completely renewed, and the trouble of repotting is also avoided. This can be said to kill two birds with one stone.
If an old stump still has some vitality, it can also be combined with shaping and cut short to make it send out new branches.
My Unusual Flower-Growing Tip No. 17 [Aglaia, Blooming and Fragrant Every Day]
Aglaia has glossy leaves and is evergreen all year round. When it blooms, it is richly fragrant. Those golden-yellow small flowers like grains of rice look very eye-catching against the green leaves. If cared for properly, it is no problem for Aglaia to bloom 5 times a year. So can it be made to bloom and be fragrant every day? There is a way.
Generally speaking, after Aglaia blooms once, it needs to "rest" for a period before it can bloom again, because it needs to accumulate nutrients to prepare for the next bloom. So its flowering appears intermittent. If we want it to bloom every day, we must artificially satisfy its nutrient needs, that is, by properly thinning buds to reduce the nutrients consumed by each blooming. Specifically, when Aglaia is full of buds for the first time (or second time) in early spring, you can first thin the buds on 1-2 branches, then after another 4-5 days thin the buds on another 1-2 branches, and so on repeatedly in continuous operation. When cumulative flower and bud thinning reaches more than 6-7 times, and the branches that have undergone bud thinning reach more than 60-70% of all branches, then all the branches of Aglaia can bloom in turn, achieving the goal of blooming and being fragrant every day. According to the procedure, branches that have not been thinned bloom first. After about 5-10 days, the branches whose buds were thinned the first time bloom next, and then they bloom in the order of bud thinning. In total, a pot of Aglaia can let you smell its fragrance every day for 7-8 months during the entire growing period. (Because its fragrance is rich, thinning some is no problem.)
Key points: 1. Water, fertilizer, and light must keep up. 2. The plant must not be too small; it should have at least about 10 branches.
My Unusual Flower-Growing Tip No. 18 - Try It: Feeding Fat Meat Makes Epiphyllum Bloom
Everyone has their own hobbies, and plants are no exception. For example, Clivia loves alcohol, while Epiphyllum is fond of fat meat. During the growth period, often feeding it some fat meat can not only make its plant deep green and glossy, but also allow it to bloom as many as 5-6 times, with large and numerous flowers.
The specific operation is very simple: soak the fat meat in boiling water to remove the salt; or boil the waste lard from pig tripe in water, then let it cool.
Then use a suitable tool to poke several holes in the Epiphyllum pot, with a diameter of 2-3 cm. After that, cut the fat meat or waste lard into tablet-sized pieces, pour them into the holes, and then cover the surface with about 3 cm of soil.
Key points: 1. Adding a small amount of potassium dihydrogen phosphate and mixing it in gives a better effect.
2. Generally, a flower pot with a pot diameter of 15 cm only needs two holes, and one of 25 cm needs three holes. And so on. The fertilizer effect can supply what Epiphyllum needs for a year of growth.
3. It must be cooked and chopped, otherwise the decomposition speed is too slow and it easily attracts ants.
4. Using the waste oil from the oil collection cup inside a range hood and pouring it in also has a very obvious effect.
My Unusual Flower-Growing Tip No. 19 - Spraying Flowers with Beer Kills Two Birds with One Stone
It goes without saying that flower growers love dealing with all kinds of flowers. But what you deal with is not only flowers, but also all kinds of pests, haha, even though you do not like them at all.
Among pests, aphids and red spiders are still relatively easy to deal with. Spray the right pesticide twice, and it is basically ok. But scale insects are more troublesome. They have a protective layer - a waxy shell. Spraying pesticide has little effect on them, and they really seem somewhat invulnerable. So, besides manual pest removal (brushing with a brush), is there any simpler and more effective method? Yes.
After discovering scale insects, do not panic. Prepare a bottle of beer, pour out some and mix it with water at a ratio of 6 parts water to 1 part beer, then spray the plant once, making sure to spray all parts as much as possible. The next day, check carefully. If the insects turn reddish-brown and fall off at a touch, then they have definitely breathed their last. If there are still live ones, spray again. Generally, after spraying three times in a row (three days), the problem can basically be solved.
Principle: After beer is sprayed, it forms a sealing film on the insects' bodies, causing them to suffocate to death. However, it is also possible that they died from drunkenness. Of course, this still needs entomologists to prove.
In addition, beer is also a very good leaf fertilizer. Spraying it often can make the plant grow full of vitality and especially spirited. The ratio should be thinner than when treating pests: 8 parts water to 1 part beer is fine. If you are interested, you might as well try it.
My Unusual Flower-Growing Tip No. 20 - Four Watering Methods
Watering is the first hurdle that flower growers must pass, and it is also a hurdle they must pass. Although watering looks simple, there are actually many particular points in it. Many beginners' flowers are ruined at the watering hurdle. Regarding watering, everyone relatively understands such things as "see dry, see wet"; water more during the growth period and less during dormancy; water more for small pots and less for large pots, and so on, so I will not say more. Below I will only introduce several special watering methods.
1. Sand column method --- prevents potting soil from compacting
When potting or repotting flowers, first stand several hollow tubes in the pot (bamboo tubes, plastic pipes, iron pipes, etc. are all fine), then fill soil around them and press it firm. Then pour coarse sand into the tubes, with the upper ends level with the soil surface. Finally, gently pull out the hollow tubes, and sand columns will form in the pot. Later, when watering, the water only spreads around through the sand columns. This prevents the soil from compacting, with no adverse side effects.
Note: The tubes cannot stand in the exact center; leave space for planting the flowers.
2. Round-trip method --- do not water only halfway
Watering only halfway means the water has not penetrated thoroughly: the top is very wet, while the bottom is still dry. If this is done often, how could the flowers and trees not die? There are several reasons: inexperience; potting soil too compacted; no repotting for a long time, with roots tangled, and so on. The solution is as follows: if you have many flowers, you can water them one by one as usual without worrying about whether they are thoroughly watered. After all have been watered, water them all over again from beginning to end, and a few can even be watered a third time. In this way, watering only halfway can basically be eliminated. Because after the first round of watering, even if it was not thorough, the potting soil has already been moistened and softened to a certain extent, so after some time, the second round of water is relatively easy to absorb.
Note: There is no need for this if the potting soil is loose. If there are not many flowers, you can go do something else after watering and water again after a while.
3. Sitting-pot method --- prevents Caragana from root rot
Caragana is very beautiful. When the flowers first open they resemble butterflies, and after unfolding they look like golden sparrows dancing gracefully. It can also be made into bonsai, so many people love to grow it. But in recent years fewer and fewer people grow it, because it is very prone to root rot and dies if you are not careful. There is one method that is very effective in preventing its root rot, namely the sitting-pot method. Put some water in a container, place the potted Caragana in it, and when the soil surface looks wet, it means it has been thoroughly watered; at this point you can take it out.
Note: You must also follow the "see dry, see wet" principle.
4. Midday water --- makes jasmine more fragrant
Watering jasmine at midday can make jasmine even more fragrant when it blooms. The ancients already summarized this: "If you want jasmine to be fragrant, give it a ladle of water at midday." But watering under the strong midday sun is a taboo in flower growing. The reasoning is just like how a person cannot take a cold shower immediately when too hot. To water flowers at midday without mishap, the premise is to first put the water under the sun to warm it, and water once the water temperature is close to the soil temperature. In this way it is ok and safe.
Reminder: Other plants have not been tested, so please use with caution.
My Unusual Flower-Growing Tip No. 21 - Old Loofah Helps You Get Green Leaves and Beautiful Flowers
When the autumn wind rises, the harvest season has arrived again. The vines of the loofah gradually wither like an old person's arms, and the leaves tremble in the wind. Only the old loofahs still hang heavily one by one.
In the past, villagers used them to wash bowls and scrub pots, but now no one uses them, and they seem to have become waste. Are they really waste? No!
After picking the old loofahs, wash them clean and dry them. When repotting and changing soil or potting flowers, cut them into small pieces about 5 cm. Spread a layer of loofah stem at one third of the way up from the bottom soil, fill soil above it, then spread another layer at two thirds of the potting soil, add more soil, and after that proceed normally.
Note: Before cutting, first spread it flat on the ground and use a hammer to smash the loofah seeds.
(This method can effectively improve the potting soil, making it loose and not compacted. Moreover, the loofah fibers and seeds slowly decompose in the potting soil and are a very good long-acting nitrogen fertilizer, so potted flowers all have green leaves and beautiful blooms.
My Unusual Flower-Growing Tip No. 22 - Wonderful Use of Sawdust Turns Waste into Treasure
During ordinary home renovation, afterward sawdust is often simply dumped as garbage. In fact, sawdust is very useful to us flower growers. We can absolutely turn waste into treasure~~
1. Cuttings: Using sawdust as a cutting medium for plants such as Chinese rose, gardenia, and pomegranate has an obvious effect, far superior to soil cuttings or water cuttings, and roots grow quickly, in greater number, and the plant is robust. There is an even greater advantage: after the plant takes root and survives, it can be moved into potting soil together with the block of sawdust, so the roots are not damaged, it is easy for the plant to establish, and flowers and fruits appear earlier. Even for varieties that are harder to root, such as rhododendron, I have tried successfully, and even inch-long tender tips of crabapple can root quickly. The reason is that sawdust has better water retention and air permeability than soil, and oxygen is sufficient.
Specific method: Put sawdust into a flower pot, then pour boiling water over it repeatedly several times to thoroughly disinfect it. After the temperature drops, squeeze out the excess water (so that the wet sawdust does not drip water when squeezed by hand), and then you can start cutting. The method is the same as soil cuttings. After cutting, keep the sawdust moist and it will quickly take root and survive. This method can be carried out in all four seasons, except in winter it needs to be placed on a sunny windowsill with heating indoors.
2. As a wrapping medium for air layering: Because sawdust is loose in texture and its dryness and moisture can be controlled, it is likewise superior to other media, roots faster, is relatively safer, and has a high survival rate.
Specific method: After ring-barking the plant, fill the plastic bag wrapped around it with a medium made of equal parts wet sawdust and loess, then tie both ends tightly.
3. As fertilizer: Making fertilizer with wet sawdust is comprehensive in nutrition, economical and convenient, and clean and hygienic.
Specific method: Mix wet sawdust with an appropriate amount of inorganic fertilizers such as superphosphate, potassium phosphate, or urea. It is even better if organic fertilizer is mixed in. Put it into a plastic bag and tie the bag opening tightly. Turn it over once every two weeks to accelerate even decomposition. In spring and autumn, it can be used after about six weeks.
Note: when using it, 50% soil must be mixed in.
The above lists just a few points, and I will not go into the rest. In fact, the uses of sawdust go beyond these; you can all put on your thinking caps and give it a try.
(Oh, I forgot an important point, let me add it now~~ Sawdust must be fermented before use.)
When I make fertilizer with sawdust, I add an appropriate amount of rapeseed cake (soybean cake works the same way), which I got from the fish farmers; I also add some chicken and duck manure (last year I used cow manure), then add a little water and let it ferment. After it has rotted, dry it until it is half-dry before use. The sawdust fertilizer made this way has fairly complete nutrients. It is better to make it in spring and summer, because the high temperature makes fermentation fast.
My Unusual Flower-Growing Tricks, No. 23 - If you want your flowers and trees to do well in winter, leave some grass in the pot
The reason I say "leave" rather than "plant" is that our potted flowers often have some wild grass that shows up uninvited, happily growing lush and incomparable. The usual reaction of gardening friends is to grit their teeth with itchiness and want nothing more than to root it out, the so-called "pull up the grass by the roots."
This trick of mine is not really so unusual when you think about it. It comes from the fact that gardening friends often say the watering standard is hard to judge in winter. Roots rot, leaves drop, and the poor flowers' little lives are hard to save. Is there any simple method that can help everyone quickly grasp the watering standard? Yes: please show mercy and leave a bit of wild grass in the pot; pulling up the grass by the roots is not the way.
Generally speaking, most plant varieties are in dormancy or semi-dormancy in winter, so they do not need much water, and the soil only needs to be slightly moist. Many gardening friends, however, rush to water as soon as they see the soil surface turn pale, thinking the flowers may dry out. Actually, that is not so. When the soil surface turns pale, the middle is still very moist. If you water this way, it would be strange if the flowers and trees did not develop problems!
Leaving some grass in the pot does not mean leaving any grass. You should leave those green grasses that stand firm against the cold in winter. And it is not a case of the more the better; just three to five plants is enough.
When should you water? When should you not water yet? Look at the grass! If the grass is still standing green and lush, do not water; if the wild grass has wilted and lost its spirit, water immediately. The standard is just that simple!
Leaving some grass in the pot has more benefits than these: it can protect against cold in winter, protect against sun in summer, and also decorate the pot surface - just think, what is attractive about bare soil? In addition, when loosening the soil, bury a spadeful of the grass in the soil and it becomes green manure, enough to make up for the loss caused by the wild grass competing with the potted flowers for nutrients.
I have used this method for watering for more than one year, and it has worked every time. If you believe it, you can try it too.
Note: 1. Plants that are still flowering and fruiting in winter are not covered by this example.
2. This method is also applicable in other seasons.
My Unusual Flower-Growing Tricks, No. 24 - Burying Nodes to Propagate Emerald Bamboo into a Grove
"Better to eat without meat than to live without bamboo." The ancients were like this, and people today are the same. In modern homes, for greening around the residence or in the environment, emerald bamboo is also one of the varieties that fully deserves its place. Planting trees often requires "ten years to grow a tree," while planting bamboo often creates a cool, evergreen environment in just one or two years. On a night with bright moonlight, the swaying bamboo shadows outside the window add infinite quiet charm.
Planting a few tall bamboo stems in a pot and adding one or two Ying stones is also a beloved desk ornament in the hearts of many flower growers.
Bamboo is generally propagated by the method of division with rhizomes, and a few are also grown from seed. This propagation method of mine is relatively rare (my cousin taught it to me), but the effect is excellent - simple, easy, and with a high survival rate. Bamboo lovers may want to give it a try...
In the early spring rainy season, choose a mother bamboo with plump buds, and saw it off between two nodes (that is, leaving one node scar in the middle); then fill both ends of the bamboo tube with moist fine sand, filling it full and pressing it firm, then seal both ends of the bamboo tube with clay. This is the first step.
Next, choose loose, permeable sandy loam soil. According to the thickness of the bamboo tube, dig a trench about 10 cm deep, place the prepared bamboo tube flat in the trench and bury it with soil, press it slightly firm, then water it thoroughly. That is the whole job done. Remember when burying the nodes to face the buds upward, and absolutely do not put it in upside down.
The bamboo nodes can grow tender shoots in about 25-30 days. If making a bonsai, just pot it during the rainy season.
Key points: 1. To cultivate a bamboo grove, choose thick bamboo; to cultivate potted plants, choose thin varieties.
2. When sawing the bamboo tube, be careful not to let it split, so as not to injure the buds.
My Unusual Flower-Growing Tricks, No. 28 - Planting Epiphyllum Inverted
Epiphyllum has large and beautiful flowers, with delicate and eye-catching colors, and it is coarse and easy to grow, so many gardening friends want to have a pot. The common trick for home propagation of Epiphyllum is cuttings, but many gardening friends report that the survival rate of cuttings is not high, and if you are not careful the roots rot, so many years of cuttings are labor wasted. Why do Epiphyllum cuttings rot easily? Because its fleshy stems are rather thick, and the cut surface is extremely sensitive to soil moisture - if too wet, the cuttings rot easily; if too dry, the branches become shriveled, thin and weak, and barely alive. Even the cut surface of a branch that has been rooted for a long time can still rot if you are not careful, and all previous work is wasted. To solve this problem, there is a clever method, and that is inverted planting.
The method is very simple: cut off a 10-15 cm cutting with a sharp knife (the part with the leaf tip at the upper end), then insert it upside down into the soil, with the buried depth about 6-8 cm. Because it is inserted upside down, the cut surface is exposed outside. At the current temperature, it can take root and survive in about 20 days, and new branches can sprout and grow in one and a half months. At this point, you can safely shift to normal management.
Notes: 1. When watering or spraying, be careful not to spray the upward-facing cut surface.
2. There is no need to control water; from the start, you can water when dry and let it dry when wet.
3. The cutting medium does not need sand or plain soil; you can insert it directly into fertile, loose soil.
4. Cut and insert right away; the cuttings do not need to be dried in the shade.
5. The section of the cutting from the new roots to the old part will naturally shrink and dry up later, and new branches will take its place.
Alright, that is all from me for now. The rest is up to everyone to slowly understand. Good luck to you all. Please pay more attention to Duorou Flower Garden, thank you!