How to prune the leaves of a clivia? Don't prune unless they turn yellow
In daily life, many growers like to keep a small pair of scissors handy, for no other reason than to snip leaves when they have some spare time and cultivate a bit of inner calm. But clivia leaves are quite large, so during cultivation, can clivia leaves be pruned? If so, how should clivia be pruned? On this point, let the editor give you a detailed introduction.
1. Can clivia leaves be pruned? Yes
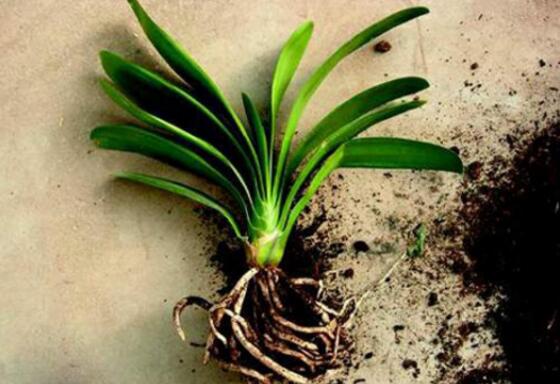
Pruning leaves and flowers is a matter of self-cultivation, but when pruning clivia, you must be very careful. That is because 6 parts of the clivia's beauty lies in its leaves, and its leaves grow extremely slowly, producing only about 5 leaves a year. If you cut them, it is truly a great pity. So can clivia leaves be pruned? They certainly can, but it is best not to try.
Clivia leaf pruning
Although clivia is best not pruned, cases like the one above, where too many leaves have grown and the shape is lost, can still be pruned. Method: cutting from the very bottom is best, because this way the leaves will still keep a good shape. But some people use too much force and cut off all the leaves, and then start to worry: with all the leaves cut off, will the clivia die?
Will clivia die if all its leaves are cut off? No
In fact, clivia will not die that easily. Even if all the leaves are cut off, as long as the root system is still healthy, it can grow new leaves again. However, the whole process may take a bit longer, roughly about 6 months before the leaves can grow out.
Pruning clivia leaves that have turned yellow
During the process of growing clivia, yellowing leaves are something many flower lovers encounter. Many people feel anxious and want to cut them off. Is that okay? In fact, yellowed clivia leaves can be cut off. Flower lovers can gently pull the leaf off from the base. Generally, it is better to wait until the leaf has completely turned yellow before pruning.
2. Clivia root pruning
During cultivation, root rot in clivia is something many flower lovers encounter, and at this point clivia root pruning needs to be carried out. When repotting, remove rotten and hollow roots, cut off overly long and old roots from the root area, and let the wounds air-dry naturally. Do not expose them to sunlight; it generally takes half a day, or you can use a cigarette butt to cauterize the cut dry. Then replant it in the soil and water thoroughly to settle the roots.
Generally speaking, clivia that has never bloomed does not need root pruning. Roots are an important organ for clivia to absorb nutrients, and cutting them will affect nutrient absorption. But for older clivia, because they have been grown for too many years and the flowers and pot are out of proportion, too many roots occupy the space in the pot and instead affect the clivia's nutrient absorption, so some roots need to be cut off.
3. Proper pruning to make clivia bloom quickly
Although most of the clivia's beauty is shown in its emerald green, plump leaves, clivia flowers are also very beautiful when they bloom. So how do you make clivia bloom quickly? This requires us to prepare in advance. If you want it to bloom during the New Year, you should start preparing the flower one month ahead, such as fertilizing, watering, and also pruning.
Pruning clivia branches and leaves can be essential. We can prune the leaves at the base of the flower roots, for example pruning old leaves from a year ago, which helps the flower grow. The earlier statement that generally no pruning is done refers to clivia that has only been grown for a short time, so do not prune those. But after growing for a long time, old leaves do need to be pruned.
What to do when clivia leaves turn yellow, how clivia leaves turn yellow
Yellowing clivia leaves are an abnormal phenomenon that flower lovers often see when growing clivia. This problem is mainly a physiological disorder caused by improper management, and in severe cases it can even cause the entire clivia plant to die. Pay attention to these points, and you won't need to worry about clivia leaves turning yellow.
Causes of yellowing clivia leaves and how to handle them 1. Avoid applying raw fertilizer or concentrated fertilizerCause 1 of yellowing clivia leaves: its fleshy root system is thick, plump and tender, and it is most averse to too much or too concentrated fertilizer or unfermented raw organic fertilizer; otherwise, it easily causes root burn, mildly causing clivia leaves to turn yellow and leaf edges to scorch, and severely causing the whole plant to wither and die in red-yellow.
Handling methods:
① Immediately increase the amount and frequency of watering to dilute the concentrated fertilizer. Prevent waterlogging.
② If the harm is caused by raw fertilizer, immediately take the plant out of the pot and change the soil. Remove the plant, first rinse the root system, cut off the damaged roots, then smear the wounds with charcoal powder, and replant.
2. Avoid poor drainageCause 2 of yellowing clivia leaves: watering too frequently or long periods of continuous rainy weather keep the potting soil in a waterlogged state for a long time, reducing oxygen in the soil so it cannot meet the plant's needs, causing abnormal life activities in the clivia, root rot, and causing the tips of young leaves to turn yellow, followed by old leaves turning yellow.
Handling methods:
① Immediately control watering.
② Avoid rain exposure.
③ Stop fertilizing.
④ Loosen the soil frequently to increase the soil's oxygen content, improve root absorption capacity, and promote plant growth.
3. Reasonable placementCause 3 of yellowing clivia leaves: it likes a cool, humid environment. If clivia is placed in a stuffy, unventilated spot, or in a high-temperature, dry environment with added harsh sun exposure, the normal activity of enzymes in the clivia plant is inhibited, the chlorophyll in the leaves is destroyed, and then clivia leaves turn yellow, especially the tips of young tender leaves turning yellow or leaf edges scorching.
Handling methods:
① Move the potted flower promptly to a ventilated, cool place.
② Shade it to prevent direct sunlight.
③ Spray water around the clivia plant and on the ground to increase humidity and lower temperature.
4. Dry soilCause 4 of yellowing clivia leaves: the potting soil is too dry and the soil lacks moisture. In severe cases, old leaves die and the tips of new leaves dry out.
Handling methods:
① First water moderately.
② When the temperature is high and dry, pay even more attention to balanced watering.
③ After the clivia gradually recovers its vitality, return to normal water and fertilizer management.
④ Usually keep the potting soil moist and loose.
5. Harsh sun exposureCause 5 of yellowing clivia leaves: it likes a cool, humid environment. If clivia is placed in a stuffy, unventilated spot, or in a high-temperature, dry environment with added harsh sun exposure, the normal activity of enzymes in the clivia plant is inhibited, the chlorophyll in the leaves is destroyed, and then clivia leaves turn yellow, especially the tips of young tender leaves turning yellow or leaf edges scorching.
Handling methods:
① Move the potted flower promptly to a ventilated, cool place.
② Shade it to prevent direct sunlight.
③ Spray water around the clivia plant and on the ground to increase humidity and lower temperature.
How to handle yellowing clivia leaves 1. Clivia leaves turn yellow, with small middle leaves turning black and rottingHandling method: There are two causes of this situation. One is that too much water was sprayed when the flower was in the owner's hands, causing dirty water to flow into the gaps and leading to bacterial infection and rot. Or it may be caused by careless watering that splashed dirty water into the gaps and caused rot. You can use toilet paper or facial tissue to absorb the rotting sap, remove the contaminants that can be cleaned by suitable methods, and usually keep the environment relatively dry. It is recommended to use the bottom-watering method.
2. All clivia leaves turn yellowHandling method: All turning yellow is often a symptom of sunscald. Shade it immediately and cut off the yellow leaves.
3. Clivia leaves wither, yellow and droopHandling method: Withered, yellow or drooping leaves are a symptom of water deficiency. Watering should follow the principle of not watering until dry and not letting water accumulate in the pot.
4. Localized yellowing of clivia leavesHandling method: Localized yellowing is very likely caused by fire scorching, cold wind, hot water, or acid-base damage. Just eliminate the external cause promptly. Sometimes, insufficient nitrogen fertilizer can cause the plant to suffer from chlorosis. The reduction of chlorophyll causes the leaves to turn yellow. In this case, apply more fermented cake fertilizer water. (Growing methods also differ by season.)
5. Clivia leaves wrinkle and develop yellow spotsHandling method: Excessive fertilizing causes root burn. Immediately change the soil, and use a 0.1% potassium permanganate aqueous solution to soak the roots for 20-30 minutes, then rinse with clean water. After air-drying, cut off the rotten roots, apply plant ash to the wounds, and replant.
6. The two outer leaves of clivia turn yellow (grown for 4 years)Handling method: This is normal metabolism of new layers. Simply prune off the two outer leaves.
7. Clivia leaves appear grayish-yellowHandling method: The main cause of grayish-yellow clivia leaves is excessively strong direct sunlight, so clivia needs to be shaded.
8. Clivia leaves show symptoms of chlorosisHandling method: Due to insufficient light, if the room is very dark, clivia will become chlorotic. Solution: use a fluorescent lamp to supplement light.
9. Clivia leaves are yellow and weakHandling method: Yellow and weak leaves indicate a lack of fertilizer. Apply thin fertilizer frequently; yellowing leaves mean the soil is raw and not breathable. Replace it with leaf mold or pine needle soil;
10. Yellowing lower leaves cause root rotHandling methods:
Materials: scissors, utility knife, chlorothalonil, rooting water, nutrient solution, spray bottle.
Causes of yellowing clivia leaves and how to improve yellowing clivia leaves
Clivia is a semi-shade plant and fears high temperatures, but if the temperature is too low it will also stop growing. In addition, many other factors can affect its growth, but the one that most damages its ornamental value is inexplicable yellowing of the leaves. So what are the causes of yellowing clivia leaves? How should yellowing clivia leaves be improved? Let's take a look below!
1. Improper temperature and humidity cause yellow leaves
The optimal growing temperature for clivia is 15-25°C. If the temperature is above 30°C, it will enter semi-dormancy. At such times, if the air humidity is below 60%, the clivia leaves will become lighter, turn yellow, and even wilt; below 6°C, clivia will suffer cold damage, and leaf tips and leaf edges will lose green and turn yellow, even developing yellow-white necrotic spots. To prevent these adverse phenomena in clivia, pay special attention to temperature control and moisture retention.
2. Potting soil too dry or overwatering and root rot cause yellow leaves
Clivia is a moisture-loving plant, and the most suitable relative humidity range is 70%-80%. If the potting soil is too dry for a long time and the temperature is also high, the leaves easily turn yellow. But long-term overwatering easily causes oxygen deficiency, hindering the plant's normal respiration and causing clivia root rot or even death.
3. Soil compaction or fertilizer burning roots causes yellow leaves
Clivia likes loose, fertile sandy soil. Soil compaction and insufficient fertilizer supply will make the leaves turn yellow and affect flowering. Generally, fertilizing once in spring and once in autumn within a year is enough. Rot-resistant leaves must be fermented before use; if not fermented, they easily burn the roots. Clivia must have its soil changed once a year. When the temperature at the clivia's care location is above 25°C, reduce or stop fertilizing appropriately, so as not to burn the fleshy roots with too much fertilizer. If the temperature can be lowered below 20°C, you can still fertilize as usual.
4. Improper lighting causes clivia leaves to turn yellow
Clivia is a semi-sun-loving flower and prefers relatively weak scattered light. It is not tolerant of strong light, and too strong light easily causes sunscald. In mild cases, the leaves turn from green to yellow; in severe cases, the leaves dehydrate, dry out and die. But if the placement location is too dark and light is insufficient for a long time, the leaves will also lose their luster, old leaves will become dark green, and new leaves will become thinner and turn yellow or yellow-green (shade yellow). At this point, move the clivia to a place with slightly stronger light or supplement the lighting. Clivia leaves are phototropic, so they should be grown facing the light in order to maintain the shape of forming a line when viewed from the side and a fan when viewed from the front.
5. Poor air circulation causes clivia leaves to turn yellow
Placing clivia too densely and having a closed-in surrounding environment both hinder air circulation, making the plant weak, yellow and thin. Therefore, strengthen indoor ventilation and avoid excessive placement density.
Clivia is a plant that turns yellow very easily. Below is a detailed explanation I have provided for everyone on how to improve yellowing clivia:
1. Normal yellow leaves
Generally, yellowing leaves can be caused just after planting or when the environment changes, but it will get better after a while, so there is no need to worry too much.
2. Water yellowing
Check whether the drainage hole at the bottom of the pot is blocked, loosen the soil, ventilate, and change the soil. Supplement with zhongshengmycin or kasugamycin sprayed on the leaf surface once every 7-10 days. Use it 2-3 times to prevent and treat root bacterial infection. Agricultural oxytetracycline and other antibacterial drugs can also be used.
3. Drought yellowing
Appropriately increase the amount and frequency of watering.
4. Sun yellowing
Move the clivia to a shaded place or grow it with shading, and prune off the badly scorched yellow leaves.
The above is the editor's careful compilation of the causes of yellowing clivia leaves and the solutions for yellowing clivia. Welcome to read.
Several disease symptoms of holes in lily-of-the-valley leaves and what to do about holes in lily-of-the-valley leaves
The leaves of lily-of-the-valley are bright and green, and indeed look very nice, but once there are holes in the leaves, it loses its own attractive quality. What are several common disease symptoms of holes in lily-of-the-valley leaves? Based on a specific analysis of the symptoms, what should be done about holes in lily-of-the-valley leaves?
Holes in lily-of-the-valley leaves really make the owner anxious. Below, the editor will explain several disease symptoms of holes in lily-of-the-valley leaves.
(1) Leaf spot disease. This disease occurs on the leaves of lily-of-the-valley, and in weather with high humidity, it is likely to occur. The lesion initially appears as a small brown spot, with a water-soaked faded green margin, and expands in concentric rings, circular to oval, with brown edges and gray-white inside. Later, dark brown mold spots appear in the center of the lesion, becoming a dark brown mold layer under humid conditions.
(2) Anthracnose. This disease also occurs on the leaves of lily-of-the-valley, and in severe cases can spread to the petioles. The lesion initially appears as small water-soaked yellow spots, and after expanding becomes oval to irregular brown or yellow-brown, slightly showing concentric rings; later the lesions join into a patch and become dry and withered, producing small black dots arranged in concentric rings. This disease is mainly favored by poor ventilation and by the presence of scale insect damage.
(3) Brown soft scale. This insect has complex feeding habits and can harm many plants, and lily-of-the-valley is one of the flower plants it damages. When brown soft scale harms plants, it generally gathers on the leaf surface or tender leaves, piercing and sucking the plant's sap, while excreting sticky liquid. Its excrement easily causes sooty mold fungi to multiply in large numbers, making stems and leaves turn black, affecting the plant's photosynthesis, causing weak growth and yellow, withered leaves, and harming its ornamental value. When the outbreak is severe, the branches and stems are covered with insect bodies, causing the plant to wither and yellow and affecting growth.
The above are several disease symptoms of holes in lily-of-the-valley leaves mentioned by the editor. Below, based on several causes of holes in lily-of-the-valley leaves, the editor will specifically explain what to do about holes in lily-of-the-valley leaves.
(1) Leaf spot disease: The method to treat leaf spot disease is to promptly remove diseased and residual leaves; both in the early and later stages of the disease, spray with 0.5%-1% Bordeaux mixture (or 50% carbendazim 1000x solution).
(2) Anthracnose: In the early stage of the disease, spray with 0.3%-0.5% equal-amount Bordeaux mixture (or 60% zineb 800-900x solution, or 70% thiophanate 1500x solution). The method to prevent and treat this disease is to strengthen care and apply more phosphorus and potassium fertilizer.
(3) Brown soft scale: Prevention and treatment methods: ① If there are few affected plants, or the number of insects is not large, generally scraping off the insect bodies with a bamboo strip or similar object is enough; ② During the nymph hatching period, spray with 40% dimethoate emulsifiable concentrate 1000x solution (or 40% omethoate emulsifiable concentrate 1000x solution), and you can also spray 5% phosmet emulsifiable concentrate 1000x solution to kill them.
The above is the editor's analysis for everyone of one symptom of holes in lily-of-the-valley leaves and what to do about holes in lily-of-the-valley leaves. Lily-of-the-valley is just like people; it can also get sick, and we should treat it well.