What to do about root rot in Clivia? Improper fertilizing is the main cause, 5 tricks to easily solve it
Clivia (Clivia miniata) is certainly familiar to flower lovers. It is an excellent indoor plant, not only extremely ornamental but also remarkably effective at beautifying the environment and for medicinal use. The benefits of Clivia have attracted many people to grow it, but during the growing process, improper care often leads to root rot. So what should you do about Clivia root rot? It is actually not difficult; learn 4 tricks and root rot will not come back. Let's learn about them together.
1. What to do about Clivia root rot: find the cause
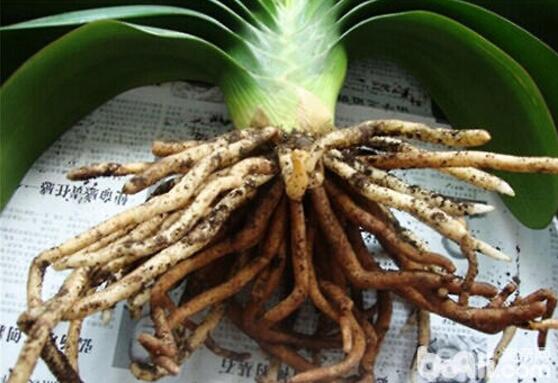
In the process of growing Clivia, various reasons can cause root rot to appear. There are many causes of Clivia root rot, and only by finding the cause can you take effective solutions and prevent the situation from worsening. What to do about Clivia root rot? Below are several causes of root rot and their solutions. If you love flowers, you must take a look!
2. Causes of Clivia root rot and solutions
1. Unsuitable environment
Whether it is Clivia leaves turning yellow or Clivia root rot, the first cause we should think of is an environmental problem. High temperature, high humidity and poor ventilation are all causes of Clivia root rot.
Solution: First remove the rotted roots, then disinfect, and finally, according to Clivia's growing methods and precautions, adjust Clivia's growing environment to the optimal state; it will recover after a period of time.
2. Improper fertilizing
This is also one of the causes of Clivia root rot, because once too much fertilizer is applied and the fertilizer comes into contact with the roots, the heat produced will burn the root system, thus affecting the roots' absorption capacity and ultimately causing root rot.
Solution: Similarly, after dealing with the rotted roots, disinfect them, then put them into a pot to encourage rooting. Having learned this lesson, we should usually apply thin fertilizer frequently when fertilizing.
3. Overwatering
In the methods for watering Clivia, we once said that you must be careful when watering Clivia, because once you water too much, the water content of the nutrient soil will be too high for extended periods, permeability will be poor, the roots will have difficulty breathing, and root rot will result.
Solution: Same as above; afterward, when watering, be careful not to pour water into the center of the Clivia, so that water does not run down the stem to the roots and cause waterlogging. Watering is usually once every 2 weeks, along with fertilizing.
4. Root injury
Repotting is a must during Clivia growing, and for beginners this step easily causes Clivia root injury, leading to root rot symptoms.
Solution: The rotting fleshy roots must be completely removed, then coat them with charcoal or fine stove ash and let them dry, then add soil and pot them, to prevent the injured roots from directly contacting pathogens in the nutrient soil and rotting.
5. Unsuitable potting soil
When talking about the causes of Clivia root rot, unsuitable potting soil is also one of them. Using ceramic pots, plastic pots and the like leads to poor air and water permeability in the potting soil, which causes Clivia root rot; and poor soil quality, with bacterial diseases invading the fleshy roots, will also cause Clivia to rot, producing root rot symptoms.
Solution: Change to a flowerpot with good air and water permeability, then disinfect the soil; for the specific steps, read on below.
3. Disinfection and treatment of Clivia root rot
We have said a lot above about solutions for Clivia root rot, but how exactly should root rot be treated? Method for removing rotted roots: Take the Clivia with rotted roots out of the flowerpot, gently strip off the soil, then rinse the roots clean with water, and use scissors to clean away the rotted root system. If any leaves are yellow or limp, it is best to cut off those damaged leaves as well.
Disinfection for Clivia root rot: Soak the cleaned roots in a 0.1% potassium permanganate solution for 5 minutes, then dip them in a little sulfur powder, plant ash or carbendazim, and let them dry in a cool, shady place for about 2 days.
4. Care after Clivia root rot
After treating Clivia root rot, many flower lovers think it is over, but in fact later care is also essential. Once care is improper, root rot symptoms will appear again. Care after Clivia root rot mainly includes the following two points:
1. Control of temperature and moisture
After treating Clivia root rot, for the potting environment, the temperature is best kept at 20-25°C, and ventilation must be good. In addition, water less; if the potting soil is too wet, it is not only unfavorable for rooting but also risks rotting again. Besides that, the flowerpot is best placed in a spot with diffused light, avoiding direct sunlight.
2. Control your own hands
Many flower lovers are obsessive and simply cannot wait for the Clivia to grow well. From time to time they dig around to check whether the root system still shows a tendency to keep rotting. In fact, doing so is not only meaningless but also increases the chance of the Clivia becoming infected with bacteria.
It is almost Chinese New Year, and your flowers are still turning yellow and dropping leaves; what should you do?
Azalea
(Author: Lavender Source: Sina Blog)
Azaleas are one of the top choices for Chinese New Year flowers. During the New Year, placing a pot of blooming azaleas at home gives you plenty of face when friends and relatives visit, but yellowing leaves are not good...
(Author: Old Niu Chouchou Source: Sina Blog)
Primary cause: improper watering
For newly bought azaleas whose leaves turn yellow, most of the reason is improper watering, either too much or too little.
The correct way to water azaleas should be to water when dry and let dry between waterings, that is, when the surface of the potting soil is dry 2~3cm down, water thoroughly. Normally you should also spray water on the azalea leaves and around them to raise the surrounding air humidity.
Secondary cause: temperature too low
Azaleas are southern flowers and are not cold-tolerant. In winter the temperature should be kept at 5~10 °C; below 5°C, the azalea will stop growing.
So, flower lovers whose homes have no heating in winter and where the temperature is very low, Huahua does not recommend you buy azaleas.
(Author: Yushui Lanling Source: Sina Blog)
Camellia
(Author: fcm1987 Source: Nipic)
Quite a few flower lovers also like camellias, but after growing them at home they find the leaves have turned yellow. What is going on?
(Source: Jinhua News Network)
Primary cause: improper watering
Watering is indeed a big problem, and with camellias, most of the time people water too much. Camellias need less water in winter, keeping the potting soil on the dry side. If the temperature at home can reach above 20°C, then watering when dry and letting dry between waterings is enough.
Secondary cause: insufficient elements
If some of the trace elements camellias need during growth cannot be supplied, it will also cause leaves to turn yellow.
At this time, you can fertilize with 20%~30% bean cake fertilizer, once a month, or mix a small amount of ferrous sulfate into the water when watering; note, 1~2 drops at a time is enough.
(Author: wenxiong34d Source: PConline)
Kalanchoe
(Author: Huachong Source: Home in Shenzhen)
Kalanchoe can be called one of the super easy-to-grow plants, but there are still flower lovers whose kalanchoe leaves turn yellow. What exactly is the reason? Let Huahua explain in detail.
(Author: Drunk Cat z Source: China Landscape Photography Network)
Primary cause: natural metabolism
Flower lovers can first observe: if only the leaves at the bottom of the kalanchoe turn yellow while the top is fine, then it is normal metabolism, and you just need to remove the yellowed leaves.
Secondary cause: overwatering
If the leaves first become soft and then turn yellow, then it is waterlogged.
You can take the kalanchoe out to get some sun, and after the leaf edges dry up, use scissors to cut off the dried parts. The remaining leaves will heal themselves in a few days, and new shoots will slowly grow out.
(Author: LF680410 Source: Huaba)
Orchid
(Author: yangyang Source: PConline)
I do not know how many flower lovers grow orchids. Many people think orchids are not easy to grow, but in Huahua's view, there are no flowers that cannot be grown well, only people who are unwilling to put in the effort!
(Author: nbmeid Source: 19Lou)
Primary cause: unsuitable environment
If it is a newly bought orchid, then the yellowing leaves are very likely due to the environment, which temporarily affects the orchid's nutrient absorption, causing yellow leaves.
Cut off the leaves that have already turned yellow, then just care for it normally.
Secondary cause: improper watering
For orchids, whether lack of water or waterlogging, both cause leaves to turn yellow. If even the tender leaves turn yellow, that indicates too much water, whereas if the lower leaves start turning yellow and then keep spreading upward, it indicates too little water and dryness.
If there is too much water, you can move the orchid to a place with good light and ventilation, which will speed up water evaporation.
If there is too little water, you need to water. Note that you must water thoroughly, that is, until you can see water flowing out of the small holes at the bottom.
(Author: Overseas Fisherman Source: Huitu Network)
Money Tree
Money Tree, perhaps most flower lovers who buy it do so for good luck, but the Money Tree's fondness for yellow leaves is also very frustrating...
Primary cause: too much watering
The Money Tree's root system is not well developed. Once watered too much, it easily rots, and once the roots rot, the leaves turn yellow.
Use a small iron rod or similar to insert along the edge of the pot, gently stir the potting soil to speed up evaporation of moisture from the soil, and afterward, wait until the surface of the potting soil is dry and whitish before watering; water thoroughly in one go.
Phalaenopsis
Phalaenopsis is a must-buy flower for the New Year. Not only is it beautiful, its symbolism is also very good! It is simply perfect for giving as a gift!
Primary cause: temperature too low
Phalaenopsis is a tropical flower with high temperature requirements. The optimal growing temperature is 18~28°C; if the temperature is below 15°C, it will affect the growth of the phalaenopsis.
Secondary cause: improper watering
If even the tender leaves turn yellow, that indicates too much water, whereas if the top and new leaves are fine and it is the lower old leaves that turn yellow, that indicates too little water and long-term failure to water thoroughly.
If there is too much water, you can stuff a strip of cloth under the nutrient pot, and it will slowly absorb the water out. Or gently turn over the surface potting soil so the soil contacts more air and evaporation speeds up.
If there is too little water, you need to water thoroughly in one go, and afterward, wait until the surface of the potting soil is dry and whitish before watering, also watering thoroughly.
Clivia
(Author: Hu Xiqing Source: Wuhai Photography Network)
Clivia is a perennial plant. If grown well, it can even bloom every year, but if grown poorly, yellow leaves are inevitable...
Main cause: improper watering
If the Clivia's leaves start turning yellow from the tips of the tender leaves and then gradually develop downward, that indicates too much water; if the tips of the old leaves turn yellow, that indicates lack of water.
For lack of water, you can use the soaking method: put the Clivia, flower and pot together, into a large basin filled with water, and take it out after the surface potting soil is moist; then the Clivia has been watered thoroughly.
If there is too much water, loosen the soil a bit, being careful not to injure the Clivia's root system, then place it in a well-ventilated spot such as a balcony to speed up water evaporation.
Secondary cause: insufficient light
Insufficient light can also cause Clivia's new leaves to turn tender yellow, especially in winter when light is relatively weak; move the Clivia promptly to a place with good light.
Cyclamen
(Source: 360 Baike)
Cyclamen is also called radish flower, and it is also one of the flowers everyone chooses during the New Year. Look at its petals, do they not look like rabbit ears?
(Source: Sanlian Network)
Main cause: dry air
Cyclamen likes water and is very sensitive to moisture, and it also has relatively high requirements for air humidity. Once the moisture does not meet its needs, yellow leaves and wilting are inevitable!
Indoors, keep the cyclamen's potting soil moist, and spray around it more to increase air humidity.
Secondary cause: insufficient light
Although cyclamen fears strong light, if it is kept in a place with insufficient light for a long time, it will also develop yellow leaves!
Winter light is originally not abundant enough and not intense, so place the cyclamen in a relatively bright spot.
(Author: smile Yibo's Mom Source: Baidu Zhidao)