What to Do When Clivia Leaves Turn Yellow? 7 Water and Fertilizer Care Tips to Keep Leaves Evergreen
Thick, emerald-green leaves, broad and spreading to both sides, neat and beautiful - this is the Clivia. Keeping one at home is an absolute visual pleasure. However, during cultivation, for various reasons, Clivia leaves may show yellowing symptoms. So what should you do when Clivia leaves turn yellow? This requires our rich experience - first find the cause, then address it specifically. The specific causes and solutions for Clivia leaf yellowing will be introduced by the editor below.
I. What to Do When Clivia Leaves Turn Yellow - Find the Cause
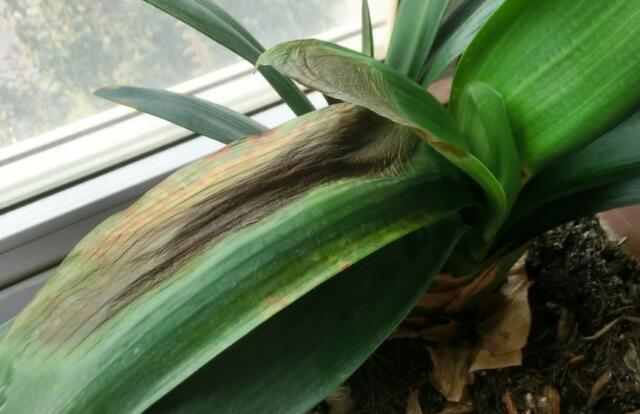
The beauty of the Clivia is mostly reflected in its thick, emerald-green leaves. So once improper care causes the leaves to turn yellow, it not only affects its growth but also its ornamental effect. As for what to do when Clivia leaves turn yellow, it is actually not difficult - just find the cause and address it specifically. Below are 7 causes and solutions for Clivia leaf yellowing. Flower lovers must take a look.
II. Causes and Solutions for Clivia Leaf Yellowing
1. Environmental Change
Most people's Clivias are bought directly from flower shops, so for Clivia leaf yellowing causes, we should first consider the environment. This is actually a normal reaction, because some Clivias are bought online, and the growing environment may change dramatically all at once, making it impossible for them to adapt, thus causing yellowing symptoms.
Solution: Communicate with the seller before purchasing, and try to let the Clivia transition under the same environment; or you can slowly change its environment to give it a process of adaptation.
2. Overwatering or Lack of Water
In Clivia watering methods, we introduced the importance of watering - too much or too little is not acceptable. Overwatering: When water accumulates in the pot for a long time, Clivia leaves are prone to infiltrative yellowing, occurring at the tips of young leaves, with symptoms developing from top to bottom; Lack of water: When too dry, or when only half-watering each time, old leaves will develop yellow tips.
Solution: When overwatering: Immediately control watering, and frequently loosen the soil to improve soil aeration. Or simply repot with fresh soil to make the Clivia fresh again; When lacking water: Follow the correct Clivia watering method and appropriately increase watering frequency.
3. Overfertilizing or Lack of Fertilizer
Among the causes of Clivia leaf yellowing, fertilization is also a key factor. Overfertilizing: Causes root burn, with yellow leaf tips; Lack of fertilizer or iron deficiency, symptoms: Leaf tips turn yellow first, and new leaves appear yellow-white.
Solution: When overfertilizing: Immediately stop fertilizing, increase watering amount to flush fertilizer out through drainage holes; or immediately repot, rinse the root ball with water and replant in the pot; When lacking fertilizer: Appropriately apply fertilizer containing iron, or promptly repot with new fertile, loose culture soil, and gradually increase application of compound flower fertilizer or dilute liquid fertilizer.
4. Too Much Light
Too much light causing sunburn disease is also one of the causes of Clivia leaf yellowing. When Clivia is placed under strong direct sunlight, its leaves will develop yellow spots, and even in high-temperature indoor conditions they are easily scorched.
Solution: Avoid exposure to strong sun, regularly wipe leaves with a cloth dipped in beer. Clivia wiped with beer not only looks better but also loses leaf moisture less easily.
5. Temperature Too High or Too Low
In Clivia cultivation methods and precautions, temperature is also a very important factor. Once it does not meet standards, its leaves will turn yellow. When temperature reaches above 30°C, Clivia leaves easily wither and yellow; When temperature drops below 0°C, frost damage occurs, with the symptom being yellow leaves.
Solution: When temperature is too high: Promptly move to a well-ventilated, cool place for care; When temperature is too low: Promptly adjust room temperature according to the situation; if conditions permit, turn on the air conditioner.
6. Pollution
Leaves being polluted can also cause Clivia leaves to turn yellow. If dirty things splash on them, the polluted areas may turn yellow. Solution: We should keep Clivia leaves clean. When polluted areas are found, quickly wash them clean with water.
7. Leaf Spot Disease
Leaf spot disease is also one of the causes of Clivia leaf yellowing. Symptoms: Yellow-brown small spots appear on the leaf surface, then the spot color gradually deepens, the spot area continuously expands, producing decay, eventually rotting the entire plant.
Solution: Replace with fresh decomposed soil, stop fertilizing, spray medication. Use 70% thiophanate-methyl, Tuzet, etc., spraying once every 10 days, 3-4 consecutive sprays to cure.
What to Do When Clivia Leaves Turn Yellow? Clivia Pest and Disease Control Methods
What to do when Clivia leaves turn yellow? Today let's look at the causes and solutions for Clivia leaf yellowing.
Clivia (scientific name: Clivia), also known as sword-leaf bush lily, is an ornamental flower of the Amaryllidaceae family, Clivia genus. Native to southern South Africa. In China it is often potted in greenhouses for ornamental purposes. Propagated by division or seeds. The drooping Clivia (C. nobilis) has the same effects and is cultivated in greenhouses in various places.
Perennial herb, with fleshy roots. Basal leaves leathery, numerous, broadly linear, leaf bases arranged in two rows closely overlapping to form a bulb-like shape. Blooms in spring and summer, scape erect, flat, fleshy, terminal umbel, many flowers, outer side with yellow-red, inner lower part with yellow. Berry purple-red.
Clivia leaf yellowing often occurs in summer, and it greatly affects the ornamental value. If your Clivia also shows such symptoms, then quickly check the following causes and solutions.
The entire leaf turns yellow.
This situation is caused by the sun being too strong and scorching the Clivia. The solution is to cut off the yellowed leaves and provide shade. After a period of time, the Clivia leaf yellowing will decrease.
Yellowing starts from the leaf tip.
This situation may be caused by the soil being too raw or too rich in fertilizer, and should be handled according to the actual situation.
Individual leaves turn yellow.
This situation is most likely caused by insufficient light for the Clivia. The corresponding measure is to supplement with lighting, or place it in a position with sufficient sunlight.
Clivia yellow leaves (including deteriorated leaf tips) are mostly caused by improper watering, fertilizing, and soil use, which first causes root rot and then leads to yellow leaves; therefore, you should repot to check, cut off rotten roots, replace soil and repot, and at the same time cut off yellow leaves to reduce the plant's burden. The main causes of root rot are:
1. Under poor ventilation conditions, too much water will cause root rot, because the water poured into the pot cannot evaporate for a long time, the plant's metabolic function will be hindered, inevitably leading to root rot.
2. Excessive fertilizer application or application of unfermented fertilizer: when room temperature rises above 25°C, it will ferment in the pot and generate high temperatures, thereby scorching the roots; 3. Using alkaline soil, clay soil, or unrotted horse manure soil to cultivate Clivia - some are not loose, some have poor aeration, and some will cause high temperatures in the pot soil, also causing root rot.
10 Solutions for Clivia Leaf Yellowing
1. Clivia leaves turn yellow, with small central leaves turning black and rotting
Solution: When this symptom appears, you need to first use the above 9 methods to prescribe the right remedy. For small central leaves turning black and rotting, further judgment is needed. Pry open two leaves to check - if the gap between leaves is black and exuding decayed juice, it can be determined that a formed Clivia flower scape did not have time to grow out from between the leaves and directly rotted in the middle of the leaves.
There are many reasons for flower scape rot: one is that when the flower was with the owner, too much water was sprayed, causing sewage to flow into the gaps and causing bacterial infection leading to rot; another situation is careless watering causing sewage to splash into the gaps and causing rot. Consequences: Generally it will not affect the orchid's life, but in high-temperature and high-humidity weather, it can easily cause the entire plant to rot from the top. Treatment: Use toilet paper or tissue paper to absorb the decayed juice, use appropriate methods to remove cleanable debris, keep the environment relatively dry normally, and it is recommended to use the bottom-watering method.
2. All Clivia leaves turn yellow
Solution: All turning yellow is often a symptom of sunburn disease. Solution: Immediately provide shade and cut off the yellow leaves.
3. Clivia leaves wither, yellow, and droop
Solution: Withered, yellow, or drooping leaves are symptoms of water deficiency. Watering should follow the principle of not watering until dry, and no water accumulation in the pot.
4. Clivia leaves partially turn yellow
Solution: Partial yellowing is likely due to fire scorching, cold wind, hot water, or acid-base erosion. Simply eliminate the external cause promptly. Sometimes, nitrogen deficiency can cause the plant to suffer from chlorosis. Reduced chlorophyll leads to yellowing leaves. In this case, increase application of fermented cake fertilizer water. (Different seasons have different cultivation methods.)
5. Clivia leaves wrinkle and develop yellow spots
Solution: Overfertilizing causes root burn. Immediately replace soil, and use 0.1% potassium permanganate aqueous solution to soak the roots for 20-30 minutes, then rinse with clean water, air dry, cut off rotten roots, apply plant ash to wounds, and replant;
6. The two outer leaves of Clivia turn yellow (planted for 4 years)
Solution: This is normal metabolism of new layers; simply trim off the 2 outer leaves.
7. Clivia leaves appear gray-yellow
Solution: The main cause of gray-yellow Clivia leaves is excessive direct sunlight, so the Clivia needs to be shaded.
8. Clivia leaves show chlorosis symptoms
Solution: Due to insufficient light - if the room is very dark, the Clivia will become chlorotic. Solution: Use fluorescent lamps to supplement lighting.
9. Clivia leaves yellow and weak
Solution: Yellow and weak leaves indicate fertilizer deficiency. Apply thin fertilizer frequently; Yellowing leaves indicate raw soil with poor aeration. Should replace with leaf mold soil or pine needle soil;
10. Lower leaves turn yellow causing root rot
Solution:
Materials: Scissors, utility knife, chlorothalonil, rooting solution, nutrient solution, spray bottle.
Operation method:
①: Pull the Clivia out with roots.
②: Use a utility knife to cut off old leaves and rotten leaves.
③: Use scissors to cut off already rotten roots and old roots.
④: Mix water and chlorothalonil at 3:5 in the spray bottle.
⑤: Move the Clivia back into the pot.
⑥: Water with rooting solution and nutrient solution.
⑦: First water about 2 times a month for 5 consecutive months.
⑧: After 5 months, water about 4 times a month for 2 consecutive months.
⑨: Return to normal watering frequency.
⑩: Complete.
Methods to Prevent Clivia Leaves from Turning Yellow:
The main cause of Clivia yellow leaves is improper management. The causes of Clivia yellow leaves are generally the following:
1. Overwatering (water-induced leaf yellowing): When water accumulates in the pot for too long, leaves are prone to infiltrative yellowing, occurring at the tips of young leaves, with symptoms developing from top to bottom. This is the common water-yellow, caused by too frequent watering. Its characteristic is that old leaves show no obvious change while young leaves turn yellow; immediately control watering;
2. Lack of water (drought-induced leaf yellowing): When too dry, or when only half-watering each time, old leaves will develop yellow tips. Caused by water deficiency and drought, its characteristic is that old leaves turn yellow first from bottom to top. If water deficiency lasts slightly longer, the whole plant's leaves will turn yellow, or even die. Should water promptly;
3. Excess fertilizer (yellowing caused by overfertilizing): Too much or too concentrated fertilizer causes root burn, with yellow leaf tips. Caused by too frequent fertilizing or too high concentration; characteristic is that young leaves are thick, glossy, and uneven; should control fertilizer, cultivate soil, and water;
4. Element deficiency causing chlorosis (iron deficiency): If the pot soil lacks iron, leaf tips turn yellow first. If lacking nitrogen, new leaves appear yellow-white.
5. Yellowing caused by insufficient nutrients: Caused by insufficient fertilizer, low fertilizer concentration, and too long intervals between fertilizing; its characteristic is that young leaves and tender stems turn yellow first. If not fertilized promptly after seeing this phenomenon, it can also cause the whole plant's leaves to turn yellow or even die; For flowers lacking fertilizer, never apply a large amount of concentrated fertilizer at once, to avoid root burn; Woody flowers in greenhouses, due to large variations in soil fertility conditions, often show yellow leaf phenomena, characterized by obvious young leaves, lighter old leaves, yellow mesophyll, green veins, and forming a typical network; This can be solved by applying ferrous sulfate aqueous solution. The method is: mix 7 parts cake fertilizer, 5 parts ferrous sulfate, 200 parts water to make a diluted solution and water with it.
6. Sunburn disease: After strong direct sunlight (summer), leaves develop yellow spots, called sunburn disease. Under high temperature (above 30°C) and dry conditions, leaves also easily wither and yellow.
7. Pollution: Clivia leaves should be kept clean. If dirty things splash on them, the polluted areas may turn yellow.
8. Frost damage: Clivia suffers frost damage below 0°C, with the symptom still being yellow leaves. To restore normal growth of Clivia after yellowing, it is necessary to find the source and take corresponding measures. The method is: dig out the entire Clivia to check the roots. If roots are rotten, remove the decayed parts, replace with new soil and replant, with a layer of fine sand under the roots. Pot soil should be loose leaf mold soil, with pH preferably neutral. Keep soil neither dry nor wet, with good aeration. Clivia prefers weak light. Except in winter, in summer it should be placed in a semi-shaded, semi-sunny location, avoiding direct sunlight. If "chlorosis" occurs, liquid fertilizer (such as black alum fertilizer water) can be added, with the key being small amounts and frequent applications. Be careful not to splash fertilizer liquid or mud on leaves or stems; if splashed on leaves, rinse off promptly with clean water. When applying solid fertilizer, also avoid direct contact with fleshy roots.
Questions About Handling Clivia Leaf Yellowing
1. Can yellowing Clivia leaves be pruned?
The key is to figure out why there are yellow leaves.
General causes of yellow leaves include:
①Place in semi-shade for care; too much sun will scorch leaves and turn them yellow.
②Clivia has fleshy roots; keep the pot soil slightly moist. Overwatering will damage roots and cause leaves to turn yellow.
③Yellow leaves from fertilizer deficiency - Clivia needs dilute nitrogen fertilizer once every half month; in hot summer, do not fertilize to avoid root damage. Clivia yellow leaves can be pruned. Hold scissors over a flame to sterilize, then cut off the yellow leaves - but do not tear them.
2. Solutions for Clivia leaf yellowing in spring:
The Clivia went through a winter and its leaves turned yellow and withered. Will it still survive in spring?
It should be possible. Repot it - remove withered leaves and hollow roots, use Clivia-specific soil mixed with large orchid stones, soil:orchid stone = 3:2. After repotting, water thoroughly once, place in a scattered-light, ventilated area to recover for 1 month, then gradually expose to light over a week, and normal care can resume. Do not expose to strong sun.
3. Solutions for Clivia leaf yellowing in summer:
Check if you have been watering too much. Too much water easily causes root rot, leaf rot, and core rot. Water should be poured into the pot soil, not on the leaves, especially not into the central leaves. If the pot soil is often too wet, it will cause water backflow, and then as you described, leaves will gradually turn black and rot starting from the tips. Therefore, Clivia pot soil should be on the drier side. In addition, summer temperatures are high. If its growing environment temperature drops below 25°C, you can also apply dilute liquid fertilizer at 1:20 or more in summer, once every half month. This can promote Clivia growth and shorten or eliminate its dormancy period. Another situation is: too much light. Clivia prefers soft light. If exposed to strong direct sunlight, the leaf surface will become rough, leaf color will turn yellow and dark, losing its emerald green, and it is also prone to "sunburn disease." =========================================================================
Summary: Cultivating Clivia is something that requires constant summarization and constant discovery of problems. Only through careful observation and meticulous care can you grow Clivia with ornamental value. Finally, wishing fellow gardeners' Clivias healthy growth.
Common Clivia Diseases
Disease Diagnosis and Treatment
Due to inappropriate cultivation conditions, Clivia often suffers pathogen invasion and disease. Mild cases affect its ornamental value, while severe cases lead to plant death. Therefore, early diagnosis of the type of Clivia disease and timely prevention and treatment measures are very necessary.
1. Leaf wilt disease: Occurs at the tips of young leaves, with symptoms developing from top to bottom. In severe cases, the entire leaf turns yellow and withers. This disease is caused by root collar rot, also called root rot, which is a relatively serious disease caused by a fungus attacking the roots. It mainly damages the root collar and the cortex and phloem of the stem near the ground. It is a physiological disease caused by overfertilizing or overwatering. If it is from excess fertilizer, repot with fresh soil, place a layer of fine sand under the roots, and use loose leaf mold soil with neutral pH. If it is from too much water, control watering and remove yellow leaves; the plant can still resume normal growth.
2. Leaf spot disease: Yellow small spots appear on leaves, the lesions enlarge, with diameter reaching about 3-5 mm, round; lesions spread and merge into one piece, and leaves will wither and yellow. Another type has large lesions on leaves, irregular in shape, yellow-brown to gray-brown, with slight concentric rings, and later black small dots appear on the back of lesions. Both diseases are caused by poor ventilation and scale insect infestation, leading to weakened plant growth. Prevention methods: Apply 0.5% potassium permanganate solution to lesions, or spray with 50% carbendazim 1000x solution; if the disease is severe, remove affected leaves, burn them, and dry wounds with sterile absorbent cotton.
3. Bacterial rot: Pathogens invade through mechanical damage or scale insect damage, harming leaf sheaths and leaf cores. Cut off the rotten parts, dry wounds with absorbent cotton, then apply 0.02% streptomycin.
Root Rot Treatment
During Clivia division, if wounds are not disinfected and become infected by bacteria; or during cultivation, overwatering, poor soil aeration, too concentrated fertilizer, or application of unrotted raw fertilizer are all common causes of Clivia root rot. For mature large Clivia, if individual roots rot, it will show as certain leaves having dry tips, blackened blades, or scorched and falling off. Find the cause, overcome it, and stop further root rot.
When many roots rot, most leaves will fall off, leaving only the small central tongue leaves. In severe cases, the plant becomes unstable - a gentle touch with the hand makes it sway. At this point, when removed from the pot, you can see that some fleshy roots are completely rotten, and some are half rotten. Rotten roots have only a shriveled membranous outer skin left; over more time, the outer skin also soft-rots. When this is discovered, shake off all the soil, rinse the roots clean with water. Carefully remove rotten roots, use clean scissors to cut off the rotten parts. Then soak the roots in 0.1% potassium permanganate solution for disinfection. After 5 minutes, take out the roots, rinse off the disinfectant with clean water, dip in a small amount of sulfur powder or plant ash, air dry indoors, and replant in the pot. When repotting, plant shallowly - just cover the stem disc, and the pseudobulb should be exposed above the soil, which is beneficial for root development. Water thoroughly once, then place in semi-shade for care. Afterward, spray more or add a plastic film cover, keeping air humidity as high as possible, and water less. Maintain temperature around 20°C until small tongue leaves grow. At this point, new roots have emerged, and normal water and fertilizer management can resume. For young plants, roots are few and very delicate. If root rot occurs, all roots will quickly rot, and leaves will droop. When these situations occur, promptly remove the plant from the pot, clean residual debris from the not-yet-rotten stem disc, rinse, disinfect, air dry the surface, then following the cutting method, insert shallowly into plain sand. Under 20-25°C environmental conditions, provide shade, maintain high air humidity and moist cutting soil, let it develop new roots. When leaves recover vitality, promptly repot with leaf mold soil.
Common Viruses
Several common Clivia diseases include southern blight, soft rot, and anthracnose.
Southern Blight
When this disease occurs, the stem near the root develops water-soaked brown irregular lesions, the cortex soft-rots, then white silky mycelium grows and spreads across the soil surface around the roots, later forming small sclerotia, finally becoming colored rapeseed-like, expanding until the entire base rots and necroses.
Prevention methods:
1. Before potting, sterilize the culture soil. A relatively simple method is to place the culture soil at 60°C for 24 hours
2. Frequently observe the soil surface. If white mycelium is found, pick it out and burn it, and sprinkle some lime powder around the diseased area for disinfection;
3. In the early stage of disease, pour 50% carbendazim wettable powder 500x solution on the stem base and surrounding soil, once a week, 2-3 times is sufficient.
Soft Rot
Pathogens often invade through wounds. When disease occurs, light yellow water-soaked spots appear on leaves, then expand into irregular lesions, causing leaves to turn brown and soft-rot, with bacterial fluid flowing from lesion wounds.
Prevention methods:
1. Once this disease is discovered, immediately separate the diseased plant, dig open the culture soil around the plant to expose the affected area, pry open rotten diseased leaves, use a sterilized knife to scrape off rotten parts, expose to appropriate sunlight, keep ventilated and dry
2. If many plants are rotted, all diseased tissue must be cut off, soak in 5% potassium permanganate aqueous solution for 1 hour, rinse with clean water and air dry, apply plant ash to cuts, repot with new soil, place in a well-ventilated area with low temperature
3. For medication, penicillin or streptomycin or oxytetracycline plus 4000-****x aqueous solution can be sprayed or applied to lesions, with certain efficacy.
Anthracnose
This disease mostly occurs in rainy, humid and muggy seasons, and the affected parts are mostly the leaf tips and leaf edges. In the early stage, small moist brown spots appear on the leaves, then expand into oval spots and main lesions like wave crests, surrounded by yellow, and later gradually shrink and dry up. Too wet potting soil and excessive nitrogen fertilizer make this disease likely to occur.
Control methods:
1. Give the flowerpot a well-ventilated and well-lit environment; the potting soil should only be kept moist, and it should not be watered too much or too frequently. Increase phosphorus and potassium fertilizer, and control nitrogen fertilizer.
2. When signs of the disease are found, immediately spray with a solution made from 50% wettable carbendazim powder plus 800 times water, or a solution of 60% anthracnose thiram plus 1000 times water, spraying about once every 6 days; 3-5 sprays will show effect.[5]
Common pests
The common pest of clivia is the scale insect. When infestation occurs, scale insects often gather on the tender tips of the leaves, suck the leaf sap, and secrete a large amount of pathogens, turning the stems and leaves moldy black, causing sooty mold and making the leaves wither. This insect has strong reproductive capacity and can produce multiple generations in one year. A single female adult can often reproduce hundreds of offspring. If control measures are not taken in time, it can cause death.
Control methods: prevention should be the main approach. Usually, frequently check the plant body, and once pests are found, remove and treat them early to prevent spread. To control scale insects, both manual and chemical methods can be used together. If pests are found on only 1 or 2 leaf tips, manual scraping can be done, using a sharpened thin wooden stick or a bamboo pick to remove the insect bodies. If a large number of nymphs appear, spray with 25% phosmet emulsifiable concentrate at 1000 times dilution, or spray with a solution of 40% omethoate emulsifiable concentrate plus 1000-1500 times water. Generally, 1-2 sprays can kill them.
In addition, note that earthworms can also become pests of clivia. When the clivia plant is young, its fleshy roots are very tender and weak. If there are earthworms in the potting soil, they often burrow around everywhere, injuring the tender roots, destroying the clivia's ability to absorb nutrients, causing the plant to stop growing and developing or causing root rot.
The control method is: frequently check whether there are round soil granules on the surface of the potting soil (that is, earthworm excrement). If found, immediately water with a solution made from 50% dichlorvos emulsifiable concentrate plus 1500-2000 times water. If earthworms are seen moving after watering, remove them immediately; repeat the same treatment one week later, and the earthworms can be completely eliminated.
Cultivation history of clivia
In 1823, the Englishman James Bowie discovered Clivia nobilis in the Eastern Cape of South Africa and cultivated it in the private garden of Clive in Northumberland, northern England. In the 1820s, clivia began to be cultivated in European countries such as Germany, Denmark and Belgium, and was introduced to Japan in 1854.
Clivia is the city flower of Changchun, Jilin Province, China. In 1932, clivia was introduced from Japan to Changchun, China, and at first was cultivated only in the Manchukuo court and imperial garden. After Japan's defeat in 1945, clivia spread from the court to the people for cultivation.
In recent years, China has cultivated more than 160 precious clivia varieties, and it is a common flower variety in ordinary households. The flowering period is from March to April. It likes warm, humid and semi-shaded environments, is not cold-tolerant, and the loam soil should have good drainage. There are two propagation methods: division and sowing. Division is carried out in March-April; during the growing period, more topdressing is applied; in summer, which is hot and rainy, fertilizer is generally not applied. Clivia has a long flowering period and evergreen leaves, and is most suitable for indoor potted ornamental display.
Main varieties
Clivia miniata Regel
Clivia nobilis Lindl.
Clivia gardenii Hook
Clivia caulescens R.A.Dyerin
Golden-thread clivia
White-flowered clivia
What to do when clivia develops spots: spraying chemicals, changing potting soil, and reasonable fertilization are key
The effects of clivia are something anyone who has grown it should deeply appreciate. Its leaves are thick and emerald green with great ornamental value, and it also has a good feng shui effect, making it very suitable for growing indoors. However, during cultivation, for certain reasons, the plant's leaves can develop spots. So what should be done when clivia develops spots? For this, the editor has summarized 5 causes of leaf spots. Let's take a look together.
I. What to do when clivia develops spots: find the cause
As a precious flower, clivia is generally used to decorate living rooms, studies and other places for people to admire. But during cultivation, some flower lovers' clivia leaves develop small yellow or brown round spots, then gradually rot, and finally the clivia leaves or the whole plant rot away. So what should be done when clivia develops spots? The editor will explain from aspects such as water and fertilizer, light, and soil.
II. Causes of spots on clivia
1. Too much watering
Regarding the causes of spots on clivia, generally speaking there are many. First, you can check the flowerpot to see whether it has been overwatered. Because once too much water is applied and water accumulates in the potting soil, it easily causes root rot in clivia, which shows up above as spots on the leaves. At this time, you can consider changing the potting soil.
2. Improper light
Clivia likes light, but avoids direct strong light. Once the plant is exposed to direct light for a long time, or cannot receive light for a long time, leaf spots can also appear. At this time, you should place the potted flower in a place with slanting sunlight.
3. Too much fertilizer
During the growth of clivia, proper fertilization can make the plant grow better, but once too much fertilizer is applied, it will cause spots on clivia. In this case, you also need to repot it with new soil.
4. Imbalance of nitrogen, phosphorus and potassium
Too much fertilizer is not good, and too little fertilizer is also not good. Once nitrogen, phosphorus and potassium are imbalanced, especially when potassium fertilizer is insufficient, or when fertilizer directly contacts the roots during application, individual leaves will also develop spots.
5. Improper soil changing
In addition to the above points, the cause of spots on clivia may also be improper soil changing. If the potting soil is not changed for a long time, the nutrients in the potting soil decrease and disease-causing bacteria are present. At this time, once the plant has a wound, it is easily infected by bacteria and becomes diseased, resulting in leaf spots. In addition, if the replacement new soil is improper, contains pathogens, or the soil is rather raw, it can also cause leaf spots.
III. Solutions for spots on clivia
1. Pruning
Now that you know the causes of spots on clivia, the next step is to solve them. First, we should cut off the diseased old leaves and keep the tender leaves in the middle, because diseased leaves not only affect the growth of other healthy leaves but also affect the overall beauty of the plant.
2. Changing soil
To solve leaf spots on clivia, you can use the method of changing the soil. When changing the soil, wash the fleshy roots with clean water, let them dry, and then repot. If some leaves have already rotted beyond recognition, simply cut them off.
3. Spraying chemicals
If the leaf spots are caused by disease, you can spray a 500-1000 times solution of Junte, once every half month, and continuous spraying 3-4 times will show effect. However, Junte is toxic, so everyone should pay attention to safety when using it.