What to do when lily leaves turn yellow? 6 tips to adjust light, water and fertilizer
The beauty of lilies is well known, so many flower lovers grow them in pots at home. However, lilies are a rather delicate plant, and once we fail to care for them properly, they will run into problems and show symptoms of yellowing leaves. So what should you do when lily leaves turn yellow? According to the editor's summary, there are mainly 6 causes of yellowing lily leaves. Below, the editor will explain the symptoms and solutions for everyone.
1. What to do when lily leaves turn yellow: find the cause
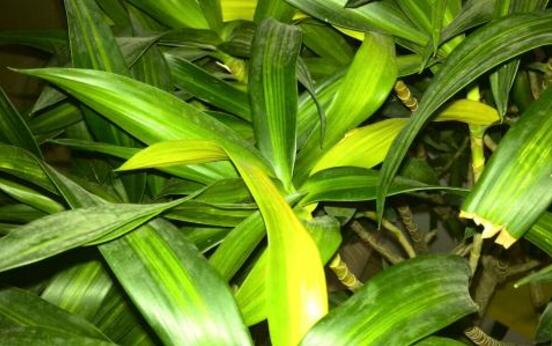
Yellowing leaves are a common symptom in plants, especially in plants grown in pots at home. Once we care for them improperly, they will develop problems. As for what to do when lily leaves turn yellow, first we need to find the cause of the yellowing, and then address it specifically. For this, the editor has summarized 6 points and attached solutions. Let's continue reading.
2. Causes of yellowing lily leaves and solutions
1. Sudden environmental change
There are many causes of yellowing lily leaves, and flower lovers should first consider environmental issues. If your lily was just bought or just transplanted, it may not have adapted to a sudden, major change in its growing environment, thus showing yellow leaves.
Solution: Ask about the lily's previous growing environment and try to keep it unchanged. Even if it must change, do so gradually so it has time to adapt. If the yellowing leaves are caused by the environment, flower lovers can place the lily in a ventilated spot to let it recover, and once the plant returns to normal, care for it in the usual way.
2. Too much or too little watering
Improper watering is one of the main causes of yellowing lily leaves. If watered too much or too frequently, the young leaves of the lily will turn yellow, while the old leaves show no obvious change; if watered too little, the opposite happens: the old leaves of the lily turn yellow from the bottom up, and in severe cases it can even cause the plant to die.
Solution: If watered too little, you must immediately water an appropriate amount, though not too much at once either; if watered too much, simply control the moisture in time. It is worth mentioning that overwatering is the most common mistake people make. This not only causes lily leaves to turn yellow, but also causes root rot in lilies. So when watering, it is better to water less than too much. After all, if it lacks water you can add more, but too much is a real problem!
3. Too much or too little fertilizer
In lily cultivation methods, fertilizing is crucial, but improper fertilizing is also troublesome, as it causes lily leaves to turn yellow: when too much fertilizer is applied, the young leaves become abnormally thick and glossy, with bumps on the surface; when too little fertilizer is applied, the young leaves and tender stems turn yellow, and if measures are not taken in time, the whole plant can eventually develop yellow leaves or even die.
Solution: When too much fertilizer is applied, reduce fertilizing or water to dilute the fertilizer concentration, and in severe cases replace the potting soil; when too little fertilizer is applied, fertilize appropriately, but do not use excessive concentrated fertilizer all at once, otherwise it will not only fail to solve the problem but also cause root burn.
4. Insufficient light
During the lily's growth process, light is essential. Once light is lacking, the lily's photosynthesis will be reduced, resulting in yellowing leaves.
Solution: Increase the light duration. It is best to move the lily outdoors in the morning and evening each day and let it bask in the sun for 2 hours.
5. Pests and diseases
When it comes to yellowing lily leaves, pests and diseases are also a point that cannot be ignored. If the yellowing is caused by insect pests, spray insecticide immediately; if it is caused by bacteria, use antibiotic medication. As for exactly which chemicals to spray, there is a detailed introduction in the pest and disease control section for lilies, so we won't go into it here.
6. Iron-deficiency yellow leaves
If the above points are ruled out, then yellowing lily leaves can only be due to iron deficiency. Under certain special circumstances, once a lily's iron content is insufficient, its leaves will turn yellow. Symptoms: the mesophyll of young leaves is yellow, and the veins form a net-like pattern.
Solution: Spray an aqueous ferrous sulfate solution, mixed in a ratio of cake fertilizer : ferrous sulfate : water of 7:5:200. It is said to have a remarkable effect on treating iron-deficiency yellow leaves.
Overall, lilies are relatively easy to grow, but because many people fail to properly control light, water and fertilizer, it affects plant growth and leads to various problems, with yellow leaves being just one of them. That's all the editor has to say about yellowing lily leaves. We hope all flower lovers can remember these methods and successfully solve such problems when they encounter them.
How to grow gardenias: uncovering yellowing gardenia leaves and failure to bloom
Among flowers, the gardenia is undoubtedly one of the more familiar ones, and people love to grow it at home, but many people aregardenia cultivation methodsnot very familiar with, resulting in many problems during cultivation, such as yellowing leaves and failure to bloom. Today the editor will introduce to everyonegardenia cultivation methodsandthe reasons for yellowing gardenia leaves and failure to bloom.
(Gardeniaplanted in the courtyard, with a strong ornamental effect)
The gardenia grows the same in all four seasons, with evergreen leaves, and when it blooms it is fragrant and elegantly simple, with white flowers appearing white, making it look especially clear and beautiful, very pleasing to people. It is often used by people for pot cultivation in courtyards, balconies and other places. It has strong environmental adaptability and can grow well in all these places, and it has strong decorative and ornamental effects. Below, the editor will explain thegardenia cultivation methodsfrom the various characteristics of the gardenia.
First, grow in acidic soil. The gardenia needs diffused light, so it likes acidic soil. If the soil is alkaline, the gardenia will be unable to absorb iron well, which greatly affects the formation of chlorophyll and further causes the flower branches to wither or even die; so its soil must be loose, fertile acidic soil, and some substances with this effect can also be added to it.
(Gardeniahas a very good decorative effect)
Second, place in a cool spot. The gardenia must never be placed in the blazing sun to bake, otherwise it will cause the leaves to turn yellow and withered, but this does not mean placing it in full shade, because it has a certain demand for light. It is best to place it where it maintains 60% light daily. In addition, after entering April, fertilize twice a month.
Third, air humidity. The gardenia likes moisture, so the air must not be too dry. According to expert statistics, if the air humidity is below 70%, it will affect the normal opening of the flowers, but if it is too humid, it will cause root and stem rot and yellowing leaves. So in addition to normal watering, also frequently spray clean water nearby. Another point to pay great attention to is that water must not be applied too much, otherwise it will also affect growth. So how should the gardenia be watered?
a. When you see the soil is dry, tap the flower pot with your hand. If there is a hollow sound, it needs watering. Stop when the bottom of the pot starts to leak water. It is best if the water used can have some egg or soybean milk added, as this is more conducive to growth.
(In full bloom,gardenia, a different kind of beauty)
Fourth, key points for fertilizing. The gardenia likes fertilizer, but too much fertilizer must not be added all at once. Be sure to apply thin fertilizer frequently, and never be lazy for convenience, otherwise it will cause thick branches, large leaves and dark green color, and it will lose its own ornamental effect.
Fifth, temperature requirements. The gardenia's growing temperature must not be too low, because it likes warmth. Generally speaking, the ideal growing-season temperature is 18 to 22 degrees, and 5 to 10 degrees in winter. If it is below minus 10 degrees, it will suffer frost damage, and the north must pay special attention to this.
Sixth, proper pruning. The gardenia very easily grows lush and leafy, creating a feeling of being impenetrable and chaotic. This causes nutrients to be dispersed and reduces ornamental value, so it needs pruning. When pruning, it is best to keep 3 main branches, and at any time cut off new shoots sprouting from root suckers. After the flowers fade, the branches should be cut short in time, so that new branches will sprout below the cut. When the new branches grow three nodes, pinch them back to prevent blind growth.
(Thegardeniashould be placed in a sunny spot)
Seventh, disease prevention. Usually the gardenia diseases we see are of four kinds:
a. Iron deficiency, this is the most common one. Iron deficiency affects the formation of chlorophyll and then makes the leaves lose their green color. At this time, ferrous sulfate water and low-concentration black alum water can be used, three times a month.
b. Magnesium deficiency. Magnesium deficiency causes the veins of the lower old leaves of the gardenia to turn yellow. At this time, a low-concentration magnesium sulfate solution should be sprayed.
c. Soil too wet or too dry, this can refer to point three
d. Sun baking, this can refer to point two.
Eighth, propagation methods. The gardenia generally has two propagation methods: cuttings and layering
a. Cuttings: in the plum rain season, use tender branches 15 cm long, insert them in a seedbed, and they root in 10-12 days
b. In April, select two-year-old branches 2O-25 cm long, press and bury them in the soil, keep them moist, and they root in about 3O days. Separate them from the mother plant in summer, and plant them separately the following spring.
Causes of yellowing gardenia leaves
First, improper moisture
a. Overwatering: in this case the tender leaves of the gardenia are dull yellow and lack luster, but the old leaves show no obvious change. At this time, just take the plant out of the pot and place it in a ventilated, cool spot, and put it back after the soil dries.
b. Lack of water: the leaf tips or edges become withered and dry, and the old leaves wither, yellow and fall from the bottom up, but in this case the new leaves grow relatively normally. At this time, water sufficiently and thoroughly.
(Gardenialeaves turn yellow, there are many causes)
Second, improper light
a. Too much light: yellow spots appear on the sun-facing part of the leaves. At this time, simply move it to a shaded spot for care and it will recover, and newly grown leaves will no longer have yellow spots.
B. Insufficient sunlight: at this time the leaves will turn yellow or even fall off. Simply place it under the sun to supplement sunlight.
Third, improper fertilizing
a. Too much fertilizer: mainly shown by brown tips on new leaves, thick and lusterless leaf surfaces, and scorched, yellow, falling old leaves. At this time, stop fertilizing immediately, and in severe cases also rinse the soil to lower the concentration. b. Insufficient fertilizer: insufficient fertilizer can also cause the plant to turn yellow, for example iron deficiency, where the leaves are pale yellow or white while the veins remain green. At this time, spray 0.2%-0.5% ferrous sulfate water for control; magnesium deficiency, where the old leaves turn yellow first, then the new leaves turn yellow, while the veins remain green. At this time, spray 0.7%-0.8% boron-magnesium fertilizer for control.
Fourth, temperature too low. Too low a temperature can also cause leaf yellowing. Simply move it to a warmer place.
Causes of gardenia failure to bloom
First, improper water and fertilizer. Once water and fertilizer are excessive, it will cause the plant to grow leggy. If reproductive growth lacks enough nutrients, it will affect flower bud formation, leading to failure to bloom or very few blooms, and some that do bloom may even fall off immediately. During the flower bud differentiation stage, pay special attention to the combination of phosphorus and potassium fertilizers, such as a 0.2% potassium dihydrogen phosphate solution, which is beneficial to flower bud formation and budding; if fertilizing is too concentrated during the budding stage, or watering fluctuates too much, it will also cause flowers and seedlings to drop.
(Gardenianever blooms, you should pay attention)
Second, unsuitable light. The gardenia likes shade, and special attention must be paid to the overly strong light in summer and the overly weak light in winter. Light that is too strong or too weak will affect the gardenia's blooming.
Third, soil with high alkalinity. The gardenia likes acidic soil. If the soil for cultivating the gardenia has high salt and alkali content, it will cause the plant to become chlorotic and ultimately affect blooming.
Fourth, no pruning or shaping,the gardenia's branches are messy, and a large number of stray branches consume a large amount of nutrients, while overly dense branches affect photosynthesis. Both are important reasons for failure to bloom.
Fifth, severe pests and diseases,this I believe everyone can understand. Severe pests and diseases will inevitably cause flowers and buds to drop.
MethodsHow to grow narcissus recommended cultivation methods for narcissus
More plants:
[Dracaena fragrans][Dieffenbachia][Dracaena][Fatsia japonica][Nandina][Ivy][Epiphyllum]
[Spider plant][Winter jasmine][Cymbidium][Aglaia][Crinum lily][Magnolia][Peace lily][Anthurium]
[Bird of paradise][Hydrangea][Dahlia][Cineraria][Clematis][Lantana][Pansy][Daphne]
[Tulip][Night-blooming jasmine][Tuberose][Hibiscus][Kalanchoe][Gerbera][Mimosa][Campanula]
[Water lily][Casa Blanca lily][Hydrangea][Red maple][Japanese maple][Salvia][Iris]
What measures should be taken after the leaves of the peace lily turn yellow?
Content summary: The peace lily, scientific name Spathiphyllum, recorded in the Araceae family, is an angiosperm, also known as spathe lily, white sail, lily intent, etc. Cultivation is relatively complex. What measures should be taken after the leaves of the peace lily turn yellow?
[Peace lily leaves turn yellow]
Causes of yellowing
Waterlogging: The peace lily is a warmth-loving plant. Watering too much in daily care causes water to accumulate in the pot, which then leads to yellowing leaves. At this time it mostly occurs on tender leaves, while old leaves over one year old show no obvious change, and the new branches and leaves first shrink, then turn yellow, and finally wither, which can also affect the whole plant.
Drought: Leaf yellowing caused by lack of water mostly shows as withered, dry leaf edges, but it mostly affects old leaves, which begin to wither and turn yellow from the bottom up, while new leaves show no change in the short term.
Sunburn: Sufficient light absorption and being kept under the blazing sun for too long can also cause yellow leaves. Because the peace lily is a shade-loving plant, and too much light will cause its flowers and leaves to wither and dry, first showing yellow spots on the leaves, which can spread and also infect others. But at the same time, insufficient daily light can also cause leaves to turn yellow, mostly showing as the whole plant's leaves turning yellow, which may then fall off.
Over-lush growth: This cause of leaf yellowing is mostly due to inadequate daily pruning, causing branches and leaves to be too dense, while the roots and the center of the root stem fail to receive enough nutrient elements in time. The lack of leaf green causes yellowing and falling off.
Insufficient nutrition: Insufficient nutrition is mostly due to daily water and fertilizer issues. Lack of fertilizer will show as new leaves becoming pale in color, lacking freshness, and their color changing from green to yellow.
Pest and disease damage: In peace lily cultivation, the most common disease is leaf spot, and leaf yellowing caused by pests and diseases also includes anthracnose, brown spot, etc. These are mostly caused by inducing scale insect parasitism. After attaching to the peace lily's flowers, branches and leaves, they transmit the virus, and after the leaves turn yellow, they mostly die.
Solutions
1. After the leaves turn yellow, first observe whether root rot has already appeared. For severe cases, the soil and pot need to be replaced, because after root rot appears, the soil can no longer provide nutrient elements and the roots have difficulty breathing. But after replacing the soil, avoid direct sunlight, and the soil should be kept loose.
2. You can determine the cause of the plant's yellowing. If it is due to overly dense growth, you can directly use division, which can both improve the yellowing and achieve the purpose of propagation.
3. If the plant's yellowing is too severe and caused by infectious disease, it is recommended to discard it. In this case, even replacing the soil and pot will be difficult to improve.
4. If the peace lily's leaves turn yellow due to excessive environmental moisture, or because the environment is too dry, you can spray water on the leaf surface, and in the short term avoid watering the roots. You can also wrap the yellowing peace lily leaves in a plastic bag, but when the climate is suitable, it needs to be opened for the plant to breathe. This method can, because of the increased internal temperature after wrapping, have a certain inhibitory effect on leaf diseases.
5. If yellowing at the leaf tips is caused by a lack of soil nutrients, you can carry out soil replacement, or apply nutrient elements to the soil to adjust the soil's acidity and alkalinity. After the plant absorbs nutrients, the yellowing can be avoided.
6. For leaf yellowing caused by too much light, it should be discovered in time, and moisture-retention treatment should be applied. Move it indoors, or directly protect the leaves with moisture, and move it away from the blazing sun in time. But if it is still left under the blazing sun for a long time, the leaf yellowing will worsen and ultimately cause death by withering.
7. Improve care details in time, such as when fertilizing, avoid contact with farmyard manure or raw manure, and after applying solid fertilizer, water with clean water in time, or dilute the fertilizer before irrigation. This not only aids absorption, but can also improve the yellowing of peace lily leaves caused by improper fertilizing.
8. For leaf yellowing caused by scale insects, yellow spots often appear on the leaves of the peace lily. In this case, you can choose to use carbendazim, simply dilute it and spray an appropriate amount, which can help remove the pests and diseases and also serve as a preventive measure.
Prevention methods
1. During routine care, adopt a scientific approach to watering and fertilizing to avoid plant disease caused by excessive or insufficient water and fertilizer. At the same time, regarding light, the peace lily is suited to gentle light; intense light easily causes scorching.
2. Mostly from May to September each year, peace lily plants develop yellow leaves because the environment is too dry, so the soil needs to be kept moist and the surface should be misted. Avoid deep watering, and fertilizing should be kept at twice a month. Until November, the plant then needs to be moved indoors to avoid spending the winter outside.
3. Learn the correct methods for growing peace lilies and pay attention to daily details, which can avoid disease, death, and leaf yellowing caused by incorrect care methods.
Summary: The causes of peace lily leaf yellowing, solutions, and prevention methods are introduced above. You should pay attention to the daily growing environment, and secondly, pay more attention to cultivation techniques, which is more conducive to growth.
[More related information] Oil tea cultivation Fountain bamboo pictures Arrowhead pictures The harm of eucalyptus What is the flower language of the water lily Bauhinia tree price