5 techniques for root-exposure on potted Serissa japonosa, get the concept right for greater ornamental appeal
Serissa japonosa, also known as "stars in the sky", though small in size, has well-spaced branches and leaves, making it an excellent target for bonsai, and especially the most suitable species for root-exposure styles. What is root exposure? It means exposing the plant's roots to increase the ornamental effect. So how do you expose the roots of a potted Serissa japonosa? Below are 5 techniques summarized by the editor, very simple, everyone can give them a try~
1. How to expose the roots of a potted Serissa japonosa, the concept is key
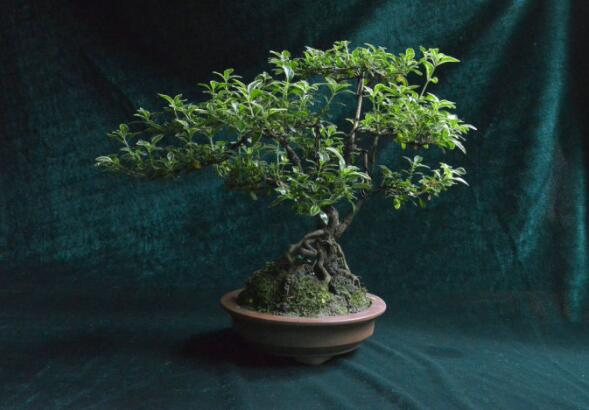
Root exposure on Serissa japonosa is easier said than done, and actually quite difficult to pull off. Of course, the difficulty is not in the method, but in making the Serissa japonosa bonsai look good! So for how to expose the roots of a potted Serissa japonosa, the concept is key: first decide the shape in your mind, then expose the roots. But before learning the root-exposure methods for Serissa japonosa bonsai, let's first look at a common root-exposure method from everyday life:
Deep pot, high planting, mounding soil root-exposure method
Prepare a deep pot and plant the tree stump in it so that the main root and side roots rise above the pot surface. Then mound soil around the base of the roots into a steamed-bun shape, keeping the roots covered. After one year, scoop away the surface soil, then every six months to a year scoop away another layer, until the roots gradually become exposed above the soil surface. After 2-3 years, combined with repotting, raise the roots upward year by year until the roots are bare and the effect is achieved.
2. Root-exposure methods for Serissa japonosa bonsai
Materials: a surviving tree stump
1. Repotting
In spring and autumn, take the Serissa japonosa plant out. Method: lay the flower pot on its side and tap it appropriately, so the whole plant can be removed easily. Then clean the soil to expose the roots. Note that the soil sticking to the root sections should be kept; never remove it, as it helps with root exposure.
2. Concept, sketch a draft
For how to expose the roots of a potted Serissa japonosa, the concept is very important. First, we must carefully observe the growth characteristics of the Serissa japonosa roots, then conceive it in our mind, and only after determining the form start working on it.
Editor's tip: to improve efficiency, you can first draw a draft, then follow the drawing, and you will get twice the result with half the effort.
3. Root pruning
Once the overall shape is conceived, it is time to start pruning the roots. First, keep the thick roots, and promptly remove dead or weak roots. Then, according to the draft, bind with palm fiber, either tying, merging, connecting or separating, and appropriately use stones to block, to achieve a satisfactory effect. In the Chinese root-exposure method for Serissa japonosa bonsai, root pruning is best kept simple and clear, able to highlight the main subject.
4. Potting
Flower pot: in the root-exposure method for Serissa japonosa bonsai, choosing a good pot is also very necessary. It is best to use a purple clay pot, and the color should not be too bright, to avoid the pot overshadowing the plant.
Potting soil: according to the cultivation method for Serissa japonosa, we should choose a sandy loam rich in organic matter, loose and fertile, with good drainage and aeration.
Potting: cover the drainage hole with a plastic mesh or tile piece, which helps drainage, then pour new soil as the base soil into 1/3 of the pot body, and add new soil. Next, place the prepared Serissa japonosa in, add original soil and firm it, noting that the soil must be tightly combined with the roots.
5. Root descent
For how to expose the roots of a potted Serissa japonosa, after completing the above steps, it is basically done. Then water with settling water, and it can be placed for management. Wait until new leaves grow and the roots have grown deep enough, then you can water with a strong stream. Step by step like this, after about three months, the upper soil will gradually be washed lower, the roots will become increasingly exposed, and the effect of exposed roots and visible claws will begin to show.
Note: do not fertilize
After root exposure on Serissa japonosa, be sure to remember not to fertilize. If you want to fertilize, wait until after three months, because too much fertilizer easily causes leggy branches and leaves, ruining the shape! During this period, you can appropriately prune the upper leaves; lean cultivation favors rooting. As for how to prune Serissa japonosa, it was introduced in detail earlier, so I won't say more here.
The above are the detailed steps for root exposure on Serissa japonosa. I wonder if everyone has learned them? Overall, Serissa japonosa has quite strong vitality, so as long as you are careful during operation and have the draft drawn well, you can basically create a beautiful Serissa japonosa bonsai~ So what are you waiting for? Get started now!
How to expose the roots of a potted Serissa japonosa
1. Repotting
When taking the whole Serissa japonosa plant out, remember to lay it on its side and tap it appropriately. Note that part of the soil sticking to the roots must be kept. Some people think keeping the original root ball intact is best, but it is still necessary to appropriately inspect the root hairs. So, to be safe, only part of the original root ball needs to be kept.
2. Concept
Carefully observe the growth characteristics of the Serissa japonosa plant's roots and determine the specific form. The best is naturally to be good from every angle. However, the natural growth form of plants cannot always be ideal. Therefore, if you cannot achieve perfection on all sides, you can focus on the front and also take the sides into account. Determining the front also requires skill: the best viewing side, determined in coordination with the roots, is the front. To improve efficiency, you can establish the concept by drawing a draft or conceiving it in your mind in advance.
3. Root pruning
After gaining a fairly detailed understanding of the Serissa japonosa root system, you can begin pruning. Thick, strong roots can be kept, while dead or weak roots should be promptly removed. According to the concept, bind with palm fiber, then appropriately use stones and other objects to block, to achieve the best effect. In this step, simple and clear is best, able to highlight the main subject.
4. Potting
It is recommended to use a purple clay pot and a fertile sandy loam rich in organic matter. When potting, remember to cover the drainage hole with a tile piece to help drainage. Next, pour new soil as the base soil into one third of the pot body, add more new soil, then place the already prepared Serissa japonosa in, add original soil and firm it, noting that the soil must be tightly combined with the roots.
5. Root descent
After watering the Serissa japonosa with settling water, it can be placed for management. Wait until new leaves grow and the roots have grown deep enough, then you can water with a strong stream. After about three months, the upper soil will gradually be washed lower, the roots will become increasingly exposed, and the effect of exposed roots and visible claws will begin to show.
The above are the detailed steps. Also note that because Serissa japonosa grows vigorously, applying fertilizer will cause leggy branches and leaves and ruin the shape. So remember, within three months absolutely do not fertilize the Serissa japonosa; after three months, appropriate fertilization is fine.
Root exposure of Serissa japonosa bonsai
The characteristic of Serissa japonosa is a well-developed root system and easy, rough management. You should make something of root exposure; it is more interesting than ordinary Serissa japonosa bonsai with unexposed roots. I have a flower friend who last year gave me several double-flowered Serissa japonosa plants grown in June and July; all survived after potting. To expose the roots, this spring I took the plant out together with its soil ball, removed the tile piece under the soil ball, and re-laid it at the bottom of an empty pot (changing to a new pot is also fine). I filled new soil to about 2/3 of the empty pot, placed the original plant with its soil ball into the soil-filled pot, and firmed and pressed it well, which favors root growth. The original soil ball was already higher than the pot surface. For convenience in watering, remove some of the new soil at the pot edge, leaving just enough depth for a water rim. When watering, water several times to soak the soil ball thoroughly. As time goes on, the old roots gradually grow into the new soil. After about four months of washing, the old roots of the original soil ball gradually become exposed, until the pot soil drops to the position of the water rim. Through the above management, the roots have all become deeply exposed, with hanging roots and visible claws, full of delightful interest. Before starting to work, first rotate the pot and observe from all sides, noting the relationship between the root form and the trunk and branches, and choose the best viewing side. "Concept before brushstroke" - carry out comprehensive conception and determine the form. Keep thick, strong roots and cut away thin, small roots. You can appropriately use single palm fiber or thin iron wire to carry out artistic processing by tying, connecting, merging, separating and cutting, achieving the form you imagine and can achieve. The fewer roots and plants kept, the simpler and better, which can reduce root water consumption, help concentrate nutrients, promote thick and strong roots and trunks and lush leaves, and also make observation easier, highlighting the root form. The processing and making of the roots is then complete. After the roots are set in shape, begin shaping the trunk and branches. Note that the total height of the trunk can only occupy 1/2 or 2/3 of the root height. Only by making it in this proportion can the role of the root form be highlighted. The trunk is like a person's body. Therefore, binding and shaping the trunk and branches is the sublimation of the bonsai's artistic conception, expressing antique vigor and vigorous vitality. As for the making method, determine the direction and variation of the tree form according to the root form, so that the trunk and branches and the root form merge into one. Following the Yangzhou style principle of "follow the bend with a bend, build momentum with momentum, and go with nature", I first used palm rope to bend and set the trunk, first the "top pad" (round shape), then the "bottom pad" (palm shape). Afterward, the other pads were made in order. The "cloud pads" should be well staggered, with the pads bound with iron wire, spaced with both density and openness, flat and spectacular, completed in one continuous effort. (See the picture.) Through artistic conception and careful making, reproduce the style of nature in a tiny pot, inspire people to strive upward, and devote themselves to the cause of the Four Modernizations. Maintenance is the key to keeping a bonsai's ornamental value. In management and maintenance, be patient and meticulous, strengthen pruning and shaping, so that it is full of vitality and spring warmth. Placed on a windowsill or desk, it looks very elegant.