How many years can a Serissa japonica bonsai live? Pruning is key in the creation method
Serissa japonica, a very beautiful flowering plant, has a graceful form and is overall short, making it an excellent choice as a bonsai placed indoors. In life, we value the saying: help yourself and you will have plenty. Since the Serissa japonica bonsai is so beautiful, have you ever thought about making one yourself? However, bonsai creation is not a simple task. Next, let me introduce the method for making a Serissa japonica bonsai.
I. How many years can a Serissa japonica bonsai live? Up to 20 years
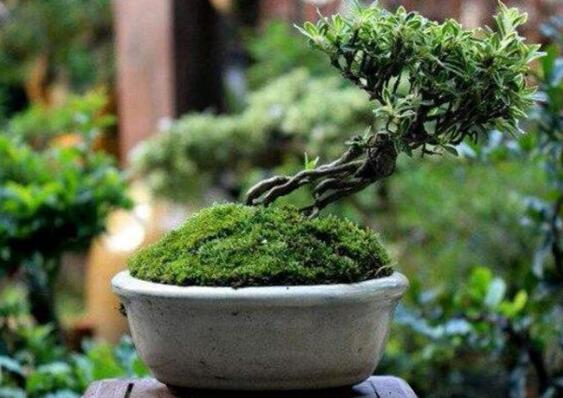
As a deciduous small shrub, Serissa japonica is very easy to manage. If you follow the cultivation methods for Serissa japonica, its lifespan is generally quite long. As for how many years a Serissa japonica bonsai can live, it mainly depends on care. Some die within a year, while others can live for 20 years! Below, we focus on introducing the method for making a Serissa japonica bonsai.
II. Method for making a Serissa japonica bonsai
1. Bonsai types
Before learning the method for making a Serissa japonica bonsai, we first need to know its bonsai types. It is understood that the branches and trunk of Serissa japonica are soft yet tough, very tolerant of pruning, and can withstand wiring. Under these conditions, Serissa japonica bonsai styles have also become diverse, mainly three types: straight trunk style, twisted style, and cascade style.
In life, many flower enthusiasts choose the cascade style, which generally requires a taller pot. Depending on the degree of tilt, the cascade style is divided into three types: semi-cascade, where the trunk basically extends horizontally out of the pot rim; full cascade, where the trunk hangs down 45 degrees below the pot rim; and small cascade, where the trunk generally hangs down about 30—40 degrees.
2. Bonsai creation
Having understood the bonsai types, we now formally begin making the Serissa japonica bonsai. Specifically, it can be divided into three steps: collecting the stump, processing, and transplanting.
1. Collecting the stump
You can use the propagation methods for Serissa japonica, dividing in March, or taking cuttings from April to October. Generally speaking, Serissa japonica can take shape in three years and become a scenic bonsai in five years, at which point you can collect the stump as the foundation for the Serissa japonica bonsai. In addition, in the southeastern and central provinces and regions of our country, you can also dig up wild tree stumps from the field for cultivation and processing.
2. Processing
Once the source of the stump material is settled, the next step is processing to create the shape that flower enthusiasts want. You can use the "wood-accumulating trunk-cutting method" or the "combining pruning and wiring method" to process the stump material. Next comes wiring, which is often carried out from after Serissa japonica partially loses its leaves in winter until before budding in spring. The main trunk and main branches are wired with metal wire, and the small branches are shaped through fine pruning.
Wiring: a shaping method of Hui-style bonsai. Coarse wiring is the process of using palm rope, palm fiber, palm strips, and metal wire to wire the main trunk and large branches of the shaped plant, forming a supple and curved posture.
3. Transplanting into the pot
Following the above steps, the making of the Serissa japonica bonsai is almost complete, with only transplanting into the pot remaining: it is best done in February-March, and can also be done during the plum rain season and late autumn.
4. Pot and soil selection
Flower pot: For the Serissa japonica bonsai, it is best to use a relatively shallow rectangular or oval pot. For the material, purple clay pottery pots or glazed pottery pots are preferred, and the color should be dark.
Soil: According to the growth habits of Serissa japonica, you can choose leaf mold or pond mud that has been sun-dried and frozen loose as the potting soil. Line the bottom of the pot with a layer of river sand and leaves, then transplant the seedling into it in early spring or late autumn. When planting, part of the long roots can be cut off.
5. Care and pruning
After the Serissa japonica bonsai is made, the next step is later care. You should repot once every 1-2 years, in spring from February—March or in late autumn, discard all the old soil, and appropriately prune the roots. You can combine repotting with raising the roots to form exposed roots and increase ornamental value. As for how to prune Serissa japonica, it has already been introduced above, so I will not say more here.
Overall, Serissa japonica is very easy to grow and is very suitable as a bonsai placed indoors for people to appreciate. However, making a Serissa japonica bonsai is not a simple task, so everyone should act according to their ability. Of course, the experienced ones can begin your performance. Finally, may everyone be able to create a beautiful Serissa japonica bonsai.
How to prune Serissa japonica, pruning methods for Serissa japonica bonsai/prune in April, bloom in June
Serissa japonica, a plant very suitable for bonsai, has an excellent ornamental effect when grown at home. Growing Serissa japonica is very simple, but making it look good is not an easy task, because pruning is involved. So how do you prune Serissa japonica? Next, let the editor tell you the pruning methods for Serissa japonica bonsai. Those who do not know how should definitely take a look~
I. How to prune Serissa japonica, timing/methods
If you want your home's Serissa japonica bonsai to look good, flower enthusiasts must prune it! It is understood that Serissa japonica has strong sprouting ability and is very tolerant of pruning, and its branches and trunk are soft, twisted, and irregular, so you can use your imagination and prune boldly to create the shape you like! As for how to prune Serissa japonica, we can explain it in detail from timing and methods.
(1) Pruning time for Serissa japonica
To prune Serissa japonica perfectly, you must first choose the right pruning time. Based on the information compiled by the editor, Serissa japonica is best pruned twice a year: once in mid-April, which helps it bloom in June after pruning; the second time after the flowers fade (after July), cutting off the branch tips that have already bloomed to encourage new buds to sprout. New buds growing from residual stems and roots at the base, as well as overly dense branches, should be cut off at any time.
(2) Pruning methods for Serissa japonica bonsai
1. Pruning parts
In the pruning methods for Serissa japonica bonsai, we first need to know the pruning parts: protruding growth, densely growing parts, and parts affected by pests and diseases should all be pruned. Simply put, shorten long branches, thin out dense branches and leaves, and directly cut off parts with pests and diseases to avoid spreading and affecting growth.
Note: During the growing season, you should also timely pinch off growing tips, remove buds, and remove side branches to maintain a graceful shape. Healthy branches that are cut off can be used for cutting propagation. As for how Serissa japonica is propagated, it was introduced in detail earlier, so I will not say more here.
2. Pruning methods
In the Serissa japonica bonsai, select about 5 branches as the main trunks, and cut off the excessively vigorous growth at the bottom. During growth, if the main trunk also grows too long, cut off the tips of the branches on the main trunk.
In addition, we must continuously cut off old branches and dense branches growing from the roots, as this helps root growth and prevents other parts from absorbing light. Old branches and trunks should be cut flat at the place where new buds grow from the stem and root, without leaving a stump, and then use your hands or a small knife to remove branches that sprout during the growing period.
3. Shaping and pruning
As mentioned earlier, Serissa japonica is very tolerant of pruning, so flower enthusiasts do not need to worry about pruning it badly. Every year from after it partially loses its leaves in winter until before budding at the start of spring, one shaping and pruning should be carried out: shorten long branches and excessively vigorous branches, thin out overly dense fine weak branches, and cut off diseased and pest-affected branches as well as other messy branches that affect the ornamental effect.
4. Repotting and pruning (roots)
In the cultivation methods for Serissa japonica, we once mentioned that Serissa japonica should be repotted once every 1-2 years, generally in spring from February to March. At this time, you can combine repotting with appropriate pruning of the plant's roots to form exposed roots and increase ornamental value.
5. Pruning and shaping
The branches and trunk of Serissa japonica are soft, twisted, and irregular. Based on these characteristics, you can prune it into various shapes, such as curved trunk style, slanting trunk style, cascade style, forest style, and so on, and shape it according to personal preference.
III. Precautions for pruning Serissa japonica bonsai
1. Pruning principles
After knowing how to prune Serissa japonica, there are still some points we need to note. First, when pruning Serissa japonica bonsai, we should grasp the principle of "prune strong main branches lightly," so as to conveniently regulate the growth of the main branches; for side branches, adopt the principle of "prune strong side branches heavily and weak side branches lightly," in order to regulate branch vigor and promote flowering.
2. Do not prune frequently
In addition to mastering the pruning principles, another point to note is: do not prune frequently over the long term, otherwise it will cause newly grown young branches to shrivel and become diseased, affecting the growing shape.
Method for making a Serissa japonica bonsai. Care methods for a Serissa japonica bonsai
The branches and trunk of Serissa japonica are soft and flexible, able to withstand wiring, and very suitable for viewing as a bonsai. Many households have Serissa japonica bonsai. Placing a Serissa japonica bonsai on the coffee table, desk, or windowsill in the living room makes the whole room appear fresh and elegant. Below, the editor will introduce the method for making a Serissa japonica bonsai and also let you enjoy pictures of Serissa japonica bonsai.
Method for making a Serissa japonica bonsai
Source of Serissa japonica bonsai plants: Serissa japonica plants suitable for bonsai can be obtained by dividing the mother plant in March, or by cutting propagation from April to October.
Potting soil for Serissa japonica bonsai: The potting soil for Serissa japonica is required to be sandy loam rich in organic matter, loose and fertile, and with good drainage and air permeability. For the flower pot, a relatively shallow purple clay pot or glazed pot can be used, and the pot color should be slightly darker, which can form a contrast with Serissa japonica and increase ornamental value. Potting Serissa japonica is suitable in February-March.
Light and temperature requirements for Serissa japonica bonsai: Serissa japonica likes a sunny, warm and humid environment with good ventilation. In early summer and early autumn, 50%-70% shade should be provided, and in winter in the north, the room temperature should be maintained at 5-12°C.
Water and fertilizer requirements for Serissa japonica bonsai: During the growing season of Serissa japonica, it should be watered frequently. In summer, spray water on the leaves of Serissa japonica 1-2 times a day to increase air humidity. In winter, reduce the frequency of watering and keep the potting soil moist and slightly dry. Serissa japonica likes fertilizer, but each fertilization should not be too concentrated. Every year in April-May, apply 2-3 times a 0.5% concentration phosphorus-potassium fertilizer solution to Serissa japonica. In the depths of winter, apply 1-2 times a dilute organic fertilizer solution as a top dressing. Fertilization is not suitable in other seasons.
Care methods for Serissa japonica bonsai
Repotting and pruning: A Serissa japonica bonsai needs repotting once every 1-2 years, carried out in spring from February to March or during late autumn. First, remove all the old soil from Serissa japonica and appropriately prune the roots. You can combine repotting with raising the roots to form exposed roots and increase ornamental value.
Every year from after Serissa japonica partially loses its leaves in winter until before budding the following spring, shaping and pruning should be carried out: shorten long branches and excessively vigorous branches, thin out overly dense fine weak branches, and cut off diseased and pest-affected branches as well as other messy branches that affect the ornamental effect. During the growing season of Serissa japonica, timely pinching off growing tips, removing buds, and removing side branches can maintain the graceful shape of the Serissa japonica bonsai.
Pest and disease control: Serissa japonica bonsai rarely suffers from pests and diseases, but aphids and snails occasionally occur. Aphids can be killed by spraying a 500-600 times diluted essential balm solution; snails can be killed by spraying a 1500 times diluted 58% Fengleiji emulsifiable concentrate. Sometimes it may get root rot. At the initial onset, use a 600-1000 times diluted 12% copper abietate emulsifiable concentrate, or a 800 times diluted 50% Genfuling solution to drench the roots and spray the leaves for control, spraying (drenching) once every 3-5 days, for 3-4 consecutive times.
The method for making a Serissa japonica bonsai has been introduced here. The editor also introduced the care methods for a Serissa japonica bonsai, hoping to help everyone. Placing a Serissa japonica bonsai at home not only brings infinite beauty to our home, but also brings us a fresh and elegant fragrance.