Causes of Root Rot in Spider Plants and How to Fix It, with Watering and Fertilizing Being Key
What Causes Spider Plant Root Rot
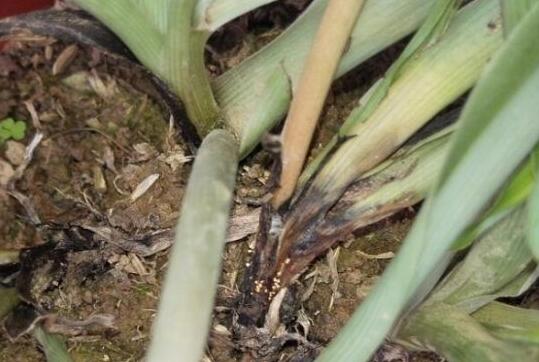
Root rot is clearly not a normal phenomenon, so what causes spider plant root rot? According to statistics, there are mainly three causes: overwatering, overfertilizing, and poor soil aeration. So you need to investigate the specific cause from these three aspects.
1. Overwatering
Spider plants need water to grow, but overwatering keeps the roots soaking in water for a long time, and over time this causes the roots to rot. Think about whether water often accumulates in the pot during your own growing process; if it does, that means this is the cause of the root rot.
2. Overfertilizing
When growing spider plants, fertilizing is essential, but when we fertilize too much, it not only causes the leaves to turn yellow but may also lead to root rot. We have previously covered what to do about yellowing spider plant leaves, so what should you do about spider plant root rot? Reducing the amount and concentration of fertilizer is key.
3. Poor Soil Aeration
Poor aeration can cause two problems: the water you pour in cannot be absorbed by the lower roots, and when you water too much, the water cannot drain out through the holes in the bottom of the pot. If you find that the upper roots are rotting while the lower roots are normal, then poor aeration is very likely the cause.
What to Do About Spider Plant Root Rot
1. Take the Spider Plant Out of the Potting Soil
When root rot appears, you should first dig the spider plant out of the potting soil, cut off the roots that have already rotted, and then disinfect the roots.
2. Disinfect the Roots
Disinfect the roots with a potassium permanganate solution or a carbendazim solution, which can be purchased from a professional source. If you do not have the appropriate medicine, you can first rinse the roots with clean water and then put them in a ventilated place to dry. Never place them in direct sunlight.
3. Replant
After disinfecting the roots, you need to transplant the plant into new potting soil. For the specific steps and methods, you can refer to the growing methods and precautions for spider plants.
4. Later Care
After replanting, be sure to change your care methods and avoid the root rot that occurred before from happening again. Therefore, when watering, take care not to overwater, and when fertilizing, also take care that the concentration is not too high. The soil should mainly be a sandy type with good aeration.
What to Do About Root Rot in Variegated Spider Plants: Proper Water and Fertilizer, Cut Off the Rotten Roots, Change the Potting Soil and Replant
The variegated spider plant is the most beautiful of the spider plants, with slender, drooping leaves and yellow-white longitudinal stripes in the middle, very beautiful and elegant. But once a variegated spider plant develops root rot, its leaves will show all kinds of problems, which affects the overall ornamental value of the plant. So what should you do about root rot in variegated spider plants? For this, we have summarized three causes. Let us take a look together!
I. Root Rot in Variegated Spider Plants: Find the Cause
Among spider plant varieties, the variegated spider plant is relatively harder to grow, and combined with its characteristic of liking moisture but fearing waterlogged soil, many beginners often run into root rot when growing it. And once the roots have rotted, the variegated spider plant naturally cannot grow well and may even die. So finding the cause of root rot in variegated spider plants is key. For this, we have summarized three points: overwatering, overfertilizing and unsuitable soil.
II. Causes of Root Rot in Variegated Spider Plants and How to Fix It
(1) Causes of Root Rot in Variegated Spider Plants
1. Overwatering
The variegated spider plant likes a moist environment, so we need to water frequently to keep the potting soil moist. But for many flower enthusiasts, watering is simple, yet the amount is hard to gauge, and overwatering often happens. Once water accumulates in the pot, the roots soak in water for a long time and will rot before long.
Remedy: After discovering that you have watered too much, regardless of the state of the root rot, first move the potted variegated spider plant to a ventilated place with good but not intense light so the water evaporates quickly.
2. Overfertilizing
When growing variegated spider plants, fertilizing is essential, but when we fertilize too much, it not only causes the leaves of the variegated spider plant to turn yellow but may also lead to root rot.
Remedy: If you find that overfertilizing has caused poor plant growth, flower enthusiasts should immediately irrigate with water so the fertilizer is diluted and then drains out from the bottom of the pot.
3. Unsuitable Soil
Besides watering and fertilizing causing root rot in variegated spider plants, unsuitable soil is also a point that cannot be ignored. Once the potting soil has poor aeration, it causes two situations: first, the water you pour in cannot be absorbed by the lower roots; second, when you water too much, the water cannot drain out through the holes in the bottom of the pot. Both will cause the plant's roots to rot.
(2) How to Fix Root Rot in Variegated Spider Plants
When you encounter root rot in a variegated spider plant, you should first carry out emergency treatment, that is, the remedies above, and only then go about solving it. For this, we have summarized 4 steps, as follows:
1. Take the Plant Out of the Pot, Cut Off the Rotten Roots and Disinfect
After root rot appears in a variegated spider plant, we should first take the plant out of the pot, then cut off the rotten root system, and then disinfect the roots. For disinfection, you can use a potassium permanganate solution or a carbendazim solution. If you do not have the appropriate medicine, you can first rinse the roots with clean water and then put them in a ventilated place to dry. Never place them in direct sunlight.
2. Replant and Provide Later Care
After disinfecting the roots of the variegated spider plant, change the potting soil and then replant the plant. After that comes careful care. To avoid root rot appearing again, when watering, take care not to overwater, and when fertilizing, also take care that the concentration is not too high. The soil should mainly be a sandy type with good aeration.
Overall, although the variegated spider plant is hard to grow, as long as everyone follows the growing methods for variegated spider plants, root rot basically will not appear. Of course, if root rot does appear, do not panic; just treat it according to the methods above. That is all for our introduction to root rot in variegated spider plants. We hope it can be of help to everyone.
What to Do About Spider Plant Root Rot, and What Causes Spider Plant Root Rot
The spider plant is a perennial herb with linear to linear-lanceolate leaves, narrow and long, tough and soft like orchids. The biggest characteristic of the spider plant is that mature plants will from time to time send out runners. For household potted spider plants, phenomena such as dry leaf tips, root rot, rotting roots, and leaves gradually losing their luster often appear, among which spider plant root rot is a rather tricky one. So what should you do about spider plant root rot, and what causes spider plant root rot?
Analysis of the Causes of Spider Plant Root Rot
The biggest possibility for spider plant root rot is that the soil has an excessive water content for a long time, causing the roots to be unable to breathe, which leads to root rot. It can also be caused by root damage or waterlogging, or by overfertilizing. When repotting or dividing the pot, be sure to damage the roots as little as possible, and let them dry in the air for a day before potting. Also control the amount of water; water only when the soil is dry, and root rot can be avoided.
Long-term watering plus non-breathable potting soil can also produce this symptom. Fertilizing should preferably be light and frequent; never apply concentrated fertilizer or unrotted raw fertilizer, otherwise it will very easily burn the roots. Now you can tip the plant out of the pot, trim the rotten roots, and place it in a cool place to dry in the air for 2-3 days before planting it in new soil. The new soil just needs to be loose, breathable, fertile and well-draining.
What to Do About Spider Plant Root Rot
1. When a spider plant shows signs of root rot, promptly move it out to get some sun, but be careful not to expose it to prolonged blazing sun. Just letting it see the sun and get enough light is fine. Sun it outdoors for about two hours a day, and mild root rot symptoms in the spider plant will generally gradually improve.
2. Water appropriately. After sunning, if the spider plant's root rot symptoms do not lessen, you can appropriately use some plant nutrient solution. Strictly follow the instructions on the bottle when adding it; do not use too much, to avoid the opposite effect. It is best to dilute it with clean water in proportion and spray it on the leaves; this is more conducive to the plant absorbing nutrients than adding it to the soil.
3. Usually, a spider plant does not have only one root. If only a few of the spider plant's plants have developed root rot, you can separate the roots that have not rotted from the rotten roots, change to a new pot and grow them, which can ensure the spider plant continues to grow. The rotten root portion can be thrown away.
4. If the root rot is relatively mild, you can drench the potting soil with a 400-500 times dilution of carbendazim solution to sterilize and disinfect. Do this once a week for three weeks in a row. Remove the yellow leaves. If the spider plant's root rot is very severe, then you must cut off the rotten roots. Use a sterilized knife to cut off the rotten roots and throw them away, apply rooting hormone to the remaining part, and then change to new soil. In this way, the spider plant will slowly grow new fleshy roots and can grow vigorously again.
5. If the spider plant's roots have completely rotted and the hope of regeneration is slim, then promptly carry out transplant cultivation. You can use the small plantlets on the spider plant's runners for transplanting. In the growing season, cut off the small plantlets on the runners and plant them in potting soil or water. After the small plantlets have grown roots, transplant them into a pot. Then you will have successfully grown a new spider plant.
Now everyone knows what to do about spider plant root rot and what causes spider plant root rot, right! The spider plant likes a warm, moist, semi-shady environment, has strong adaptability, is relatively drought-tolerant, and is not very cold-tolerant. If the indoor temperature in winter stays above 12°C, the plant can grow normally and send out leaves and bloom; if the temperature is too low, growth slows or it goes dormant; below 5°C, it is prone to cold damage.