How to Grow a Sago Palm? Detailed Explanation of Nine Key Cultivation Factors
Sago palms mainly grow in Asia, native to southern China, India, Japan and other places. Sago palm cultivation and growth prefer a warm and humid environment, are not resistant to severe cold, but tolerate shade. Moreover, during the growth process of the sago palm, it is relatively sensitive to iron deficiency, so when cultivating sago palms, iron filings should be appropriately added to the potting soil.
As the saying goes, "even the sago palm has bloomed." In fact, sago palms rarely bloom in cultivation - generally only trees that have been grown for 20 or 30 years will bloom, with the flowering period from June to August. Although sago palms rarely bloom, their leaves are quite magnificent and spectacular, so sago palms are also often kept as excellent foliage plants. Below, the editor will specifically introduce the cultivation methods for sago palms.
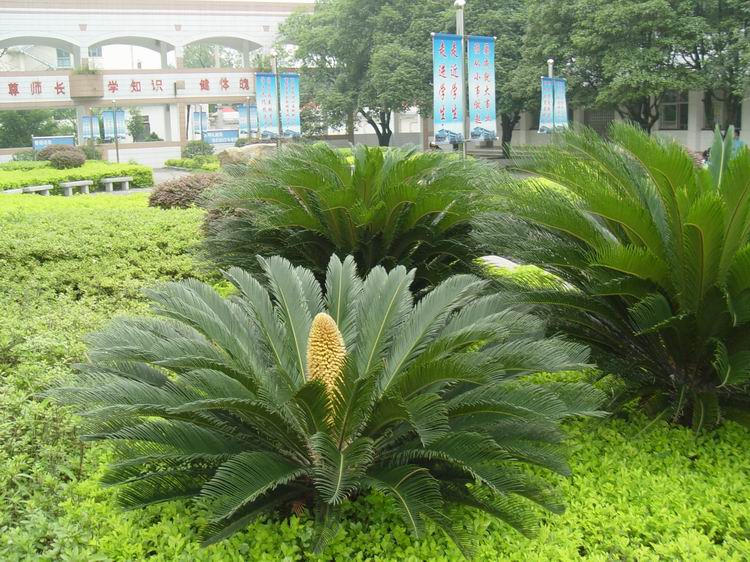
1. Cultivation Methods for Sago Palms
1. Soil: Potted sago palms are suitable for well-drained, loose and fertile slightly acidic sandy soil.
2. Temperature: Sago palms prefer warmth. During high summer temperatures, water should be sprayed appropriately to cool them down. In winter, the indoor room temperature should be maintained at around 10°C. Since sago palms grow relatively slowly, they should avoid direct sunlight exposure in summer, otherwise it can easily cause leaf scorching and yellowing. Sago palms have strong cold resistance, but when the winter temperature reaches 0°C, they should be moved indoors or to a warm place to overwinter.
3. Light: Sago palms should not be placed indoors for too long, because they love light. Lack of light, while not fatal, will cause new leaves to be sparse, thin and weak, and lose their green color. Therefore, sago palms should be placed in a sunny location in all four seasons during cultivation, especially when growing new leaves in spring and autumn, they should be placed in direct sunlight for care. After the new leaves have matured, they can be moved indoors for viewing.
4. Watering: Sago palms are relatively drought-tolerant, prefer dry conditions and avoid wetness. Generally, water after the soil has dried. If watered too much, it can easily cause root rot and leaf damage. Generally, water once every 10 days or so in winter, once every 3-5 days in spring and autumn, and once in the morning and once in the evening in summer. Watering should follow the principle of "water when dry, not when wet." Long-term water accumulation and excessive moisture in the sago palm pot soil can cause yellow leaves and root rot.
5. Fertilizing: During the growing season of sago palms, apply supplemental fertilizer frequently, mainly nitrogen and potassium fertilizers, with decomposed cake fertilizer water being the best. Fertilizing should be done with thin fertilizer applied frequently, and never too concentrated. To promote dark green and glossy leaf color, an appropriate amount of ferrous sulfate solution can be added to the fertilizer. When fertilizing, pay attention to applying more vanadium fertilizer water. You can also put some rusty iron in the soil, or buy special sago palm fertilizer from the flower market, which can make the sago palm leaves dark green and glossy, improving their ornamental value.
How to Grow a Sago Palm, Potted Sago Palm Cultivation Methods and Precautions / Sufficient Light is Needed
Regarding the sago palm, flower enthusiasts should have heard of it. It has a beautiful tree shape, emerald green leaves, and stays evergreen all year round. It is a widely praised foliage plant. In daily life, because the sago palm has strong beneficial effects, many people want to keep one at home. So how do you grow a sago palm? In this regard, the editor has carefully compiled the cultivation methods and precautions for sago palms, very detailed. Those who want to grow one must take a look~
1. How to Grow a Sago Palm, Understand Its Habits
Sago palms prefer warm, well-lit environments. They tolerate partial shade and are not cold-resistant. When caring for them indoors, place them in a well-lit location, water appropriately according to the pot soil conditions, and take good warmth measures in winter. As for soil, it is best to choose fertile, moist, slightly acidic soil. So how to grow a sago palm is very simple - just meet its growth habits.
2. Cultivation Methods and Precautions for Sago Palms
1. Soil
How to grow a potted sago palm - first, you should reselect the soil. Nowadays, the sago palms that flower enthusiasts grow are basically purchased as existing potted plants, and normal care can ensure plant growth. But that soil is very cheap. To make sago palms grow well, it is best to choose loose, fertile, well-drained, humus-rich, slightly acidic sandy soil.
2. Light
As a foliage plant, it has a great demand for light, so in the cultivation methods and precautions for sago palms, light is an extremely critical part. Sago palms love light. Whether it is spring and summer or autumn and winter, the potted plant should be placed in a well-lit location. Especially when growing new leaves in spring and autumn, it is best to place it outside to bask in the sun. After the new leaves have matured, move it indoors for viewing.
Precautions: In summer, avoid direct strong light; in addition, sago palms tolerate partial shade. If placed in a dark place for a long time, the plant lacks light. Although it will not die, its new leaves will be very sparse, thin and weak, and lose their green color. Therefore, it should not be placed indoors for too long - let it bask in the sun outside from time to time.
3. Temperature
How to grow a sago palm - appropriately adjusting the temperature is also very necessary. Sago palms prefer warm environments. During high summer temperatures, water should be sprayed appropriately to cool them down. Sago palms are not cold-resistant. In winter, they should be moved indoors for care, and the room temperature should be maintained above 10°C.
4. Watering
Water is the source of life, so how to grow a sago palm - watering is an indispensable part. Sago palms prefer moisture but are prone to waterlogging, so watering should follow the principle of "don't water if not dry, water thoroughly when you do." When growing new leaves in spring and autumn, spray water 2-3 times in the morning and evening. In summer, water sufficiently, watering once in the morning and once in the evening. In winter, control watering, generally watering once every 2-3 days.
Precautions: Although sago palms prefer moisture, they have a limit to their water requirements. Once watered too much, it easily causes root rot, thereby affecting plant growth.
5. Fertilizing
Having covered watering, let's talk about fertilizing, which is also very important in sago palm cultivation methods. During the growing season of sago palms, in order to make new leaves grow quickly, supplemental fertilizer should be applied frequently, mainly nitrogen and potassium fertilizers. To promote dark green and glossy leaf color, an appropriate amount of ferrous sulfate solution can also be added to the fertilizer.
6. Pruning
During the growth process of sago palms, they sprout new leaves 1-2 times each year in spring and autumn. So for aesthetic purposes, flower enthusiasts should prune the sago palm once every other year, cutting off old leaves, withered yellow leaves, and overly dense or overly long leaves.
7. Repotting
As the sago palm grows, its potting soil will gradually become impoverished. So for the healthy growth of the plant, flower enthusiasts should repot once every 2-3 years, preferably in March to April of spring. Note that when repotting, dead and damaged roots should be cut off. Also pay attention to leaving space at the bottom of the pot to facilitate ventilation and drainage.
8. Pests and Diseases
During the process of cultivating sago palms, due to factors such as high temperature, dryness, poor ventilation, and high air humidity, the plant can develop pests and diseases. Among these, the main pest to watch for is scale insects, and the main diseases to watch for are leaf spot disease and sooty mold. Once pests or diseases occur, they will affect the growth of the sago palm, so once discovered, everyone should immediately take control measures. For this, flower enthusiasts can refer to pest and disease control for sago palms.
The Correct Cultivation Methods for Phalaenopsis Orchids
Table of ContentsMorphological Characteristics
Artificial Cultivation
Care Essentials
Cultural Symbolism
Expand
Edit This Section: Morphological Characteristics
There are about 100 species of Phalaenopsis, native to Eurasia, North Africa, North America and Central America. Two very famous species: Platanthera chlorantha bears white flowers and is a smaller plant; Platanthera hologlottis has large green-white flowers and a larger plant form. Both have 5-15 flowers, fragrant, clustered into spike-like inflorescences.The stem of Phalaenopsis is very short, often enclosed by leaf sheaths. The leaves are slightly fleshy, usually 3-4 or more, green on the upper surface, purple on the underside, elliptical, oblong or sickle-shaped oblong, 10-20 cm long, 3-6 cm wide, with acute or obtuse tips, wedge-shaped or sometimes skewed at the base, with short and broad sheaths. The inflorescence is lateral at the base of the stem, up to 50 cm long, unbranched or sometimes branched; the peduncle
green, 4-5 mm thick, covered with several scaly sheaths; the rachis is purple-green, more or less zigzag, usually with several flowers opening one by one from the base toward the tip; floral bracts are ovate-triangular, 3-5 mm long; the pedicel together with the ovary is green, slender, 2.5-4.5 cm long; flowers are white, beautiful, with a long flowering period; the dorsal sepal is nearly elliptical, 2.5-3 cm long, 1.4-1.7 cm wide, with an obtuse tip, slightly narrowed at the base, with reticulate veins; the lateral sepals are skewed ovate, 2.6-3.5 cm long, 1.4-2.2 cm wide, with an obtuse tip, narrowed at the base and attached to the column foot, with reticulate veins; the petals are rhombic-circular, 2.7-3.4 cm long, 2.4-3.8 cm wide, with a rounded tip, narrowed at the base into a short claw, with reticulate veins; the lip is 3-lobed, with a base having a claw about 7-9mm long; the lateral lobes are upright, obovate, 2 cm long, with a rounded or acute tip, narrowed at the base, with red spots or fine stripes, and at the junction between the two lateral lobes and the base of the mid-lobe there is 1 yellow fleshy callus; the mid-lobe is rhombic-like, 1.5-2.8 cm long, 1.4-1.7 cm wide, gradually narrowed at the tip and with 2 tendrils 8-18 mm long, wedge-shaped at the base; the column is stout, about 1 cm long, with a broad column foot; there are 2 pollinia, nearly spherical, each splitting into 2 unequal halves. Flowering period is April to June.
The scientific name of Phalaenopsis in Greek originally means "orchid resembling a butterfly." It can absorb nutrients from the air to survive and is classified in the category of epiphytic orchids, and can be said to be a major group among tropical orchids. Its plant is very peculiar - it has neither creeping stems nor pseudobulbs. Each plant only grows several broad leaves as thick as spoons, alternately stacked above the base. White, thick aerial roots are exposed around the leaves, some climbing on the outer wall of the flower pot, full of natural wild charm. When the Chinese New Year season arrives, a flower stalk up to a full chi long emerges from the leaf axils, and then flowers open one after another. Each flower has 5 petals, with the lip embedded in the center. The flower colors are brilliant and dazzling, including pure white, goose yellow, crimson, as well as light purple, orange-red and azure blue. Many varieties have two or three colors, some appear to have embroidered patterns of stripes, and some look as if uniformly sprayed with colored dots. Each stalk bears seven or eight flowers, with some bearing twelve or thirteen, and can be enjoyed continuously for sixty or seventy days.The Phalaenopsis genus is a famous cut flower category, with over 50 species in the entire genus. Phalaenopsis is a monopodial epiphytic orchid with a short stem, large leaves, and one to several arching flower stems with large flowers, named for their butterfly-like flower shape. Its flowers are elegant in posture and magnificent in color, making it a treasure among tropical orchids, with the reputation of "Queen of Orchids."
Phalaenopsis orchids have graceful flowers, elegant and diverse colors, and are named for their butterfly-like flower shape. They are widely cultivated around the world. Although they belong to epiphytic orchids, they have no pseudobulbs, only a very short stem at the base. The leaves are broad and thick, oblong, reaching over 50 cm in length. Some varieties have beautiful light silver mottling on the leaves, with purple undersides. The flower stalk emerges from the leaf axils, slightly curved, of varying lengths, bearing from several to hundreds of flowers, shaped like butterflies. The sepals are oblong, the lip tip is three-lobed, and the flower colors are numerous and varied. They can bloom for over a month. Abroad, they are mostly used as cut flowers and are high-end products among tropical orchids. The vast majority of Phalaenopsis orchids have no scent; only a few are fragrant. We call them fragrant Phalaenopsis. This kind of Phalaenopsis is very rare, but many people say after smelling it that it is a foul odor, and some people who work near those flowers get headaches from the smell.
Growth Habits
Prefers environments with high temperature, high humidity, and good ventilation; not tolerant of waterlogging, tolerant of partial shade, avoids direct sunlight, avoids water accumulation, fears cold. The optimal growth temperature is 22-28°C, and the overwintering temperature should not be lower than 15°C.
Distribution RangePhalaenopsis was discovered in 1750. To date, over 70 native species have been discovered, most of which originate from humid Asian regions, naturally distributed in Assam, Myanmar, the islands of the Indian Ocean, the Malay Peninsula, the South Sea Islands, the Philippines and even low-latitude tropical islands such as Taiwan, China. The Phalaenopsis produced in the forests around Wusenyong in Taitung and Green Island are the most famous.
Variety Types
There are about 70 or more native species worldwide, but most native species have small, unremarkable flowers. Phalaenopsis orchids cultivated commercially are mostly artificially hybridized and selected varieties.
There are about 530 or so hybridized and selected varieties. Those with yellow flowers are considered more precious. There is a yellow-flowered variety called "Emperor" that can be called a "superstar," and its price is very high. Blue-flowered varieties are also relatively rare. At the 1952 and 1953 International Orchid Exhibitions, the Phalaenopsis sent by Taiwan, China won gold medals and trophies for two consecutive years. At the 14th Orchid Exhibition held in Hong Kong, China in 1989, a Phalaenopsis with white petals and a red lip sent by Mr. Hu Bingchi won the grand championship of the entire show. These outstanding honors laid a solidfoundation for the development of Phalaenopsis. Today, consumer demand for Phalaenopsis in European and American countries continues to increase. All high-end banquets cannot do without Phalaenopsis as decoration. Many brides and bridesmaids prefer to use them as bouquets and corsages. In Italy alone in 1990, over 2.6 million Phalaenopsis plants were sold, setting a historical record. In Hong Kong, China, each pot sells for about 70-100 Hong Kong dollars, and cut flowers from the mother stalk sell for 15-30 Hong Kong dollars.
1. Phalaenopsis minor is a variety of Phalaenopsis. The flowers are slightly smaller.
2. Phalaenopsis aphrodite is a variety of Phalaenopsis. Leaves are large, flat, thick, green, and have markings. The flower stalk branches.
3. Phalaenopsis schilleriana, also known as Schiller's Phalaenopsis. It is a common species in the same genus. Leaves are large, oblong, 70 cm long, 14 cm wide. The upper leaf surface has gray and green markings, and the leaf underside is purple. It bears over 170 flowers, 8-9 cm in diameter, light purple with white edges. Flowering period is spring and summer.
4. Phalaenopsis mannii, also known as Banna Phalaenopsis. It is a common species in the same genus. Leaves are 30 cm long, green, with yellow at the base. The sepals and petals are orange-red with brown-purple horizontal stripes. The lip is white, 3-lobed, with upright lateral lobes and a truncate tip. The mid-lobe is nearly semilunar, with a raised central tip and densely papillose hairs on both sides. Flowering period is March to April.5. Phalaenopsis amabilis is a common species in the same genus. Leaves are 40 cm long, with prominent main veins on the upper surface, green, with purple on the underside. Flowers are white, often with green or cream-yellow in the center.
6. Phalaenopsis philippinensis is a common species in the same genus. The flower stalk is about 60 cm long, drooping. Flowers are brown with purple-brown horizontal banding. Flowering period is May to June.
7. Phalaenopsis wilsonii is a common species in the same genus. The sepals and petals are yellow-green, the lip is purple, and the base has a raised papillate protrusion on the underside.
Edit This Section: Artificial Cultivation
Cultivation Conditions
(1) Temperature
Phalaenopsis is a tropical plant, and the cultivation temperature should be maintained between 15-34°C. Appropriate temperatures are as follows: 26-27°C during the growth stage, 19-21°C during the flowering stage. To obtain more flower stalks, the temperature can be maintained at 18-20°C for a total of 4-8 weeks. When light is insufficient or daytime temperatures are too high, maintain at 18°C to strengthen flower induction (induce flower bud formation). Because leaf growth must also be maintained during the flowering period, do not keep the low-temperature period too long. When light is insufficient, if the temperature exceeds 23°C for more than 24 hours, it will cause excessive vegetative growth and loss of flower buds.(2) Light Intensity
1. In the Netherlands region
To obtain proper leaf and root development, sufficient light needs to be provided. Excessive light leads to scorch marks on the leaves. Too low light intensity (below 100W/m2) leads to stalled plant growth, poor quality, improper flower bud development and poor root development. The appropriate light intensity is 2002. In summer with strong sunlight (1400 W/㎡), use 80-85% shade netting.
2. In tropical regions
Need to have the capacity to maintain 80-90% shading. Usually a fixed net providing 65% shade and another set of movable netting providing 65% shade are used. In areas with heavy rainstorms, plastic sheeting roofs should be used to reduce disease and reduce rainwater leaching of the medium. (Note: This section addresses simple rain shelter facilities in places like Indonesia, and does not discuss subtropical greenhouses)
Appropriate light intensity is as follows:
1. Growth stage: 5000-8000lux
2. Flowering stage: 8000-15000lux
In regions with year-round abundant sunlight, the light requirement can be increased by 20%. However, pay attention to the refraction of light so that all orchid leaves receive uniform light. Higher relative humidity should be maintained at high light intensity.
(3) Artificial Supplemental Lighting
Artificial supplemental lighting benefits leaf temperature, microclimate, and orchid seedling growth, and can reduce plant losses. Its features are as follows:
1. Plug tray seedling growth: promotes rapid growth and reduces orchid plant losses
2. Growth stage: promotes rapid growth and better development
3. Flowering stage: helps flower stalk and flower bud development, reduces flower bud loss, and increases quality.In winter, Phalaenopsis needs at least 12-14 hours of 3500-4000 lux light, so artificial light sources are suitable. Using excessive light on sunny days will cause leaves to turn red, thereby causing growth stagnation. In addition, orchid plants need to maintain at least 8 hours of dark period to ensure carbon dioxide absorption.
(4) Carbon Dioxide Concentration
Phalaenopsis is a Crassulacean acid metabolism plant, absorbing carbon dioxide at night. The appropriate concentration is 600-800ppm.
(5) Relative Humidity
Due to its physiological structure, Phalaenopsis can protect itself from stress effects under low humidity conditions, but in overly wet environments, high temperature and high humidity often accompany diseases. The most suitable relative humidity range is 60%-80%RH. Under high temperature and low humidity conditions, relative humidity needs to be increased. Applicable equipment systems include high-pressure spray equipment above the greenhouse to increase mist particles, sprinkling water below the planting beds, using water walls and fans, etc. However, avoid making the crops wet. Another additional benefit of humidification is lowering the temperature.
(6) Other Information
When crops grow in high relative humidity environments, daytime temperature and sunlight can both be increased, keeping the greenhouse interior at a constant temperature, and good air circulation must be maintained. Therefore, the greenhouse height should preferably be 3-4 meters above the plants.
In order to analyze problems faced by plant growth, measurement and recording of the microclimate is very important. For example, light intensity, temperature and relative humidity all need to be measured and recorded. Measurement operations can use microcomputers or handheld sensors, and daily maximum/minimum values need to be measured.
Cultivation Plan
Phalaenopsis cut flower cultivation is divided into two stages:
1. Growth stage: from seedling to mature plant.
2. Flowering stage: flower induction and cut flower sales.
(1) Growth Stage
At the beginning of cultivation, smaller varieties or smaller-graded seedlings should be cultivated on another planting bed. Large varieties and larger grades can be arranged in square patterns, but before the leaf spread begins to touch, plants should be spaced out to avoid growing thin and elongated leaves. In Europe, the planting bed area required for the growth stage is about 10% of the total cultivation area.
(2) Flowering Stage
Economic cost calculation, with a 5-year flowering period:
After the plant has developed 4-5 leaves, replant in 15-17cm pots, and the pot spacing can be fixed at this point. Varieties with larger leaf spreads need increased spacing. When the orchid plant has grown to a sufficient size and the root system has developed well, this orchid plant can serve as a flowering plant.
There are about 20 plants per square meter on average, with a total of 5 years from flowering planting to commercial production. If seedlings are too small or the root system is poorly developed, the flower stalk will be smaller and the flowers smaller, the pot-insertion time will not be long, and the time until the next stalk emergence will be longer.
Phalaenopsis should be cultivated in transparent pots. Transparent pots ensure more vigorous growth and better root quality. Pots are placed on planting beds, and ventilation should be good. Movable planting beds should be less than 1.6 meters wide, with appropriate height, so that cut flower work is easy to carry out.
Medium
The criteria for medium selection are as follows: large particles for drainage, fine particles (not dust particles) for retaining and distributing water and nutrients. If the medium contains too much fine dust, it easily forms a hard layer structure at the bottom of the pot. The medium used in the Netherlands is bark of 12-16mm length and 2-3kg/ of sphagnum moss. For large containers such as 14-24cm pots, coarser bark (14-24mm) is suitable, but it should be mixed with clay particles or lava medium. In 17cm pots, adding appropriate sphagnum moss (2-3kg/m) allows uniform moisture distribution within the medium. This is especially important in the first year of cultivation. Within one year the sphagnum moss will decay, but the root system will already be able to distribute effectively within the pot.
In addition to the medium, the drainage performance of the pot is equally important. After irrigation, water should not accumulate at the bottom of the pot for too long. Transparent pots allow roots to stay within the pot, and the root system will turn green. If the root system only grows downward without coiling, the root fixation is incorrect. After irrigation operations, water and nutrient absorption requires a longer time, and future flower stalk quality becomes worse. Using transparent pots allows checking whether the root system maintains vigor and is evenly distributed.
Within the first month after transplanting, the medium should be kept moist. The top should not be too dry. If the moisture change in the medium during the first week is too drastic, it will be difficult to remedy in later cultivation periods. However, overly wet medium can also cause problems.
Irrigation System
Available irrigation methods include:
1. Using drip irrigation lines,
2. Using fixed nozzles, irrigating from top to bottom,
3. Manual irrigation,
4. Combinations of the above methods.
Phalaenopsis leaves easily absorb nutrients such as urea from the leaf surface during foliar fertilizing. Porous medium is very important for roots; despite negative capillary effects, its advantages are greater. In the early growth stage, using sprinkler irrigation or irrigation arms for irrigation is very useful for crops. During the flowering stage, to avoid gray mold on petals caused by watering, using drip irrigation lines is better. When the flower stalk already has many flowers, watering from above easily causes the flower stalk to break.
Irrigation water must not contain chemical components or visible microorganisms. The sodium and chloride ions contained in the water must not exceed 100mg/l, and bicarbonate must not be excessive. If there is no good water source, reverse osmosis treated water must be used. The amount of watering is related to climate, medium and plant age. In Western European environments, the irrigation amount is approximately as follows: once every 7-10 days in winter, once every 5-7 days in summer. During the growth period, the water temperature needs to be 18-20°C to avoid root damage.
During the growth period and the first month after moving to large pots, water must be applied from above. In addition to ensuring the medium remains sufficiently moist, this also avoids salt accumulation on the top layer of the medium. After the root system has developed well, a drip irrigation system can be used instead. At least once a year, water should be applied from above to leach the medium.
Fertilizer
Phalaenopsis fertilization can use compound fertilizers or directly apply nitrogen fertilizer. Fertilizer application varies by variety. If using base fertilizer, the base fertilizer must contain Dolokal (L3-4 kg / l) and PG mixture, with a pH range of 5.2-6.2 and an EC range of 0.8-1.2mS/cm. If nitrogen fertilizer is too high, it will cause excessive leaf growth. If the EC value is too high, the roots will die. If too low, the plant lacks trace elements. The best way to measure EC is to collect the water discharged from the bottom after irrigation. Exceeding 1.5mS/cm indicates that the medium in the pot has become salinized. Usually the roots will form barrel-red spots, and at this time they need to be leached with clean water or water with low EC.
Phalaenopsis should be fertilized year-round. Unless low temperatures persist for a long time, fertilizing should not be stopped. Winter is the flower bud differentiation period for Phalaenopsis, and stopping fertilizer can easily lead to no flowers or few flowers. Spring and summer are the growth period, and dilute liquid fertilizer can be applied once every 7-10 days. Organic fertilizer is preferred, and special Phalaenopsis nutrient solution can also be used, but do not apply when there are flower buds, otherwise it easily causes premature bud drop. When growing leaves in summer (i.e., after the flowering period), nitrogen and potassium fertilizers can be applied. During the flower stalk growth period in autumn and winter, phosphorus fertilizer can be used, but it should be dilute, applied about once every 2-3 weeks. Fertilizing time is after watering in the afternoon. After fertilizing several times, flush the orchid pot and orchid plant with a large amount of water to prevent residual inorganic salts from harming the roots.
Flowering Stage
When the plant has 5 mature leaves, flower induction can be carried out. When the plant is sufficiently mature and has gone through a transition period, the flower stalk will naturally emerge. Natural flower induction in autumn means they can be sold in February to March of the following year. Flowering period can be controlled by adjusting temperature and light intensity. When all flower buds on the flower stalk except the last one have opened, it can be cut for sale. When the flower stalk is cut, it usually already has three flower buds. The second flower stalk emerges from the remaining flower buds, starting from the terminal bud. However, inducing this new flower stalk requires a longer time, so whether to adopt this method of first natural flowering and then emerging a second flower stalk depends on the required flower stalk quality and sales plan. In addition to the first flower stalk, as long as the plant is healthy, the second time can have double flower stalks, which can be sold as cut flowers. Therefore, an average of 2.5 flower stalks can be sold per year. After the flower stalk emerges, use hanging strings to keep it straight to avoid bending.
Immature Flowering Plants
During the growth period, flower stalks that emerge prematurely before maturity need to be removed promptly. Before the flower stalk hardens, it can be removed manually. If the flower stalk has already hardened, it must be removed with tools. Before removal or cutting operations, both hands and tools must be disinfected to avoid transmitting diseases. Maintaining a temperature of 27°C during the growth period can avoid this premature flowering phenomenon.
Staged Care
Phalaenopsis orchids go through 5 growth stages from flask seedlings to flowering and sale: flask seedlings, small seedlings, medium seedlings, large seedlings, and the flowering stage. The key points of cultivation and management are as follows.
1. Early-stage management. During the flask seedling growth stage, the optimal growing temperature is 25-28°C during the day and 18-20°C at night. The optimal growing temperature for the small seedling stage is 23°C. Growth stops above 35°C or below 10°C. Newly deflasked small seedlings should be kept below 20°C, with relative air humidity maintained at 70%-80% and light controlled below 1000 lux. After a transition period, light is gradually increased to 10,000 lux, and finally can reach 15,000 lux.
Fertilizer and water management during the small seedling growth stage plays a decisive role. Within 3-5 days after the tissue-cultured seedlings are deflasked, they should not be fertilized or watered, but they must be sterilized immediately. Carbendazim at 1000 times dilution can be used for leaf surface sterilization, and rooting powder sprayed the next day, for a total of 3 sprays. After a 3-5 day transition period, apply the first fertilizer with Peters Professional No. 10 (nitrogen, phosphorus, potassium ratio of 30:10:10) at 1800 times dilution by spraying, until the sphagnum moss is completely wet. One day later, apply Peters Professional No. 10 (30:10:10) at 2500 times dilution as a foliar fertilizer. One week later, based on the dryness or moisture of the small seedlings, apply the second fertilizer, with the fertilization principle at this time being high nitrogen, low phosphorus and low potassium.
After 4 months of cultivation, the small seedlings grow into medium seedlings, and at this point they should be repotted. The tightness of the sphagnum moss should be judged by the firmness of the muscle below the palm when the hand is naturally made into a fist; the tightness may be greater or lesser, but the standard must be uniform. Management during the medium seedling period is basically similar to the small seedling stage, but light can be increased to 20,000 lux. Fertilization uses Peters Professional No. 8 and No. 1 (nitrogen, phosphorus, potassium ratios of 20:10:20 and 20:20:20 respectively) used alternately. During the medium seedling period, pay attention to the orientation and growth vigor of new leaves; generally place them in an east-west orientation, and periodically turn the leaves. At this time the fertilization principle is low nitrogen, high phosphorus and high potassium.
After 4-6 months of cultivation, the medium seedlings enter the large seedling stage. The management method is the same as for medium seedlings, but fertilization uses Peters Professional No. 1 (nitrogen, phosphorus, potassium ratio of 20:20:20).
2. Late-stage management. The flowering stage is the management of the late growth stage. Flowering in Phalaenopsis is induced by low temperatures, so in addition to meticulous management, temperature must also be well controlled. First keep the temperature above 20°C for 2 months, then lower the nighttime temperature to below 18°C, and flower buds will form after 45 days. After the flower buds form, keep the nighttime temperature at 18-20°C and the daytime temperature at 25-28°C. Flowers can open after 3-4 months; during the flowering period, lower the temperature slightly, but not below 15°C. After the flower buds emerge, a support stake must be set up, that is, before the flower stem extends and lodges, insert the stake and tie the flower stem to it, leaving space for the flower stem to elongate and thicken.
Water and fertilizer management during the flowering period is especially important. Watering should be done at 10 a.m., avoiding splashing water directly onto the flowers. After watering, use an exhaust fan for ventilation to keep the air in the greenhouse fresh and allow residual moisture to dissipate as quickly as possible. At this time, fertilization with Peters Professional No. 2 (nitrogen, phosphorus, potassium ratio of 10:30:20) at 1000 times dilution is best, depending on the condition of the Phalaenopsis itself.
Phalaenopsis is prone to soft rot and gray leaf spot. Soft rot is extremely contagious; once found, immediately isolate the diseased plants. Diseased plants can be treated with mancozeb or thiophanate-methyl. Usually sterilize once every 15 days.
Cultivation Methods
The growing medium for tropical orchids must meet the following requirements:
It must enable the orchid's root system to bear the weight of the orchid itself and maintain normal plant form, but it must not be too heavy; lightweight is best.
Good drainage and water retention. Orchid roots need moisture, but the moisture must also drain away quickly, because waterlogging will cause the roots to rot; on the other hand, moisture must be retained so it does not dry out too quickly. [1]
Good aeration.
Contains a considerable amount of mineral nutrients.
Can remain without rotting for 1-2 years.
Inexpensive, suitable, easy to obtain, and convenient to handle.
The following media are suitable for cultivating tropical orchids:
Tree fern fibers, made by processing and crushing the aerial roots of tree ferns;
Sphagnum peat moss;
Sphagnum moss;
Osmunda roots; one type is black, wire-like and hard, and the other is brown and softer; it does not rot easily, contains small amounts of nitrogen, phosphorus, potassium and trace elements, drains well, provides aeration and retains water, and is durable. pH value 5;
Bark; Douglas fir and white fir bark chunks are soft, provide aeration and retain water, pH value 4-6;
Coconut coir and coconut husk fiber;
Others: palm fiber, dried leaves, trunks and branches, dried cow dung, pumice, clay pellets, crushed bricks, tiles, vermiculite, plastic balls, etc. can all be used to grow orchids. The medium used for the Phalaenopsis potted flowers sold on the market is generally sphagnum moss.
Pre-flowering and Post-flowering Management
After the flower buds of Phalaenopsis form, apply more phosphorus until flowering. When the flower stem extends upward and tends to lean to one side, a stake should be set up and the stem tied so the flower stalk does not break. Afterward, as the flower stalk grows longer and taller, tying should also be done gradually, with the stake slightly curved to enhance the aesthetic appeal. Stop fertilizing during the flowering period and before new leaves grow. After the flowers fade, for robust orchid plants with more than 5 leaves, the lower 3-4 nodes of the stem can be left and the rest cut back, and it may be hoped that the remaining flower stem will bloom again later; watering should not be too frequent, and water only after the medium has dried out.
Repotting
When Phalaenopsis has many roots growing outside the pot, or when the medium in the pot turns black and rots, it is time to consider repotting. The steps for repotting are as follows:
Carefully remove the Phalaenopsis from the pot and remove all the old medium;
Trim the root system, cutting off dead roots, rotten roots, broken roots and shriveled roots; if the base of the orchid plant is too high, that is, the root stock is too long, part of it can be cut off;
Then place sphagnum moss under the roots and wrap the wet moss tightly around the root system;
Use a relatively large piece of foam plastic as a base at the bottom of the pot, place the moss-wrapped orchid plant into the pot, and pack the moss tightly around the inside edge of the pot so that the orchid plant does not wobble; then place it in a shady spot and do not water until the moss dries out completely. At ordinary times, just mist it (wet moss means soaking dry moss in water until thoroughly wet, then taking it out and squeezing out the excess water).
Edit this section Care Key Points
1. Growing medium: The common growing media for Phalaenopsis are mainly sphagnum moss and moss.
2. Temperature: When growing Phalaenopsis at home, temperature must first be ensured. Phalaenopsis likes a high-temperature, high-humidity environment; during the growth period the minimum temperature should be kept above 15°C, and the suitable growing temperature for Phalaenopsis is 16-30°C. Attention should be paid to raising the temperature in autumn and winter, at the turn of winter and spring, and when winter temperatures are low. Generally, in rooms with heating equipment in winter, this temperature is not difficult to reach, but note that the flowers should not be placed directly on the radiator or too close to it. When summer temperatures are on the high side, cooling is needed, and attention should be paid to ventilation; if the temperature is above 32°C, Phalaenopsis usually enters a semi-dormant state, and continuous high temperatures should be avoided. Around the Spring Festival is the full flowering period; appropriate cooling can prolong the viewing time, and at flowering the nighttime temperature is best controlled between 13-16°C, but must not be lower than 13°C.
3. Watering: Phalaenopsis originates in primeval forests, where there is more mist and higher temperatures. Phalaenopsis does not have thick pseudobulbs to store nutrients; if the air humidity is insufficient, the leaves wrinkle and become weak and limp. Therefore, Phalaenopsis should be cultivated and cared for in a ventilated, high-humidity environment. The suitable growing air humidity for Phalaenopsis is 60%-80%. During the vigorous new root elongation period of Phalaenopsis, water more; during the post-flowering dormant period, water less. In spring and autumn, water once every day around 5 p.m.; in summer, when the plant grows vigorously, water once each at 9 a.m. and 5 p.m.; in winter, when light is weak and temperatures are low, watering once every other week is enough, and it is best done before 10 a.m. If a cold wave arrives, do not water; keep it dry, and resume watering after the cold wave passes. The principle of watering is to water when dry and let it dry between waterings; when the surface of the growing medium becomes dry, water thoroughly once, and the water temperature should be close to room temperature. When the indoor air is dry, a sprayer can be used to spray directly onto the leaves; it is enough for the leaf surface to become moist, but note that during the flowering period water mist must not be sprayed onto the flowers. Tap water should be stored for more than 72 hours before being used for watering. 4. Light: Although Phalaenopsis prefers shade, the orchid plant still needs to receive some light, especially before and after the flowering period; appropriate light can promote flowering in Phalaenopsis and make the flowers more brilliant and long-lasting. Generally, it should be placed in a spot indoors with diffused light, and direct sunlight should not be allowed.
5. Ventilation: The normal growth of Phalaenopsis requires flowing fresh air, so when growing Phalaenopsis at home, ventilation must be good, especially during the high-humidity period in summer; good ventilation must be used to prevent heat stress, and it can also avoid infection by pests and diseases.
6. Nutrition: Phalaenopsis should be fertilized throughout the year, and fertilization should not be stopped unless low temperatures persist for a long time. Winter is the flower bud differentiation period for Phalaenopsis, and stopping fertilization can easily lead to no flowers or few flowers. Spring and summer are the growth period, and a dilute liquid fertilizer can be applied once every 7-10 days; organic fertilizer is preferable, and a special nutrient solution for Phalaenopsis can also be used, but do not apply it when there are flower buds, otherwise the buds are likely to drop early. In summer, when leaves grow (that is, after the flowering period), nitrogen fertilizer and potassium fertilizer can be applied as a top dressing. In autumn and winter, during the flower stem growth period, phosphorus fertilizer can be used, but it should be dilute, applied about once every 2-3 weeks. Fertilization should be done after watering in the afternoon; after several fertilizations, flush the orchid pot and orchid plant with a large amount of water to prevent residual inorganic salts from harming the roots.
7. Post-flowering management: The flowering period is generally around the Spring Festival, and the viewing period can last as long as 2-3 months. After the flowers wither, the faded flowers must be cut off as early as possible, as this can reduce nutrient consumption. If the flower stem is cut at the 4th-5th node from the base, it can bloom again after 2-3 months. However, this consumes too many nutrients from the plant and is not conducive to growth the following year. If you want the plant to bloom well again the following year, it is best to cut the flower stem from the base. When the medium ages, it should be replaced in good time; otherwise aeration worsens, causing root rot and weakening the plant's growth or even death. Generally, repotting in May, when new leaves grow, is suitable.
Precautions
1. Watering too frequently: Friends who grow Phalaenopsis always worry that the orchid lacks water, and regardless of whether the growing medium is dry, they water every day, causing severe root rot.
2. Temperature too low: Usually, flowering Phalaenopsis plants are mostly marketed in early spring, and after being bought and taken home they are generally placed in living rooms and other places for viewing. Although the daytime temperature in these places is sufficient, the nighttime temperature is slightly on the low side. On the other hand, professionally cultivated orchids are mostly in well-equipped greenhouses; by comparison, the temperature and humidity at home are both somewhat insufficient, so the plant's growth vigor tends to weaken day by day. Therefore, sometimes no matter how well they are cared for, the orchids still fail to bloom.
3. Over-fertilization: Fertilizing whenever fertilizer is available, and without paying attention to concentration, thinking that applying fertilizer will make the plant grow faster. One should know that Phalaenopsis should be given light fertilizer, applied in small amounts and many times. Remember that "tonic feeding" must not be excessive, otherwise it will have the opposite effect.
4. Planting a small plant in a large pot: Thinking that using a large pot can give Phalaenopsis a spacious environment and ample material. In fact, after using a large pot, the sphagnum moss does not dry easily; one should know that Phalaenopsis likes aeration, and when air circulates it thrives.
5. Dry buds on flowers: Most Phalaenopsis nowadays are forced into bloom, and after leaving the production base, once the environment changes, dry bud problems easily appear. At this time, do not assume they are dry and do not water more; instead, increase indoor humidity and control indoor temperature; the temperature must not be too high. When buying flowers, try to choose ones with thick petals.
Over-summering Techniques
1. Measures: Over-summering Phalaenopsis is mainly a matter of cooling, and the following measures should be taken:
① Add a double-layer shade net to reduce light, which can achieve a good cooling effect (lowering by 2°C-4°C).
② Sprinkle or flood the ground with water. Summer temperatures are very high, but the water just drawn from a well is actually very cold, around 16°C. Therefore, sprinkling or flooding with water can produce an obvious cooling effect.
③ Spray water on the leaves; this cools fastest, but the effect lasts the shortest time.
④ Ventilation. Make a 40cm×40cm square opening in the wall every 5 meters at a height of 70cm from the ground to increase ventilation and reduce the occurrence of pests and diseases; turn on fans when the temperature is above 25°C to strengthen air circulation and favor plant growth.
2. Undesirable phenomena that easily occur during over-summering
① Leaf aging and shedding; some plants' lower leaves decline during the over-summering process, and from late summer to autumn gradually yellow and shed.
② Serious pests and diseases, especially when the weather is hot, relative air humidity is too high and there is no wind, and temperatures are high; this easily leads to diseases such as soft rot, brown spot and viral diseases.
Cut Flower Techniques
Introduction to Phalaenopsis
The native habitat of Phalaenopsis is all tropical regions of Asia. In the wild, its daytime growing temperature is 28-35°C and nighttime temperature is 20-24°C, and it prefers high relative humidity and shaded conditions. This crop absorbs nutrients through roots and leaves. The root system is also used to anchor the plant.
Breeding Program
At Anthura there is a professional breeding team, and the breeding objectives are divided into pot flowers and cut flowers. This company is also the only company that lists cut flowers in its breeding program. The genetic characteristics of the male and female parents are required to show dominant differences to ensure that their offspring have stable inheritance, and thus can become a new cultivar. Its germplasm sources include cultivars that began to be preserved 40 years ago, as well as new lines purchased from Asia. The development of a new cultivar includes development through hybridization, selection, and mass propagation. Developing a new cultivar takes 7-9 years. From pollination to the formation of a seed pod takes 6 months, and from sowing seeds to becoming a seedling takes 1 year. From seedling to flowering takes 1.5 years. Using 1 flower stalk to produce tissue-cultured plantlets takes 2 years, and from meristem plantlets to flowering takes 1.5 years, so 6.5 years have already passed. Only at this stage does mass propagation of meristem plantlets begin.
The Anthura Phalaenopsis breeding program has two major directions: cut flowers and pot flowers. The selection and breeding program includes flower shape and flower color. For cut flowers, the most important selection criteria include the number of flower stalks produced, color, the proportion of optimum quality, the fewer branches the better, the thickness and strength of the flower stalk, the development of the flower stalk and flowers, flower shape, phyllotaxis, plant developmental traits, post-harvest storage and transport characteristics, and vase life, etc. Post-harvest characteristics are most closely related to heredity. The viewing period varies from 5 days to 6 weeks. In addition to the above main selection criteria, other secondary selection criteria are also used to evaluate cultivars, such as the loss rate during the orchid production process and disease resistance.
Plantlet Characteristics
Anthura provides tissue-cultured plantlets and plug tray small seedlings. Tissue-cultured plantlets must be specially ordered. Customers gain two benefits from using plug tray small seedlings: reducing losses during the acclimatization period of small seedlings, and reducing the cultivation period by 5-7 months. Each plug tray contains 40 small seedlings, and when they arrive at the customer's greenhouse they can immediately be transplanted.
Small seedlings in rectangular trays have a leaf span of 10-14cm and usually have 2-3 well-grown leaves. Before small seedlings are transplanted into 12cm soft pots, they must be graded. Anthura does not perform this grading work for customers. Usually the grower divides the small seedlings in the rectangular tray into two grades, large and small, and after transplanting cultivates them on different benches. The cultivation period for small seedlings is 3-4 months longer than for large seedlings.
The work of transplanting small seedlings into 12cm soft pots is still mainly done by hand. The small seedlings must be kept vertical, placed at the lower center of the soft pot, and planted at the correct height. If the plant's growing point is too deep, it is prone to disease infection; if the transplanting depth is too shallow, support is poor. After transplanting, the arrangement of the soft pots is very important. When the orchid seedlings grow and the leaves begin to shade each other, the pots must be spaced out to increase the distance between soft pots.
Cultivation Management
Overview
It likes a high-temperature, high-humidity, ventilated, semi-shaded environment, and dislikes waterlogging and stuffy air. The overwintering temperature should not be lower than 15°C. Because Phalaenopsis originated in tropical rainforest regions, it is by nature fond of warmth and afraid of cold. The suitable growing temperature is 18-30°C; in winter, growth stops below 15°C, and it easily dies below 10°C. For mass production in various places in Lingnan, cold-protection facilities are necessary and protected cultivation must be carried out. If grown on a small scale at home, it can safely overwinter if it is immediately moved indoors to maintain temperature when it turns cold.
For its propagation, cell tissue culture is mostly used; after test-tube plantlets are grown and transplanted, they can generally bloom after about two years. In some mother plants, after the flowering period ends, the axillary buds on the flower stalk sometimes also grow and develop into daughter plants; when they grow roots, they can be cut from the flower stalk for division propagation.
Medium
Because of its epiphytic nature, the growing medium for potting should not be soil, but rather sphagnum moss, pumice, tree fern scraps, charcoal fragments, etc., or the seedlings can be fixed directly onto a tree fern board (also called snake wood) and allowed to attach and grow on their own. This cultivation method imitates its original ecological environment. When it blooms, hanging the whole board on the wall for viewing truly has a distinctive charm. Phalaenopsis has quite a few aerial roots, and their root tips are emerald green and quite sensitive, so they must be carefully protected; the root tips must never be touched or damaged, otherwise that root will stop growing.
Temperature
Phalaenopsis belongs to the tropical high-temperature orchids, and the suitable growing temperature is 20-30°C. Below 15°C it enters dormancy, and below 10°C it easily dies. However, temperatures above 35°C affect growth and make it prone to disease. Flowering requires experiencing one month of low temperature at 15-18°C to induce flower bud differentiation; if low temperatures continue thereafter, flower stalk emergence will be slow.
Air
Phalaenopsis likes an environment with high air humidity and ventilation. The air is required to maintain humidity at 60%-80% at all times, and air circulation is best kept up, preferably with a gentle breeze. There must not be too much standing water in the pot; if the roots are surrounded by liquid water for 6-8 hours, they rot extremely easily. Therefore, aeration is the key to growing Phalaenopsis well, and the medium needs to be loose and airy so the roots grow strong and healthy. Dry, hot winds are disliked. When growing in northern winters, it must not be placed on a radiator or directly facing air-conditioner airflow.
Sunlight
Under natural conditions, Phalaenopsis mostly grows epiphytically on the branches and trunks of tall trees in tropical rainforests, sheltered by tree shade. Direct scorching sunlight is disliked, otherwise it will cause large areas of leaf scorch, but it also cannot tolerate being too shady indoors, which will lead to slow growth and be unfavorable for nutrient storage and flowering. It is best placed on a north- or east-facing balcony or beside a windowsill so it receives diffused light, and then it grows strong and has few diseases.
Water
Because it has no stolons or pseudobulbs, Phalaenopsis is not drought-tolerant, and because of its epiphytic nature, Phalaenopsis also fears waterlogging and wetness. During the high-temperature period in summer, it is enough to keep the medium moist; a sprayer can be used to sprinkle water to cool and increase humidity (but water must not be left in the leaf crown, as it easily causes crown rot). A wet towel can also be placed beside the pot to increase humidity, but be sure to note: the roots must not be excessively damp and shaded for a long time, especially being surrounded by liquid water for a long time makes them extremely prone to rot. For example, the amount of daily watering in summer should be such that it can naturally air-dry the same day, alternating dry and wet, which will greatly reduce the occurrence of root rot and diseases. In winter, water less and only keep the medium slightly moist.
Fertilization
The fertilization principle for Phalaenopsis is light fertilizer applied frequently, and never use overly concentrated chemical fertilizer. A suitable concentration is about 1 time more diluted than the concentration stated on the chemical fertilizer packaging, that is, about 1500-2000 times. Special fertilizer for Phalaenopsis can also be used. Apply nitrogen and potassium fertilizer during the growth period, and phosphorus and potassium fertilizer during the flowering induction period. Applying once a week or once every half month is enough. Do not fertilize during the flowering period or dormant period, but attention should be paid to appropriately supplementing fertilizer before and after flowering.
Cultivation Techniques
Phalaenopsis is an epiphytic orchid, and cultivation requires good root aeration; the potting medium must be loose, well-draining and airy, commonly using moss, fern roots, bark chunks, coconut shells or vermiculite, etc. New plants grow new roots about 30-40 days after planting.
During the growth period, fertilize once every ten days; from flower bud formation to the flowering period, apply more phosphorus and potassium fertilizer. Also frequently spray water on the ground and leaves to raise air humidity, which is very beneficial to stem and leaf growth. Repot every year in May-June, when new roots begin to grow after flowering; the temperature should be 20-25°C. If the temperature is too low, new plants recover slowly and are also prone to rot. High temperatures above 32°C are unfavorable to Phalaenopsis growth, will cause it to enter a semi-dormant state, affect flower bud differentiation, and result in failure to bloom. Phalaenopsis has long inflorescences and large flowers, so when potted, a support stake is needed to prevent toppling and damage to the floral appearance.
The pot should be somewhat large. Pot size is also very important: if the roots of the plant are very large, the pot should also be appropriately larger; if the roots are relatively small, do not use too large a pot either. If the pot is relatively large, it contains a lot of soil, which easily makes the soil permeability poor. When planting, orchids, camellias, rhododendrons, Michelia alba, gardenias, etc. need acidic soil (mountain soil); Phalaenopsis and clivia use leaf mold; osmanthus, sago palm, palm bamboo, etc. use 2/3 garden soil plus 1/3 coal cinder ash, the purpose being to increase soil permeability.
Pest and Disease Control
Flowering in Phalaenopsis is mainly affected by temperature. Flower bud differentiation requires low-temperature stimulation. After stimulation for one month at daytime 20-23°C and nighttime below 18°C (but it must not remain below 15°C for a long time), the latent buds in the stem can be transformed into flower buds. Afterward, when the flower buds break through the epidermis and grow into flower stalks, a relatively higher temperature is needed; the normal growing temperature is suitable. Continuous low temperatures will cause the flower stalk to emerge slowly, the flowers to be somewhat small or even to wither midway. Appropriately increasing sunlight during the flowering period helps produce large, brightly colored flowers and earlier flowering. Phalaenopsis pest and disease control: the occurrence of Phalaenopsis diseases is mostly caused by poor environment and hygiene, and diseases are especially likely when temperatures are low or sunlight is insufficient. Regular environmental cleaning, temperature and humidity control, and rapid removal of diseased plants can prevent the occurrence and spread of most diseases. Phalaenopsis diseases can generally be divided into those caused by bacteria, mold, insects and the environment. The disease conditions and control methods are as follows:
Bacterial diseases: This type of disease initially mostly multiplies in the internal tissues, and then spreads over the leaf surface and plant body surface. Common symptoms include exuding sap and rotting, mostly due to excessive watering or transmission through insects or contact between plants. Black rot symptoms: a common disease of orchid plants; when Phalaenopsis is affected, it usually rots entirely and dies, making it a quite serious disease. Control methods: Special attention must be paid to greenhouse ventilation, and the temperature also needs to be appropriately lowered. If an orchid plant develops this disease, spraying water must be avoided to prevent the disease from spreading. Fungicide powder should be sprayed to protect unaffected orchid plants, and diseased plants should be removed as quickly as possible.
Brown rot symptoms: This can be said to be one of the quite difficult orchid diseases to deal with. Initially, pale spots appear on the plant body or leaf surface, then gradually become darker and turn dark brown, and cause the plant body to wrinkle. Brown rot spreads quite quickly; from initial onset to wrinkling and rotting takes only one day. Usually infection occurs in the morning and rotting begins in the evening, making it a quite troublesome Phalaenopsis disease. Brown rot mostly occurs in environments with high air humidity, and is most likely to occur in spring and summer, when air humidity is relatively high and orchid plants grow relatively fast; once an orchid plant is infected, it easily causes surrounding orchids to become infected as well. Control methods: Brown rot easily occurs in environments with high air humidity. If diseased plants are found, stop watering, cut off the diseased parts, and apply fungicides. If the condition is severe or there is concern that the disease will expand, the diseased plants can be removed or isolated. If other orchid plants are at risk of infection, fungicide powder can be sprayed for prevention. Humidity in spring and summer must also be strictly controlled, and the orchid garden should be kept ventilated and the environment clean.
Mold: Too much variation in environmental humidity, or damage to the plant caused by soil and nutrient solution fertility factors, leads to mold attacking orchid tissues. Lowering the EC value of irrigation water and reducing medium moisture are common treatment methods. In addition, gray mold on orchid petals is also a mold disease; it forms small spots on orchid flowers. The cause of this disease is excessive dampness or too high relative humidity, and temperature and humidity control is required.
Spot disease symptoms: It mostly occurs on the leaves. In the early stage, round dark brown spots appear on the leaf surface, and the spots gradually spread and finally cause the orchid plant to rot. It is a type of fungal disease, mostly occurring in low-temperature, humid and poorly ventilated environments in autumn and winter. Control methods: This disease mostly occurs in low-temperature, humid and poorly ventilated environments. The primary control method is to improve dampness and keep the leaf surface dry, water as little as possible in cold weather, raise the environmental temperature and maintain ventilation, and prevent damp moisture from stagnating on the plant body. Leaf blight symptoms: In the early stage of leaf blight, discoloration begins at the leaf tip, then gradually spreads to the entire leaf and the whole plant, and finally the entire orchid turns dark brown, and the affected orchid plant becomes hard and dies. This disease is also caused by an excessively humid environment, and humidity control must be noted.
Control methods: Pay attention to humidity control in the orchid garden, and improving ventilation is also something requiring special attention. If there is concern about disease, fungicide powder can be sprayed for prevention; orchid plants that have already become diseased need to be cut away and isolated as soon as possible to avoid expanding the outbreak.
Insect pests. Slugs and snails. Slugs and snails are common Phalaenopsis pests. The commonly occurring damage is that young plant bodies are gnawed, producing small holes, affecting the appearance and growth of the orchid. Damage by snails and slugs is quite rapid, and in a short period many orchid plants can be affected. Once discovered, insecticide must be used as soon as possible to eliminate them. Mites and red spiders. Mites bite the leaf areas, causing deformation and discoloration, creating unfavorable factors for the appearance and growth of the orchid. Insecticides can be used to control this type of pest.
Physiological abnormalities caused by the environment. Bud drop. After Phalaenopsis finishes flowering, if light is too strong and room temperature is too high, the phenomenon of buds dropping before the flowering period ends easily occurs. It may also be caused by poor root development in the orchid. To address Phalaenopsis bud drop, one must start from the above two points. Spots. The appearance of spots on orchids is not necessarily a pathogen problem; sometimes too strong light or poor environmental adaptation can also produce the same symptoms. Attention must be paid to environmental changes, especially when plant bodies are moved.
Pest and Disease Management
Proper sanitary handling and weekly removal of infected plants can prevent the spread of most diseases. Bacterial infection is mainly caused by water droplets splashing onto the plant body, or by being affected during transport. This kind of disease cannot be controlled with chemical agents. Various diseases and their modes of transmission are as follows:
1. Bacterial diseases
Bacterial brown spot is the most serious disease of Phalaenopsis. The symptom is the appearance of brown spots on the leaves. They are oily or heart-shaped, and surrounded by yellow material. Treatment methods include adjusting the nitrogen amount in the fertilizer solution, removing diseased plants, and maintaining stable relative humidity. Chemical agents have no effect on this disease. Only by using plants in good growing condition and healthy plants can this kind of bacterial problem be avoided.
2. Mold
Too much variation in medium moisture or an unsuitable EC value can cause root damage, thereby prompting mold to attack the tissues. The way to deal with it is to lower the EC value of the irrigation water and temporarily reduce the moisture content of the medium.
3. Gray mold fungus
Another disease caused by mold is gray mold on the petals, which forms many small spots on the flowers. The cause is that the plant remains in a damp state for too long or the relative humidity is too high.
4. Fusarium
Fusarium causes black triangular spots, forming yellow and dark red areas on the basal leaves. The leaves will quickly drop. This disease easily occurs when the roots are in standing water.
Common Cases
1. Leaf spot: It mainly occurs on the leaves. In the early stage of the disease, small spots appear on the leaves, and later develop into nearly circular lesions. The lesion edges have a water-soaked yellow halo with clear boundaries. Control methods: Strengthen ventilation, lower air humidity, and cut off diseased leaves. During the disease period, spray with 75% chlorothalonil wettable powder at 800 times dilution, once every 10 days, for 3 consecutive sprays.
2. Gray mold: It occurs in spring when temperatures are low and humidity is high. Generally, small brown spots appear on the petals of white flowers, and in severe cases soft rot occurs. Control methods: Strengthen ventilation, lower humidity, and immediately cut off affected flowers. In the early stage of the disease, spray with 75% thiophanate-methyl wettable powder at 1000 times dilution, once every 10 days, for 2 consecutive sprays.
3. Brown spot: It occurs in summer and autumn under high-temperature and humid weather. It mainly occurs on the leaves. In the early stage of the disease, round small spots appear on the leaves, and later gradually expand into large lesions. The lesions are dark brown, and in severe cases the leaves turn black and wither. Control methods: Pay attention to ventilation and light transmission. In the early stage of the disease, spray with 10% Polyoxin at 80 times dilution once every half month.
4. Scale insects: The most common pest of Phalaenopsis. It mostly occurs in autumn and winter; poor indoor ventilation and dryness lead to scale insect damage. Control methods: Pay attention to ventilation, and the orchid plants should not be placed too densely. When only a small number is found, the scale insects can be wiped off with a soft cloth; repeating several times can eradicate the pest.
5: Soft rot
(1) Disease symptoms
Bacterial soft rot mainly harms the marginal leaves, crown leaves, leaf sheaths and basal stem. When it harms marginal leaves, it first causes mung-bean-sized, circular, water-soaked spots on the front of the leaf, and the expansion speed is especially fast. Under suitable conditions, within 5-8h it can rapidly expand into circular water-soaked rotten spots 3-4cm in diameter, and then spread into patches or even the whole leaf, causing the leaf to become soft and rotten. After the leaf mesophyll soft-rots, thread-like veins remain, and pus-like exudate overflows, giving off a rotten apple smell [1]. When it harms the leaf sheath, it starts from the sheath-wrapping membrane and moves upward along the leaf veins, causing the leaf to partially turn yellow; after expansion, the leaf sheath together with the leaf base partially discolors and soft-rots, and the entire leaf drops off. The symptoms of crown leaf infection and marginal leaf infection are basically the same, and in severe cases they rot together with the basal stem, and the entire plant dies.
(2) Causes of the disease
2.1 Repeated use of greenhouse rooms leads to a large pathogen base
The pathogens causing soft rot include 2 types, bacteria and fungi. They all overwinter in soil, weeds, seedling beds, and seedlings, are spread by wind and rain, and invade through wounds and stomata. Under suitable conditions they can all cause disease, becoming the main source of primary infection for the initial diseased plants. The larger the pathogen base, the more severe the disease in that year. At present, Phalaenopsis mostly uses soilless cultivation in greenhouses. Because greenhouse rooms are reused, a large number of pathogens reside in the indoor soil, seedling beds, trays and pots, and walls, making the disease worse year after year. Even in new greenhouses, because seedlings are introduced from epidemic areas, the seedlings themselves carry pathogens, which also becomes an important route for long-distance spread of the disease.
2.2 High temperature and high humidity
According to observation, when the temperature exceeds 26°C and humidity exceeds 60%, plants begin to develop the disease, and as temperature and humidity increase, the lesions expand rapidly and the spread speed accelerates [2]. While greenhouses retain heat, they also increase indoor humidity. Especially in summer and autumn, humidity approaches saturation and the temperature is also much higher than outdoor temperature. Even with fan ventilation and water curtain cooling, the daytime temperature is still above 30°C, and at night it is still 27-30°C. While cooling, the water curtain also increases indoor humidity. Therefore, inside the greenhouse there are more conditions for disease than outside. When watering, the splashed water droplets very easily spread pathogens from diseased plants to the surroundings, forming a disease center area centered on old diseased plants. While ventilating, fans also accelerate indoor air flow, speeding up the diffusion of pathogens within the greenhouse. At the same time, because nighttime humidity is greater, the speed of lesion expansion and the plant disease incidence are greatly higher than during the day. Overnight, small spots become large spots, and healthy plants become diseased plants. The degree of susceptibility varies greatly among plant lines. Generally, large-leaved cultivars are more susceptible, those with thick leaf wax are more resistant, plants that have not flowered are more resistant, plants that have already flowered are more susceptible, the Ruby cultivar is the most susceptible, and Taicun Red Angel and Shihua Diamond are not resistant.
(3) Control measures
3.1 Do a good job of disinfecting greenhouse rooms and seedlings
Before seedlings are moved through the greenhouse in spring, especially in reused greenhouses, disinfection must be carried out thoroughly to eradicate overwintering pathogens and reduce the pathogen base. For chemicals, 40% asomate at 100 times dilution, or sodium pentachlorophenate at 200 times dilution can be used for indoor spraying, and quicklime can also be spread at 500g/sq m for floor disinfection; after application, seal the greenhouse for 3-4d. In new areas, avoid introducing seedlings from epidemic areas, and pay attention to inspection and quarantine work for newly introduced seedlings. Immediately after entering the greenhouse, spray with 10% Duoxiu liquid formulation at 800 times dilution for sterilization, for 2-3 consecutive sprays. Susceptible lines should be cultivated separately from other lines to avoid cultivation in the same room and on the same bench, reducing cross-infection.
3.2 Strengthening water and fertilizer management
Phalaenopsis is a flower with high water requirements, but if the amount of watering is too large or too frequent, the substrate in the pot will hold too much water and remain saturated for a long time, resulting in poor aeration, which can easily cause root rot, affect healthy plant growth and reduce disease resistance. Each watering should follow the principle of alternating dry and wet: do not water when the medium is still moist, and water slowly and gently to prevent water from splashing onto the leaves. It is best if the water just penetrates to the substrate at the bottom of the pot. Watering in the morning is generally preferable; avoid watering in the evening and leaving water on the leaves overnight, and keep the water temperature as close to room temperature as possible. For seedlings whose substrate has been wet for a long time, the pot bag can be removed to let the plants dry out. Fertilization of Phalaenopsis is generally carried out together with watering. Fertilization should follow the principle of applying thin fertilizer frequently, with compound fertilizers and organic fertilizers rich in nitrogen, phosphorus and potassium being preferable. During the seedling stage, a compound fertilizer with a high nitrogen content can be applied; during the flowering induction stage, a compound fertilizer with a high phosphorus and potassium content can be applied; and during the high-temperature disease outbreak period in summer, trace elements such as calcium and magnesium can also be added.
3.3 Reducing temperature and humidity in the greenhouse and strengthening patrols
The optimum temperature for Phalaenopsis growth is 25-30°C, and the optimum humidity is 60%-70%, but in summer the temperature and humidity inside the greenhouse greatly exceed these limits. Adding a double layer of shade netting can not only lower the temperature inside the greenhouse but also prevent strong light from scorching the leaves. Simple greenhouses without ventilation equipment should open the surrounding greenhouse covers to lower temperature and humidity. In greenhouses equipped with fans and wet curtains, special attention should be paid to reducing the wet-curtain watering time at night while extending the ventilation time. Seedlings on the benches should not be placed too densely; a certain spacing between plants and rows should be maintained to avoid crossing and overlapping leaves, so as to facilitate ventilation and light penetration and create a good microclimate for healthy plant growth. Keep the greenhouse clean and hygienic at all times, ensuring there are no weeds and no diseased leaves or plant debris in the greenhouse. Starting from the early stage of disease onset, persist in patrolling the greenhouse 2-3 times a day to promptly find diseased plants and remove diseased leaves. For diseased leaves with small lesions, they can be cut off at healthy tissue 4-5 cm away from the lesion. Leaves that are completely rotted should be removed thoroughly together with the leaf sheath. Diseased leaves should be promptly taken out of the greenhouse and buried deep. Diseased and disabled plants should be isolated promptly to prevent repeated infection. The scissors and knives used should also be disinfected to prevent human-mediated spread.
3.4 Chemical control
For bacterial soft rot, starting from the early stage of disease onset, alternately spray 600-fold Caijunqing solution or 3,000-4,000-fold agricultural streptomycin solution every 7-10 d. For fungal soft rot, 80% thiophanate-methyl or 80% mancozeb at 800-1,000-fold can be used, sprayed continuously 2-3 times. The spray should be uniform, so that water drips from the leaf surface and the base is also soaked. Spraying should preferably be finished by 15:00-16:00 so that the water on the leaf surface can dry before nightfall, reducing the humidity inside the greenhouse and on the leaf surface.
(2) Viruses
The symptoms of virus-infected Phalaenopsis are smaller flowers and slower growth. However, the growth traits of some varieties are not affected by virus infection. The symptoms of viruses are more obvious during the low-temperature flowering induction stage. The greatest impact of viruses on Phalaenopsis lies in growth speed.
(3) Insects and small animals
1. Slugs and snails
Slugs and snails bite small holes in young plants and can damage many plants within just a few days. They also bite and damage root tips. The use of chemicals can effectively control these small animals.
2. Mites
Spider mites cause slight deformation and severe color changes on the leaves. Because their distribution is concentrated, they can be controlled with insecticides.
3. Thrips: Brown thrips are usually found on every part and appear in groups. Chemical agents are difficult to use for eradication. Removing diseased plants is the best solution.
4. Sciaridae, fungus gnats: This insect attacks root tips. Applying predatory natural enemies (Hypoaspis predatory mite, 100-150/ 2) and hanging yellow sticky insect traps can prevent infection.
(4) Physiological abnormalities caused by the environment
1. Bud drop
At the stage when flowering is being completed, if the light is too strong or the temperature is too high, the buds are likely to fall off the flower stalk. Poor root quality can also cause this phenomenon. If flowers do not undergo an acclimation stage before transport, bud drop can also occur.
2. Chilling injury during transport:
When plants are transported from the growing area to the sales area, orange-red spots may appear on the leaf surface, usually caused by cell death due to chilling injury. Other environmental stresses or excessively strong light can also cause this.
(5) Phytotoxicity: caused by the use of unsuitable chemical agents.
Harvesting and packaging
The flower stalk should be fixed with a support or hanging wire. It can be harvested when there is still one unopened bud. Insert the flower stalk into a preservation tube containing 16 cc. Chrysal or hot water at 40-45°C can be used as the preservation solution. Place the bouquet in a packing box and store at 7-10°C. If the flowers are slightly wilted, the stalk can be cut again and placed in hot water at about 40°C. Vase life ranges from 5 days to 6 weeks, varying with variety and surrounding environment. The dimensions of the cut flower packing box are 100 x 15 x 11.5 cm. Usually one box contains 25-30 flowers. The selling price varies with variety and the orchid nursery producing them.
1. Harvesting stages
The harvesting of Phalaenopsis generally includes two stages:
1. From the bud stage to full opening;
2. From full opening to maturity and senescence.
2. Purpose of harvesting
1. To promote the opening of Phalaenopsis buds so that Phalaenopsis can fully display its ornamental characteristics;
2. Second, to reduce metabolism, delay the flowering and senescence process, and prolong the life of Phalaenopsis.
3. Harvesting methods
Phalaenopsis is harvested when the flowers are fully open or when the buds have been open for 3-4 days. For markets that are nearby, harvesting can be slightly later; for markets that are farther away, harvesting should be slightly earlier. In addition, attention should also be paid to the harvesting time within a day. Harvesting in the morning can maintain high turgor pressure in the flower cells of Phalaenopsis, that is, at this time the water content of Phalaenopsis flowers is the highest, which helps reduce the occurrence of postharvest wilting; however, morning harvesting, because of heavy dew, is also relatively humid and more susceptible to infection by fungal and other diseases.
Economic evaluation
With a production area of 1,000 sq m, the economic evaluation is as follows:
a. Cultivation area: 1,000 sq m
b. Actual planting area: 870 sq m
c. Area used for cultivation: 87 sq m
d. Area used for flowering plants: 783 sq m
e. 20 plants per sq m, totaling 15,666 plants.
f. Product: 2.5 flower stalks per year, with 39,150 flower stalks produced annually. Each flower stalk has 8-10 flowers, yielding 313,200 flowers annually.
g. Average price in 2003: 0.51 euros per flower
h. Output value of 1,000 sq m: 159,732 euros
i. Output value per sq m: 160 euros
Edit this section: Cultural symbolism
Meaning of the famous orchid
Phalaenopsis flower language: I love you, happiness is flying to you
Zodiac signs corresponding to Phalaenopsis: Aquarius & Sagittarius, representing loyalty, wisdom, rationality, and virtue.
Phalaenopsis of various flower colors also have different meanings:
White Phalaenopsis: pure love, precious friendship
Red-centered Phalaenopsis: good fortune ahead, eternal union
Red Phalaenopsis: smooth career, happiness and fulfillment
Striped Phalaenopsis: everything goes smoothly, wishes come true
Yellow Phalaenopsis: flourishing career, prosperous business
Mini Phalaenopsis: happy angel, in the prime of life
Phalaenopsis -- first love, gradual happiness, pure beauty
Flower language of life
◇White Phalaenopsis: pure love, precious friendship
◇Red-centered Phalaenopsis: good fortune ahead, eternal union
◇Red Phalaenopsis: smooth career, happiness and fulfillment
◇Striped Phalaenopsis: everything goes smoothly, wishes come true
◇Yellow Phalaenopsis: flourishing career, prosperous business
◇Mini Phalaenopsis: happy angel in the prime of life
Phalaenopsis flower language: I love you, happiness is flying to you
Zodiac signs corresponding to Phalaenopsis: Aquarius & Sagittarius, representing loyalty, wisdom, rationality, virtue
Prose for enjoyment
Phalaenopsis
Phalaenopsis is a beautiful "princess" that brings people much fragrance and beauty.
The stem of Phalaenopsis is black, the leaves are spoon-shaped and emerald green, and the beautiful flowers emerge from the spoons, wearing purple clothes; some have only unfolded two or three petals, some have all their petals fully unfolded, revealing pearl-like stamens; some are still flower buds, looking as if they are about to burst open at any moment. At this moment, are the Phalaenopsis I see not just little purple butterflies? Oh! I understand, this is how Phalaenopsis got its name.
Little butterflies, one after another, stop on the flower stems, as if they are looking at all of us! They also seem to be saying to us: "Everyone, look at me quickly, I am the princess among all flowers!" At this time Phalaenopsis smiles at us; now it nods, now looks here, now looks there, and sometimes even dances for us from time to time! The Phalaenopsis princess is truly both naughty and lovely!
Phalaenopsis is really so beautiful!
References:
1. Introduction to Phalaenopsis and key care points
2. Taitung City city flower