What to do when hydrangea leaves turn yellow? Increase light, adjust temperature, spray to prevent pests and diseases
Hydrangea, also known as Ziyang qinhua or hydrangea, originated in China during the Ming and Qing dynasties and has high ornamental value. The hydrangea has luxuriant branches and leaves, is extraordinarily beautiful and elegant, and its flowers are pure white, full, large and beautiful, delighting the eye and refreshing the mind. It is a common ornamental shrub. The lenticels are obvious, and the leaves are large and slightly thick. Below, the editor will explain to everyone how to prevent hydrangea leaves from turning yellow.
I. Causes of yellowing hydrangea leaves and solutions
1. Maintain acidic soil
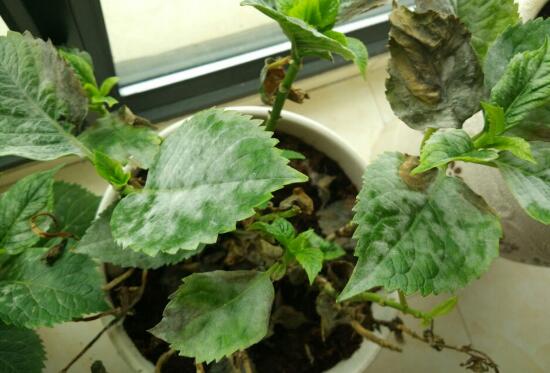
Hydrangea is suitable for growing in acidic soil, because acidic soil contains a large amount of iron, which can meet its nutrient needs. If grown in alkaline soil, it easily leads to an acid-base imbalance, and the leaf color gradually turns yellow. When the soil is acidic, the flowers are blue; when the soil is alkaline, the flowers are red.
Water with ferrous sulfate solution or potassium dihydrogen phosphate solution once every 10-20 days to ensure the soil is acidic. Or directly water with a 150-250 times diluted edible rice vinegar solution, and results can be seen in 3-4 applications. When planting or repotting and changing soil, add sulfur powder to the soil to ensure the soil is acidic, and its effective period can last 2-3 years.
2. Maintain suitable temperature
Hydrangea likes a warm, semi-shaded environment. A suitable temperature can extend the ornamental period of hydrangea. The suitable growth temperature for hydrangea is 18-28°C, and the winter temperature should not be lower than 5°C. High temperatures easily cause the flower color of hydrangea to fade.
3. Proper balance of dry and wet
Hydrangea likes a relatively moist environment. Too much watering causes waterlogging in the pot soil and lack of oxygen, which easily leads to root rot and yellowing leaves. Too little watering makes it hard for the lower part to absorb water, causing the leaf tips to turn yellow.
When overwatered, loosen the soil, and when the soil dries, water a small amount to keep the soil moist. When underwatered, first water a small amount, and at the same time spray some water into the air to keep the air humid.
4. Correct fertilization
Overfertilizing hydrangea or applying raw fertilizer very easily burns the roots, causing leaves to turn yellow. Underfertilizing hydrangea or not changing the soil for a long time means the plant lacks nutrients for growth, and the leaves easily turn yellow.
When overfertilized, water a small amount, or change the soil and replant. If underfertilized, appropriately apply some fertilizer to ensure normal plant growth.
5. Light requirements
Hydrangea likes shade and not direct sun. When moved outdoors in spring, it should be placed in a semi-shaded spot for care. In midsummer, place the plant in a well-ventilated shaded area to prevent scorching by strong sunlight. After September, as light gradually weakens, place the plant in a bright spot to promote flower bud differentiation.
6. Pest and disease control
Diseases include wilt disease and leaf spot disease, which require spraying with a 500 times dilution of 65% zineb wettable powder for control. Pests are mainly aphids, which can be treated with a folk remedy: soaking cigarette butts in water to rinse them, which is quite effective, or spraying with a 1500 times dilution of 40% omethoate emulsifiable concentrate to kill them.
That is all the editor has to introduce about hydrangea leaves turning yellow. If there is anything you still do not understand, you can look up relevant knowledge online. I hope today's explanation from the editor can be of some help to everyone.
What to do when hydrangea leaves turn yellow
Hydrangea is also called baxianhua. Its flowers are pure white and huge, and the flower colors include red and blue. When in full bloom, they delight the eye and refresh the mind. As a common potted ornamental flowering plant, hydrangea is also grown in most areas of China. But many people wonder why hydrangea leaves easily turn yellow, and what to do when hydrangea leaves turn yellow. Below, the editor will introduce it to you.
What to do when hydrangea leaves turn yellow
Hydrangea leaves turning yellow is mainly caused by light, watering, ventilation, and pests and diseases.
The light requirement for hydrangea is full sun, not shade. Only during the high-temperature period in summer when light is intense should it be shaded by 30-50% to prevent leaf scorch. At other times, do not shade it, otherwise the leaves easily turn yellow.
Hydrangea should be watered evenly, watering thoroughly only when the soil surface is dry. Do not keep the pot soil moist, and even less should there be waterlogging or drought. Otherwise, a large number of leaves will fall, especially the lower old leaves, which drop noticeably.
At the same time, good ventilation is a very key link for hydrangea; in poorly ventilated, closed places, leaves easily turn yellow and fall.
In addition, do not fertilize hydrangea too much at one time; if your hydrangea has already reached about 40 cm in height or taller, and the lower leaves have fallen, you can place it in a spot with sufficient light, then strengthen fertilizer and water management. After a week, cut back every branch to rejuvenate and renew it, keeping only about 5 cm on each branch (note that you must keep the plant shape attractive; pruned branches forming a mushroom or round shape look good). More branches will sprout. Since hydrangea flowers bloom at the tips of new branches, this method will increase the amount of blooming. Moreover, the pruned branches can also be cuttings placed in plain sand, where they root easily.
Growth habits of hydrangea
Hydrangea is native to China and Japan. It likes a warm, moist and semi-shaded environment. The suitable growth temperature for hydrangea is 18-28°C, and the winter temperature should not be lower than 5°C. Flower bud differentiation requires 6-8 weeks at 5-7°C. A temperature of 20°C can promote flowering, and maintaining 16°C after flowering can extend the ornamental flowering period. But high temperatures make the flowers fade quickly.
The pot soil of hydrangea should be kept moist, but watering should not be excessive. Especially in the rainy season, pay attention to drainage to prevent waterlogging from causing root rot. In winter, indoor potted hydrangea is better kept slightly dry. If too moist, the leaves easily rot.
Hydrangea is a short-day plant. With more than 10 hours of darkness each day, flower buds form in about 45-50 days. In daily cultivation, avoid direct sunlight, and 60%-70% shading is most ideal.
The soil for hydrangea is best as loose, fertile and well-drained sandy loam. But changes in soil pH greatly change the flower color of hydrangea. To deepen the blue color, aluminum sulfate can be applied during the flower bud formation period. To maintain pink, lime can be applied to the soil.
The above is a simple summary of what to do when hydrangea leaves turn yellow. Hydrangea not only has a particularly beautiful flower shape, but its flower color is also very appealing. Growing one at home can not only beautify the environment, but also symbolizes a beautiful meaning. When cultivating, pay attention that hydrangea likes sun, warmth and a semi-shaded environment, and always pay attention to regulating humidity and ventilation.
Potted cultivation methods of hydrangea and main pest and disease control techniques
How to grow hydrangea and when does it bloom? Today's main content is to discuss potted hydrangea cultivation techniques and propagation methods. With such a beautiful hydrangea, how could flower growers miss it?
1 Propagation
Hydrangea propagation mostly uses methods such as division, layering and cuttings.
1.1 Division propagation
It is best carried out in early spring before new branches sprout. First take the mother plant out of the pot, remove most of the old growing medium, expose the new buds and the extending direction of the sprouting root system, remove the outer dead roots and old roots, and separate the root system that has tangled together, injuring the roots as little as possible. Use a sharp knife to cut apart the part connecting the tiller seedlings and the mother plant, then plant them separately and manage them, and they become independent plants.
1.2 Layering propagation
Generally carried out before the plum rain season. Select robust, semi-lignified branches free of pests and diseases, use a sharp knife to make a 360° girdling cut up and down to the phloem, then peel off the bark. The girdling width is best at 3 times the branch diameter. Use plastic film to wrap the cut area with moist moss, peat soil or growing medium, wrapping it into a spindle shape and tying it tightly at the top and bottom. If the wrapped medium becomes dry and white, a syringe can be inserted to add water. Under suitable temperature and humidity, roots can form in about 1 month, and after 3 months it can be cut from the mother plant, the plastic film removed, potted, and with careful management cultivated into an independent plant.
1.3 Cutting propagation
The best time for cutting propagation is May to June, carried out together with pruning and post-flowering shaping. Select tender, semi-lignified or lignified branches free of pests and diseases, 8-10 cm long, keep 2-3 leaves at the top and cut off 1/2-2/3 of each. Soak in 250 mg/kg ABT rooting solution for about 30 min, then first make holes with a bamboo stick and insert them into a cutting bed with garden soil, river sand, vermiculite or perlite (ratio 6:2:2) as the medium. Shade appropriately, keep the bed soil moist, pull out weeds in time, and roots begin to sprout in about half a month. After that, gradually reduce the frequency of spraying water, increase light, and transplant in about 1 month.
2 Cultivation management
2.1 Medium
Hydrangea likes loose, fertile and well-drained loam. In winter, mix equal amounts of sawdust, pig and cattle manure, peat and garden soil evenly, and use them after they are fully decomposed. The flower color of hydrangea is greatly affected by soil acidity and alkalinity; in acidic soil the flowers are mostly blue, while in alkaline soil the flowers are red.
2.2 Transplanting and shaping
After transplanting the seedlings, pay attention to moderate shading and spray water on the leaves at irregular intervals to help them recover. When new branches grow to about 8 cm, pinch off the growing tips to promote branching, promptly thin out overly dense and overlapping branches, and keep 3-5 branches so as to form a better plant shape.
2.3 Temperature
The suitable growth temperature is 15-27°C. North of the Yangtze River, it cannot overwinter outdoors, and in winter it needs to be moved into a greenhouse above 5°C to overwinter, so as to avoid cold damage. In hot summers, cooling measures such as moderate shading, enhanced ventilation and spraying water on the leaves can be used.
2.4 Light
Hydrangea is a short-day plant. With more than 10 hours of darkness each day, it takes about 6 weeks to form flower buds. Hydrangea likes a semi-shaded environment. Too strong light will cause the leaves to lose green and turn white, and in severe cases even cause leaf scorch and dieback. Under moderate light, the plant grows robustly and the leaves are deep green. In intense summer heat, use a 70% shade net for shading. On sunny days, pull the shade net on at around 10 a.m. and pull it off at around 4 p.m.; on cloudy and rainy days, remove the shade net entirely. Note that when removing the shade net, it should be removed gradually to avoid the plant leaves suffering discomfort due to a sudden change in light.
2.5 Watering
Watering should not be too frequent or too much; it is best to keep the soil moist regularly. In hot dry summer, spray water on the leaves to lower leaf temperature and slow the rate of water transpiration. In winter, follow the principle of "water when dry, stop when wet," control watering during dormancy, and maintain a semi-dry state. Before and after budding, the plant's water requirement increases significantly, and it is best to water 1-2 times a day in the early morning and evening.
2.6 Fertilization
During the growth period, apply decomposed cake fertilizer water once every 10-15 days, and spray once every 15 days or so with 0.1% urea or 0.1%-0.2% ferrous sulfate solution. During flower bud differentiation, appropriately increase the application of P and K fertilizers. During dormancy, stop fertilizing.
2.7 Main pest and disease control
2.7.1 Leaf spot disease
It mainly harms leaves. The spots are round to polygonal, brown or dark gray, with purple-brown or nearly black-brown edges. In the early stage of the disease, spray with a 500 times dilution of 65% zineb wettable powder or Bordeaux mixture, once every 10 days, for 2-3 consecutive sprays.
2.7.2 Rust disease
It mainly harms leaves. Larger pale yellow to rust-brown spore masses appear on the leaf surface, and diseased leaves dry up and break apart. In the disease season, spray with a 800 times dilution of 15% triadimefon wettable powder every 10 days, for 2-3 consecutive sprays.
2.7.3 Damping-off
It mainly harms leaves and stems. Water-soaked yellow-brown spots appear on leaves near the ground and spread to the stems, causing leaves to dry up and stems to turn black and rot. In the early stage of the disease, spray with a 800 times dilution of 75% chlorothalonil or a 500 times dilution of 50% thiram wettable powder every 10 days, for 2-3 consecutive controls.
2.7.4 Powdery mildew
It mainly harms leaves, and in severe cases can infect stems. A layer of light gray mold appears on the leaf surface, later gradually becoming light brown. During the disease period, spray with a 1000 times dilution of 15% triadimefon wettable powder or 70% thiophanate-methyl wettable powder, once every 7 days, for 2-3 consecutive sprays.
2.7.5 Scale insects
They mainly harm young tender stems and leaves, causing leaf color to turn yellow and branches to dry up. When the pest infestation is light, they can be gently brushed off with a soft brush and then rinsed clean with water. When using chemical control, it is best to spray a 1000 times dilution of 80% dichlorvos or 50% fenitrothion emulsifiable concentrate during the nymph hatching period.
2.8 Others
Strictly strengthen quarantine to prevent diseased plants from entering the nursery. Always pay attention to environmental hygiene, promptly remove surrounding weeds, and strengthen ventilation and light penetration. Promptly remove diseased leaves, pull out diseased plants and destroy them.
3 Forcing cultivation
Hydrangea is a short-day plant. With more than 10 h of darkness each day and a night temperature of 10-20°C, flower buds can form in about 6 weeks. After flower bud differentiation is complete, gradually reduce watering to help the branches fully mature. Remove the leaves and move it into a cold room, control water and fertilizer, maintain a semi-dry state, and promote full dormancy. After 6-8 weeks, forcing cultivation can begin. At the initial stage of forcing cultivation, the temperature should not rise too high too quickly; it is best to first raise it to 13-15°C, and after 3-5 days, gradually raise it to about 20°C, while maintaining sufficient light, moist soil and relatively high air humidity. When the flower buds are visible and the inflorescence elongates, quickly lower the temperature to about 16°C, reduce air humidity, and it will bloom in about 3 weeks. During the flowering period, sufficient water and full light are needed. Hydrangea flowers are large and the plant is fairly bulky. To avoid drooping or lodging when flowering, stakes can be set up for support to maintain its high ornamental effect.
That is all for the above potted hydrangea cultivation techniques. Dear flower growers, if you think it is not bad, you can continue to follow Huinong Network!