What to Do When Wintersweet Leaves Turn Scorched? Four Methods to Make the Leaves Shiny and Dark Green
What to do when wintersweet leaves turn scorched
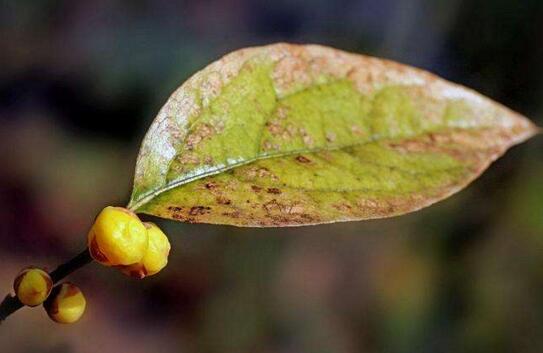
Because wintersweet has extremely strong adaptability, leaf scorching is relatively rare. Statistics show that the main causes of this phenomenon are lack of light, too little fertilizer, too much watering, and pests and diseases.
1. Lack of light
Wintersweet likes ample sunlight, and only sufficient light can keep its leaves emerald green and glossy. When light is lacking, the leaves' photosynthesis weakens, ultimately slowing down metabolism, and the leaves become scorched.
Solution: Do not keep wintersweet in a place lacking light for a long time. If it is grown in the open ground, move it to a place with sunlight; if it is a potted indoor plant, move it to a bright place, or supplement with scattered light.
2. Too little fertilizer
Too little fertilizer includes two aspects: first, the amount applied at each feeding is insufficient; second, the interval between feedings is too long. Both situations can cause wintersweet to lack nutrients, and the leaves then show scorch-like symptoms.
Solution: What to do when wintersweet leaves turn scorched due to fertilizer problems? Apply extra fertilizer in time, but be careful not to apply too much. Generally, apply extra fertilizer once every 15-20 days. Normally, apply thin fertilizer frequently. We have described the specific method in detail in how to fertilize wintersweet.
3. Too much watering
Scientific research has found that wintersweet is drought-tolerant and afraid of waterlogging, meaning it is very afraid of soggy conditions. If watering is too frequent and each watering is also too heavy, its roots will rot and be unable to absorb nutrients, so some leaves become scorched.
Solution: Be careful not to water too frequently, and do not water too much each time. If it is rainy, pay attention to soil drainage to avoid rainwater collecting in the pot and causing water accumulation in the pot.
4. Pests and diseases
Many diseases can cause leaves to turn scorched, such as black spot disease, leaf blight, and so on. These diseases are mainly caused by fungi, insect pests, and so on, and they are also the chief culprits threatening the growth and life of wintersweet.
Solution: What to do when wintersweet leaves turn scorched due to pests and diseases? Remove diseased leaves in time. When disease spots are found on branches and leaves, treat them with medicine in time to avoid the disease spreading. Usually pay attention to proper care and keep the environment well ventilated.
What to Do When Bird's-Nest Fern Leaves Turn Scorched
1. Improper watering
Cause: Insufficient water supply will cause its leaves to develop scorched edges. Too much water in the potting soil, or potting soil that is too dry, will both affect the root system and cause scorched edges on bird's-nest fern leaves.
Treatment: Adjust the amount of watering according to whether the potting soil is dry or wet. In addition, decide according to the season. In summer, when temperatures are higher and water evaporates faster, water often and also maintain air humidity; in winter, when temperatures are low, do not water too much. Spraying a small amount of water to keep the potting soil moist is enough.
2. High temperature damage
Cause: Bird's-nest fern is a shade plant and is not tolerant of strong light. If exposed to strong light for a long time, the leaves will shrink, dehydrate, and develop scorched edges.
Treatment: Choose a semi-shaded environment to grow bird's-nest fern, ensuring about 2 hours of light, which can keep the spider plant evergreen. As summer begins, lower the temperature through covering, sprinkling water on the ground, and ventilation measures. If leaves with scorched edges have already appeared, cut them off in time and avoid exposure to strong light.
3. Low-temperature freezing damage
Cause: Although bird's-nest fern is a shade plant, it also likes a warm environment. In winter, if the temperature is below 10°C, bird's-nest fern is easily frostbitten, and if it is below 5°C, it may die.
Treatment: First move the plant to a warm place and keep the temperature above 10°C. Smoking, applying more warm fertilizers, and other methods can also help the plant survive the winter.
What to Do When Yew Leaves Dry Up: 8 Causes Need Comprehensive Consideration / Coping Tips Included
The bark of yew is usually grayish brown or reddish brown. Its leaves are arranged in two rows, dark green on top and pale yellow-green underneath. The leaf surface is glossy and has high ornamental value. However, sometimes for various reasons it suffers from leaf drying, which is very headache-inducing. So what to do when yew leaves dry up? The editor will tell you 8 causes and solutions.
What to do when yew leaves dry up
1. Excessive watering
Although yew prefers a moist environment, if watered excessively, the soil will become too wet, thereby preventing air from entering the soil to be absorbed by the roots. This prevents the roots from breathing normally and absorbing nutrients, causing young leaves to turn pale yellow and old leaves to dry up.
Solution: Reduce watering, let the soil dry out appropriately, and ensure the soil is breathable and drains well.
2. Too little watering
If watering is too little for a long time or even not done at all, the soil will become dry. Although yew has a certain drought tolerance, its growth needs some water, and if watered too little, the leaves will become dull and lose their gloss.
Solution: Increase the number of waterings, but do not water heavily all at once. You can spray a small amount of water. After yew leaves return to normal, water reasonably according to yew watering methods.
3. Malnutrition
If fertilizer is often not applied, or if fertilization lacks any one of the nutrient elements nitrogen, phosphorus, or potassium, the leaves will become weak, thin, and small, and over time the leaves will dry up and fall off.
Solution: What to do when yew leaves dry up due to malnutrition? Replace the soil in time and use more fertile nutrient soil to increase the soil's nutrient content. During daily care, apply dilute, fully decomposed compound fertilizer and pay attention to balanced nutrition.
4. Excessive fertilizer
Yew needs nutrients to grow, but its nutrient demand is not as high as that of other plants. Excessive fertilizer will make new leaves uneven on the surface, with thick leaves and dry, scorched tips.
Solution: Stop fertilizing immediately, then increase the number of waterings so that excess fertilizer drains out from the bottom of the pot with the water. If there is still no improvement, replace the soil.
5. Temperature too high
Yew can adapt to a certain degree of high-temperature weather, but if it is kept indoors, summer temperatures of 37 degrees can easily dry out the leaves. If shade and cooling are not provided in time, the leaves may be scorched.
Solution: When the temperature is relatively high, place the yew in a shady place as much as possible, or move it back to a cool indoor area, and be careful to spray more water to lower the temperature.
6. Soil and water too alkaline
Yew is more suitable for growing in neutral or slightly acidic soil. If the soil and water alkalinity is too high, it will cause a lack of absorbable soluble iron in the soil, causing yew leaves to dry up and turn yellow.
Solution: When choosing soil, slightly acidic soil is best. When watering, the alkalinity of the water must not be too high. In the north, it is best not to use groundwater for irrigation.
7. Light too weak
Yew likes a semi-shaded environment, but it cannot be placed in a place with insufficient light, such as a dark room, a dim corner, and so on. This may not only dry out the leaves but also cause yew to become leggy.
Solution: Immediately move the yew to a bright or semi-shaded place. If indoor light is limited, use lights to increase light.
8. Caused by pests and diseases
Yew may be affected by some insect pests and diseases, such as stem rot, red spider mites, and so on. Once these pests and diseases appear, they may cause the leaves to dry up and disease spots to appear on the surface.
Solution: Promptly spray and disinfect with carbendazim and other medicines. At the same time, strengthen care and management, keep the environment well ventilated, and prevent the temperature from being too high or too low.