How to Fertilize Hibiscus: Fertilization Methods for Hibiscus / Balanced Nutrition and Never Overdo It
Fertilizing, like watering, is very important in the cultivation of hibiscus, and when fertilizing, the choice of fertilizer and the amount to use both need to be considered. So how do you fertilize hibiscus in a more scientific way? Let's look at the fertilization methods for hibiscus.
How to Fertilize Hibiscus
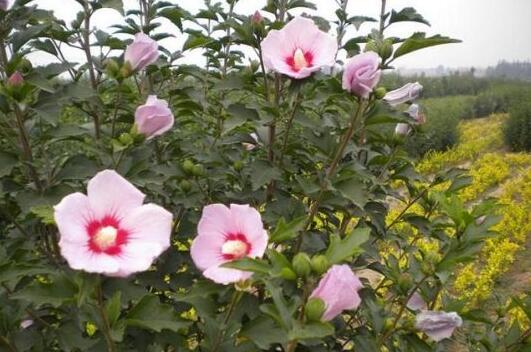
The principle of fertilizing is to provide the nutrients needed for hibiscus growth while also promoting its growth, budding, and flowering, so at different growth stages, the fertilizer applied will also differ. Exactly how do you fertilize hibiscus? Below are the specific methods.
Fertilization Methods for Hibiscus
1. When Potting
When potting, base fertilizer should be added at the bottom of the pot or into the soil. Since hibiscus does not have high requirements for soil pH, the base fertilizer can be applied with confidence, and it can be made by mixing decomposed livestock manure with compound fertilizer.
2. After Sprouting
After sprouting, hibiscus enters a period of vigorous growth, usually in mid-to-late April. At this time, quick-acting fertilizer is mainly used, which ensures that the sprouts can absorb sufficient nutrients more quickly, promotes healthy growth of the hibiscus, and makes the leaves more deep green.
3. Before Flowering
Before flowering, a phosphorus fertilizer can be applied once. It promotes flowering, makes the flower color more vivid, and allows some weaker-growing plants to sprout flower branches.
4. During Flowering
During flowering, fertilization needs to be reduced, generally once every two months is sufficient. Compound fertilizer is mainly used, which can extend the flowering period and prolong the viewing time.
5. After Flowers Fade
After the flowers naturally fade, the temperature gradually drops, and the hibiscus slowly enters its winter dormancy. Before winter arrives, a nitrogen fertilizer can be applied once to improve its resistance during overwintering and help it overwinter smoothly.
What to Do If You Over-Fertilize Hibiscus
Never over-fertilize. If too much fertilizer is applied, there are two methods to solve the problem. The first is to replace the potting soil. If there is too much fertilizer in the soil, it will cause fertilizer burn, and replacing the potting soil is a relatively thorough solution.
The second method is to bury radish seeds around the roots, letting the seeds absorb the excess nutrients in the soil. Once the seeds sprout, pull them out. At the same time, be sure to water more when over-fertilization occurs.
How to Grow Hibiscus: Cultivation Methods and Precautions for Hibiscus / Do Not Overdo Water and Fertilizer
We know that among the benefits and uses of hibiscus, it not only has high nutritional value but can also treat many ailments, so many people grow it. So how do you grow hibiscus so it thrives better? Let's look at the cultivation methods and precautions for hibiscus.
How to Grow Hibiscus
To know the cultivation methods for hibiscus, you first need to understand its growth habits. Hibiscus has very strong adaptability to the environment. It is tolerant of dryness, shade, heat, cold, pruning, waterlogging, and poor soil, and combined with its extremely strong ability to send up suckers, it is very easy to keep alive.
Suitable Environment for Hibiscus
1. Soil
Hibiscus's requirements for soil may be the most relaxed among plants. It can grow in heavy clay and also in poor soil, but to grow it better, using fertile, well-draining acidic soil is preferable.
2. Temperature
Hibiscus has strong cold and heat tolerance, but it prefers a warm environment, so in the cultivation methods and precautions for hibiscus, 18-25 degrees is most suitable, when it grows fastest. In winter, note that the temperature must not be below 0 degrees, and in summer it should not be above 35 degrees.
3. Light
Hibiscus has outstanding shade tolerance and can grow normally in a semi-shaded environment, but it prefers an environment with ample light. Lack of light will cause its flower color to be dull and flowering to be reduced, so it should be placed in a bright spot for care. If it is in a full-light environment, it should be shaded in summer.
Cultivation Methods for Hibiscus
1. Watering
Hibiscus has strong tolerance for both drought and waterlogging, but during cultivation, the soil should be kept from becoming too dry or frequently waterlogged. So when watering, keep the soil moist and do not let it become too dry. In summer, water should also be sprayed on the leaves.
2. Fertilizing
Hibiscus is a fertilizer-loving plant, so when fertilizing, how do you grow hibiscus? Pay attention to rational fertilization. For example, before buds form, phosphorus and potassium fertilizer should be applied to promote flowering and make the flower color more vivid, while during the growth period, nitrogen fertilizer should be applied to provide the nutrients needed for growth and make the leaves more emerald green.
3. Pruning
When hibiscus sprouts in spring, shaping and pruning can be carried out. In the spring of the second year after planting, the trunk can be cut back to promote branching at the base, thereby training the hibiscus into an ideal tree shape and increasing its ornamental value. In the cultivation methods and precautions for hibiscus, pruning is easily overlooked.
Precautions for Growing Hibiscus
1. Loosening Soil and Repotting
Whether grown in the open ground or in pots, regular soil loosening and repotting are needed. Generally, the soil should be loosened or the pot changed once every 1-2 years to ensure soil aeration and good drainage, while also preventing the soil from becoming too poor and affecting flowering.
2. Soil Disinfection
Although hibiscus does not have high requirements for soil, it is not entirely without requirements, and the most important point is that the soil must be healthy and free of pathogens and insect eggs. To achieve this, the soil needs to be disinfected before planting.
3. Do Not Use Too Much Water or Fertilizer
Whether watering or fertilizing, note that excess is not advisable. Do not pour large amounts of water just because it tolerates waterlogging, causing the roots to soak in water for a long time. Over-fertilizing will cause the leaves to become thick and fleshy and will also affect flower bud formation. This kind of shortcut is not advisable when growing hibiscus.
How to Grow Potted Hibiscus
If growing hibiscus as a household potted plant, in addition to understanding the above points, you also need to pay attention to the prevention and control of pests and diseases. The preventive method is to keep the environment ventilated and clean, and when pests or diseases occur, treat them promptly with medication to avoid the damage spreading.
How to Propagate Hibiscus: Propagation Methods for Hibiscus / Cuttings and Division Are the Most Practical
Hibiscus grows very quickly, so after keeping hibiscus for 3-4 years, flower lovers need to consider the issue of propagation. As a deciduous shrub, how is hibiscus best propagated? Let's look at the propagation methods for hibiscus.
How to Propagate Hibiscus
The commonly used propagation methods for hibiscus include sowing, cuttings, division, grafting, layering, and tissue culture. For ordinary flower lovers, the more commonly used methods are cuttings, division, and layering, so the following focuses on these three methods.
I. Division Propagation
1. Time
The time for division is generally chosen in early spring, that is, before mass sprouting. At this time, division is climatically most suitable.
2. Division Method
The same as the division method for most plants, dig out a vigorously growing and healthy mature plant from the soil, then plant it in clumps of 3 plants each at a certain density. This hibiscus propagation method has the least impact on its growth.
II. Hibiscus Cutting Propagation
1. Time
The time can be chosen in spring or autumn, and usually spring cutting is best. It can be combined with pruning in March, allowing it to flower smoothly in summer, thereby bringing into play the benefits and uses of hibiscus.
2. Method
When using cuttings, how do you propagate hibiscus? First, choose the branches well. Generally, choose branches from robust 1-2 year old plants. The branches are best in an unsprouted state. If they have already sprouted or grown leaves, the newly grown leaves can be removed.
Second, cut the branches into small sections. Cut the selected branches into 10-15 cm sections to make cuttings. Each cutting should contain two leaves and plump buds. The lower cut is best made in a horseshoe shape, with the bud about 1 cm near the cut, and the upper and lower cuts should be level.
Finally, insert the cuttings. In hibiscus propagation methods, cuttings are inserted as soon as they are cut, so once the cuttings are made, they need to be inserted immediately. The substrate used for cuttings can be peat soil, garden soil, and so on. Loose and fertile soil is beneficial for rapid rooting and sprouting after cutting.
3. Management
Generally, no base fertilizer needs to be applied before cuttings. After cutting, a certain humidity needs to be maintained, and thorough watering is needed when the cuttings are completed. After that, place the hibiscus in a cool place, then cover it with plastic film and wait three weeks for it to root.
III. Hibiscus Layering Propagation
1. Time. Layering propagation is usually chosen in April, when growth is relatively vigorous, and sprouting after layering will be relatively smooth.
2. Method. When using layering, how do you propagate hibiscus? Choose robust 2-year-old branches, make a ring cut 0.5 cm below a node, then wrap peat soil in plastic film and bind it around the cut area, leaving a water inlet at the upper end.
3. Care. If the plastic film becomes too dry, water a moderate amount from the water inlet, and do not let water accumulate inside the film. The time needed from layering to rooting is usually 3 months, so a certain amount of patience is required.