How to repot amaryllis, amaryllis repotting precautions/there's a trick to choosing the timing
To ensure the soil has enough nutrients, besides fertilizing, changing the potting soil is one of the main methods, and growing amaryllis is no exception. Moreover, among amaryllis propagation methods, repotting is also a key step. So how do you repot amaryllis? Let me tell you the techniques and precautions for repotting.
When to repot amaryllis
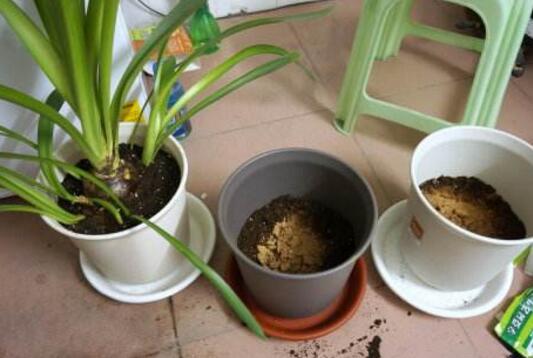
Repotting amaryllis should generally be done in November, when the amaryllis is about to enter its dormant period, so the impact on its growth is minimal. You can also choose the early growth stage in spring, but do not choose the peak growth period or the flowering period, otherwise it will affect the growth, development and flowering of the amaryllis.
How to repot amaryllis
1. Choose a flower pot of the right size
The replacement flower pot should not be too large or too small. If it is too large, it will be difficult to control when fertilizing and watering. The experience summarized by many flower lovers is that growing small flowers in a large pot is a big taboo. It not only affects the growth of the amaryllis, but also feels like using a big material for a small purpose. A suitable flower pot should be chosen according to the size of the plant.
2. Take out the plant
Gently tap the outer wall of the flower pot to loosen the plant from the pot, making it easier to take the plant out. Remove the plant together with the root ball from the flower pot, then shake off the old soil, cut off the old roots, and place it into the prepared flower pot.
3. Potting
Add soil to the new flower pot. The soil is best if it is fertile, loose and well-drained sandy soil. Firm the soil to ensure the plant stands upright, then place the flower pot in a cool and ventilated place for care.
Precautions for repotting amaryllis
1. Never damage the roots
When taking the amaryllis out of its original flower pot, be sure to be careful and never damage the roots, otherwise root injury is likely to occur. It will cause the leaves to droop and lose their luster, and will seriously affect the growth of the amaryllis after repotting.
2. Watering after repotting
After repotting, water once. When watering, pay attention to whether the soil drains well. If water cannot flow out of the drainage hole, it means there is a problem with soil drainage. After watering thoroughly, reduce the frequency of watering, and after the seedling recovery period has passed, water once every 5-7 days.
3. Control light
After repotting, do not place the amaryllis in the sunlight for care. It should be managed in a cool place to avoid excessively strong light causing the leaves to turn yellow and droop. After 3-4 days of repotting, the amaryllis can be moved to a bright place for normal care.
Tips to make amaryllis bloom more
Amaryllis is also known as amaryllis, hundred-branch lotus and trumpet flower, and is a plant of the genus Hippeastrum in the Amaryllidaceae family. The amaryllis flower stalk stands gracefully, with 4 to 6 vermilion trumpet-shaped flowers borne at the top, opening toward the sun, appearing especially gorgeous and pleasing to the eye. Because the amaryllis looks very much like clivia, it also has the elegant name "gentleman red". In Tianjin it is called "rouge cave", which is quite a clever meaning. Now it is widely cultivated around the world. Besides potted ornamental use, it is also planted in open-ground courtyards to form community landscapes and add to garden scenery. The amaryllis leaves are thick and glossy, the flower colors are soft and gorgeous, and the flowers are large and fleshy. It is suitable for potted display in the living room, study and windowsill.
How can you make amaryllis grow robustly, produce more flower stalks and bloom more, and bloom several times a year? Based on the amaryllis's habits of liking warmth, fearing cold, liking sunlight and tolerating fertilizer, this is how I cultivate and manage it: 1. Use culture soil rich in humus, loose and fertile, and mix in a little bone meal in an appropriate amount when potting.
2. Throughout the entire growth period, apply a decomposed sesame cake residue liquid fertilizer once every seven or eight days, with the concentration preferably at a ratio of three parts fertilizer to seven parts water. Do not apply fertilizer temporarily during the flowering period, and continue fertilizing after the flowers fade.
3. After each flower fades, promptly cut off the flower stalk and do not let it set seed, so as not to affect the second flowering.
4. It should be placed in a sunny place for care. On sunny days with high temperatures, water thoroughly once a day.
5. It should undergo winter dormancy. In the Nanyang area of Henan Province, stop fertilizing in late October and reduce the amount of watering. In mid-November, stop watering, cut off the leaves, and move it indoors to overwinter in dormancy. The room temperature is generally around 3°C and should not be high. It is not necessary to water throughout the winter.
6. In the coming spring, start watering in late mid-March, and at the end of the month or in early April move the pot outdoors for care. After leaves emerge, start topdressing, and after flower stalks appear, appropriately increase the amount of topdressing. 7. Repot once every three years. When potting, in addition to the mother bulb, keep two or three larger daughter bulbs, so that one pot of amaryllis can produce more flower stalks and bloom more.
A spring that belongs to amaryllis
If you like floral art, you might consider the indoor arrangement and potted appreciation of the elegantly shaped amaryllis (Hippeastrum). This tropical bulb plant - an extremely popular indoor flower available in pink, red, green, white and mixed colors - can add charm to the arrangement of any room and tabletop. However, instead of displaying your amaryllis in plain plastic pots, it is better to cleverly use themed containers and material combinations to further enhance the ornamental effect of the amaryllis and bring the beauty of nature indoors.Before planting the bulbs, first decide on a flowering strategy. If you want a visual feast of amaryllis flowers, you should plant all the bulbs at the same time, or plant a batch of different bulbs every two weeks to achieve a continuous blooming effect. Once planted, Dutch amaryllis bulbs usually need eight to twelve weeks to bloom, while South African amaryllis can send up flower stalks in four to six weeks. The growth rate of amaryllis is quite astonishing, which precisely brings more anticipation to the floral combinations we make. Of course, you can also buy amaryllis already planted in plastic pots, but if you arrange it yourself, watching the bulbs grow little by little with your own eyes is even more exciting.
If you want to put amaryllis flower stalks in a vase, wait until the first flower opens on the flower stalk, then cut it cleanly at the base. Change the water in the vase about every five days, and trim off a little of the flower stalk to keep the flowers fresh. With proper handling, cut flowers can last up to two weeks.
Placing a few amaryllis plants can make any sunlit tabletop more ethereal and lively. The amaryllis shown here, from left to right, are amaryllis 'Summertime', amaryllis 'Faro' with flower buds emerging (open salmon-pink petals with star-shaped radiating markings, while the flower throat is green), amaryllis 'Evergreen' with slender-petaled orchid-like flowers, 'Purple Rain' under a bell-shaped glass cover, the red-and-white bicolor 'Sparkling' (Impressive), 'Picotee' with pale white petals edged in dark red, and 'Emerald' with slender petals and a green flower throat.
To create an ingenious bird's nest shape, first prepare the needed materials: a terracotta flower pot, a bird's nest craft piece with a diameter of 20cm (the size must fit exactly into the terracotta flower pot), a sheet of moss, potting soil and one amaryllis 'Merry Christmas' bulb. Wrap the bulb from below the shoulder with moss and secure it with hemp rope, then add potting soil to the terracotta flower pot, filling it to three-quarters of the pot. Place the bird's nest on the surface of the potting soil, then pour a small amount of potting soil into the bird's nest, then put the wrapped bulb into the bird's nest, lightly folding and pressing the roots underneath as well, so that the roots can pass through the gaps of the bird's nest and grow into the soil deep in the flower pot. Finally, place a small bird ornament beside the bird's nest for decoration and it is complete.
Whether grown alone or in combination plantings, amaryllis can thrive. In the potted combination here, the straight branches of winterberry fruit bring a lively and festive atmosphere. These branches also help support the tall flower stalks produced by the amaryllis, and the dark red fruit enriches the color depth of the overall floral arrangement. To create this potted combination, first plant three amaryllis bulbs in a large terracotta pot. Here, amaryllis 'Faro' is used, whose petals are salmon-pink and which radiates star-shaped white stripes from a green flower throat. Scatter some moss over the surface of the potting soil, then pair it with three to four plants of polka dot plant, which is suitable for indoor growing and has pretty leaves.
This amaryllis potted planting compresses a vivid extraordinary spring landscape into a small basket, with clumps of green moss spread out, looking very pleasing. The embellishment of small indoor plants and ferns surrounds and sets off the graceful upright figure of amaryllis 'Impressive'. To create this potted planting, first lay a layer of plastic film in a round shallow basket, cut a drainage hole near the middle of the basket, then plant the amaryllis bulb into a small flower pot and place it in the center of the shallow basket, and fill the shallow basket with soil around the small flower pot. Dig small holes in the soil outside the small flower pot, plant small tropical ferns and miniature plants that can grow in glass containers, and finally cover the exposed soil outside the small flower pot with moss, leaving the amaryllis bulb in the center exposed.
The three amaryllis 'Apple Blossom' bulbs growing in the plastic flower pot are the basic component of this floral design with a strong earthy feel, and bark, branches and hemp rope are also used. The making of the floral arrangement begins with collecting some small twigs and long strips of bark, which can come from a fallen large tree. Gently flatten the bark so that it can fit snugly around the outside of the container holding the plant. The bark should be completely dry and separated into several strips, longer than the height of the flower pot. Then use hot glue to attach these strips of bark one by one vertically around the outside of the flower pot in a ring, with each piece of bark slightly overlapping the next. Finally, wrap hemp rope horizontally around the bark several times and tie a knot at the front. Insert some sturdy branches around the amaryllis bulb. Using bare branches hung with pine cones will fully express the scene of nature at the end of winter and beginning of spring when tender leaves have not yet sprouted. After the creation is completed, cut a cross-section from the fallen tree trunk as the base of the work, or take out your collected wooden plate as the vessel for displaying the floral arrangement.
Besides simply planting amaryllis 'Summertime' into a small terracotta pot for appreciation, we have a better way to achieve a balance between the tall flower stems and full flowers of the amaryllis, and that way is double-potting for display. To replicate this planting pattern at home, you need to prepare a large glass bowl, lay some moss at the bottom of the bowl to raise the amaryllis bulb planted in a simple flower pot, so that after being raised, the top surface of the flower pot is roughly level with the rim of the glass bowl, and finally fill the remaining space of the glass bowl with moss to conceal the simple flower pot. Amaryllis 'Summertime' blooms deep pink flowers, with white markings extending from the flower throat toward the petal tips, and the flower color gradually becomes softer and paler along the markings.
The floral combination displayed in a glass vessel creates an extraordinary temperament for the interior at the current season. First find a glass vessel with an open top large enough to hold a small to medium-sized potted amaryllis. After placing the pot inside, add pine cones, twigs, moss and other collectibles from nature to replace fresh plant accessories. These materials help stabilize the flower pot while the amaryllis flower stalks gradually grow tall and slender until blooming. Collect some long branches and insert them into the glass vessel to support the slender-petaled orchid-like flowers of amaryllis 'Emerald'. This tropical-style amaryllis variety was chosen precisely because it has slender petals with red-and-white stripes like long spider legs, while the flower throat has a color like an emerald gem.
Amaryllis often performs amazingly as a cut flower. When the flowers are in full bloom or the buds have just begun to show color, you can choose the flower stalks to use as cut flowers. The pure white flowers of amaryllis 'Picotee', amaryllis 'Apple Blossom' and 'Fairy' with a flower shape resembling a peony, whether singly or several stalks arranged together in a vase, can all add charming and moving color to a room. The design here is naturally formed. Pale green blinds replace a tablecloth to set off the elegant lightness of the flowers, and the selected cut flowers are all at their flowering stage. The floral artist dug some moss from the acidic soil under rhododendron bushes and placed it around the glass bottle, and finally added a candlestick to complete the overall arrangement. Cut flowers usually last 10~14 days. To prolong the freshness of the flowers, trim the ends of the flower stems every few days to encourage the stems to absorb more water. The floral artist also suggests inserting a small stick wrapped with a wet cotton ball into the hollow flower stem to extend the life of the cut flowers.
Tips for growing amaryllis
With suitable conditions, amaryllis is very easy to grow. If the outdoor temperature in your area never drops below -12°C, then you can choose a sunny spot outdoors to plant amaryllis bulbs.
Before planting purchased bulbs, first store the bulbs for a period in an environment with a temperature of 7°C~12°C and humidity of 65%, so that they adapt and are stimulated into vitality.
For indoor amaryllis growing, you can choose from October each year to January of the following year.
The potting soil for cultivating bulbs needs to be sterile, well-drained and with moderate acidity and alkalinity.
Choose a flower pot that can retain warmth and is of suitable size for planting. Leave a distance of 2.5cm between the bulb and the outer rim of the flower pot. The planting depth should ensure that one quarter of the bulb is exposed above the soil, and the soil around the bulb needs to be firmed.
After planting, water once with lukewarm water, and do not water again before the bulb sends up green stems. Watering too much in a short period can hinder bulb development and may also cause the bulb to rot.
Placing a heatable cultivation mat at the bottom of the flower pot can speed up the sprouting of the bulb. Generally, sprouting takes two to eight weeks.
To achieve suitable flower stalk height, attractive flower color and strong root growth, amaryllis pots should be placed in a place with direct light at room temperature. The warmer the room, the faster the bulb grows.
Turn the flower pot from time to time to keep the amaryllis flower stems growing straight and upright.
After the bulb begins to grow, water should be replenished regularly. Do not apply light misting, nor overwater to the point of drowning the bulb.