How to prune Chinese Violet (African Jasmine)? Illustrated pruning methods and timing
In terms of growth rate, Chinese Violet (African Jasmine) is not a very fast grower, but if you want to keep it more attractive, pruning is also essential during care. So how should Chinese Violet be pruned appropriately? Let's look at the illustrated pruning methods for Chinese Violet.
How to prune Chinese Violet
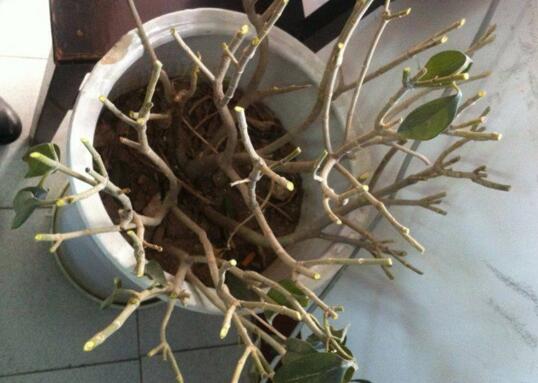
The most suitable time to prune Chinese Violet is in spring, when it sprouts abundantly. In addition, it can also be pruned at the beginning of summer, early autumn, and so on, because Chinese Violet sprouts and sends up suckers very vigorously, so it has a strong tolerance for pruning. Even repeated pruning will not affect normal growth.
Illustrated pruning methods for Chinese Violet
1. Pinching
Pinching should be done neither too late nor too early. At this point, how should Chinese Violet be pruned? During the growth period of young plants, when the new shoots grow to the semi-lignified stage, you can cut off the basal fertilizer at the top one-third of the new shoot, and at the same time remove 1-3 leaves at the front end of the branch. This can promote the sprouting of new buds and control the growth vigor of Chinese Violet.
2. Thinning
When the branches of Chinese Violet are found to be growing too densely, part of them needs to be thinned out from the base, such as crossing branches, parallel branches, aged branches, and so on. Although this weakens the plant, it allows other branches to receive sufficient light, which is beneficial to the growth of the whole plant.
3. Heading back
In the illustrated pruning methods for Chinese Violet, heading back is the most commonly used. For branches that grow relatively quickly and tall, cut them back, keeping about 10 cm of them, and then remove the rest. Heading back can be used at every stage of growth.
4. Shaping
In addition to the above three pruning methods, we can shape Chinese Violet according to our own preferences, for example by cutting it into a mushroom shape, a spherical shape, and so on. At the same time, remove slender branches, diseased branches, dead branches, and so on, to achieve the purpose of controlling the form.
Precautions for pruning Chinese Violet
1. The pruning extent should not be too large
Each time you prune, do not cut off a large amount of branches and leaves all at once, and especially do not damage the main stem. If the pruning extent is too large and new branches and buds have not yet sprouted, it may affect growth. Therefore, each time you prune, apart from diseased branches and dead branches, other branches should be kept at 15-30 cm.
2. Control watering after pruning
After each pruning, watering should be reduced. At this time, after part of its branches and leaves have been cut off, Chinese Violet has a lower water requirement than before, so at this stage it should mainly be given dilute fertilizer water. After new branches and tender buds grow out, water reasonably according to the detailed introduction in how often Chinese Violet should be watered.
Common methods for growing indoor plants
Key points of this article
Flowerpot, watering can, soil, fertilizer, flower scissors...
/14 step-by-step reading
1. How to grow Alocasia (Dumb Cane) (has the effect of removing dust from the air; cannot be placed in the bedroom)
1. Temperature. Alocasia can only grow well in an environment not lower than 18°C. If the temperature is lower than 18°C, Alocasia will enter a dormant state and stop growing. 2. Fertilizing. Alocasia likes fertilizer, and it should be fertilized every month. 3. Watering. Alocasia needs more water in summer, but not excessively; it is suitable to alternate between dry and wet, and there must be no standing water in the soil, otherwise the tubers will rot. In winter it goes dormant, so water less and stop fertilizing. 4. Sunlight. Alocasia likes shade, so do not let direct sunlight hit it. If Alocasia becomes "wilted," it is mainly due to insufficient fertilization, so pay attention to topdressing. Care: Alocasia likes a warm, humid, and slightly shaded environment, but during the flowering period it needs sufficient sunlight, otherwise the spathe will be greenish, affecting quality. It must receive 3-5 hours of light per day, otherwise the leaf stalks will elongate and reduce ornamental value. Alocasia has weak cold resistance, so it should be moved into a greenhouse in mid-October. In summer, under shaded conditions, it needs frequent water spraying to cool down and maintain humidity. Alocasia likes moist, fertile soil, that is, what is often called "heavy fertilizer and heavy water," and during the growing period it needs more watering.
/14
2. How to grow Chinese Violet (the volatile oils it produces have a significant bactericidal effect. It can make people relax, help with sleep, and also improve work efficiency)
1. Temperature. Chinese Violet grows well in a warm climate, with an optimum growth temperature of 18°C to 32°C. When the summer temperature is above 38°C, plant growth will be inhibited; in some areas of South China, field planting can overwinter outdoors, while north of the Yangtze River, potted plants require a winter greenhouse temperature of no lower than 3°C to 5°C. 2. Light. Chinese Violet likes sunlight, and its native environment is mostly semi-shaded. In South China, when planted in the field as a garden greening tree, it is best to choose a site with side shade; north of the Yangtze River, for potted plants, full sunlight can be accepted in spring and autumn, while in summer it requires a shade shed or being moved under the dense shade of large trees, at least avoiding direct sunlight for several hours around noon; it is especially worth noting that from June to July, after long periods of rain followed by clear days, the temperature rises suddenly and the light is very intense, so shading work must be done well to prevent young new shoots and tender leaves from being scorched. For potted plants in public places, relatively sufficient scattered light is required, or they should be placed near a window; they should not be kept too dark, otherwise the leaves will lose greenness and turn yellow or fall off. 3. Moisture. Whether field planted or potted, sufficient moisture is required, but the roots must not have standing water, otherwise root rot easily occurs. In spring and autumn, watering should be based on keeping the potting soil moist; during the plum rain season, be careful to prevent water accumulation; in the scorching summer, spray water once in the morning and once in the afternoon to increase humidity and lower temperature; in winter, for indoor potted plants, it is suitable to keep the potting soil slightly moist, and around noon when the temperature is relatively higher, spray an appropriate amount of water on the leaves. In spring, summer, and autumn, under normal fertilization, if the lower leaves of a potted plant turn yellow and fall off, it is very likely due to water accumulation and root rot, so the pot should be repotted and the soil changed in time; in summer, if watering has been neglected and the newly sprouted tender shoots wilt and droop, do not immediately pour a large amount of water onto the potting soil. Instead, first spray some water on the leaves, and after the leaves recover slightly, then water the potting soil with an appropriate amount of water. 4. Soil. In the southern region, cultivation requires a loose, fertile, well-drained sandy loam site. For potted plants in the north, a mix of 7 parts leaf mold, 1 part river sand, 1 part composted organic fertilizer, and 1 part fermented sawdust can be used. During the growing season, loosen the soil of potted plants once a month, always keeping the root area in a well-aerated state. In addition, potted plants can have their soil changed once every 1 to 2 years. 5. Fertilizer. During the growing season, potted plants should be topdressed once a month with dilute decomposed cake fertilizer water, and before flowering in May, apply a phosphorus-potassium fertilizer once to promote flowering; after autumn, supplement with 1 to 2 more applications of phosphorus-potassium fertilizer to help them overwinter safely. For potted plants in northern regions, to prevent leaf yellowing, add 0.2% ferrous sulfate when watering and fertilizing during the growing season. When field planting, apply sufficient base fertilizer, and in late autumn dig trenches around the outer Roots and bury cake fertilizer, 0.5 to 1 kg per plant;
Pest and disease control 1. Diseases ① Anthracnose mostly occurs on tender branches and leaves, with nearly circular to irregular depressed spots, brown edges, gray-white to gray-brown centers, and sparse small black grains on the surface, which are its acervuli. Control method: in the early stage of the disease, spray 50% carbendazim wettable powder 800-fold solution plus 25% chlorothalonil wettable powder 800-fold solution, or 25% carbendazim wettable powder 500-fold solution, alternating once every 10 days, for 3 to 4 consecutive times. ② Sunscald disease In the severe heat of midsummer, when shade sheds do not provide adequate shading, the tender shoots and young leaves of potted Chinese Violet are prone to sunscald, shown as many gray-white or light white scorched spots on the leaves. Control method: use shade netting for shading and adjust the position appropriately; in hot, dry seasons, appropriately increase the frequency and amount of watering, and spray water on the leaves when necessary; for plants that have already been scorched, promptly move them under a shade shed, cut off the scorched tender shoots and young leaves, and strengthen water and fertilizer management so the plants can recover health as soon as possible. 2. Insect pests Chinese Violet occasionally also suffers from leaf-eating pests, such as Atractomorpha sinensis, causing many holes or notches on the leaves. Spray 90% trichlorfon crystal 800-fold solution in time to kill them.
/14
3. How to grow Peace Lily (Spathiphyllum) (suppresses waste gases exhaled by the human body, such as ammonia and acetone. At the same time, it can also filter benzene, trichloroethylene, and formaldehyde from the air. Its high evaporation rate can prevent nasal mucosa dryness and greatly reduce the possibility of illness) Peace Lily is an "expert" at suppressing waste gases exhaled by the human body, such as ammonia and acetone. At the same time, it can also filter benzene, trichloroethylene, and formaldehyde from the air. Its high evaporation rate can prevent nasal mucosa dryness and greatly reduce the possibility of illness. This beautiful indoor plant, native to the tropical rainforests of Venezuela, is undoubtedly a miracle in medicinal biology. The following is an illustration. Light conditions: neutral plant, suitable for planting in semi-shade. Required care: keep the potting soil moist and fertilize regularly; the leaves need frequent spraying. Suitable temperature: optimum growth temperature is 20-28°C, overwintering temperature is 10C. Can remove: ammonia, acetone, benzene, trichloroethylene, formaldehyde.
/14
4. How to grow Aglaonema (Chinese Evergreen) (known for its unique air-purifying ability: the higher the concentration of pollutants in the air, the more it can exert its purifying ability! Therefore, it is very suitable for dark rooms with poor ventilation.) This plant with gray-white leaves likes to live in a constant-temperature environment. If watered with warm water, it can survive for a longer time. ★Suitable temperature: 16-21 °C ★Can remove nicotine, formaldehyde
/14
5. How to grow Maidenhair Fern (Adiantum) (can absorb about 20 micrograms of formaldehyde per hour, so it is considered the most effective biological "purifier." People who deal with paint and coatings all day, or who have smokers around them, should place at least one pot of fern in the workplace. In addition, it can also suppress xylene and toluene released from computer monitors and printers.) Maidenhair Fern likes loose, permeable, fertile calcareous sandy loam. For potting, the growing medium can be made by mixing equal parts loam, leaf mold, and river sand. During the growing period, apply liquid fertilizer once a week, and take care to keep the potting soil moist and the air humidity relatively high. In dry seasons, water can often be sprinkled on the ground around the plant to increase air humidity. Maidenhair Fern likes bright scattered light and avoids direct sunlight. If the light is too strong, the leaves will wither and yellow or even die. It likes warmth and is also cold tolerant, with an optimum growth temperature of 13-22, and a winter overwintering temperature of 5. Among ferns, Maidenhair Fern is one of the most widely cultivated species. Its stems and leaves are elegant and varied, graceful in form, and compact in plant size, making it very suitable for small pot cultivation and for accenting rock bonsai. Because its black leaf stalks are slender and glossy, closely resembling human hair, and its texture is very soft and beautiful, like a young girl's soft hair, it is also called "maidenhair"; its light green thin leaves paired with glossy black leaf stalks appear especially elegant and graceful. It likes shade, has strong adaptability, and is easy to cultivate, making it even more suitable for year-round indoor potted viewing. As a small potted shade-loving foliage plant, it is superior to asparagus fern in many respects. Small pots can be placed on desks and coffee tables; larger pots can be used to decorate windowsills, corridors, or living rooms in shaded rooms, and can be enjoyed for a relatively long time. Maidenhair Fern leaves are also good cut-leaf material and dried flower material.
/14
6. How to grow Umbrella Tree (Schefflera) (brings fresh air to smoking households. The leaves can absorb nicotine and other harmful substances from smoke-filled air, and through photosynthesis convert them into harmless substances of the plant's own. In addition, it can reduce formaldehyde concentration by about 9 mg per hour.) It likes semi-shade and can be enjoyed for a relatively long time in a bright and well-ventilated home. If there is about 4 hours of direct light indoors each day, it can grow well. For varieties with yellow and white markings, if the light is too weak or nitrogen fertilizer is applied excessively, the markings will become blurred, thus losing their original characteristics. Optimum growth temperature is 15-25°C, and the winter minimum temperature should not be lower than 5°C, otherwise leaves will fall off. New leaves will appear the following spring. It grows well in an environment with high air humidity and sufficient soil moisture, but it has strong adaptability to the dry climate of the north. Be careful that the potting soil does not lack water, otherwise a large number of leaves will fall off. Under low winter temperatures, water should be controlled appropriately. During the growing season, apply liquid fertilizer once every 1-2 weeks. Change the pot once every spring; if using a plastic container, pay attention to drainage. The potting soil can be prepared with peat soil, leaf mold, perlite, and a small amount of base fertilizer. Fine sandy soil can also be used for potting. Pruning does not require major pruning. If the lower leaves have all fallen off and it has become a bare stem, cut it back at the upper half to encourage new branches to sprout. The cut branches can also be used for cuttings and will become new plants after rooting. If you do not want the Umbrella Tree to grow too tall, you can pinch it once it reaches 30 cm, that is, remove the top, pinch off the top buds, and after some time side branches will grow.
/14
7. How to grow Spider Plant (Chlorophytum) (can absorb 95% of carbon monoxide and 85% of formaldehyde in the air.) Medium: Spider Plant has strong adaptability to various soils and is easy to cultivate. Fertile sandy loam, humus soil, peat soil, or fine sandy soil with a small amount of base fertilizer can be used as potting soil. Propagation: usually by division, which can be done in all seasons except winter when the temperature is too low. Small plantlets with roots on the flower stems can also be cut off and potted. Watering: Spider Plant likes a humid environment, and the potting soil should be kept moist often. However, its fleshy roots can store a large amount of water, so it has strong drought resistance and will not dry out and die if not watered for several days. In winter, when the temperature is below 5°C, water less, and do not let the potting soil become too wet, otherwise the leaves easily turn yellow. Fertilizing: during the growing season, apply liquid fertilizer once every two weeks. For variegated varieties, apply less nitrogen fertilizer, otherwise the white or yellow markings on the leaves will become less obvious. Stop fertilizing when the ambient temperature is below 4°C. Light: Spider Plant likes a semi-shaded environment and can be grown year-round in a bright room. Spider Plants cultivated outdoors can also grow well under strong direct sunlight in summer. However, Spider Plants grown indoors for a long time should avoid strong direct sunlight and need 50-70% shading. Temperature: Spider Plant is tolerant of high temperatures. The suitable temperature is above 15°C, and the winter overwintering temperature is above 4°C. Humidity: it likes a humid environment. To keep Spider Plant fresh and green, you can often spray water on the leaves to wash them. Pruning: usually cut off yellow leaves at any time. Once a year in March, repot and cut off old roots, rotten roots, and excess fibrous roots. In early to mid-May, cut off some old leaves of Spider Plant, which will encourage more new leaves and small spider plantlets to sprout. Hydroponics: Spider Plant can be grown hydroponically. Take the potted Spider Plant out of the pot, wash the soil off with water, cut off old leaves and old roots, place it in a hydroponic vessel, and add clean water. Do not use too much water; it is suitable if it just reaches the root crown. For vigorous growth, add a few drops of nutrient solution (can be homemade) to the water. The vessel can be a wide-mouth glass bottle, glass cup, or other container. The water in the container can be changed every few days, or simply topped up with some water.
/14
8. How to grow Aloe (one pot of Aloe is equivalent to nine biological air cleaners) Growing Aloe as a household potted plant not only beautifies the home, but also allows you to harvest at any time and obtain the freshest Aloe leaves for home health care. Some people say that growing a few pots of Aloe at home is like hiring a resident "private doctor." Although this statement is somewhat exaggerated, it is not entirely unreasonable. Whether Aloe is used as medicine to treat illness or for beauty and skin care, only fresh Aloe can achieve the best results. 1. Preparation of potting soil There are many formulas for preparing Aloe potting substrate. A common formula uses humus soil, garden soil, and river sand in a ratio of 4:4:2. Practice has proved that this substrate preparation is relatively suitable. Replacing river sand with sawdust reduces substrate weight and increases air permeability and water permeability, and can achieve good results. Sawdust from hard miscellaneous woods is preferable, and it should be piled up and fermented before use. 2. Disinfection of potting soil As potting soil for indoor Aloe cultivation, it is best to disinfect it before use to kill possible insect eggs and pathogens in the substrate. Common methods include soil burning disinfection, steam disinfection, and chemical disinfection. (1) Soil burning disinfection: place the prepared mixed substrate on a stove with an iron plate and heat and stir-fry it. Generally, at 80°C for 30 minutes, harmful microorganisms and various insect eggs in the substrate can be killed. (2) Steam disinfection: place the prepared substrate in a container and steam it thoroughly. Ordinary household coal stoves and gas stoves can be used for heating and disinfection. Steam disinfection should be kept above 80°C, and steaming for 2 hours can achieve a thorough disinfection effect. (3) Chemical disinfection: commonly use 40% formalin, apply 400-500 ml of the solution evenly per cubic meter of culture substrate, seal and cover it flat with plastic film, leave it for 1-2 days, then open it, air-dry and sun it for 2-3 days, and pot it after the solution has evaporated. 3. Potting and repotting The process of planting grown Aloe into a flowerpot is called potting. Potting time: it should be done in spring and summer. An indoor temperature of 15-28°C is relatively suitable. Potting method: selecting seedlings before potting is an important key. Healthy Aloe seedlings have short, thick leaves, dark green color, and more than 4 adventitious roots. When potting, first place some broken tiles at the bottom of the pot to facilitate drainage and ventilation, then fill in some prepared substrate, put the Aloe into the pot, try to spread the root system, cover the roots with soil, then gently lift the seedling upward and press it slightly so that the roots are in close contact with the substrate above, below, left, and right, then fill the potting soil to about 2 cm from the pot rim. Finally, slowly pour water thoroughly into the pot, and potting is complete. After potting, do not water too much. Generally, do not water until dry; when dry, water thoroughly. Frequently spraying water on Aloe leaves can speed up its revival and rooting. Newly potted Aloe should also not be exposed to direct sunlight, and can be maintained in semi-shade. Repotting: household potted Aloe generally needs repotting once every 1-2 years. Spring is also preferable for repotting. When repotting, master the correct technique for removing the plant from the pot. Turn the potted plant upside down, support the potting soil with the left hand, and strike the pot rim sharply with the palm of the right hand several times, and the pot and old potting soil will naturally separate. Then move the Aloe together with the soil ball into a larger new pot, add new potting soil around the pot, then press the potting soil firmly with your hands and water thoroughly. After repotting, it still needs to be maintained in semi-shade for a period, and moved to a sunny place only after it has fully recovered. 4. Management and care The management of household potted Aloe mainly includes three aspects: fertilizing, watering, and winter insulation. Fertilizing: during the growth process, Aloe needs large amounts of elements such as carbon, hydrogen, oxygen, nitrogen, phosphorus, potassium, sulfur, calcium, magnesium, and iron. Among them, carbon, hydrogen, and oxygen come from the air, while other elements are absorbed from the potting substrate. In addition, it needs elements such as boron, manganese, molybdenum, zinc, copper, and chlorine. Although the required amounts are not large, they cannot be replaced by other elements. Scientific fertilization can supplement nutrition. Watering: in winter, generally water once every 15-20 days, and spray water on the leaves if needed. Water as little as possible and keep the potting soil dry, which is beneficial for the plant to overwinter safely; in spring, generally water once every 5-7 days. Do not water until dry; when watering, water thoroughly, and let the potting soil alternate between dry and wet; in summer, the temperature is relatively high and evaporation is large, so water once every 2-3 days, and in addition spray water on Aloe leaves in the morning and evening every day. Also be careful to reduce exposure to scorching sun to decrease water loss; in autumn, the watering method for Aloe is basically similar to spring, and the potting soil should alternate between dry and wet. Watering time is generally best in the early morning and evening, when the water temperature is closer to the potting soil temperature, which can avoid affecting root growth due to a sudden change in potting soil temperature caused by watering. Remember: "For potted Aloe, better dry than wet." 5. Overwintering management (1) Temperature requirements: except in the tropical regions of southern China and frost-free areas year-round, such as southern Fujian, the coastal areas of Guangdong, and Hainan, where Aloe can overwinter safely and naturally, other regions must strengthen overwintering and freeze-protection management. 5°C is taken as the minimum safe line for Aloe overwintering temperature. Mastering the safe overwintering temperature for Aloe is one of the key techniques for the success of household potted Aloe. (2) Methods for increasing and maintaining temperature: in regions where winter is not very cold or where indoor heating conditions are available, moving potted Aloe indoors will generally allow it to overwinter safely. When the temperature cannot be guaranteed to be above 5°C, corresponding warmth measures must be taken. For example, dig rectangular pits (commonly called ground cellars), make a simple insulation box, and so on. (3) Control watering and increase light: in winter, water as little as possible or not at all, and keep the potting soil dry. If the air is too dry, spray water on the leaves. In addition, let potted Aloe receive as much sunlight as possible.
/14
9. How to grow Monstera (absorbs carbon dioxide at night, improving air quality) 1) Soil and repotting. When Monstera cuttings have rooted and are transplanted into pots, fertile pond mud or black mountain soil can be used. Because it grows quickly, it needs repotting once a year. Repotting should be done in March-April. When repotting, remove part of the old soil and dead roots, and change to a pot one size larger. Place some hoof pieces, crushed bones, and so on at the bottom of the pot as base fertilizer, and fill in a growing medium mixed with 1/3 each of leaf mold, vegetable garden soil, and sandy soil. (2) Pay attention to the growing environment. Monstera avoids direct scorching sunlight and is not cold tolerant. In midsummer, it should be placed indoors or under a shade shed, and must not be placed on a balcony with overly strong sunlight, otherwise it easily causes dead leaves and affects ornamental value. When the winter temperature drops to 6°C, it should be moved indoors for warmth. 3) Keep the potting soil moist. Monstera likes moisture and needs sufficient water during the growing period. For daily watering, once a day is acceptable; in summer, once in the morning and once in the evening; when the weather is dry, it is even more necessary to spray water on the leaves and sprinkle water in the growing environment to maintain air humidity and keep the leaves bright. In winter, water once every 3-4 days. Every 7-10 days, spray the leaves once with clean water close to room temperature, to keep the plant evergreen and fresh and improve ornamental value. (4) Fertilize appropriately. Monstera is a flowering plant that relatively likes fertilizer. From April to September, apply dilute cake fertilizer water once every 15 days; decomposed human urine diluted with water can also be applied thinly. With sufficient fertilizer, the leaf color will be pleasing. In addition, for newly planted and growing plants, support frames should be set up and tied in time. After the shape is set, pay attention to pruning the whole plant, striving for a beautiful plant form. Let me also tell you a few pest prevention methods, listen carefully! The main pests and diseases harming Monstera are scale insects and gray leaf spot. (1) Scale insects. When Monstera is cultivated indoors, if ventilation is poor, scale insects easily appear on stems and leaves, causing loss of ornamental value. When few occur, manual capture can be used; when severe, spray 40% omethoate emulsifiable concentrate 1000-fold solution to kill them. (2) Monstera gray leaf spot. It mostly starts from wounds at the leaf edges. It is more severe after low temperature, smoke, and pest damage. After being damaged, the lesions are initially black spots, and after expanding they become elliptical or irregular. The edges are dark brown and the inside is gray-brown. Control methods: ① Strengthen plant care, remove insects in time, and cut off some diseased leaves. ② When the disease occurs, spray 70% thiophanate 1000-fold solution or 0.5 equal-strength Bordeaux mixture.
/14
10. How to grow Ivy (the champion of formaldehyde absorption) Just water it a little when it dries out. Master the principle of not watering until dry and watering thoroughly when dry, and you can grow it well. Ivy can also be grown in water; you can add some nutrient water. Growing it in a vase is both hygienic and beautiful. Try it quickly!
/14
11. How to grow Rubber Tree (a multi-purpose eliminator of harmful substances) The Rubber Tree grows relatively quickly! ① Light. Apart from appropriate shading in summer (30-50%), it is best to provide sufficient light at other times. ② Temperature. Rubber Tree likes high temperatures, with a suitable temperature of 20-32°C, and it must not be lower than 10°C. ③ Humidity. A high-humidity environment is good for growth and will also produce aerial roots, so in addition to normal watering, it should also be sprayed frequently. Of course, it is best if the growing environment has 75-95% humidity. ④ Watering. It should not be too frequent. It is suitable to water thoroughly after the surface soil dries, and it must not be kept dry for a long time or have only the surface soil watered. ⑤ Fertilizing. A compound fertilizer mainly based on nitrogen fertilizer is sufficient, and it can be applied in holes or as a fertilizer solution. However, fertilizing must be done when the ambient temperature is between 18-30°C. ⑥ Pruning. Actually, this step is only for a fuller plant shape or to control growth; instead, it will affect its growing larger! ⑦ Pest and disease control. Under normal care, there are few pests and diseases. Only when maintained indoors in winter may red spider mites and scale insects cause harm. Special pesticides can be sprayed for control, such as dicofol (red spider mites) and methidathion (scale insects).
/14
12. How to grow Asparagus Fern (a protective umbrella that eliminates bacteria and viruses) Asparagus Fern, also called cloud-leaf bamboo, is a perennial evergreen vine plant in the genus Asparagus of the lily family. It is native to southern Africa. Ecological habits: Asparagus Fern is not cold tolerant and not drought tolerant. It likes a warm, semi-shaded environment and avoids frost. Asparagus Fern has strict requirements for potting soil: it requires loose, fertile, well-drained, and well-aerated soil, and the potting soil is best neutral. It can be prepared with leaf mold, sand, and decomposed fertilizer. Asparagus Fern is not cold tolerant and is also afraid of heat, with an optimum growth temperature of 15-25°C. It can neither withstand direct light nor stay in a shaded place for too long. Do not water too much; master the watering principle of seeing dry and seeing wet. Applying fertilizer once a month can meet growth needs. One- to two-year-old Asparagus Fern has the greatest ornamental value. Three-year-old Asparagus Fern begins to send out vines, so supports should be set up for it to climb. If you do not want to set up supports, you can also cut off the climbing branches at the base. Asparagus Fern is not cold tolerant, and the overwintering temperature is 10°C.
/14
Common questions about growing flowers at home:
1. Why do the tender leaves of Asparagus Fern turn scorched black at the tip when they grow to a certain height, while branches and leaves can still grow from the sides? The main reasons for the scorched tips of Asparagus Fern tender leaves are excessively dry potting soil, insufficient fertilizer, or fertilizer damage. In addition, Asparagus Fern is originally a climbing plant, and when it grows tall it must have supports or strings for it to climb up; otherwise, because the top shoot bends and droops, affecting the supply of water and nutrients, similar conditions can also occur. 2. What diseases is Asparagus Fern prone to? How should they be prevented and controlled? ① Asparagus Fern twigs turn yellow but do not fall off, mainly caused by insufficient nutrients in the potting soil and malnutrition. Some cases are caused by hard, compacted potting soil, poor aeration, and reduced root vitality, which affects the normal growth of the plant. In addition to repotting in spring with growing medium rich in organic matter, the surface of the potting soil should also be loosened frequently, and fertilization should be strengthened. ② Asparagus Fern leaf tips wither and yellow or fall off, mainly due to too little watering, potting soil being on the dry side, or relative humidity being too low. Keep the potting soil moist often, and frequently spray water on the plant. The water temperature is best the same as room temperature, and place the Asparagus Fern in a place with high air humidity. During the growing season, apply mixed fertilizer appropriately to make the plant strong and increase resistance. ③ The branch tips of Asparagus Fern are dark yellow or yellow-green, caused by strong light exposure or excessive watering. It should be moved to a shaded place or to a window with curtains, avoiding direct strong light, and also take care not to water too much. ④ Asparagus Fern roots rot and branch tips scorch and fall off, mainly caused by invasion by strong winds in hot summer or long-term water accumulation in the flowerpot. Therefore, in summer, special attention should be paid to guarding against thunderstorms or typhoons. 3. Causes and control methods for yellowing branches and leaves of potted bamboo? a) Light too strong. Asparagus Fern likes semi-shade and avoids strong light. In summer, if it is placed in direct sunlight, it will cause branches and leaves to wither and yellow. Once this happens, move the flowerpot to a cool place, and at the same time frequently spray water on the branches and leaves to increase relative humidity. Most plants with less severe damage can recover. b) Improper watering. Although Asparagus Fern likes moisture, it is very afraid of water accumulation in the pot. Too much water easily causes root rot, while too little water makes leaf tips dry easily. If root rot occurs, control watering and loosen the soil frequently. For dry and withered leaf tips, first water a small amount, then gradually increase it, while spraying water on the branches and leaves. c) Insufficient nutrients. Asparagus Fern likes fertile soil. If the soil is not changed and fertilizer is not added for a long time, nutrients will be in short supply, and branches and leaves will turn yellow. At this time, apply dilute liquid fertilizer once a week, and water and loosen the soil in time. d) Improper fertilization. If the topdressing concentration is too strong or immature fertilizer is applied, it easily causes fertilizer damage and leads to dry, fallen leaves. Once fertilizer damage occurs, take the pot out, remove the fertilizer, then rinse the soil ball with clean water, and replace it with new growing medium. e) Poor winter management. Asparagus Fern likes warmth and should face the sun in winter. If it is placed in a place with insufficient light for a long time at this time, plus poor ventilation and cold, the branches and leaves easily wither and yellow. At this time, move it to a warm place with sunlight, and appropriately control watering, and it can gradually recover to normal. f) Infection by pests and diseases. Once Asparagus Fern is infected by pests such as scale insects, it will also cause branches and leaves to wither and yellow, and should be controlled in time.
/14
13. How to grow Broadleaf Lady Palm (eliminates heavy metal pollution and carbon dioxide) Broadleaf Lady Palm, also called Guanyin bamboo, tendon-head bamboo, palm bamboo, and dwarf palm bamboo, is an evergreen foliage plant in the genus Rhapis of the palm family. Broadleaf Lady Palm is a clumping shrub with upright stems, 1-3 m tall. The stems are slender like fingers, unbranched, with leaf nodes, wrapped in leaf sheaths with brown netted fibers. The leaves are clustered at the top of the stem, palmate, deeply parted almost to the base, with 3-12 segments, 20-25 cm long and 1-2 cm wide; the leaf stalks are slender, about 8-20 cm. The spadix is axillary, with small, pale yellow flowers, very numerous, unisexual, dioecious. The flowering period is April-May. The berry is spherical, and the seed is spherical. Broadleaf Lady Palm is native to Guangdong, Yunnan, and other places in China, and also exists in Japan. There are more than 20 species in the same genus, mainly distributed in Southeast Asia. It often grows in shaded, moist thickets on hillsides and beside ditches. Cultivated types are divided into large-leaf, medium-leaf, and fine-leaf Broadleaf Lady Palm, and there is also variegated Broadleaf Lady Palm. It likes a warm, humid, semi-shaded, and well-ventilated environment, fears scorching sun, and is slightly cold tolerant, able to withstand low temperatures of about 0°C. Broadleaf Lady Palm can be propagated by sowing and division. Home cultivation is mostly by division. For sowing, use loose, permeable soil as the substrate, generally mixing leaf mold and river sand, etc. Before sowing, the seeds can be treated by soaking in warm water (soak in 30-35°C warm water for two days), and sown when the seeds begin to sprout. Because germination is generally uneven, after sowing the soil covering should be slightly deeper. Generally, they germinate 1-2 months after sowing, and the germination rate can reach about 80%. When the cotyledons of the seedlings reach 8-10 cm, they can be transplanted. It is worth noting that when transplanting, 3-5 plants must be planted as one clump to facilitate survival and growth. Division propagation is generally carried out in spring when repotting. Use a sharp knife to divide the original plant clump with many suckers into several clumps. When dividing, try to damage the roots as little as possible and not damage the buds, so that each clump contains more than 8-10 plants; otherwise, growth is slow and the ornamental effect is poor. After dividing and potting, place in semi-shade, keep moist, and frequently spray water on the leaves to prevent leaf yellowing. After new branches sprout, move to a sunny place for care, and then carry out normal management. For potted Broadleaf Lady Palm, a substrate mixed with equal parts leaf mold, garden soil, and river sand can be used, and an appropriate amount of base fertilizer can be added when planting. During the vigorous growth period from May to September, apply liquid fertilizer 1-2 times a month; the potting soil should be kept moist, better wet than dry, but it must not have standing water, otherwise root rot easily occurs. In autumn and winter, appropriately reduce watering. During the growing season, shade is required, especially in summer when scorching sun exposure should be avoided, otherwise the leaves turn yellow and the plant grows slowly and short. Generally, a shading level of about 50% should be maintained. Broadleaf Lady Palm requires a well-ventilated environment for growth. If ventilation is poor, scale insects easily occur. If few occur, manually scrape them off in time, and use 800-fold omethoate solution for control. At the same time, pay attention to ventilation and air permeability, and prune dead branches and fallen leaves in time. Broadleaf Lady Palm has a compact and elegant plant form, upright clumps, delicate leaf shapes, and dark green, glossy leaves. It has both a tropical charm and the elegance of bamboo, and is an important indoor foliage plant. It is very shade tolerant and is suitable both as small and medium potted plants for general household indoor display and viewing, and as large potted plants for indoor arrangement in large buildings. It is one of the large indoor foliage plants. In a bright room, it can be enjoyed for a long time, and in a darker room it can be viewed continuously for 3-4 weeks. 2. Hydroponic method for Broadleaf Lady Palm. In the palm family, genus Rhapis, also called Guanyin bamboo. It is native to Guangdong, Guangxi, Hainan, Yunnan, and other places. Characteristics: evergreen clumping shrub. The stem is cylindrical, unbranched, with nodes like bamboo, bearing brown coarse fibrous leaf sheaths, like palm. Leaves are clustered at the top of the stem, leathery, dark green and glossy, palmately deeply parted, with 4-10 segments. Dioecious. Habits: likes a warm, shady, humid, and well-ventilated environment. The suitable growth temperature is 20-30°C, and in winter it should be kept above 4°C. It can withstand short-term low temperatures of about 0°C. Propagation: generally by division combined with repotting. Choose a large, dense clump, first take the plant out of the pot, then use a sharp knife to divide the clump into several clumps. When dividing, cut as few roots as possible, and keep the divided plants with a certain plant shape. Then repot, water thoroughly, and place in a semi-shaded, moist place, frequently spraying water on the leaves. After growth resumes, normal care can begin. Sowing: after the seeds mature in autumn, sow them in pots immediately, move them into a greenhouse in winter, and seedlings emerge the following spring. Key points of hydroponic care: 1. It is shade tolerant, but when light is too weak it easily produces yellow leaves, and when ventilation is poor it breeds parasites. 2. During the growing period, spray water on the leaves frequently. Method for obtaining hydroponic material: potted plant root washing is suitable. The root system of Broadleaf Lady Palm is relatively hard in texture, and after hydroponics it is not easy to rot, but new roots sprout slowly, requiring as long as one and a half months.
Precautions
Pay attention to indoor temperature!
Plant cultivation