Can Goldfish Begonia Be Grown in Water? Hydroponic Methods and Tips on Light and Water Changes
Goldfish Begonia (Nematanthus gregarius), a beautiful plant also suited to indoor growing, is kept in pots in many homes. Friends who love hydroponic plants must want to grow Goldfish Begonia in water too, so can Goldfish Begonia be grown in water? In the eyes of experienced growers, as long as the stems can survive when stuck in water, it can be grown hydroponically, and Goldfish Begonia is one of them. Next, let's take a look at the hydroponic method for Goldfish Begonia.
I. Can Goldfish Begonia be grown in water? Yes
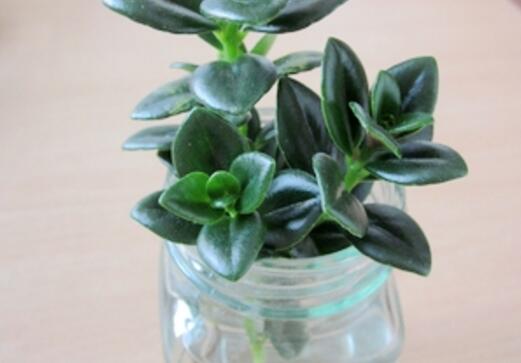
Goldfish Begonia is beautiful when it blooms, but have you ever thought about making it even more beautiful, such as by growing it hydroponically? After all, hydroponic plants are very clean. So can Goldfish Begonia be grown in water? According to experienced growers, Goldfish Begonia can be grown hydroponically, but how to do it requires a method. Let's keep reading for the specific steps.
II. Hydroponic method for Goldfish Begonia
Unlike other hydroponic plants, growing Goldfish Begonia in water is quite troublesome. Although it can be grown hydroponically, the water in the bottle must not exceed one third of the root mass at one time. Once the water level is too high, the old roots, being soaked in water for a long time, are prone to rot and death. So hydroponic Goldfish Begonia needs frequent water changes. The specific method:
Prepare a transparent glass container so you can observe the water level and root condition. Then add water to the bottle, just enough to submerge one third of the roots. In spring and autumn, change the water about once every half a month; in summer, when temperatures are high and water is absorbed and evaporates quickly, change it about once every ten days; in winter, when growth is slow, change it about once every twenty days.
III. How to care for hydroponic Goldfish Begonia
Can Goldfish Begonia be grown in water? After reading the above, everyone should know the answer. If you have already done what was described above, then you must read the following care methods. The following cultivation methods for hydroponic Goldfish Begonia are experiences shared by flower lovers who have successfully grown Goldfish Begonia, and you can use them as a reference.
1. Control the water volume
How to grow hydroponic Goldfish Begonia? First of all, naturally, control the water volume. The water in the bottle must not exceed one third of the old roots, to prevent root rot. Water on the leaf surface should also be paid attention to; you should spray water frequently, which not only maintains leaf humidity but also cleans the leaf surface, allowing it to breathe freely and grow better.
2. Sufficient light
Just like the soil cultivation method for Goldfish Begonia, hydroponic growing also needs sufficient light: in spring, autumn and winter, direct sunlight can be appropriately given, while in summer shade is needed. So the placement of hydroponic Goldfish Begonia is best chosen on a sunny balcony; also, the glass container holding the Goldfish Begonia should not have too large an opening, and the number of plants placed in it should not be too many, just appropriately uncrowded.
3. Add nutrient solution
Soil-grown Goldfish Begonia needs fertilizer, while hydroponic growing means adding nutrient solution. At this time you need to make some nutrients yourself or buy special hydroponic nutrient solution from a flower market, and add it regularly. Especially before the growing season and flowering season, add a few more drops than usual to ensure vigorous growth and a large number of flower buds, for the sake of propagation.
4. Change the water in time
In the cultivation methods for hydroponic Goldfish Begonia, changing the water is very important. In spring and autumn, generally change the water once a week; in summer, water quality deteriorates quickly, so generally change it about once every four days; in winter, keeping it to about once every ten days is fine; each water change only needs to replace two thirds of the original water volume.
That is all for the hydroponic cultivation method of Goldfish Begonia. I believe everyone has more or less learned it. If you are tempted, you might as well give it a try. After all, it is just a matter of a few stems; if you fail, you won't feel bad, and if you succeed, you'll be happy. By then, one pot grown in soil and one pot grown in water, blooming together, how beautiful that would be`
Can Goldfish Begonia Be Grown Hydroponically? Hydroponic Cultivation Methods and Precautions for Goldfish Begonia
Goldfish Begonia is a plant native to foreign countries, later introduced and widely cultivated in our country. It can now be seen in many places in our country and is a plant with very high ornamental value. People are most accustomed to growing Goldfish Begonia in soil, but many are not clear about whether it can be grown hydroponically.
Can Goldfish Begonia be grown hydroponically?
Goldfish Begonia is a plant that can be grown both hydroponically and in soil. Different methods have different cultivation techniques.
Hydroponic cultivation methods for Goldfish Begonia
1. Take the potted Goldfish Begonia out of the pot, wash the soil off with water, cut off old leaves and old roots, place it in a hydroponic container, and pour in clean water.
2. Do not use too much water; it is best not to exceed one third of the height of the roots. In this way, the old roots are not easily rotted and killed by being completely soaked in water, and one third of the root system easily produces water roots.
3. When some water roots have grown, for vigorous growth, drip a few drops of nutrient solution into the water (you can make it yourself).
4. Glass bottles, glass cups and other glass containers can be used. The water in the container should be changed once every 5-7 days in spring and autumn, every 3-5 days in summer, and every 10-15 days in winter, each time replacing two thirds of the original bottle water. Each water change can be accompanied by adding nutrient solution to the bottle according to the amount.
Precautions for Goldfish Begonia
1. Goldfish Begonia that has been grown hydroponically after root washing needs a certain adaptation period. Old roots that have not adapted will show rot; check and clean them in time. Do not use nutrient solution when the roots have wounds; use nutrient solution after the roots have adapted to the water environment and are growing normally.
2. The care environment for hydroponic Goldfish Begonia is not much different from that for soil-grown plants. Place it in a bright spot to ensure sufficient light. If light is insufficient, hydroponic Goldfish Begonia will likewise show narrow, elongated leaves and dull leaf color. In addition, when the sunlight is strong in summer, it must not be exposed to direct sun, to avoid the water temperature being too high, which affects root growth.
3. Hydroponic Goldfish Begonia can bloom in about half a year. When it blooms, be careful not to spray water on the flowers, to avoid the flowers dropping early. After the flowers fade, cut off the flowering branches in time to promote blooming the next year.
4. Put the prepared Goldfish Begonia into the hydroponic container. For a professional hydroponic container (one with a hydroponic basket), fix the plant and then use stones to hold it in place, ensuring the plant is upright. For an ordinary glass container, put the plant straight and let the leaves lean against the bottle wall. During fixing, avoid injuring the roots, and let the roots spread around the container.
Pests and diseases of Goldfish Begonia and their control methods
1. Leaf spot. Symptoms: leaf spot mainly harms the leaves. Many small brown spots appear on the leaves, similar to anthracnose symptoms, but the spots spread over the entire leaf.
Control method: Remove diseased leaves in time, pay attention to ventilation, and provide sufficient sunlight. Spray chemicals: use a 500-fold solution of amobam for spray control.
2. Anthracnose. Symptoms: when anthracnose occurs, it mainly affects the middle section of the leaves, and even the flowers, but Goldfish Begonia does not bloom! Reddish-brown or dark brown spots appear on the leaves. As the disease worsens, the spots gradually expand and develop ring-shaped markings. The same plant can be infected repeatedly.
Control method: Clean the leaves, wash them with a clear water spray, and usually give them more sun. Spray chemicals: anthracnose infection can only be curbed by chemicals. You can choose carbendazim, thiophanate or thiamethoxam, dilute the solution and spray, once every 1-2 days, and improvement can be seen after 3-4 times.
Goldfish Begonia can not only be grown hydroponically, but the method is also very simple. The main thing is to choose a suitable bottle for growing it. When growing Goldfish Begonia, the treatment of water is also very important. Adding an appropriate amount of nutrient solution to it can promote its growth.
Hydroponic cultivation methods for spider plant_Can variegated spider plant be grown hydroponically?
Plant information: Variegated spider plant (Chlorophytum comosum 'Vittatum'), recorded in the Liliaceae, belongs to the spider plant group, and is named because the center of its leaves is white and the edges are green. It is most suitable for hanging display at home. Moreover, spider plant is an evergreen plant and is quite suitable for indoor planting, becoming the best flower and plant for flower stands and indoor cabinet tops. So can variegated spider plant be grown hydroponically? What are the details of hydroponic cultivation methods for spider plant?
[Morphological characteristics of variegated spider plant]
The leaves of variegated spider plant are relatively broad, light green in color, mostly attached to short stems, and the leaves are fleshy, succulent plants, with green edges and white centers, unique and distinctive, with irregular growth, mostly curved and drooping.
Variegated spider plant is a flowering plant, with small inflorescences; the raceme can reach more than 30 cm, single, with white flowers, and it enters the flowering period early and grows quickly. Variegated spider plant has reproductive ability and can grow small plantlets on the flower stems, which can be transplanted naturally or manually. The best way is hydroponics, with strong ornamental value.
[Can variegated spider plant be grown hydroponically]
Benefits of hydroponics
Spider plants are propagating plants with strong survivability, and the best way is hydroponics. This cultivation method is simple to care for daily and can also increase ornamental value. At the same time, goldfish can be kept inside it, enhancing the vitality of the room. Hydroponic spider plants grow faster, have strong adaptability to seasons and climate, and reproduce faster. Moreover, with this cultivation method, their rhizomes and grass leaves can all be used as medicine, giving stronger plant value.
Hydroponic steps
1. Container selection: For hydroponic variegated spider plant, you can choose a double-layer glass vessel that can filter out residue and impurities. The vessel has a uniquely designed hanging bottle to satisfy the downward-growing trend of variegated spider plant roots.
2. Plant selection: Variegated spider plant mostly reproduces by flowers, so division propagation can be used. Directly lift the roots out of the soil, wash them clean with clear water, clean up residual roots, old roots and rotten roots, prune old leaves, diseased leaves and yellow leaves, and then directly reserve 6-9 healthy leaves before transplanting.
3. Potting and planting: Plant according to the different containers chosen. If a double-layer glass bottle is chosen, the roots of the variegated spider plant can be hung down through a plastic sieve, then stone grains are placed on top, while clear water and flower nutrient solution can be added to the lower bottle, and then it can be placed directly in a cool place.
4. Care and management: For hydroponic variegated spider plant, during the survival period, change the water once every 2-3 days; when changing directly from soil culture to a water cup, the number of waterings can be reduced. When changing the water, if rotten roots appear, they need to be cut off and disinfected. When the roots have grown to about 3 cm or more, an appropriate amount of nutrient solution can be added.
5. Fertilizing: For hydroponic variegated spider plant, during the survival period, it can be limited to once every three days, directly diluting the nutrient solution and spraying it on the branches and leaves.
[Soil cultivation of variegated spider plant]
1. Soil cultivation: Using soil as the cultivation method for variegated spider plant gives extremely strong adaptability and greater drought tolerance, but the soil is generally chosen as sandy soil, with certain drainage performance, loose and fertile.
2. Watering: Variegated spider plant likes semi-shaded places when growing, so it is necessary to maintain the habit of "water when dry". During the growing period, it needs appropriate more watering, but avoid water accumulation in the container. In winter, the number of waterings needs to be controlled. For daily care, use spray watering and clean the leaf surface every day to avoid dust accumulation.
3. Light: Variegated spider plant grows delicate and avoids sunlight, but appropriate light needs to be controlled to ensure healthy survival. In spring and autumn, avoid direct scorching sun, while in summer you can choose morning and evening diffused light. In the growth of variegated spider plant, in a low-light environment, the leaves and rhizomes will be brighter and more lush. In winter, the light time can be appropriately increased to avoid frost damage.
4. Humidity: Variegated spider plant likes a semi-shaded environment when growing. Avoid humidity that is too low, which will cause drying out. The humidity should be maintained at around 15°C, and in winter the temperature should not be lower than 10°C.
5. Fertilizing: For variegated spider plant, insufficient fertilizer and water can easily cause yellowing and withering of leaf tips. During its growing season, fertilize once every half a month. For fertilizing variegated spider plant, the best choice is nitrogen fertilizer. Do not fertilize directly at the roots; dilute it first.
[Yellowing leaf tips of variegated spider plant]
Excessive fertilizing
Fertilizing variegated spider plant should be diluted, and the amount needs to be controlled. Insufficient or excessive fertilizing will both affect the growth of variegated spider plant. The leaves will appear dry and wrinkled, and in severe cases it will directly cause root rot. The phenomenon of yellowing leaf tips is mostly caused by excessive fertilizing or incorrect fertilizing methods. At this time, stop fertilizing in time, increase the number of waterings, or directly replace the soil.
Daily care
Due to a lack of professional knowledge of daily care, such as incorrect soil turning, not turning the soil of variegated spider plant for a long time will cause compaction. This will not only directly affect the absorption of nutrients by variegated spider plant, but also cause trouble for future soil turning work, and the leaf tips will turn yellow, reducing ornamental value. Maintain the rule of turning the soil once every half a year and changing the soil once every two years. After yellowing appears at the leaf tips, a small amount of alum fertilizer water can be sprayed.
Excessive or insufficient daily light can also cause yellowing leaf tips. Long-term direct exposure to scorching sun will cause a lack of water in the leaves, resulting in drying out. Or insufficient light will lead to reduced chlorophyll, loss of leaf gloss, and yellowing. The daily light time should be maintained at about 4 hours, but it must not be exposed to direct scorching sun. During long periods of cloudy weather, the spider plant can be placed in a bright indoor place, such as under an incandescent lamp.
Pot soil influence
If plastic bottles or compacted soil are used for a long time and the soil is not loosened in time, it will affect the air permeability and water permeability of the plant. The bottom soil is moist while the surface is dry, making it difficult for the plant to absorb nutrients. After long-term water accumulation that is difficult to dry, it will affect root respiration, and the leaves will naturally turn yellow. At this time, you can change the watering method, control the water volume, and loosen the soil appropriately, keeping the pot soil moist.
[Hydroponic cultivation methods for spider plant]
Step 1: Container selection
Considering daily care, choose a container mainly made of glass, which has good transparency and can also be cleaned to observe root growth.
Step 2: Nutrient solution preparation
For the initial cultivation of spider plant, you can prepare the nutrient solution yourself, mainly adding calcium nitrate, magnesium sulfate, potassium chloride and ferrous phosphate, with contents of 1.8 g, 0.187 g, 0.62 g and 0.0278 g respectively. Dilute them with 1 liter of clear water to complete the preparation of the nutrient solution.
Step 3: Spider plant selection
For hydroponic spider plant, you can directly choose plants with robust rhizomes from soil-grown spider plants, prune the roots, cut off old roots, diseased roots and fibrous roots, then clean up the plant shape. After removing diseased leaves, use clear water to clean off the soil on the roots. The leaves should mainly be rinsed, but avoid damaging the leaves.
Step 4: Planting
Place the spider plant in the prepared glass vessel, then use glass balls, stone grains, etc. to fix the roots, avoiding wind blowing it over and affecting the plant's upright shape.
Step 5: Management and care
Place the hydroponic spider plant in a cool place, avoiding direct sunlight. Maintain the temperature difference at 21-28°C, and it can be placed in a low-light spot.
Every week, the nutrient solution can be replaced. You can directly buy professional spider plant nutrient solution. At the same time, pay attention to the cleanliness of the water body. When changing the water and nutrient solution, you can appropriately clean the spider plant roots to avoid soil mixing.
[More related information] How to grow sago palm How to grow bamboo fern Clivia Trident maple Beaucarnea recurvata Norfolk Island pine Freesia Sophora japonica leaf pictures