How to repot Cymbidium orchids? Method for trimming roots and changing potting soil after flowering
As one of the most beautiful orchid varieties, Cymbidium orchids are kept in many people's homes. To grow them well, there are some care techniques everyone must master, including repotting. During cultivation, it is best to repot Cymbidium orchids once a year. So how do you repot a Cymbidium orchid? Let's take a look at the repotting method for Cymbidium orchids.
1. How to repot Cymbidium orchids: the method matters
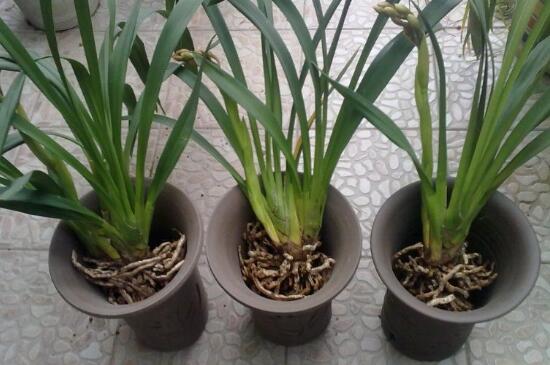
After buying a Cymbidium orchid, as cultivation time increases, it will grow larger and larger, and the pot will seem too small. For the healthy growth of the Cymbidium orchid, repotting it at the right time becomes crucial. So how do you repot a Cymbidium orchid? At this point, you need to master the repotting method, otherwise it is easy to kill the plant.
2. Repotting method for Cymbidium orchids
(1) Repotting time
Repotting a Cymbidium orchid is generally done once a year. As for the specific time, it is best to repot it after the flowering period each year. Take the whole plant out, trim the rotten roots, and replace some of the growing medium. This helps it bloom again the following year.
(2) Preparation before repotting
Now that you know the importance of repotting Cymbidium orchids and the specific repotting time, you should also do the preparation work before repotting. Simply put, before repotting a Cymbidium orchid, you need to prepare some materials and do some things, as follows:
1. Decomposed pine bark: You can collect it yourself or buy it online. Before use, boil it for 30 minutes to remove oily substances and kill insect eggs and bacteria.
2. Flower pot: an orchid-specific pot one size larger than the original pot. It cannot be too large, otherwise the soil will not dry easily after watering, which can easily cause root rot. Orchid-specific pots have better air permeability and water drainage.
3. When pulling out the Cymbidium orchid, be as careful as possible and do not damage the root system. You should be prepared to break the pot rather than destroy the roots.
4. Before repotting, you need to stop watering the Cymbidium orchid for a few days, because if the roots have absorbed enough water, they are easily broken when removing the plant from the pot. In a water-deficient state, the roots are soft and less likely to break.
5. Clean up rotten roots, empty roots and some old leaves. If there are many rotten roots, a lot needs to be trimmed off. We need to place it in a cool, ventilated place for two days, which helps the root wounds heal.
(3) Starting the repotting
How to repot a Cymbidium orchid: after completing the above preparation work, you can officially begin. Put the decomposed pine bark into the flower pot, adding enough so that the original Cymbidium orchid potting soil is level with the rim of the pot. Then fill decomposed pine bark around the edges, filling it completely so the roots and growing medium are in full contact.
After that, the repotting is complete. Isn't it simple? And because boiled pine bark is used, you do not need to water. Just use pure pine bark as the growing medium; no other additions are needed. That is all for the content on repotting Cymbidium orchids. I hope it helps everyone.
When to repot Cymbidium orchids, and the repotting method for Cymbidium orchids
Cymbidium orchids have bright colors, large flowers and a beautiful shape, so they are much loved by people. So when should Cymbidium orchids be repotted? Below is an introduction to the repotting method for Cymbidium orchids.
Why Cymbidium orchids need repotting
The larger the pot and the more growing medium, the less breathable the Cymbidium orchid roots are, and the more prone they are to disease. If new growing medium is added, it is better, and at the same time it makes the medium looser, which benefits the growth of Cymbidium orchid roots. In fact, this is also a process of loosening the soil.
Cymbidium orchids produce new shoots every year. Between the new shoots and old shoots, on the one hand, the pseudobulbs of the old shoots provide a large amount of nutrients for the growth of the new shoots. On the other hand, there is also competitive growth between the new shoots and old shoots. After the old shoots have grown for one year, their roots have already filled the flower pot, and at this time the roots of the new shoots no longer have space to grow.
If you repot into a larger pot 3 months after the new shoots start growing, you can leave space for the roots of the new shoots to grow. When the new shoots have grown for 6 months, the nutrients in the pseudobulbs of the previous generation of old shoots have been used up due to flowering or providing growth support for the new shoots, and they are no longer useful. At this time, the old shoots can be removed (we generally remove all the leaves). In this way, the plant will not be too dense, and the new shoots will have better ventilation and light, so the new shoots can grow better. If the new shoots are grown well enough at this time, they will bloom.
Repotting method for Cymbidium orchids
When choosing a flower pot for a Cymbidium orchid, you should choose according to the size of the plant. Generally, based on the width of the root system, a pot about 4 cm wider than the roots is sufficient, and the depth of the pot should also be moderate. As for the material of the flower pot, there are generally no requirements, but the bottom of the pot must have holes so that water does not accumulate. It is even better if the sides of the pot have holes.
For professional growers, before the plants reach flowering size, they generally choose disposable, cheap nursery pots for planting. At the final repotting, they choose hard black plastic pots for planting. Around the New Year, Cymbidium orchids as Lunar New Year flowers are transported to various retail stores and planted in all kinds of beautiful pots for retail sale.
Professional growers generally use 3 pots when growing Cymbidium orchids. The first pot is used for planting tissue-cultured seedlings, with a diameter generally around 9 cm. After one year of growth, they change to a second pot with a diameter around 13 cm. After another year of growth, they use a hard pot around 19 cm. After another year of growth, it blooms. Here is a small tip to share: in order to make Cymbidium orchids produce more new shoots, professional growers use the method of removing the growing point, that is, destroying the tender leaves in the middle of the old shoots.
When repotting, if it is a nursery pot, the plant can be taken out very conveniently because the nursery pot can be torn open. If it is a hard pot, and the root system has grown too much, it may be difficult to take out. After taking out the plant, there is no need to remove the old growing medium, otherwise it would cause serious damage. First add some growing medium to the bottom of the new pot, then place the plant on it, and then add growing medium around the edges. The growing medium does not need to be pressed firm. This fluffy growing medium will provide the best environment for the growth of the new shoots' roots.
How to prune Cymbidium orchid flower stems, pruning method for Cymbidium orchids / pruning after flowering
Cymbidium orchids, a hybrid orchid with many varieties, have developed to nearly 1000 varieties so far. Their flowers are large and their colors are rich, and they are deeply loved by flower enthusiasts. During the flowering period of Cymbidium orchids, we can fully enjoy their beauty, but after the flowers fade, they need to be pruned. So how do you prune Cymbidium orchid flower stems? Let's take a look at the pruning method for Cymbidium orchids.
1. How to prune Cymbidium orchid flower stems: the method matters
In the cultivation methods for Cymbidium orchids, besides light, water and fertilizer that everyone needs to pay attention to, there is another point that cannot be ignored, namely pruning flower stems. Pruning is a technical task, especially when pruning flower stems, because incorrect pruning may kill the plant. So how to prune Cymbidium orchid flower stems requires us to master the method.
2. Pruning method for Cymbidium orchids
1. Reasons for pruning flower stems
Before understanding how to prune Cymbidium orchid flower stems, we must know the reasons for pruning flower stems. For this, I have summarized 2 points:
① After Cymbidium orchids bloom, the flowers are large and numerous, and the top is too heavy, making them prone to falling over, so pruning is needed;
② The flowering period of Cymbidium orchids is 1-2 months, after which the flowers gradually fade. Cutting off the flower stems at this time can avoid consuming too many nutrients, benefits the sprouting of new shoots, and does not affect flowering the following year.
2. Pruning method
① If there are many flowers, you can cut the Cymbidium orchid flower stem from below. This will not affect the appearance and can also ensure that nutrients are not excessively consumed;
② After the Cymbidium orchid flowers fade, cut off the remaining flowers, gently take the plant out of the pot, clean up diseased roots, old roots and residual roots, and then plant it into a slightly larger pot.
In addition, after pruning the flower stems, there is no need to repot. You can simply clean up and replace the rotten and blackened growing medium in the flower pot. Cymbidium orchids are not afraid of being crowded, and the more crowded they are, the better they grow, which is even more beneficial for their own flowering.
3. Points to note
How to prune Cymbidium orchid flower stems? Besides knowing the method, there are also some points to note. For example, during pruning, protect the new shoots and pseudobulbs that have already formed. The original pseudobulbs and leaves of the Cymbidium orchid all need to be retained and cannot be pruned, because the Cymbidium orchid plant is composed of the mother bulb, daughter bulb and granddaughter bulb. Among them, the granddaughter bulb grows fastest and is also the bulb that sprouts and blooms in that year.
In addition, Cymbidium orchids like humidity and sunlight. After cutting off the inflorescence, you should move them to a well-ventilated windowsill, which can promote better growth. After placing them there for about a week, move the Cymbidium orchids outdoors, proceeding gradually. Never suddenly move them from indoors to outdoors, because sudden changes in environment and light will affect their growth.