Why are the leaves of the Selaginella uncinata dry? Six causes and solutions
Selaginella uncinata is an evergreen plant all year round. Its leaves grow densely in a feather-like pattern along the stems, and they are not only brightly colored but also give off a sapphire-like sheen, making them truly very attractive. But sometimes gardening enthusiasts also encounter the phenomenon of dry, withered leaves. Why are the leaves of Selaginella uncinata dry? How should we deal with it? Let me tell you a few causes and solutions.
Why are the leaves of Selaginella uncinata dry?
1. Soil too dry
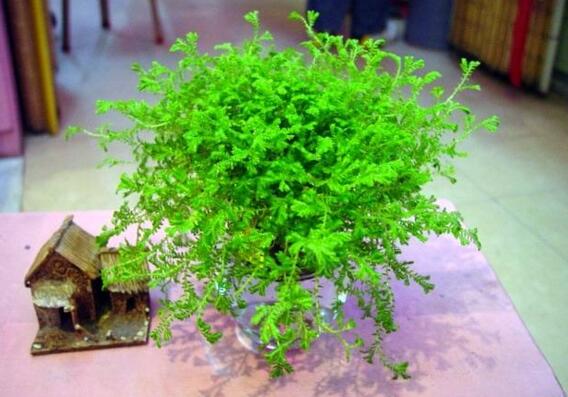
Cause: Selaginella uncinata originally grows inside rock caves, on moist rocks, or in crevices between stones. It prefers to grow in semi-shaded environments beside streams and rivers, and it likes moist environments. If the Selaginella uncinata grown at home always has soil that is too dry, the leaves will dry out at the edges due to lack of water.
Solution: There are two ways to avoid the soil being too dry. First, pay attention to reasonable watering at ordinary times, and each time you water, water thoroughly so the soil stays slightly moist. Second, frequently spray water on the leaf surface and around the plant; the water on the stems flowing into the soil can likewise create a moist environment.
2. Direct sunlight
Cause: In the cultivation methods for Selaginella uncinata, we once emphasized that it likes semi-shaded environments and avoids direct strong light. If gardening enthusiasts always keep it in the sun for care and management, over time its leaves will be scorched and dry out.
Solution: Quickly move the Selaginella uncinata to a shaded place, cut off the dried leaves, and in subsequent care avoid direct sunlight on it. At the same time, do not let overly strong diffused light shine on it either.
3. Temperature too high
Cause: Some gardening enthusiasts keep the plant indoors, but the leaves still turn dry and yellow. At this point, why are the leaves of Selaginella uncinata dry? It may be caused by too high a temperature. Selaginella uncinata is not a plant that can tolerate high temperatures. It can survive briefly in a high-temperature environment, but if the ambient temperature stays high for a long time, the leaves will dry out because the temperature is too high.
Solution: Check whether the environment is too enclosed and the temperature is relatively high. Especially in summer, do not put Selaginella uncinata in a closed, sun-facing room. Although the room temperature is lower than outside, if there is no ventilation the temperature will be especially high, and Selaginella uncinata finds it hard to adapt to such an environment.
4. Soil tends toward alkaline
Cause: As is well known, Selaginella uncinata likes weakly acidic and acidic soil, but some soils gradually show increased alkalinity during the care process. When Selaginella uncinata grows for a long time in highly alkaline soil, its growth weakens, and the leaves also dry out.
Solution: There are likewise two techniques to avoid soil alkalinity being too high. One is to replace the soil regularly, and the soil used should be acidic sandy soil, such as peat, plain sand, and so on mixed together. The second is to use water with lower alkalinity as much as possible when watering.
5. Root damage
Cause: Most causes of root damage are due to overwatering or pests and diseases. Overwatering keeps the roots soaking in water for long periods, causing the roots to rot. And some pests attack the roots, causing poor root growth.
Solution: When watering normally, do not pour in too much water; the principle is that there should be no standing water in the soil. As for pests and diseases, prevention and control need to be done well. Keep the environment clean and tidy at ordinary times, and pay attention to disinfecting the soil.
6. Sudden environmental changes
Cause: Selaginella uncinata has a certain air-purifying effect, but it finds it hard to adapt to sudden environmental changes and relatively strong stimulation. For example, if the temperature suddenly rises and falls, or if many harmful gases appear in the soil of the environment, the leaves will dry out.
Solution: Environmental changes are unavoidable, but gardening enthusiasts need to make sure they are not too drastic. In particular, do not place Selaginella uncinata in an especially harsh place. Creating a stable environment for it as much as possible is beneficial for growth.
A complete guide to orchid cultivation and growing techniques
"Three parts planting, seven parts care" - this is the ancients' experience in growing orchids. The quality of care determines whether the orchids flourish and whether they can bloom, so it makes sense that predecessors attached great importance to this. Below is a detailed introduction to the methods of caring for and managing orchids.I. Location
The location where orchids are placed is very important, as it directly affects the growth and development of the orchids. Orchids are generally placed outdoors in spring, summer, and autumn (in summer, placed in a shaded spot outdoors), and indoors in winter. Outdoors, it is best to have open space all around and moist air. Indoors, there should be ample light, preferably facing south. This is beneficial for orchid growth. The orchid pots are best placed on wooden stands or tables, not directly on the ground.
II. Shading
Most orchids belong to semi-shade plants, and most species are afraid of direct sunlight, so appropriate shading is needed. In early to mid-April, orchids can get more sunlight to promote growth. After late April, appropriate shading is needed. Among summer orchids and autumn orchids, varieties with upright leaves are best placed on the south side of a shaded area so they receive a bit more sunlight; for autumn orchids and spring orchids with drooping leaves, two hours of light per day is best. From the beginning of June to September, shading should be started earlier each day; if using reed blinds, use dense blinds or two layers of sparse blinds. After October, the weather turns cooler and sunlight is weaker, so shading can be delayed, but around noon, attention must still be paid to shading.
III. Rain protection
Orchids can be exposed to light rain, but must be protected from plum rain, showers, or continuous rain. During the plum rain season, rain protection work must be done especially well. From late June to mid-September, there are often showers. If the rain is short and the rainfall is light, more watering should be done in the evening to let the heat inside the pot escape; otherwise the orchids will be damaged, or even have root rot and die. If a shower is followed by sunshine, shade them promptly to prevent heat rising from the ground from affecting orchid growth. The rainy season coincides with the stage when orchids are sprouting leaf buds. If the potting soil is too warm, it will cause poor leaf bud growth or invite disease. At this time, a small amount of plant ash can be scattered to regulate the moisture of the potting soil.
IV. Watering
There is a gardening saying: "Dry orchids, wet chrysanthemums," and there is some truth to this. Generally speaking, orchids are best kept at eight parts dry and two parts wet. If too wet, the flowers easily rot at the roots and die. The principle of watering should be: water when dry, stop when wet, and lean appropriately toward dry. In specific practice, generally note: during the growth period (from May to the end of June), water appropriately more; during the leaf bud sprouting period (about March to April) and the flowering period (about March to April), water appropriately less; during the dormant period (winter), water even less or not at all. If the pot is large and the orchid plant is small, water less; if the pot is small and the plant is large, water more. In hot, dry weather, water appropriately more; in cool, humid conditions (such as the plum rain season), water less or not at all. For orchids newly dug from the mountains, if the root system is sparse or many roots are broken, water less and keep the potting soil a bit dry; this prevents root rot and helps new leaves sprout. The ancients' experience that "do not let them dry in autumn, do not let them stay wet in winter" is a very good summary of how to water spring orchids and summer orchids. However, in some northern regions, because the climate in winter and early spring is too dry, orchids should not be allowed to become overly dry either. Watering time: in summer and autumn, water after sunset so the orchid leaf surfaces dry before nightfall; watering in the early morning is also acceptable. In winter and spring, watering around sunrise is best. Do not suddenly use cold water to irrigate after scorching sun exposure, to avoid lowering the soil temperature, affecting root water uptake, and disrupting physiological balance. The amount of water should not be too large, so as to help suppress disease occurrence.
Watering method: Water should be poured in from the edge of the pot, and must not be poured into the flower buds, to avoid causing rot.
Predecessors had very good summarized experience on watering orchids. For example, Yu Zhao in "Records of Orchid Growing in the Capital" proposed different watering methods according to the twenty-four solar terms within a year. The following is an excerpt for reference. But two points need attention: first, "Records of Orchid Growing in the Capital" uses Beijing's climate as the standard; second, the months in the text refer to the lunar calendar rather than the Gregorian calendar, so "the first month" is actually February in the Gregorian calendar.
1. Start of Spring, Rain Water: spring orchids have already set flowers, the soil should not be too dry; slightly moisten along the edge of the pot. If the autumn orchid pot has not dried to the bottom, do not water.
2. Awakening of Insects: when the spring orchid pot has dried halfway (dry on top, firm below), it can be moistened, but not too much; autumn orchids same as before.
3. Spring Equinox: spring orchids have finished flowering and should avoid moisture; when the pot is half dry, it can be moistened.
4. Clear and Bright, Grain Rain: do not let the potting soil become too dry; moisten with water every 5 days.
5. Start of Summer: orchids begin to be brought out of the room; it is suitable to water thoroughly once.
6. Grain Full: do not let the potting soil become too dry or too wet. If spots appear on the leaves, it is too wet; if the tips of new shoots wither, it is too dry. Water one sheng (about a dried teacup) every 4 days, so that the lower 2/3 of the potting soil from bottom to top is moist.
7. Grain in Ear: the climate is dry, so pay even more attention not to let it become too dry or too wet.
8. Summer Solstice: the potting soil must not be too dry. If heavy rain occurs, it can only endure one day. If there are successive days of overcast rain, the pot needs to be moved to a ventilated place.
9. Minor Heat: at this time the air is too humid, so the potting soil must not be too wet. The pot should be placed in a ventilated place. If it is hot and dry with little rain, water one sheng every 2 days. After heavy rain or one heavy wetting, you must wait until the potting soil has dried to 2/3; otherwise it should not be watered again.
10. Major Heat: the potting soil easily dries all the way through; note that only one heavy rain or one heavy wetting per day is suitable.
11. Start of Autumn: orchids need water at this time; water 2 sheng every 3 days, and they should also be sheltered from wind.
12. End of Heat: water once every 5 days. Except during successive days of misty rain, they can be allowed to receive rain and dew.
13. White Dew: autumn orchids need frequent watering even more than spring orchids, but after becoming wet they must dry out greatly before they can be wetted again.
14. Autumn Equinox: if autumn orchids have already produced flowers, water slightly less; if they have not produced flowers, water slightly more.
15. Cold Dew: autumn orchids should be watered thoroughly; spring orchids should not be watered thoroughly but kept moist.
16. Frost's Descent: orchids should be moved indoors, and the watering time changed to midday. After watering, they need to be placed in the midday sun for 1-2 hours.
17. Start of Winter: only moisten with water, about half a sheng every 5 days.
18. Minor Snow: the flower room should avoid warmth and should not be too humid. If too humid, it can cause root rot, scarred leaves, and even withering. If the pot has not dried to the bottom, only slightly moisten the surface of the soil.
19. Major Snow: autumn orchids need no water; spring orchids should be slightly moistened.
20. Winter Solstice: neither should be irrigated.
21. Minor Cold: watering is forbidden for both.
22. Major Cold: autumn orchids still need no water; spring orchids can be slightly moistened with water.
V. Fertilizing
Orchid fertilizing should be decided according to the orchid's growth condition. Those growing luxuriantly and without disease can be fertilized; those growing poorly should not be fertilized or only lightly fertilized. For orchids newly dug from the mountains, before new roots have developed, fertilizing is strictly forbidden. They need 1-2 years of cultivation, and only when the new roots are vigorous can they be fertilized; otherwise they are prone to withering and dying.
Generally speaking, in June-July, when the orchid leaf buds have extended about 1.5 cm, 1-2 applications of thin, fully rotted liquid fertilizer can be given (chemical fertilizers are not suitable), but fertilizing is not suitable in high-temperature seasons. In August-September, apply 1-2 more applications of fully rotted thin liquid fertilizer. For plain-hearted orchid varieties, 1-2 applications of plant ash extract can be given, with very good results. Fertilizing in the evening is best, and the next morning water once with clear water.
A relatively simple way to tell whether orchids need fertilizing is to look at the depth of leaf color. If the leaves appear yellow and thin, it is a lack of fertilizer and topdressing should be applied; if the leaves are dark and the leaf tips are scorched, it is excessive fertilizing and fertilizing should be stopped.
For fertilizer, the various methods introduced above can be used to make fertilizer at home. When applying these fertilizers, they need to be diluted with 8-9 times water, and must never be too concentrated. When fertilizing, apply it to the root zone of the plant, and never apply it to the leaf surface. The main fertilizing times and dates for orchids: times, dates, category, first time, second time, third time, fourth time, remarks
Spring orchid type: late June, mid-July, mid-August, early September. The fourth time should be especially thin.
Summer orchid type: late June, mid-July, mid-August, early September. The fourth time should be especially thin.
Autumn orchid type: early June, late June, late July, mid-August. The fourth time should be especially thin.
VI. Pruning
During orchid cultivation, pruning must be carried out continuously. When old leaves turn yellow and withered, they should be cut off promptly to improve ventilation. Some leaves whose tips have dried out should also be cut off. In particular, leaves harmed by pests and diseases need to be removed promptly to avoid contagion. When cutting off leaves with viral disease, the scissors used should not then be used to cut healthy leaves, to prevent virus transmission. If the same pair of scissors is used, it must be disinfected. For precious orchids, after the flower buds emerge from the soil, if there are too many flower buds, keep the strong buds and remove the remaining thin, small flower buds; per pot, keeping 1-2 flower buds is suitable. If there are too many flower buds, it will both make that year's flowers bloom poorly and consume too much of the parent plant's nutrients, affecting next year's flowering. Generally, orchids do not need their flower buds cut off. Spring orchid flowers, after blooming for about half a month, need to be cut off; for summer orchid flowers, when the last flower on the inflorescence has been open for one week, the inflorescence should also be cut off. Precious varieties should not be allowed to be pollinated and set seed, otherwise it will affect flowering the following year. If used for hybrid breeding, then extra care in cultivation is needed to make the fruit full and ripe.
VII. Cold protection
Autumn orchids should have cold protection work done early; for example, when the temperature is 2-3°C, they can be moved indoors. Cold orchids, which grow in the south, need even earlier cold protection. Spring and summer orchids have relatively strong cold resistance, but if freezing occurs they must also be moved indoors promptly. If the room temperature can be kept at 1-2°C, they can overwinter. If a severe cold wave strikes and the room temperature drops below zero, heating must be carried out promptly; generally it is enough to keep the room from freezing. Indoors, autumn orchids need to be placed on the south-facing side, and spring and summer orchids on the other side. Around noon, windows on the south and southeast sides should be opened for ventilation (for autumn orchids, on overcast days at 1-2°C, windows must not be opened, to prevent cold wind from blowing in and freezing the leaves). Autumn orchids like to be a bit drier in winter; the potting soil of the other orchids should be kept moist.
VIII. Flower removal
For orchids that grow poorly, with not many leaves per clump, or with poor roots, flower removal should be carried out. For better varieties, spring orchids can appropriately have 1-2 flower buds removed; for summer orchids, when the flower buds have extended, keep 1-2 flower buds and remove the rest. This way the flowers can last longer, more new leaves can sprout, and old leaves are less likely to wither and die. Precious spring orchids should have their flowers removed after 3-5 days of blooming, so that the leaf buds grow robustly; for summer orchids, when the topmost flower has opened, they can also be cut off at a distance of cm from the pot surface.
IX. Flood prevention
If the cultivation site is open all around and on relatively high ground, when strong winds or typhoons pass through in summer, wind protection work needs to be done well, to prevent the leaves of summer orchids or cold orchids from being broken and damaged.
X. Misting
In dry seasons, mist every evening on the balcony where the potted flowers are placed, mainly to moisten the ground and increase air humidity. The pot surface of the orchids should also be misted. When misting, spray upward so that the mist droplets fall finely and evenly and the leaf surfaces become moist. This can promote good orchid growth, and the leaf surfaces will be full of luster.
XII. Pest and disease control
Sterilization treatment should be carried out (exposure under the hot sun is sufficient) to prevent disease occurrence. Orchids are most prone to southern blight in rainy, high-temperature seasons. It can be prevented by spraying with 800-times thiophanate solution or Bordeaux mixture. If the disease is severe, use thiophanate diluted 500-750 times, spraying once every 7-10 days. Among insect pests, scale insects occur most. This insect attaches to the base of the leaves; if scale insects are found, they should be removed promptly. To avoid scale insect infestation, starting from April, "1059" at 2000-times solution can be used for control. In order to suppress the occurrence of orchid diseases, in addition to appropriately controlling the dry and wet degree of the potting soil at ordinary times, when choosing flower pots, clay pots should be used as much as possible and glazed pots used less. Especially for poorly growing orchids newly dug from the mountains, clay pots must be used for planting. Doing so makes the potting soil dry easily, which can promote orchid growth and reduce disease occurrence
How should orchids be grown well?
1. Potting soil requirements: A neutral to slightly acidic soil containing plenty of humus, loose and with good drainage is best, with a pH generally around 5.5 to 6.5. In Sichuan, Emei Immortal Soil and "Xinghong brand" refined orchid growing medium are mostly used; more commonly, "bamboo root soil" and leaf mold from broad-leaved forests in mountainous areas are used to cultivate orchids.
2. Placement location: Orchids can be grown outdoors and on balconies in spring, summer, and autumn, and a location with good ventilation, moist air, and no environmental pollution should be chosen. Being near a pond or riverside is of course good; at the very least there should be tall trees or bamboo groves and shade netting to reduce sunlight exposure and lower the temperature. Orchid pots are best placed on wooden stands (or steel stands); if placed on the ground, bricks should be used as a base. Home balconies can also use small galvanized iron water troughs to store water, with bricks placed on top for growing, increasing humidity.
3. Appropriate shading: Most orchids belong to semi-shade plants, and most species are afraid of direct sunlight, so appropriate shading is needed. In early to mid-April, orchids can have the netting removed and windows opened, getting more sunlight to promote growth. In May, except for the midday sun, they can get 6 hours of light; starting from June, shade all day long; after October, except for midday, they can be kept fully open for care. Remember the proverb: "More shade gives good leaves, more sun gives good flowers."
4. Reasonable fertilizing: Orchids are inherently "vegetarian," and fertilizing should be decided according to the chosen potting soil and growth condition. Those growing luxuriantly and without disease can be fertilized; those growing poorly should not be fertilized or only lightly fertilized. For newly planted orchids in pots whose roots have not fully developed, only after 1-2 years can they be fertilized. Generally in June-July, when the orchid leaf buds have extended about 1.5 cm, apply a fully rotted liquid fertilizer once every three weeks (a thin concentration of 10% is suitable). Chemical fertilizers are taboo. If high-temperature seasons occur, fertilizing is not suitable. In August-September, apply diluted liquid fertilizer once every two to three weeks. Each time orchids are fertilized, it is best to do it in the evening, and in the morning water with clear water, called "return water."
5. Appropriate watering: Rainwater and spring water are best for watering orchids; tap water or rice-washing water needs to be left overnight before use. When watering, pour from the edge of the pot, and do not pour into the flower buds. The amount of water should be determined according to temperature, the dry and wet degree of the potting soil, and the growth condition of the orchid. If the leaves are large, water more; if the leaves are fine, water less. In April-May, new shoots have not yet emerged from the soil, so the potting soil should be a bit dry; if too wet, the new shoots easily rot. June-September is the growth period for orchid new shoots, and the amount of water should be increased; on sunny days, water once each morning or once daily, and never water under the scorching midday sun. In autumn, reduce the amount of water as appropriate; leaf-surface misting can be used, and keeping the potting soil moist is best. In winter, water should be controlled even more, keeping it at "eight parts dry, two parts wet" as suitable.
6. Evening misting: Orchids originally grow in moist-air environments, so in dry seasons, besides shading, evening misting must also be done to increase air humidity and lower the temperature; water can also be poured onto the ground (table surface) where the potted orchids are placed. "One cold, one hot" can further stimulate orchid growth.
7. Wind and rain protection: "February ghost wind" causing old leaves to yellow and fall is a normal phenomenon; dead branches and withered leaves can be cut off. Orchids can be exposed to light rain, but must avoid plum rain, torrential rain, or continuous rain, otherwise the heart and leaves easily rot. In rainy seasons, a small amount of plant ash can be scattered as appropriate.
8. Pruning and flower removal: During orchid cultivation, withered, yellow, broken, and diseased leaves should be cut off frequently to improve ventilation. For precious orchids, if there are too many flower buds, keep only the strong buds; per pot, 1-2 flower buds are suitable. Spring orchids should have their flowers removed after half a month of blooming; precious orchids should have them removed after 7 days, so that the spring orchid leaf buds grow robustly and bloom even better the following year. For summer orchids, when the last flower on the inflorescence has been open for one week, cut it off at 3 cm from the pot surface.
9. Cold protection and warmth: Because orchid varieties differ, their places of origin vary, and their cold resistance also differs, so the time to move them indoors in winter and their indoor placement also differ. Cold orchids, autumn orchids, and New Year orchids grow in the south and should be moved indoors (or have windows closed and netting drawn) when the temperature is 5°C, and placed in a south-facing sunny spot as much as possible. Spring and summer orchids have strong cold resistance and can be moved indoors only when the temperature reaches 0°C, placed on the northeast side. Around noon on sunny, windless days, windows on the south or southeast side should be opened and netting drawn for ventilation. Autumn orchids, on sunny days at 1-2°C, must not have windows opened. Of course, if there is a greenhouse, electric light heating can be used.
10. Disease and pest control: The potting soil generally needs sterilization treatment (exposure under the hot sun is also acceptable), to prevent disease occurrence. Orchids are most prone to southern blight in rainy, high-temperature seasons. For a small amount, a damp cloth can be used to wipe it off; if there are many pots, 500-800 times Bordeaux mixture or thiophanate can be used, spraying once every 7-10 days. Among insect pests, scale insects (commonly known as "orchid lice") occur heavily. During the hatching period, use 1% omethoate and 25% phosmet emulsifiable concentrate at 1000-times solution, spraying once a week. To treat the symptoms one must treat the root cause: pots should be placed with appropriate spacing, arranged high and low, increasing air circulation and ventilation, so as to reduce disease occurrence.
(II) The ecological habits of orchid cultivation
Orchids originated in our country. They like warmth and humidity, and especially ideal is warm winters and cool summers; high temperature and dryness must be avoided. In winter, it is best if they do not freeze, and keeping 3C-7C is most suitable; in summer, 25C-28C is suitable. In natural distribution, orchid habitats have streams and gullies nearby, receive rain and dew year-round, and require annual rainfall of more than 1000 mm. They require deep upper soil, rich in humus, dark brown, loose and fertile, with good water permeability and water retention, and slightly acidic soil, PH5-PH6.5, and they must avoid standing water.
Orchids like shade and require short sunshine duration. In natural distribution, it is shown that spring orchids require tree shade density of 0.7-0.95; cymbidium orchids require 0.5-0.8 and a slightly longer light duration than spring orchids; sword-leaf orchids, ink orchids, and cold orchids also require a large shade density. Cymbidium plants have a dormant habit in their places of origin, which depends on the rainy and dry seasons. Usually the dry season is in winter, which is the orchid's dormant period, and the rainy season is in spring and summer, which is the orchid's growth period, when they can continuously bud and bloom.
(III) Propagation methods for orchid cultivation Orchids are commonly propagated by division, sowing, and tissue culture.
1. Division: This can be done in both spring and autumn, generally once every three years. Any plant that grows robustly with densely clustered pseudobulbs can be divided. After division, each clump must retain at least 5 interconnected pseudobulbs. Before division, reduce watering to make the potting soil relatively dry. When potting after division, first cover the drainage hole at the bottom of the pot with broken tile pieces, then spread coarse gravel to occupy 1/5 to 1/4 of the pot depth, then place coarse-grained soil and a small amount of fine soil, and then plant with humus-rich sandy loam. The planting depth should be such that the pseudobulbs are just buried in the soil; leave a 2 cm rim at the edge of the pot, spread Selaginella uncinata or fine gravel on top, and finally water thoroughly, place in a shady spot for 10-15 days, keep the soil moist, gradually reduce watering, and carry out normal care.
2. Sowing propagation: Orchid seeds are extremely fine, and the seed contains only one incompletely developed embryo, with very low germination ability. In addition, the seed coat does not easily absorb water, so sowing by conventional methods cannot germinate. Therefore, orchid fungi or artificial culture medium are needed to supply nutrients for germination. For sowing, it is best to choose fruit that has not yet split. After sterilizing the surface with 75% alcohol, take out the seeds, soak them in 10% sodium hypochlorite for 5-10 minutes, take them out and rinse 3 times with sterile water, then sow them in culture bottles containing culture medium, and place them in a dark culture room, keeping the temperature at about 25C. After they sprout, move them into the light and they can form protocorms. From sowing to transplanting takes half a year to a year. Tissue culture has already been successful, and where conditions permit, this method can be used for propagation.
(IV) Orchid cultivation techniques
1. Site selection: It requires open space all around, good ventilation, and proximity to water, with moist air and no coal smoke pollution. On the southwest side of the site, evergreen broad-leaved trees can be planted, with a shade density of about 0.7. This can reduce afternoon sunlight exposure and regulate humidity and temperature.
2. Watering: Rainwater or spring water is suitable; water containing salt and alkali should not be used. If tap water is used, it should be left standing for several days before use. Watering should be determined according to temperature conditions. In spring, the amount of water should be less; in summer, more is suitable. The plum rain season coincides with orchids sprouting leaf buds, so the potting soil should be slightly dry. After autumn, the weather turns cooler, and the amount of water should be reduced as appropriate, keeping it moist. In winter indoors, it should be dry, reducing watering frequency, and it is suitable to water at noon. Orchids can be exposed to light rain, but continuous rain or torrential rain easily rots the heart and leaves, so attention must be paid to rain protection.
3. Fertilizing: For growing orchids, cake fertilizer is suitable. Mix 4 parts plant ash, 10 parts bean cake, and 10 parts bone meal evenly, put them in a vat, add water several times until the bean cake is soaked through, then cover and seal, and after one year of decomposition, make them into dry granules. When using, place them on the pot surface. If using whole manure, it should also undergo one year of decomposition, then be mixed with water, diluted, and filtered for use. Generally, fertilizing starts in May and stops at the Start of Autumn, with the principle of thin fertilizer applied frequently. Fertilizing should be done in the evening, and the next morning water once with clear water.
4. Shading and cold protection: Except in early spring and winter, they should all be placed under open-air sheds. The shade shed requires good ventilation. When orchids have just been brought out in March-April, they can get more sun, and afterward the shading time gradually increases. In winter, orchids must be moved indoors for cold protection, and keeping the room temperature at 1C-2C is sufficient. In addition, after orchids are brought out in spring and before they are moved indoors in autumn, attention must also be paid to frost protection.
5. Pest and disease control: The main pests and diseases of orchids are:
(1) Southern blight: Mostly occurs in the plum rain season. Attention should be paid to ventilation and light transmission and good potting soil drainage for prevention. After onset, remove the infected potting soil and sprinkle pentachloronitrobenzene powder or lime.
(2) Anthracnose: Present year-round, and even more rampant in high-temperature, rainy seasons. In addition to improving environmental conditions, during the onset period spray with 50% thiophanate-methyl wettable powder at 800-1500 times solution, once every 7-10 days, and then supplement with 1% equal-amount Bordeaux mixture, once every half month.
(3) Scale insects: Under high temperature, high humidity, and poor air circulation, they reproduce fastest. Use conventional control methods.
In summary, to grow orchids well, one must master their natural growth environment conditions, take reasonable measures, and strengthen care and management. According to "Orchid Growing Formulas": "Do not bring them out in spring, do not sun them in summer, do not let them dry in autumn, do not let them stay wet in winter." This is a summary of our country's orchid-growing experience.
A brief discussion of reasonable pesticide use for orchids
Fungicides are agents for preventing and controlling crop diseases. When we normally prevent and control orchid diseases, we should choose according to the different properties and modes of action of different types of fungicides. One type is protective fungicides, whose function is to treat plants or the environment in which plants are located before pathogens invade. They need to be used before the plant comes into contact with pathogens or before disease occurs to achieve results, such as Bordeaux mixture, lime sulfur mixture, mancozeb, zineb, and so on. There is also another type, therapeutic fungicides. We often come into contact with this type of fungicide, and its characteristic is that it is systemic. The use of this type of fungicide is when the pathogen has already invaded the plant body or the plant is already diseased; at this time it is applied to reduce or eliminate plant disease. Applying the pesticide in the early stage of plant disease will give better results.
The early and peak stages of disease for different pathogens also differ, greatly influenced by the external environment, especially by the growth and development status of the infected crop and by temperature and humidity, (therefore, we must grow orchid seedlings strong). When preventing and controlling diseases, it is even better if everyone can be familiar with the living habits and epidemic patterns of the pathogenic pathogens. Disease control can be done according to different seasons and temperature environments, and this plays a huge role in the effective exertion of pesticide efficacy. Crop diseases caused by various pathogens are different, and the disease symptoms are also obviously different. Therefore, when choosing fungicide drugs, the right medicine must be chosen for the disease. Moreover, the efficacy should be significant and lasting; one should not blindly pursue high efficiency, broad spectrum, or even "all-purpose" agents, as if no matter what the disease, I treat it with only one drug. This is definitely not acceptable. When using pesticides, attention should be paid to preventing the development of pathogen resistance, that is, the same fungicide cannot be used continuously, nor can the same type of fungicide be used continuously several times in one growing season. In particular, the number of uses of systemic agents should be limited. For example, in production, systemic agents can be combined or alternated with chlorothalonil, mancozeb, and so on.
In our daily pesticide use, we should adopt corresponding control measures according to the patterns of pathogen infection. When using fungicides to spray directly on orchid plants, attention should be paid to the influence of natural conditions to prevent loss of efficacy or pesticide damage. When temperature and humidity are relatively high, the concentration of the pesticide used can be appropriately reduced; for agents that easily decompose or volatilize under strong light, they should be applied on overcast days or in the evening. Different pesticides all have a certain scope of use. Only by understanding them deeply and mastering their usage characteristics can one correctly select pesticides and achieve twice the result with half the effort. Carbendazim is a systemic fungicide commonly used by everyone. It can prevent and control dozens of fungal diseases. Ascomycetes and deuteromycetes are especially sensitive to this drug, but it is ineffective against diseases caused by bacteria and oomycetes among fungi. Therefore, when it is confirmed that a plant is infected with a fungal disease and repeated use of carbendazim is ineffective, consideration should be given to switching to phenylamide pesticides (such as metalaxyl). This type of drug is mainly used for downy mildew, phytophthora disease, and pythium disease caused by oomycetes, while its effect on diseases caused by other fungi and bacteria is very poor. Chlorothalonil is a non-systemic broad-spectrum fungicide. It has a preventive effect on many plant fungal diseases. It can prevent pathogen spores from germinating, hinder mycelial development and spore formation, and can also prevent and control diseases that have developed resistance to carbendazim, but its control effect on diseases caused by soil-borne pythium is poor. Therefore, frequently change fungicides, (Huakang is said to be able to kill all diseases; I do not know if it is true. When I use it, I do not dare to be careless, and still mix it with other fungicides) striving for maximum protection of orchid plants, so that they are spared from the torment of disease. When orchids grow healthily, orchid enthusiasts are also happy.Figure 1 Ring rot + anthracnose "Colletotrichum"
Ring rot + anthracnose "Colletotrichum" Preventive pesticide use in ordinary times:
Pesticide name: 77% Kocide wettable powder; mode of action: broad-spectrum protective fungicide; method of use: 1000-times solution / 3-4 times / interval 7 days spray / leaf underside, leaf surface; can simultaneously prevent: brown spot, anthracnose, leaf spot, ring rot, bacterial brown spot;
Pesticide name: 25% Sportak emulsifiable concentrate; mode of action: broad-spectrum fungicide; method of use: 1500-times / 2-3 times / interval 8 days spray / leaf underside, leaf surface; can simultaneously prevent: anthracnose, leaf spot, sooty mold, black spot, round spot, ring rot;
Pesticide name: 80% mancozeb wettable powder; mode of action: broad-spectrum protective fungicide; method of use: 800-times / 3-4 times / interval 6 days spray / leaf underside, leaf surface; can simultaneously prevent: anthracnose, leaf spot, sooty mold, black spot, round spot, ring rot;
Ring rot + anthracnose "Colletotrichum" Supplementary explanation:
1. Because most of the control prescriptions for anthracnose are emulsifiable concentrates or mancozeb-type, when using pesticides, attention must be paid to weather temperature and UV index.
2. When the temperature exceeds 30 degrees, avoid using emulsifiable concentrates and copper agents as much as possible. When the weather UV is too high, choose as much as possible to apply the pesticide before 5 a.m. or after 6 p.m.
3. It is recommended that during normal pesticide use, two prescriptions of fungicides can be selected and mixed for use. This can provide treatment and defense in multiple aspects.Image 2 Ring rot + leaf spot
Ring rot + leaf spot Preventive pesticide use in ordinary times
Pesticide name: 80% mancozeb wettable powder; mode of action: broad-spectrum protective fungicide; method of use: 800-times / 3-4 times / interval 6 days spray / leaf underside, leaf surface; can simultaneously prevent: anthracnose, leaf spot, sooty mold, black spot, round spot, ring rot;
Pesticide name: 77% Kocide wettable powder; mode of action: broad-spectrum protective fungicide; method of use: 1000-times solution / 3-4 times / interval 7 days spray / leaf underside, leaf surface; can simultaneously prevent: brown spot, anthracnose, leaf spot, ring rot, bacterial
Ring spot disease + leaf spot disease supplementary note: Before the leaves of an affected orchid have dried up, ring spot disease is often mistaken for ordinary leaf spot disease or something else if not examined carefully. Treatment... [unclear text]... it is also a relatively difficult disease to control.
2. It is recommended that during normal pesticide use, you can choose to mix two formulations of fungicides for use, so that you can achieve treatment and prevention from multiple aspects.Image 3: Mild nutrient deficiency disease (zinc, magnesium, iron).
Mild nutrient deficiency disease (zinc, magnesium, iron). Routine preventive medication: although this is a diseased state, it is not contagious. During normal fertilization, supplement some trace elements and fertilizers containing zinc, magnesium, iron, and calcium. Mild nutrient deficiency disease (zinc, magnesium, iron) supplementary note: during normal fertilization, supplement some trace elements and fertilizers containing zinc, magnesium, iron, and calcium.Image 4: Soft rot + black spot disease.
Pesticide name: 72% agricultural streptomycin sulfate wettable powder; mode of action: antibiotic fungicide; method of use: 800 times dilution / 2-3 applications / 7-day interval, spray, root drench; can also prevent: bacterial brown spot disease, soft rot disease.
Soft rot + black spot disease supplementary note: because this is a condition caused simultaneously by fungi and bacteria, two different fungicides must be mixed for use. Since the two fungicides each have their own dilution concentration when mixed, this often troubles beginner orchid growers. Here is a supplementary explanation again: ratio: 100 jin of water, use the bacterial one, streptomycin sulfate at 500 times, mixed with the fungal one, carbendazim, at 1000 times.
1. For 100 jin of water, streptomycin sulfate at 500 times means 100 grams of streptomycin sulfate needs to be added.
2. For 100 jin of water, carbendazim at 1000 times means 50 grams of carbendazim needs to be added.
3. That is, using 100 grams of streptomycin sulfate equals "500 times" plus 50 grams of carbendazim equals "1000 times," put into 100 jin of water at the same time and mixed for use; only then is it considered a correct pesticide dosage preparation.Image 5: Leaf tip anthracnose + leaf blight.
Routine preventive medication for leaf tip anthracnose + leaf blight.
Pesticide name: 25% propiconazole emulsifiable concentrate; mode of action: broad-spectrum systemic fungicide; method of use: 1500 times / 2-3 applications / 8-day interval, spray / leaf underside, leaf surface; can also prevent: brown spot disease, round spot disease, anthracnose, leaf spot disease, leaf tip blight.
Pesticide name: 10% Score water-dispersible granule; mode of action: broad-spectrum systemic fungicide; method of use: 3000 times / 2-3 applications / 8-day interval, spray / leaf underside, leaf surface; can also prevent: brown spot disease, leaf spot disease, black spot disease, round spot disease, leaf blight, ring spot disease, leaf tip blight, sooty mold.
Leaf tip anthracnose + leaf blight supplementary note: because this is a cross-symbiosis of two pathogens, it is recommended to use two fungicides for relatively simple control. The mixing method for the two fungicides is repeated here once. When two disease conditions occur at the same time, two different fungicides must be mixed for use. Since the two fungicides each have their own dilution concentration when mixed, this often troubles beginner orchid growers. Here is a new supplementary explanation: ratio: 100 jin of water, use the bacterial streptomycin sulfate at 500 times mixed with the fungal carbendazim at 1000 times.
1. For 100 jin of water, streptomycin sulfate at 500 times means 100 grams of streptomycin sulfate needs to be added.
2. For 100 jin of water, carbendazim at 1000 times means 50 grams of carbendazim needs to be added.
3. That is, using 100 grams of streptomycin sulfate equals "500 times" + 50 grams of carbendazim equals "1000 times," put into 100 jin of water at the same time and mixed for use; only then is it considered a correct pesticide dosage preparation.Image 6: Leaf margin black spot disease.
Routine preventive medication for leaf margin black spot disease.
Pesticide name: 80% mancozeb wettable powder. Mode of action: broad-spectrum protective fungicide. Method of use: 800 times / 3-4 applications / 6-day interval, spray / leaf underside, leaf surface. Can also prevent: anthracnose, leaf spot disease, sooty mold, black spot disease, round spot disease, ring spot disease.
Pesticide name: 10% Score water-dispersible granule; mode of action: broad-spectrum systemic fungicide; method of use: 3000 times / 2-3 applications / 8-day interval, spray / leaf underside, leaf surface; can also prevent: brown spot disease, leaf spot disease, black spot disease, round spot disease, leaf blight, ring spot disease, leaf tip blight, sooty mold.
Pesticide name: 25% Sportak emulsifiable concentrate; mode of action: broad-spectrum fungicide; method of use: 1500 times / 2-3 applications / 8-day interval, spray / leaf underside, leaf surface; can also prevent: anthracnose, leaf spot disease, sooty mold, black spot disease, round spot disease, ring spot disease.
Pesticide name: 50% Sporgon wettable powder; mode of action: broad-spectrum fungicide; method of use: 2000 times / 2-3 applications / 8-day interval, spray / leaf underside, leaf surface; can also prevent: anthracnose, leaf spot disease, sooty mold, black spot disease, round spot disease, ring spot disease.
Leaf margin black spot disease supplementary note: in fact, many fungicides used for orchid leaf diseases have similar properties, but as our professional introduction, we have no choice but to present all the disease conditions for orchid growers to understand. In general, when choosing fungicides, broad-spectrum and systemic pesticides of the two types are the best.
Experience reminder: in my experience, the key work when buying pesticides is to choose manufacturers with credibility and clearly labeled ingredients, so as to avoid the psychological comfort of having already applied a fungicide while the result is fake ingredients, causing the disease not to be controlled and missing the golden time for treatment.
Experience reminder: the second cause of harm is this: thinking that these pesticides may not have sufficient labeled ingredients, one instead increases the concentration or dilution, only to find that this time genuine pesticide was bought, and as a result, once the dilution was increased, serious pesticide damage was caused. Haha! One can only look to heaven speechlessly.Image 7: Blight disease.
Routine preventive medication for blight disease.
Pesticide name: 72% Curzate wettable powder; mode of action: systemic fungicide; method of use: 1500 times solution / 2-3 applications / 10-day interval, drench roots and stems; can also prevent: blight disease.
Pesticide name: 50% Anchor wettable powder; mode of action: systemic fungicide; method of use: 12500 times / 2-3 applications / 10-day interval, drench roots and stems; can also prevent: blight disease.
Supplementary note on treating blight disease after infection:
1. During the peak period of disease outbreak, continuous preventive medication must be used. Having understood the characteristics of stem rot, we can only use targeted fungicides.
2. 72% agricultural streptomycin sulfate soluble powder 800 times solution, 77% Kocide powder 1000 times solution, spray leaf underside, leaf surface, and crown.
3. Mizar (emulsifiable concentrate) 1500 times + tetracycline (powder) 2000 + dimethomorph (powder) 2000 times solution, spray leaf underside, leaf surface, and crown.
4. Antracol 500 times + Mizar 1500 times + streptomycin sulfate 500 times solution, spray leaf underside, leaf surface, and crown. (When applying fertilizers and pesticides, you must spray the leaf underside, because plants absorb through the stomata on the leaf underside.)
5. About every 20 days, use Dexon 800 times + tetracycline 3000 times solution to thoroughly drench the roots.
6. Fungicides must be alternated and rotated so as not to produce resistance and delay treatment of the disease.Basic principles of orchid cultivation and management techniques - orchid cultivation techniques.
1. Preparation of growing medium. Planting orchids requires specially prepared growing medium, also called orchid soil. Orchid growing medium should preferably be loose and breathable, well aerated, moderately fertile, and free of hidden pests and diseases. The composition of growing medium is made from one or several basic components (substrates). These basic components include soil, fertilizers, and other materials, with quite many types. Some components may seem unrelated to soil, but they are all substrates on which orchids rely for stabilizing the plant and for growth and development.
(1) Growing medium formula.
In East China, orchid growers generally prefer orchid soil from places such as Shaoxing and Yuyao. In recent years, Emei Lotus King brand Xiantu has also become popular, but these growing media are limited in quantity and expensive, and can only be used for repotting. Large-scale ground planting requires hundreds or thousands of tons of growing medium, so only local materials can be used. After years of practice and repeated screening, we determined that the best formula is: four parts yellow sandy soil, four parts sawdust, two parts river sand; if using yellow loam, then one part river sand, one part sawdust, and one part yellow loam. All are thoroughly mixed. The prepared growing medium should have a pH value between 6.5-6.8, be loose and breathable, have excellent water retention and aeration, and be comprehensively nutritious. River sand and sawdust serve to conduct water and air; sawdust is decomposed by bacteria and can slowly release nitrogen, phosphorus, potassium, and so on. Yellow loam also contains various trace elements. After years of observation, this formula is very suitable for orchid growth. It is especially suitable as a substrate for domesticating and cultivating wild orchids. It is suitable for Chunlan (Cymbidium goeringii) and Huilan (Cymbidium faberi), and is also ideal for Jianlan (Cymbidium ensifolium) and Hanlan (Cymbidium kanran). Whether in flowering rate or stress resistance, it increases significantly.
(2) Bamboo root soil.
This refers to the soil at the roots of bamboo clumps that have been planted for many years. Because of the spreading growth of bamboo rhizomes and bamboo roots, as well as the decomposition of bamboo leaves and shoot sheaths, this soil becomes loose in structure, well drained, and has a certain fertility without being excessively fertile, making it suitable for orchid growth. The quality of bamboo root soil depends on three factors: first, the original soil quality, which is the predecessor and foundation of the bamboo root soil, with sandy loam being best; second, the number of years the bamboo clump has been planted, since the longer the time, the more fully the bamboo roots, bamboo leaves, and bamboo rhizomes have acted; third, the distance from the bamboo stump, since the closer the soil is to the bamboo stump, the better.
(3) Vetch chaff soil.
Vetch chaff is made by harvesting, sun-drying, and crushing the plants of green manure (Chinese milk vetch). Mix vetch chaff with bamboo root soil or ordinary sandy loam, pile it up, and decompose it to make vetch chaff soil. The preparation method is: choose a rain-sheltered site, spread one layer of soil, then one layer of vetch chaff, pour one application of *manure water, and pile layer by layer in this way; after the pile is complete, sprinkle water on the surface to moisten it, then coat it with thin mud to seal it. After piling and fermenting for half a year, it can be used.
When using, mix it into other growing media in proportion.
(4) Leaf mold.
Made by piling fallen leaves or green grass and tall stalks, watering or applying fertilizer, coating with thin mud to seal, and after decomposition and screening. It is best to use green grass that has not set seed and to fully decompose it to kill pests, diseases, and weed seeds; otherwise, there will be many weeds in the orchid pots later.
(5) Mountain soil.
That is, the forest soil where wild orchids originally grow. It is formed by dead branches and fallen leaves accumulating and rotting over many years and mixing with soil. Naturally formed leaf mold contains rich humus, is loose and breathable, and is very suitable for orchid growth. When transportation is convenient, digging up mountain soil in large quantities to plant orchids is relatively simple and economical, and it is even better for domesticating raw orchids. Humus soil under broad-leaved forests, especially leaf mold under chestnut trees, is a very ideal soil for orchids.
(6) Pond mud.
In conjunction with winter repairs of ponds and fish ponds, dig out the mud, dry it in the sun, then break it into fine particles. It can be used to cultivate all flowers, including orchids.
(7) Field soil.
That is, choose loose topsoil from fields, mix in a little sandy soil or a small amount of rice hull ash, then add some decomposed compost or fermented and decomposed organic fertilizers such as soybean cake and rapeseed cake, to promote improvement of soil structure and enhance fertilizer efficiency. After turning and mixing the pile evenly many times, screen it. This soil is nearly neutral and not as good as humus soil. Therefore, it is only used reluctantly when there is no suitable humus soil or mountain forest sandy loam, and is mostly used for cultivating coarse orchid varieties.
(8) Cow dung soil.
Made by crushing and grinding fermented dry cow dung into fine powder and mixing it into sandy soil or field topsoil at a ratio of 1:3. It is best to select cow dung from cattle fed dry feed in winter, because after dry forage is ruminating through the cow's stomach, although the fibers are finely broken, they are still elastic, and as plant fiber they contain certain nutrients. This cow dung soil is soft and rich in fertilizer, and is extremely suitable for the air-loving orchid roots. In Taiwan, China's orchid-growing circles, people often use this cow dung soil as a filling material for cultivating terrestrial orchids, with very good results. Abroad, for cultivating terrestrial orchids, generally 5 parts humus soil or leaf mold plus 1 part sand is used; or 3 parts peat soil plus 1 part river sand, mixed with crushed dry cow dung, fully mixed before use. The cultivation substrate for epiphytic orchids is mainly moss and ferns, with a small amount of tree leaves, small pieces of charcoal, and crushed dry cow dung added. Before using soil to plant orchids, expose the soil to sunlight for disinfection and sterilization. In summer, spread the soil out and let it sun-expose for more than 3 days, which can kill pathogens and insect eggs in it. Before use, the growing medium should be tested and its pH adjusted. For overly acidic soil, lime can be used to adjust it. For overly alkaline soil, calcium superphosphate, ferrous sulfate, etc. can be mixed into the soil. In short, it is best to control soil pH at neutral to slightly acidic (that is, pH 5.5-7). Using organic fertilizers, such as green grass and tree leaves composted into fertilizer, and adding them to the soil to change soil acidity and alkalinity is a better method. In addition, before planting orchids, the nutrient soil should be screened and graded, separating large particles from small particles.
When planting orchids, place the large particles at the bottom of the pot to facilitate drainage. At the same time, the degree of soil dryness and moisture should also be adjusted well; it should not be too wet or too dry. It is best to squeeze the soil in the hand with force so that it forms a ball; when the hand is opened and given a shake, the soil disperses into granular form again. This degree of dryness and moisture is suitable.
2. Preparation of the orchid growing site. 1. Productive ground planting. The original environment for terrestrial orchids is among secluded mountain forests and valleys, with high and airy terrain, shaded by trees, forming a humid microclimate. The temperature difference is small and the air is clean.
When introducing and domesticating them, their wild environment should first be simulated so that they can be grown with abundant flowers and lush leaves. At present, with industrial development and urban modernization, greening work cannot keep up correspondingly for the time being, and they are affected by pollution from factories and transportation. Therefore, orchids cultivated in cities are not as robust as those grown in the suburbs. There is a gap with the native environment of wild orchids, and a great difference from the meteorological factors of the native places of Hanlan and Jianlan. Therefore, careful design was made for the domestication and orchid-growing site, and practical arrangements were made for regulating environmental factors.
The orchid nursery covers about 15,000 sq m and is rectangular. In the nursery there is a rectangular pond used to store rainwater. In the nursery, every about 2.5 m, a 2.5 m high moso bamboo pole is fixed, and bamboo is tied horizontally above to form a frame, used to lay and tie the first layer of shade net. At 20 cm below the first layer of shade net, another horizontal thin bamboo is placed, used to lay the second layer of movable shade net. The first layer of shade net is basically fixed from spring to autumn, while the second layer can be retracted or extended as needed. Carefully regulate light and temperature. The seedbed width is 1.2 m, length 12-16 m (depending on terrain), height about 30-40 cm (5-7 bricks high), seedbed spacing 50 cm, and path width 130 cm. This facilitates daily management. In winter, every two beds are tied with a plastic greenhouse for warmth. On snowy days, pay attention to clearing snow and avoid too much snow crushing the plastic shed. About every mu (one mu is about 667 sq m), build two water tanks with a storage capacity of 1 cubic meter to treat tap water. In winter, place 100-150 watt light bulbs about every 4 m inside the plastic shed, mainly for heating.
2. Open-field cultivation.
(1) Ground planting of orchids under tree shade.
This is for ornamental purposes, using sparse tree shade in front of houses, in wall corners, or in scenic areas for appropriate ground planting, but the original poor clay must be dug out and replaced with loose humus soil or good field topsoil.
When winter arrives, spread some rice straw over the root soil surface to avoid freezing the orchid roots. If there is severe cold, grass curtains or other soft coverings should also be laid over the leaf clusters to prevent cold damage. Except for strengthened management and protection during the hottest midsummer, this kind of ground-planted orchid cultivation can generally be extensive and allowed to grow naturally. Orchids planted in the open field are all coarse varieties without petal-type classification. In spring of the following year, after the weather turns warm, the cold-protection coverings can be removed. After years of growth, as long as they are watered and fertilized in a timely manner, their adaptability is still relatively strong. They can bloom abundantly every year, with fragrance drifting far, making them an excellent item for embellishing the countryside.
However, when arranging ground-planted orchid cultivation, in addition to considering the quietness of the layout,
(2) Pot cultivation of orchids.
This refers to growing orchids under a shade shed.
For potted orchid cultivation, it is best to use clay pots, that is, unglazed earthenware pots. They have good air permeability, can filter water, and are cheap. They are economical and practical orchid-growing supplies. But clay pots are relatively rough and not attractive, and are unsuitable for exhibitions. Porcelain pots or glazed pots are attractive in appearance, but their air permeability and water filtration are very poor. If used for long-term orchid cultivation, they easily rot the orchid roots, making it difficult for orchids to grow vigorously. Therefore, when using porcelain or glazed pots to grow orchids, more drainage tiles or fillers such as clam shells must be placed at the bottom of the pot; moreover, watering must be controlled and not excessive. If using clay tile pots to grow orchids, they can be placed inside larger porcelain or glazed pots during exhibitions. Yixing purple clay pots are attractive and elegant in appearance and also have a certain degree of air permeability, making them relatively suitable for orchid cultivation. Newly bought orchid pots must be soaked in water for several days; especially newly kilned clay pots must be allowed to absorb enough water to completely eliminate their fiery dryness. In general orchid cultivation, newly planted orchids mostly use new pots, and repotting mostly uses old pots. For all potted orchids, it is best not to place them directly on the ground, because they are easily disturbed by pests and overgrown weeds. Especially in hot summer, when the blazing sun is intense and ground temperature rises, it harms the orchid plants; during thunderstorms and plum rain seasons, hot and humid air rises even more, easily steaming the orchid roots; moreover, being close to the ground, ventilation is poor. This benefits aerial root growth. To reduce the above effects, orchid pots can be placed on orchid stands built from cement boards, facilitating upward and downward convection, continuously supplying fresh air, promoting orchid respiration, enhancing metabolic functions, accumulating nutrients and energy production, making orchids grow robustly, and also avoiding damage to orchid roots by ants, slugs, and so on. If limited by conditions, an empty clay pot can be turned upside down on the ground, and then the potted orchid placed on top.
3. Orchid room cultivation. The orchid room is mainly for overwintering terrestrial orchids.
Different types of orchids have different ecological habits, so the time for moving them indoors for winter and the room temperature requirements also differ. For terrestrial orchids, as long as the temperature is not lower than 7°C-8°C, most can be cultivated in the open. In Jiangsu and Zhejiang, the custom is that after the Beginning of Winter, Jianlan, Hanlan, and Baosuilan, which require slightly higher temperatures, are moved indoors for cultivation, while some Chunlan and Huilan with flower buds are moved under eaves or to cold-protected places to avoid attack by early frost, which would affect flower bud development. After Light Snow, potted orchids cultivated from pseudobulbs and thin weak small plants, especially orchids belonging to the plain-heart petal type, are gradually moved indoors and placed on orchid stands near windows so as to receive sunlight. After Great Snow, all potted orchids are moved indoors for care. Before orchids enter the orchid room, first wash the area around the orchid pots clean, which can prevent mud stains from carrying insect eggs, mold, and so on, and also look clean and elegant. When placing orchid pots, pay attention to reasonable arrangement, which facilitates sunlight penetration and also benefits ventilation. When terrestrial orchids overwinter indoors, the key is to master temperature and humidity well. Generally, room temperature should be maintained above 7°C-8°C, and for Baosuilan it should ideally be maintained at 10°C-15°C. After orchid pots are moved indoors, if the weather is not yet severely cold and freezing, open the south-facing windows around noon and open a small vent on the north side to facilitate indoor air circulation. In the evening, if the indoor temperature is still above 5°C, the small north and south vents can be opened slightly; if below 5°C, all windows should be closed. In deep winter, only on windless sunny days at noon should windows be slightly opened halfway for a little ventilation. Once the sun begins to slant, doors and windows should be closed, and in the evening grass curtains or cotton cloth curtains should be hung. If the temperature continuously drops below 3°C-5°C, a coal stove with a chimney pipe can be used for heating. After the Beginning of Spring, as the climate gradually warms, all doors and windows of the orchid room can be opened at sunny noon, but attention should be paid to temperature changes; in the afternoon as the temperature gradually drops, the south windows should be half opened and half closed; before nightfall, close them all again.
During this period, the orchid room temperature should preferably be kept at around 10°C. If the temperature is too high, it will cause early-flowering varieties of Chunlan to bloom earlier, and the flowers are also prone to wilting early. In early spring, it is even more necessary to prevent a late spring cold spell, which affects flower bud growth and may even freeze orchid roots.
After Awakening of Insects, all Chunlan and Huilan without flower buds can leave the room and be placed on open-air stands, with reed curtains added over the shed at night to prevent frost damage. All types of orchids with flower buds should still remain in the orchid room for care, and only after Qingming can they be moved outside for cultivation; but at night, attention should still be paid to preventing late frost. During the period of indoor orchid cultivation, especially in severe cold seasons, special attention must be paid to the dryness and moisture of potted orchids. The pot soil should preferably be dry. When watering is needed can be determined by looking at the pot surface: if the surface soil appears powdery and loose while the soil below is still slightly moist, do not wait until the pot soil is completely dry before watering. When watering, first move the potted orchid down and place it on the ground, and water along the water groove at the pot rim. Never let water soak into the leaf clusters. The orchid pot can also be placed in a water vat and shallow-soaked for several minutes, with water limited to reaching the waist of the pot. When watering, if water soaks into the leaf sheaths, it should be promptly wiped away with a cloth, or allowed to dry in sunlight before the plant is moved back indoors. Because orchids are placed indoors for long periods, many dust particles often adhere to the leaf surface, hindering metabolism. On clear warm days, around noon, move the pots outdoors into sunlight and use a fine-nozzle watering can to spray and clean the leaf surface, washing away dust. After the water marks dry, move them back indoors. If the water marks are not dry, the wet parts of the orchid leaves are prone to turning black and withering. During indoor orchid cultivation and heating, the indoor air temperature is often relatively high, the leaf clusters appear dry, the soil surface in the pots is dry and loose, or the moss on the pot surface looks withered. Then water should be sprayed promptly on the paths and walls to allow evaporation to regulate temperature. In short, for indoor orchid cultivation, whether the orchid plants in the pots or the moss on the pot surface should remain green and lush. If you are a hobby orchid grower, due to limited conditions, you can use an outdoor south-facing sunny spot along a wall, leaning against the wall on one side and using bricks on the other three sides to build a single-slope ground box. The size can be determined by the number of pots. On the sloped surface of the ground box, install wooden-framed glass windows or plastic film windows that can be opened and closed. For orchids with long and tall leaves, place them in higher positions near the wall, on inverted empty flower pots, or on bricks, wooden strips, or cement boards stacked to suitable height. Low orchid pots are arranged row by row toward the front, and all leaf tips or the tops of encircling leaves must not touch the glass or plastic film of the window. In severe cold seasons, whenever the temperature is too low or on windy and snowy days, the sloped windows must be covered with enough grass curtains or other coverings to prevent cold air from entering. In clear and mild weather, especially after the Beginning of Spring, when sunlight shines, the cold-protection grass curtains can be removed; at noon when sunlight is strong and the temperature is slightly higher, the covered windows can be lifted to leave a gap to regulate fresh air. After the sunlight slants, the covered windows should be closed immediately. In daily care, great attention must be paid: excessive water droplets must not condense on the covering window glass, to prevent them from dripping into the leaf clusters; wet areas often turn black and rot, or even die.
3. Planting orchids. 1. Planting timing. Whether repotting or newly planting, the choice of timing has a great impact on orchid survival, growth vigor, and development. Therefore it is very important. Generally, the more suitable time is the orchid dormancy period, that is, March-April, before new shoots have emerged; in terms of solar terms, it is between the Spring Equinox and Qingming. If after new shoots have emerged, operation is very inconvenient, and a little carelessness may break or injure the new shoots. When the orchid dormancy period is about to end and new shoots and new roots are at the stage of being about to grow but not yet grown, planting at this time is best. Shortly after planting, they can root and sprout and resume normal growth. If planted too early, orchids are not easily revived after planting, and low temperatures, cold waves, late frost, and spring thunder often cause cold damage. In the Yangtze River basin, orchid rooms are rarely heated in winter. Winter is very cold, so division in severe winter is not advocated. To make division convenient, the soil can be allowed to dry appropriately before division, making the roots whitish and producing inconspicuous shrinkage, so that the originally brittle and easily broken fleshy roots become soft, and the roots are not broken too much during division and potting. In larger orchid nurseries, the planting workload is large and takes a long time from beginning to end. Precious varieties should be arranged for planting at the best time. Ordinary varieties can be delayed or advanced as appropriate.
2. Using orchid seedlings for propagation. For propagation, orchid seedlings that grow well and are free of pests and diseases should be selected.
After 2-3 years of cultivation, orchids need soil replacement or repotting, and at this time division propagation should be combined. When repotting, support the bottom of the flower pot with the left palm, carefully extend the fingers of the right hand into the orchid leaf cluster to block the pot soil, then lay the orchid pot on its side, tilt the pot body sideways facing the person, and let the lower edge of the pot mouth touch the ground. At this time, lift the pot slightly upward with both hands at the same time, so that the lower edge of the pot gently taps the ground, loosening the pot soil. Rotate the pot body and change the contact point where the lower edge of the pot mouth taps the ground, so that the pot soil gradually loosens evenly and separates from the flower pot. Support the orchid plant with the right hand and remove the flower pot with the left hand. If the orchid plant is too tall, it is better to tap the lower edge of the pot mouth against the edge of a wooden chair or cement platform, so that the orchid leaves hang in the air and are not injured or broken. After the orchid pot soil separates from the pot, lay the orchid seedlings and pot soil flat so that the soil ball does not suddenly loosen and crack, causing the orchid root system to break. Then carefully pat the soil ball gently to loosen it, and gradually shake off the old pot soil. Carefully hold the pseudobulbs to avoid injuring leaves and tender shoots, especially protecting root tips. Cut off already yellowed and withered leaves, decayed bract leaves on the pseudobulbs, and rotten, dried, and hollow old roots. However, for leaves on pseudobulbs with new shoots, retain them as much as possible to promote good growth of new shoots. For larger clumps that have been selected and cleaned, find the natural gap where two pseudobulbs are relatively far apart and easily loosen when shaken by hand, cut the two pseudobulbs apart. The ancients called this "opening the road." Then hold the bases of the two clumps with both hands and gently shake and slowly pull along the road to divide them into two clumps. Properly prune the separated orchid clumps, then soak them in a 800 times water-diluted thiophanate solution for 10-15 minutes. Only the roots should be soaked, not the leaves; a 1000 times potassium permanganate solution can also be used for disinfection. Note that only the wounded parts should be disinfected, then air-dry the orchids in a cool, ventilated place. When the orchid roots become soft and easy to bend, they can be planted. Generally, in clear weather, air-drying for half a day is enough. Of course, they must not be dried too much.
3. Planting procedure. For separated orchid clumps, do not divide them too sparsely. Each clump should have at least 3-5 seedlings, and it is best to keep one-year-old plants, two-year-old plants, and three-year-old plants in the same clump.
(1) Bottoming the pot.
Cover the drainage hole at the bottom of the pot with a piece of tile, then gradually fill with bricks, tiles, or shells, filling large gaps with mud particles or pea gravel, generally about 1/2-1/3 of the pot's internal height. The remaining clear height above is about 10-15 cm, reserved as the growing medium layer. The specific height should be determined according to the orchid type, the length of orchid roots, and the height of the pot. The bedding material should not be packed too densely or too solidly; some pores should be retained. Practice has shown that some new roots can grow well in the pores of the bedding layer.
(2) Planting.
On the bedding layer, first fill 2-3 cm of growing medium and press it slightly firm with the hand, then place the orchid upright on it. According to the size of the plant and flower pot, several single plants, 2 clumps, 3 clumps, or more clumps can be planted in one pot. 3 clumps should be planted in a tripod arrangement. 4 clumps can be planted in a square. 5 clumps should be arranged in a plum blossom shape. The orchid roots should stretch naturally, and the leaves should spread in all directions. Slowly place the orchid roots into the pot so that the orchid roots stretch naturally and as much as possible do not scrape against the inner wall of the pot. After the orchid plant is put into the pot, gradually fix the posture of the orchid plant. For one clump per pot, the old pseudobulbs should be placed toward one side, leaving room for new shoots to develop. For multiple clumps per pot, the old pseudobulbs of each clump should be relatively gathered toward the middle of the pot, so that new roots and new shoots developing outward each have enough space.
(3) Filling soil.
When planting, hold the leaves with one hand and add nutrient soil with the other, holding the base of the orchid plant and lifting slightly upward to stretch the root system, while shaking the orchid pot. Let the growing medium go deep into the root zone; continue adding soil and shaking the orchid pot, adjusting the position and height of the orchid plant. Press with the hand along the pot edge, but do not press too hard and injure the roots. Continue adding soil and pressing until the pot surface soil is 2-3 cm above the pot rim, slightly in a steamed bun shape. The growing medium should cover all orchid roots, up to the base of the pseudobulbs. Regarding the depth of soil filling, tradition holds that Chunlan should be shallow and Huilan should be deep, but generally the standard is not to bury the leaf bases on the pseudobulbs. When newly collected orchids grow in the wild, the plants retain obvious markers above and below the soil surface, and these markers can be used as the standard. The size of the flower pot should also match the size and number of plants; it should be neither a large pot with few small plants nor a small pot with many large plants. Generally, the number of plants should be based on the principle that they will just fill the pot in 2-3 years. Plant size should match pot height. This benefits growth and also meets ornamental requirements.
(4) Topdressing the surface.
After planting is completed, spread a layer of small stone particles or green moss on the pot soil surface, preferably high-quality moss from under the forest. It is both attractive and can regulate moisture. It can also protect the leaf surface from being contaminated by muddy water, and new shoots will not rot at the center from infection by pathogens in the soil; in addition, it can reduce the washing effect of rainwater on the pot soil and keep the pot soil loose.
(5) Watering.
After planting is completed, water for the first time. The pot soil must be thoroughly wet. Water droplets should be small and the impact force should not be strong. If placed in a water basin to soak, never soak too long. Once the pot soil is soaked, immediately take out the orchid pot and then move it to a shaded place for care.
4. Care and management after planting. Mastering orchid planting techniques is certainly very important, but managing and caring for orchids well is even more difficult, hence the saying "three parts planting, seven parts care." Orchid care requires understanding the environment, accumulating care experience, and patience and carefulness. The most important thing is to master the laws of orchid growth and development: when they sprout, when they grow leaves, when they bloom, and when they dormancy. Then carry out care and management in terms of temperature, humidity, watering, fertilization, ventilation, plant protection, cherishing leaves, and protecting flowers, and you will certainly be able to grow orchids well.
1. Cherishing leaves. Orchid leaves are soft and beautiful but not weak, upright but not stiff.
Orchids are moving and lovely, but good flowers do not always come, and there is no way to keep flowers from falling; yet orchid leaves remain green through the four seasons, forever full of vitality, giving people year-round enjoyment. The elegance of orchids is shown both in the flowers and supported by the leaves.
And lush leaves are the prerequisite for good flowers. When leaves are healthy and lush, they themselves manufacture abundant nutrients, so flowers are numerous and beautiful. If leaves are damaged while flowers are numerous, it is merely a sign of rapid decline. The key to cherishing leaves is first to control shade density, air humidity, appropriate water and fertilizer, and maintain good ventilation. Make orchid leaves lush and healthy, verdant and glossy. Also strengthen pest and disease control, and prevent wind, rain attack, and mechanical damage. In addition, preserve the leaf tips. The ends of orchid leaves are like sword tips, brush points, and eyebrows, able to convey meaning and spirit. Losing the leaf tip makes them appear abrupt and dull. The key to preserving leaf tips is to ensure that the orchid has sufficient water and nutrients, that the pot soil is loose and breathable, and therefore that the root system is developed and intact, and the plant grows vigorously, with no scorched tips. Some people say that the sign of well-grown orchids is that the leaf tip can pass through the eye of a needle, which means the leaf tip is intact and the tip is undamaged. The leaf tip shapes of different orchid types differ: some are acuminate, some obtuse and rounded, some notched, and some upturned. In terms of leaf color, some orchid varieties have golden tips or silver tips (that is, the leaf tip is yellow or white), showing their preciousness and rarity. This is another layer of interest in leaf appreciation regarding leaf tips. In daily care, attention should be paid to protecting orchid leaves. During operations, be gentle and careful, do not bump the orchid leaves, and maintain their natural posture.
Carefully clean contaminated leaves, and sprayed water must not accumulate in the center of the leaf cluster. Withered yellow old leaves and diseased leaves should be cut off promptly. For partial pruning of orchid leaves, cut at an appropriate place with a slanted cut, and the resulting pointed angle should be less than 30. Some also cut twice, but it must not be cut into a flat top.
2. Protecting flowers. After flower buds emerge, if there are too many, they consume excessive nutrients from the mother plant, hindering the formation and vigorous growth of leaf buds. Excess thin small flower buds should be removed as early as possible. Keep one flower bud per orchid seedling.
Each pot should retain 3-5 flower buds. Appropriately retain flower buds according to the orchid variety, pot size, and number of seedlings. In order to protect and develop precious varieties, all flower buds can also be removed to let them proliferate abundantly. During the period from flower bud elongation to flowering, maintain moderate light so that flower color is bright and full, rich in luster, and sufficiently fragrant. If light is too weak, the flower color is pale and lacks luster; flowers remain open too long, consume nutrients, and hinder sprouting and leaf growth as well as flowering the next year. Chunlan flowers remain open for about half a month; after they fade, the flower scape should be cut off promptly. For Huilan flowers, when the last flower of the inflorescence has been open for 1 week, cut off the inflorescence. When breaking off the flower scape, steady the leaf base with one hand and press the flower scape to one side with the other, then it can be broken off from the base, or it can be cut off. The removed flower stems can be placed in a vase and still enjoyed for many days. Generally, orchids are not allowed to be pollinated and set seed after flowering, especially not the less robust and precious varieties, otherwise flowering the next year will be affected. If hybrid breeding is to be carried out, artificial pollination should be carried out at the appropriate time. And the maternal parent should be carefully managed so that the seeds are full and mature.
3. Temperature. Most regions of our country are in the temperate and subtropical zones, while orchids generally originate in places with mild and humid climate, relatively high annual average temperature, and a long frost-free period. In Northeast and Northwest China, orchids are rarely cultivated, mainly due to temperature constraints. The northernmost distributed Cymbidium plants in our country are Chunlan and Huilan. Along their distribution line, there is frost or short-term snow cover in winter, and temperatures are relatively high in summer. However, because orchids mostly grow in mixed broad-leaved and coniferous forests or in bamboo forests, the trees both block the summer sun and resist the winter cold wind; even in places covered with snow, the impact on orchids is not great, because snow actually protects orchids through winter, and the ground temperature under snow is generally not lower than 0°C. In our introduction and domestication of Jianlan and Hanlan, we have moved them 600-1000 km northward from their original production areas, and on a large-scale ground-planting basis. It can be seen that the survival ability and adaptability of orchids are still relatively strong. In most areas of Northeast, Northwest, and North China, winters are too cold, and outdoor orchid cultivation is unsuitable. From mid-to-late October to late April of the following year, for half a year, orchids all need to be moved indoors or into greenhouses for cultivation. In the lower Yangtze region, orchids also need indoor cultivation or greenhouse heating in winter. In provinces and regions such as Fujian, Guangdong, Guangxi, Yunnan, Sichuan, and Taiwan, China, Hanlan and Jianlan generally do not need indoor overwintering in winter. In Jiangxi, Hunan, and parts of Sichuan, certain measures are still needed in winter to protect orchids.
Orchid temperature requirements: the temperature for orchid seed germination is: 21°C-25°C during the day, 15°C-18°C at night. The temperature required for grown terrestrial orchid plants is 20°C-22°C during the day and 13°C-0°C at night.
During the winter dormancy period of orchids, the temperature can be lowered. For example, Chunlan and Huilan require a minimum winter night temperature of 4°C-6°C, and dropping to 0°C is also acceptable. The plant leaves can even tolerate dropping to minus 2°C-3°C under dry conditions. Orchid flowers develop from flower buds, and flower bud differentiation is closely related to temperature and light. Previous generations did much research on orchid flower bud differentiation, and the conclusion was that a low temperature of 12°C-13°C is enough to induce flower bud differentiation, and the relationship with day length is not very great. But the more light the orchid receives, the more significant the effect of low temperature on flower bud formation. Therefore, from late spring to autumn, placing orchids outdoors for cultivation is better for growth and development than indoors. The purpose of regulating temperature mainly has 3 aspects, namely: preventing cold in winter, preventing summer heat, and changing the flowering period. When winter temperature is below 0°C, orchid leaves and flower buds are prone to cold damage, with water-soaked black spots appearing on leaves and flower buds withering. If the temperature drops suddenly and sharply or there is severe frost, the damage is even greater. But winter temperature being too high is also not good, because orchids are in a dormant state in winter, and too high a temperature can disturb dormancy. In summer, if the temperature is too high and orchids suffer heat, the leaves turn yellow, become rough and lusterless, and are prone to disease attack, often with decay beginning at the leaf base. The flowering period of orchids is very obviously affected by temperature. Under general conditions, appropriately raising the temperature can make them bloom earlier. For example, the flowering period of orchids under plain and urban cultivation conditions is often 15-30 days earlier than under original wild conditions. Using this biological characteristic, temperature can be appropriately regulated to advance the flowering period by half a month to one month. Especially for spring-flowering types, flower buds are generally already formed from July-September of the previous year. After they pass through the dormancy stage, appropriately raising the temperature can make them bloom earlier, in time for the Spring Festival holiday. But it must be pointed out that raising the temperature must be done step by step. Experiments show that sharply raising the temperature instead produces an inhibitory effect and delays the flowering period.
Methods of regulating temperature:
Temperature has an extremely great influence on orchid growth and development. If the temperature is too high, respiration accelerates, consuming more nutrients; if too low, enzyme activity decreases, synthesis is low, and growth and development slow. What is important is that daily temperature difference and seasonal temperature difference must form, so that sprouting and flowering can occur. In temperature regulation for domesticated cultivation, we adopt the principle of approximating the original orchid production area. In summer, double-layer shade nets are used to shade the orchid nursery, with an obvious cooling effect. When the air temperature reaches as high as 35°C, the temperature in the orchid nursery is only 31°C-32°C. In winter, plastic greenhouses are used for warmth. When the air temperature is as low as 0°C, the inside of the plastic shed can still remain at 6°C-8°C. The temperature difference in winter is smaller than in the open field, which is beneficial for nutrient storage and also prevents cold damage. In addition to building earthen orchid sheds and orchid rooms, temperature regulation can also be done by planting trees, shrubs, vines, and lawns around the orchid nursery. In summer, they can absorb part of the solar radiant heat, and in winter they can reduce the loss of heat from the ground and air. Taking lawn as an example, according to measurements, in winter the air temperature in a lawn environment is higher than on bare soil ground, with a maximum daytime difference of up to 4.4°C, helping to avoid cold damage; while in summer the air temperature in a lawn environment is much lower than on cement ground, helping prevent heat and lower temperature. In summer, it is advisable to spray or sprinkle clear water in the air, on the ground surface, on flower stands, and on orchid leaves. Because water absorbs part of the heat when evaporating, it can play a role in cooling and preventing heat; similarly, expanding water surfaces nearby also has this effect, such as ponds, reservoirs, ditches, and water vats. In greenhouses, curtains need to be hung on the glass to block light and prevent heat. In hot times, pay even more attention to ventilation and strengthening air convection for heat dissipation, partially lifting the covering on the shed; in the orchid room, open doors and windows to avoid accumulation of hot air. In temperature regulation, in addition to air temperature, soil temperature should also be noted. Orchid roots grow in the soil, and the temperature of the pot soil has a direct impact on their physiological functions. Under general conditions, soil temperature and air temperature are positively correlated. When air temperature is high, pot soil temperature also rises, but the change process is relatively slow. First, prevent direct sunlight from shining on flower pots, heating the soil and pot and burning orchid roots close to the pot wall; also note that when watering, the water temperature should be close to the soil temperature and should not differ too greatly. There is another issue worth discussing, namely the relationship between artificial protection and the orchid's own adaptability. Like all plants, orchids also have adaptability to the external environment. They are not inherently delicate. Therefore, when orchid growers protect orchids from heat and cold, their measures should be moderate. Too dense shading and too long a time will inevitably weaken their resistance. In our orchid nursery, the Hanlan and Jianlan introduced and domesticated from 600-1000 km to the south, in addition to protective measures, are gradually allowed to strengthen their resistance and gradually adapt to the new environment.
4. Humidity. Humidity generally refers to relative humidity, commonly expressed as a percentage.
Orchids have no fibrous roots, let alone root hairs, so they have a small surface area for absorbing water; in contrast, orchid leaves grow in clusters. The leaf surface transpires heavily, so only when the air is humid can the balance between water absorption and transpiration be maintained. In the orchid's native habitat, rainfall is abundant during the growing season, the air is moist, and relative humidity is above 80%; Cymbidium sinense in particular grows beside streams, where water mist is often pervasive and relative humidity stays around 90%. The dryness of the air is one of the important reasons why growing orchids in the north is difficult. It is generally hard to succeed in growing orchids in city homes and on balconies, and insufficient temperature is also a major factor. When air humidity is low, orchid leaves are rough, dull, and lusterless; when air humidity is suitable, the leaf surface is moist and green. Generally, the humidity required during the orchid's growing season should not be lower than 70%, and in the winter dormant period it is about 50%; air humidity at night should be somewhat higher than during the day. Humidity and ventilation are two relative, contradictory factors; too much ventilation lowers humidity, and in the north, the dry winds of winter and spring often blow and cannot maintain humidity, which is unfavorable to orchid growth, so ventilation should be appropriately reduced.
Methods for regulating and raising air humidity:
Plant many trees, bamboo, and grasses around the orchid nursery. The root systems of these plants can absorb large amounts of water from underground and then release it through transpiration from the leaves above ground. They can also retain surface water, which gradually transpires and increases the content of water molecules in the air, thereby raising air humidity. When the ground is dry, sprinkle water on the ground, benches, and walls, which also has the effect of lowering temperature. You can also mist or sprinkle water in the space of the orchid-growing site or on the leaf surface. However, sprinkling or misting the leaf surface should not be done at night; if the leaf surface must be sprinkled in the evening, be sure that the leaf surface can dry again by night. In southern China it is sometimes continuously rainy, and especially during the plum rain season the humidity is too high, so doors, windows, and covers should be opened for ventilation. Orchids like warmth and moisture; when humidity is high and ventilation is good, orchids grow robustly; but when the temperature is low and there is no ventilation, water vapor condenses into droplets, which harms new shoots and easily triggers disease, so low temperature with high humidity should be avoided. In our seedling beds for large-area field-planted orchids, bricks are laid around the edges and covered with moss. Bricks and moss have a strong ability to absorb water and retain moisture, and this economical and convenient natural humidification measure is very effective.
5. Watering. When watering, attention should be paid to water quantity, water quality, water temperature, watering time, watering method, and other issues.
In the classification of xerophytes, hydrophytes, and mesophytes, orchids belong to the mesophytes and do not need excessive water, so the potting soil should not be too wet. This is determined by the structural characteristics of orchid rhizomes. The pseudobulbs of orchids are plump, with a cuticle on the surface, and the epidermal cells are thickened to form stone cells, while the stem is filled with scattered vascular bundles. The pseudobulbs can store nutrients and water and do not easily lose them by evaporation. Orchid roots are mostly fleshy, with the outermost layer being velamen tissue; the cells of the velamen tissue are elongated-cylindrical and polygonal. When the velamen tissue cells mature, the protoplasm disintegrates and thickened stripes form on the cell walls. The function of the velamen tissue is to protect the cortex, absorb water, and reduce and protect against the loss of water from inside the cortex. Therefore, orchids should not be watered too frequently, and the potting soil should not be too wet, so as to avoid root rot. In addition, judging from the orchid's places of origin, orchids mostly grow on hillsides, on both sides of mountain ridges, and in rock crevices. These places drain well and have no accumulation of dampness or standing water. It is precisely by adapting to such an environment that the orchid rhizome structure is suited to storing and conserving water and nutrients.
Principles of watering orchids:
The following conditions must be relied upon:
(1) The type of orchid.
Epiphytic orchids and those with aerial roots can be watered less; for example, Cymbidium hookerianum has aerial roots and can absorb water from the air, so it need not be watered too much. In addition, those with thick cuticles on the leaves should be watered less; for example, the leaves of 'Tiegusu' have a thick cuticle and lose little water through evaporation, so watering must be strictly controlled.
(2) The orchid's growing season.
In spring, as the temperature gradually rises, it is the season for new shoots to sprout, so watering should be timely. Water once a day or every other day to keep the potting soil moist. During this period, lack of water causes delayed flowering and weak shoots. In summer, the temperature is high and water evaporation is great; this is the period of leaf expansion, root emergence, and root and leaf elongation, so water once every morning, and in the evening if the potting soil is dry, some water can be added to moisten the potting soil and thoroughly moisten the leaves, lowering the temperature and reducing nutrient consumption to favor growth and development. Entering autumn, the temperature gradually drops and orchid growth slows; observe the dryness or moisture of the potting soil each day, watering when dry and leaving it when wet. In winter, orchids enter dormancy. The potting soil should be somewhat dry, and watering should be reduced or omitted, but attention must be paid to the potting soil to prevent it from losing too much water and instead drawing water out of the roots. At the turn of winter and spring, after Cymbidium goeringii buds and the flower buds begin to elongate, so the potting soil should also maintain a certain humidity. If the potting soil is too wet in winter, the water content of the orchid plant increases and frost damage is easily caused.
(3) The orchid's growth condition.
If the orchid grows vigorously and the roots are good, it can be watered more; otherwise reduce as appropriate, and for diseased plants water must be controlled even more. When orchids are sprouting and growing, water can be somewhat more; after sprouting it can be gradually reduced. When the new shoots gradually mature, water should again be somewhat less; when flower buds appear, slightly more water; and during flowering, water should not be too much, so as to prolong the flowering period. After the flowers fade, watering should be stopped for several days to let the potting soil dry slightly and the orchid rest a little, and then water again.
(4) The condition of the pot and the plant.
That is, water according to the texture and size of the flowerpot: water more in clay pots and large pots, and less in porcelain pots and glazed pots. Water more when there are many potted plants or when field-planted orchid plants are dense.
(5) The dryness or moisture of the potting soil.
The bases for watering, such as season, plant, weather, flowerpot, and soil quality, can all be comprehensively reflected in the degree of dryness or moisture of the potting soil, so the dryness or moisture of the potting soil is the direct and intuitive basis for watering.
It can be judged by observation and touch. If the potting soil becomes hard, its color becomes lighter, and the moss on the pot surface is dry and wilted, it indicates that the soil is dry. It should be watered immediately. If the potting soil is dark in color, has a damp feeling, and the moss grows mold, it is a sign that the soil is too wet, and water should not be added. Generally, the suitable soil water content is 15%-20%.
(6) Watering time.
Generally speaking, in spring and autumn it is best to water in the morning; during the hot height of summer it is best around sunrise and around sunset; in early winter and early spring, water after the sun is directly overhead and the temperature has warmed slightly. During the period when plants are brought indoors to overwinter, watering must be done at noon on clear days. But care should be taken to avoid wetting the leaf surface or letting water seep into the leaf sheaths. Among the people there are some very valuable experiences in watering orchids; for example, for Cymbidium goeringii and Cymbidium faberi there is the experience of "not dry in autumn, not wet in winter," and "likes moisture in spring, likes slight dampness in summer and autumn, and needs moisture with some dryness in winter." This shows that orchids have different water requirements at each stage of growth and development, and management should be adapted to local conditions and handled flexibly. Generally, after the Beginning of Spring, the climate gradually warms, the flower buds open and develop, and the soil should be kept moist, with misting once every 2-5 days. After Awakening of Insects, for flowerless Cymbidium goeringii and Cymbidium faberi grown in the open, where wind and sun easily dry the water in the pot, daily watering should be frequent, but the amount should not be too much; water once every 2-3 days or a small amount once a day. After the Beginning of Summer, for all orchids that have finished flowering (including Cymbidium kanran and Cymbidium sinense), the soil should be somewhat dry, because after flowering most have a brief dormant period, grow slowly, and lose less water from the leaf surface. From June onward, the weather gradually becomes hot and the daughter plants (that is, young shoots) grow faster; at this time pay more attention to soil moisture, frequently sprinkling the orchid leaves and orchid benches with clean water to create a moist microclimate, which is favorable for the daughter plants to elongate and produce leaves. During the plum rain season, watering should be controlled to reduce the occurrence of disease; leaf-variegated plants and some petal-type seedlings are even more prone to disease, so even more attention should be paid. During the three fu periods the climate is hot; in addition to strengthening shading, carefully maintain soil moisture, and sprinkle leaves and the pot surface with clean water around sunrise every day. After White Dew it gradually turns cool in autumn, and with the nourishment of night dew, the growth of new plants pauses and the orchid buds break through the soil and grow slowly; at this time the amount of irrigation can be reduced; but when the potting soil is found to be dry, it must be watered until moist. In late autumn, the new plants have changed from new green and tender green to deeper and darker colors. The flower bud sheaths are all visible, and prolonged rain and excessive moisture should be prevented to reduce rot of the sheaths (that is, rotting of the bud sheaths); measures should be taken to shelter from rain and receive more sunlight.
(7) The water quality and water temperature for watering.
For watering orchids it is best to use stored rainwater, which is the cleanest and also neutral; river water is next; well water contains minerals and is mostly alkaline, so it is relatively poor; tap water contains disinfectants and is the least suitable for orchids. If tap water must be used, it should be stored in a water tank for more than 24 hours, and better still exposed to sunlight, and after the disinfectant has settled out or decomposed, use the clear water on top to water the orchids. Besides this storage treatment, there is also an activation treatment, that is, raising fish, algae, chlorella, red floating algae, and other aquatic organisms in the tank where tap water is stored, in order to improve water quality. But attention should be paid to whether the fish have diseases, to prevent water quality contamination. The temperature of the potting soil can directly affect the water-absorbing function of orchid roots. Therefore, the temperature of the irrigation water should be very close to the potting soil temperature and the air temperature. In hot summer, after flowerpots and soil have been heated by direct sunlight, if cold water is suddenly poured on them, the temperature difference between the two is too great, which will disrupt the normal absorption function of the root system and affect physiological balance. Therefore, when watering orchids in summer, it is best to do so in the morning and evening, when the water temperature is close to the soil temperature. The water storage tank or water storage jar is best half buried in the soil, plus shading, so that the water temperature will not become too high in summer.
(8) Watering methods.
The commonly used methods for watering orchids include watering, misting, and soaking. Usually a watering can, ladle, or hose is used for watering; when watering, pour slowly from the edge of the pot so that the water gradually seeps downward and toward the center; never pour it abruptly into the center of the leaf cluster, and do not let the water splash up the potting soil and dirty the leaves. Misting should penetrate the entire pot and must not be half-watering, that is, with water only on the surface while the lower layer gets none; if half-watering is done for a long time, the surface is wet while the interior is dry, causing some orchid roots to be unable to absorb water for a long time and shrivel, while the upper orchid roots turn upward and grow, coiling messily in the surface soil. Many people, for convenience and to save trouble, connect a rubber hose directly to the tap and irrigate the orchid pots, which is very harmful: first, the tap water has not been treated, and the bleaching agent is harmful to orchids; second, the water temperature differs greatly from the soil temperature; third, watering cannot be differentiated according to different situations. The misting method is to spray water on the leaf surface with a spray bottle, which can both increase air humidity and soil moisture and wash away dirt on the leaf surface; this method is often used during the orchid growing season. Do not mist too much each time; the standard is that the leaf surface is wet but water does not run off. If too much water is poured into the leaf center and remains for a long time, it will rot the new shoots. The nozzle holes of the spray bottle should be fine and dense, and the water droplets fine and even. The soaking method is also called seep-watering, that is, placing the bottom of the orchid pot into shallow water and letting the water gradually moisten the potting soil. The soaking time must not be too long; as soon as the surface soil is seen to be moist, take the orchid pot out immediately. This method can keep the orchid leaf surface clean. In dry seasons, the orchid pot can also be placed in a shallow water tray; the flowerpot absorbs the accumulated water in the tray, which then moistens the potting soil, thus maintaining relatively stable soil moisture. The disadvantage is that the bottom hole of the flowerpot is blocked by water, so air permeability is affected to a certain extent.
6. Light and sunshine. Light refers to the quality and quantity of sunlight, including wavelength, spectral composition, and light intensity. Sunshine refers to the duration of sunlight; generally, illumination for more than 14 hours is long-day, and less than 14 hours is short-day. Among plants, those that need long days to flower are called long-day plants; conversely, those that need short days to flower are called short-day plants. Light and sunshine are closely related to the growth and development of orchids.
Orchids' requirements for light:
There is a floral proverb: "Shade for camellias, sun for peonies, half shade and half sun for the four-season orchid." This shows that different flowers and trees have different sunshine needs, and orchids need half-shade and half-sun light conditions. The effect of light on leaf color--orchids have long grown in mountain forests and have developed a shade-tolerant habit, disliking direct strong light. When light is too strong, the leaf color turns pale green; if exposed to sudden strong light, the leaf color quickly turns yellow, the leaf surface becomes rough, and the leaves may even scorch. With moderate light, the leaves are green, fine in texture, and glossy; with too little light, the leaf color is dark green and loses its luster. The effect of light on sprouting--the strength of light has a direct impact on the number of leaf buds and flower buds, the time they emerge from the soil, and their growth condition. With too little light, orchids produce more leaf buds and fewer flower buds, and their growth is poor. Therefore, starting some time before flower bud formation, appropriately increasing light can promote flower bud differentiation and achieve the goal of more flowering. The effect of light on flower color and flowering--the flower color of orchids is mainly determined by flower pigments, and violet light and ultraviolet light in the spectrum are the main light energy for forming orchid pigments. Therefore, when light is strong, the flower color is deeper and more vivid; when light is excessively weak, the flower color is very pale, and compared with normal it may be mistaken for another variety. For example, in ancient times Ningbo in Zhejiang had a type of snow orchid, which was produced on the shady, north-facing side of mountains; if planted in a pot and exposed to a little sunlight, it turned green, and so it was regarded as rare and precious, but today it is often encountered during collection in the wild and can also be obtained through artificial cultivation. Some people use this to practice fraud and pass it off as a new variety, and the inexperienced are often deceived. If other conditions are the same, then orchid pots placed in a position with stronger light bloom first; this is because the accumulated illumination and accumulated temperature first reach a certain value. Some people have experimented and found that extending the light period to 14-16 hours can promote earlier flowering in medium-sized plants and small seedlings; but for mature orchid plants, a light period of no more than 8 hours can promote flowering. For orchids that bloom in winter, short days and long nights and low temperature conditions must be met to promote flowering. For orchids that bloom in summer, long days and short nights and high temperature are required to promote flowering. For orchids with flower buds, to promote earlier flowering, appropriately extend light and increase temperature. In a small room, using a 100-watt bulb can raise the room temperature by 3°C-5°C, which can promote earlier flowering. The relationship between light and leaf variegation--leaf variegation is the cultivation technique in which lines or spots appear on the leaves. Leaf variegation is related to light. Changes in light can be used to promote changes in leaf variegation. The method is to use robust growing orchid seedlings, with more than three plants connected together; before 9 o'clock in summer and before 10 o'clock in winter, put the orchid pot out in the sunlight, insert a thermometer in the pot, and when it has been sunned to 30°C move it into the shade. When it drops to 25°C, move it out again into the sunlight. Repeat this over the long term. One shade and one sun, one cold and one hot, is favorable for the appearance of variable factors within the leaves; over months and years, hard work pays off, and variegated leaves may appear. But this must be premised on the existence of recessive factors for leaf variegation within the orchid leaves; the change in sunlight merely promotes their manifestation.
Bases and methods for regulating orchid light:
Liking half-shade and half-sun light is a common characteristic of most Cymbidium plants, but there are also differences among orchid species. Species that bloom in spring, such as Cymbidium goeringii, Cymbidium goeringii var. longibracteatum, and Cymbidium cyperifolium, need relatively weaker light, and the shading degree should be controlled between 70%-80%. Species that bloom in summer and autumn, such as summer Cymbidium and autumn Cymbidium, need somewhat stronger light, and their shading degree should be controlled between 60%-70%; Cymbidium sinense needs about 85%. The light duration and intensity of spring, summer, autumn, and winter are all different and should be treated separately, adjusting the shading degree well. Within a single day, morning and evening sunlight can be allowed to shine, the harsh midday sun must be blocked and regulated, and on cloudy days the shading degree should be reduced. It is worth noting that after summer rainstorms, or when it first clears after long rain, orchid pots must absolutely not be exposed to the sun; the experience of predecessors: if exposed to the sun right after rain, the water in the pot is hot, which scalds the leaves and injures the roots. Although orchids are relatively shade-tolerant, they also have phototropism; in the same cultivation site, the flowers and leaves on the sunny side are always somewhat more luxuriant. Over a long time this makes the growth of flowers and leaves uneven, and they lean to one side. For symmetry and beauty, the direction of the orchid pot should be rotated and adjusted at intervals. If for the special needs of shaping or composition, in order to express a specific poetic and pictorial mood, the position of the light source can also be used to strengthen the tendency of flowers and leaves, achieving the beauty of dynamic balance and satisfying appreciation needs. To regulate the shading degree and light duration, there are usually the following methods: Buildings--build greenhouses, orchid pavilions, waterside pavilions, and orchid corridors to place orchids, and use the light-transmitting and sun-shading properties of such buildings to regulate light. As long as the orchid pots are placed appropriately, the desired effect can be achieved; in the sunny areas of these buildings, bamboo blinds or shade nets can be hung for regulation. For potted orchids grown on balconies, light is regulated by carrying them in and out; although it is hard and tiring work, it also cultivates enjoyment, and there is joy in combining flower growing with fitness. Building sheds--the shade shed can be built with bamboo, wood, angle steel, and so on as a frame, covered with bamboo blinds, plastic film, shade nets, and so on. Our method of regulating light intensity is to use bamboo to build frames in the orchid nursery, on which are set two layers of shade nets with 50%-70% shading rate; the upper layer is relatively fixed and is only rolled up in winter, while the lower layer can be put down or taken up. In midsummer use two layers; in spring and autumn use one layer; on clear summer and autumn days at noon use two layers, and on cloudy and rainy days one layer. In winter it depends on the situation: on clear days put down the lower layer, on cloudy days roll up the lower layer, because in winter the light change inside the plastic greenhouse must not be too great; if it is too great, the temperature and humidity also change accordingly, which is unfavorable for orchid dormancy. In addition, before orchid flower buds are ready to open, they must receive moderate scattered sunlight; otherwise the flower color is dull and does not show its beauty. Building frames--on the orchid cultivation site, build bamboo frames, wooden frames, or reinforced concrete frames, and let vines such as grape, honeysuckle, morning glory, Chinese trumpet creeper, and cypress vine climb and spread over them, which can both shade and be beautiful and practical. Deciduous vines shade in summer and let light through in winter, which is a natural regulation. Planting trees--around the orchid nursery, plant evergreen trees, deciduous trees, bamboos, and so on of different heights in combination to regulate light intensity.7. Fertilization. Orchid roots have no fibrous roots, and within the roots there are symbiotic bacteria.
The root fungi absorb mineral nutrients from outside and supply them to the orchid, while the orchid root cells provide water and organic nutrients to the root fungi, forming a mutually beneficial and coexisting symbiotic relationship. But a stable balance must be maintained between them for luxuriant growth. Preparing suitable nutrient soil and fertilizing appropriately to maintain the balance between the two can promote robust orchid growth. Previously some people thought that since orchids grow in the mountains and are naturally refined, clear water and fresh air alone could sustain them. Others loved orchids too deeply and were too impatient, often applying heavy fertilizer with high efficiency and high concentration, producing results contrary to their wishes. Therefore we must seriously explore scientific and rational fertilization.
(1) Types of fertilizer.
Fertilizers can be distinguished by their effective components, fertilizer properties, and fertilizer usage. By effective components, there are mainly nitrogen fertilizers, phosphorus fertilizers, and potassium fertilizers. Nitrogen is a main component of cell nuclei and proteins, and is also an indispensable element in forming chlorophyll. Nitrogen fertilizer can make orchid leaves luxuriant and robust; otherwise the leaves droop and soften, sprouting is difficult, and the reproduction rate is low. Commonly used nitrogen fertilizers include compost, human and animal urine, urea, green manure, ammonium sulfate, and ammonium nitrate. Phosphorus is also a main component of cell nuclei, directly affecting cell division, chlorophyll formation, and protein synthesis and transformation within plant cells; it can promote flower bud differentiation and growth, and help produce large flowers, bright color, and strong fragrance. Commonly used phosphorus fertilizers include superphosphate, monopotassium phosphate, phosphate rock powder, bone meal, and rice-washing water. Potassium directly participates in photosynthesis, can make cell physiology normal, and is also related to the synthesis of carbohydrates, proteins, and fats. Potassium fertilizer can make orchid stems, leaves, and roots grow robustly. It makes leaves tough and not easily broken, and enhances cold resistance and disease resistance, and can also increase the fragrance of flowers. Commonly used potassium fertilizers include plant ash, potassium sulfate, and monopotassium phosphate, all of which are fertilizers relatively rich in potassium. Besides the three main elements nitrogen, phosphorus, and potassium, orchids also need various trace elements such as calcium, magnesium, iron, boron, and zinc; these can be satisfied in the prepared culture soil and generally need not be added separately. But the demand for nitrogen, phosphorus, and potassium is relatively large and must be solved through fertilization, repotting, and changing soil. By fertilizer properties, they can generally be divided into organic and inorganic fertilizers. Organic fertilizers include compost, green manure, barnyard manure, and cake fertilizer. Before use, organic fertilizer must be fully fermented, and the fermentation time must be at least more than one month. Organic fertilizer can improve soil structure, increase soil humus, make soil air permeability and water retention good, and its fertilizer effect is also long-lasting, able to gradually decompose and supply long-acting nutrients for orchid absorption. Inorganic fertilizers, also called chemical fertilizers, have high nutrient content, are clean and odorless, and can be diluted and used immediately without fermentation; they are convenient and fast-acting, but last only a short time, and long-term use can deteriorate soil structure. Generally orchid growers oppose the use of chemical fertilizers. In fact, if orchids are mainly given organic fertilizers and chemical fertilizers are used in combination, the effect is still very good. By fertilizer usage, they can be divided into base fertilizer and topdressing. Base fertilizer is the fertilizer added to the soil when preparing culture soil or before planting, such as leaf mold, grass compost, and chaff soil, which are both cultivation media for orchids and base fertilizer. Silkworm droppings, human and animal manure, cow dung, bone meal, hair, and cake fertilizer can all be used as base fertilizer added to the bottom of the pot or turned under the soil as base fertilizer, but chicken manure and human feces should be avoided.
(2) Topdressing is fertilizer applied during the growing season after orchids have been planted.
Generally, orchids are only repotted and given fresh soil 2-3 years after planting, and in the interim nutrients must be supplemented, so topdressing should be applied.
Fertilization time:
During the spring and summer growing period of orchids, to make orchids grow robustly and vigorously, more nitrogen fertilizer can be applied. If it is a leaf-variegated variety, then apply less or no nitrogen fertilizer, because dark green leaf color will affect the appreciation effect of leaf variegation. Do not fertilize when the summer temperature is above 30°C, because the potting soil temperature is relatively high, water evaporates too quickly, and the concentration of residual fertilizer increases, which is harmful to growth. If fertilized too frequently in summer, it easily forces autumn shoots, and the plants that grow later are short and weak, and the spring shoots of the following year will be inhibited as a result. Do not fertilize when the temperature is below 10°C, because at this time orchids are in a semi-dormant state and do not absorb nutrients. Only apply fertilizer when sunlight and temperature are suitable and photosynthesis is vigorous. In winter orchids are dormant, so there is even less need to fertilize. From before the new shoots of orchids grow to half-maturity in the pseudobulb, and before and after leaf buds emerge from the soil and during their elongation period, this is the vegetative growth stage of orchids, and somewhat more nitrogen fertilizer should be applied, while phosphorus and potassium fertilizers should be less. After vegetative growth comes reproductive growth; the nutrients produced by photosynthesis are stored in the pseudobulbs and leaves for flowering or new shoot growth. At this time more phosphorus and potassium fertilizers are needed, and applying appropriate phosphorus and potassium fertilizers can promote plump and mature pseudobulbs, sprouting, and flowering. If orchid leaves are pale and yellow and the plants are weak, it is mostly caused by fertilizer deficiency, and topdressing should be applied in time. But sometimes leaves also turn yellow due to excessive sunlight. Diseased plants should not be fertilized; fertilize only after the disease has been cured and the plant has recovered. Robust orchid seedlings given more fertilizer can be helped to grow.
Ancient orchid growers had the experience:
Never suddenly fertilize a thin orchid. Never leave a fat orchid thin for long. This means that a thin orchid that has never been fertilized cannot suddenly be given strong fertilizer, for it cannot absorb it and it is harmful. For orchids that are regularly fertilized, one also cannot go a long time without fertilizing. In short, uneven fatness and thinness is not beneficial to orchids. Usually Cymbidium goeringii, Cymbidium faberi, and Cymbidium ensifolium begin fertilization in early May. In the three fu periods of summer and from December to early February of the following year, do not fertilize. From May onward, apply dilute fertilizer once every 2-3 weeks until the end of September. In early September apply dilute fertilizer once to Cymbidium goeringii, and in late September fertilize Cymbidium ensifolium once. After each fertilization, clean water must be added the next morning, which facilitates orchid absorption and also prevents root damage from improper concentration. Generally, fertilization is not suitable before and after flowering.
(3) Fertilization methods.
Fertilization must mainly use organic fertilizers, which can make the soil loose and well structured, favorable for orchid growth. Also, apply thin fertilizer frequently, that is, the experience of predecessors that it is best to apply frequently and dilute, and that sudden thick applications must be avoided, which is the same meaning as what people today call small amounts and many meals. When applying, dilute the water-fertilizer appropriately, then use a watering can to pour it around the roots, without contaminating orchid leaves. If chemical fertilizers are used, the concentration must be even lower. During the orchid growing season, a water solution of 2‰ urea and 2‰ monopotassium phosphate can be used as topdressing 2-3 times.
8. Ventilation.
Ventilation is also very important in orchid cultivation and management, but it is often overlooked by people. 146 Zhuhong Xinsu (Beijing) With good ventilation and a continuous supply of sufficient fresh air to orchids, photosynthesis can be promoted, nutrient production increased, metabolism promoted, and orchids made luxuriant. Ventilation in the orchid room and shade shed can regulate their temperature and humidity, making them favorable for orchid growth, and can also reduce the occurrence of pests and diseases. Orchid brown spot and southern blight mostly occur in poorly ventilated environments. The orchid-growing site must be open, the terrain should be slightly high, the flower bench should not be too low, and attention should always be paid to ventilation. Orchids like gentle and soft breezes and dislike sharp winds; too cold and too strong winds should be avoided by all means. Orchid pots should be placed sparsely rather than densely, and sufficient distance should be kept between orchid pots to avoid leaves rubbing against each other in the wind and being damaged. If the site is small, the flower bench can be built in a stepped shape, which is good for ventilation and convenient for management and viewing. Each orchid pot should not contain too many or too densely packed plants. If the plants have multiplied too densely, they should be repotted and divided in time. Frequently clear weeds, diseased leaves, and fallen tree leaves and other debris from the orchid pots to facilitate ventilation in the pots. Daily work for field-planted orchids throughout the four seasons: in spring, around Qingming, remove the plastic film from the large shed, then water thoroughly once; several days later apply once a 15-20 times diluted duck feather water or fertilizer water made by fermenting cake fertilizer. At the same time, spray once with 1‰ omethoate (containing 40% effective ingredient) to kill insects. From May to July, apply once a month a fertilizer water made with 5% duck feather water or cake fertilizer. In August apply once a 3‰-5‰ compound fertilizer. After autumn begins, do not fertilize again. Autumn management is extremely important, and we summarize it in two words: autumn tempering. That is, after autumn begins, orchids are no longer fertilized, water is controlled, and light is increased, prompting early maturity. Generally, potted orchids should follow the golden rules of orchid growing: do not take them out in spring, do not sun them in summer, do not let them dry in autumn, and do not let them stay wet in winter. But field-planted orchids are not entirely like this; in autumn they should be kept dry rather than wet. The reason is: although the air is dry in autumn, ground warmth still rises from the soil, so serious water shortage will not occur; moreover, drought can temper the orchid's cold resistance and prepare it for overwintering. Autumn tempering can promote the concentration of nutrients into the pseudobulbs, raise the protoplasm concentration of the pseudobulbs, lower the freezing point, and prevent frost damage. If orchid seedlings grow vigorously in autumn and then encounter a cold wave with a sudden drop in temperature, they will inevitably suffer frost damage. Field-planted orchids cannot be moved indoors before the severe winter arrives, so only through autumn tempering can they survive. November is a relatively busy season in the orchid nursery; the main work is preparing for the orchids' overwintering. First remove the upper shade net, then install the plastic greenhouse; the two ends of the greenhouse are not closed at first, and are closed only when the temperature clearly drops, and on clear days open them at noon for ventilation. This month, spray once with 1:1 Bordeaux mixture. Entering the severe winter season, first, do not water easily; second, appropriately increase light. "Appropriately" means that in winter some clear days have relatively high temperatures, especially with the warming winter phenomenon in recent years; at such times put down the lower shade net so that the temperature in the shed does not rise or fall suddenly. If the shade net is not put down, once the temperature in the shed reaches 18°C-22°C for several consecutive days, some new shoots will sprout, and once a cold wave arrives and the temperature drops sharply, they will undoubtedly be frostbitten. Therefore, in winter a dormant environment must be created for orchids, and dormancy must not be easily broken. In early spring, cold and warm air masses move frequently over the land, so management must be even more careful; otherwise orchid seedlings that have consumed nutrients over the winter are very likely to turn yellow and wither. Gradually and appropriately increase light, and do not remove the plastic film too early; only after the weather in early April is clear and stable can it be removed.
1. Potting soil requirements: It is best to use neutral to slightly acidic soil containing a large amount of humus, loose and well drained; the pH value is generally about 5.5 to 6.5. Sichuan mostly uses Emei Xiantu and "Xinghong brand" refined orchid planting material, and more commonly uses "bamboo root soil" and leaf mold from moist forests in mountainous areas to cultivate orchids.
2. Placement site: Orchids can be grown outdoors and on balconies in spring, summer, and autumn, and a place with good ventilation, moist air, and no environmental pollution should be chosen. Being near a pond or riverside is of course good, but at least there should be tall trees or bamboo groves and shade nets to reduce sunlight and lower temperature. Orchid pots are best placed on wooden racks (or steel racks); if placed on the ground, bricks should be used as a base. Home balconies can also use small water tanks made of galvanized iron sheet to store water, with bricks placed on top for growing, to increase humidity.
3. Appropriate shading: Most orchids belong to semi-shade plants, and most species fear direct sunlight and need appropriate shading. In early to mid-April, orchids can have the net removed and windows opened, giving more sunlight to promote growth. In May, apart from the midday sun, they can receive 6 hours of sunlight; starting in June, shade all day; after October, apart from the midday sun, they can be kept fully open. Remember the proverb: "More shade makes good leaves, more sun makes good flowers."
4. Rational fertilization: Orchids are naturally "vegetarian," and fertilization should depend on the chosen potting soil and growth condition. Those growing luxuriantly and free of disease can be fertilized, while those growing poorly should not be fertilized or should be fertilized only lightly. Newly planted orchids whose roots have not fully developed must wait 1-2 years before fertilizing. Generally, in June-July, when orchid leaf buds have elongated to about 1.5 cm, apply a fully decomposed liquid fertilizer once every three weeks (the concentration should be dilute, about 10%). Avoid chemical fertilizers. In high-temperature seasons fertilization is not suitable. In August-September apply diluted liquid fertilizer once every two to three weeks. Each fertilization of orchids should be done in the evening, and clean water should be poured in the morning, called "return water."
5. Appropriate watering: For watering orchids, rainwater and spring water are best; tap water or rice-washing water must be left overnight before use. When watering, pour from the edge of the pot and do not pour into the flower buds. The amount of water should be determined according to temperature, the dryness or moisture of the potting soil, and the growth condition of the orchid plants. Water more for large leaves and less for fine leaves. In April-May, when new shoots have not yet emerged from the soil, the potting soil should be somewhat dry, because if too wet the new shoots easily rot; June-September is the growth period of new orchid shoots, and the amount of watering should be increased, watering once every morning on clear days, and absolutely avoid watering under the fierce midday sun. In autumn, reduce the amount of water as appropriate, and leaf-surface misting can be used to keep the potting soil moist; in winter, water should be controlled even more, keeping it at "80% dry and 20% wet" as suitable.
6. Evening misting: Orchids originally grow in an environment with moist air, so in dry seasons, besides shading, evening misting is also necessary to increase air humidity and lower temperature; water can also be poured on the ground (bench surface) where potted orchids are placed; "one cold and one hot" can further stimulate orchid growth.
7. Wind and rain protection: "February ghost wind" causing old leaves to turn yellow and fall is a normal phenomenon, and dead branches and withered leaves can be cut off. Orchids can be exposed to light rain, but must avoid plum rain, rainstorms, or continuous rain, otherwise the heart and leaves easily rot. In seasons with a lot of rain, a small amount of plant ash can be appropriately scattered.
8. Pruning and flower removal: During orchid cultivation, withered, yellow, broken leaves and diseased leaves should often be cut off to facilitate ventilation. For precious orchids, if there are too many flower buds, keep only the strong buds, with 1-2 flower buds per pot as suitable. For Cymbidium goeringii, remove the flowers half a month after flowering; for precious orchids, they should be removed after 7 days, so that the spring leaf buds grow robustly and produce better flowers the following year. For summer orchids, when the last flower on the inflorescence has been open for a week, cut it off 3 cm above the pot surface.
9. Cold protection and warmth: Because orchid varieties differ and their places of origin vary, their cold resistance also differs, so the time for bringing them indoors in winter and their indoor placement also differ. Cymbidium kanran, autumn orchids, and Cymbidium sinense grow in the south and should be brought indoors (or have windows closed and nets put up) when the temperature is 5°C, and placed as far as possible in a sunny spot facing south. Spring and summer orchids have strong cold resistance and can be brought indoors only when the temperature reaches 0°C, placed on the northeast side. Around noon on clear, windless days, open windows on the south or southeast side and pull back the net for ventilation. For autumn orchids, on clear days at 1-2°C, windows must not be opened. Of course, where there is a greenhouse, electric light can be used for heating.
10. Disease and pest control: The potting soil should generally be sterilized (sun exposure also works) to prevent disease. Orchids are most prone to southern blight in rainy, high-temperature seasons; for a small amount, it can be brushed off with a wet cloth, and for many pots, 500-800 times Bordeaux mixture or thiophanate can be used, sprayed once every 7-10 days. Among pests, scale insects (commonly called "orchid lice") occur most; during the hatching period use 1% omethoate and 25% phosmet emulsifiable concentrate at 1000 times solution, spraying once a week. To treat the symptoms one must treat the root cause; pots should be appropriately spaced, placed at different heights, with increased air permeability and ventilation, so as to reduce the occurrence of disease.
However, different orchids have different cultivation methods.
Several aspects to note in orchid cultivation.
Our country has a long history of orchid growing, and our predecessors have accumulated rich experience in orchid cultivation for us. We should thoroughly understand the experience of our predecessors, absorb its essence, and deeply recognize that cultivation environment, planting material, watering, fertilization, and prevention and control of pests and diseases are the five major links in orchid cultivation and management.
1. The choice of environment is relatively important. Cymbidium faberi mainly grows under shrubs in subtropical mountain forests, developing the orchid's growth habit of liking half shade and half sun and liking moisture and airy conditions. As long as the orchid's growth patterns are grasped and environmental conditions close to the orchid's growth environment are provided or created, all parts of the country are suitable for cultivating Cymbidium goeringii and Cymbidium faberi.
2. Use of planting material. According to cultivation experience in various places, as long as it is slightly acidic, no matter what planting material is used (including soilless cultivation), orchids can be grown well; the issue is that different planting materials should be managed by different methods. Flowerpots are best made of clay pots or Yixing clay pots, because orchids are aerial-root plants and pot air permeability is very favorable for orchid growth.
3. Rational watering is the key to growing orchids well. The water used for watering orchids must be clean and slightly acidic, and must never be sewage carrying pathogens. The watering method should differ according to the plant. Loose mountain soil holds sufficient water, and granular soil plus water-absorbing volcanic rock also absorbs water relatively fully but does not accumulate water. After different planting materials have been given one thorough watering, when the pot surface is seen to be dry and about one centimeter of the planting material has turned white, to increase air humidity you can spray the pot surface to increase the moisture in the upper part of the pot's planting material so that the orchid plants and pseudobulbs maintain a certain moisture; when the whole pot is not yet dry throughout, water heavily again with thorough watering.
4. Fertilization: On the basis of mastering watering well, in order to promote better growth of orchid plants, fertilization becomes even more important. Organic fertilizer, that is, farmyard manure, should be dilute and can be applied once every ten days or so; other inorganic fertilizers (chemical fertilizers) should be used according to the instructions. During the orchid growing season, foliar fertilizer can be applied as a topdressing outside the roots. Base fertilizer is also very important; when repotting and changing soil, an appropriate amount of base fertilizer can be added as long as the fertilizer does not touch the orchid roots. Too much fertilizer easily burns orchid roots and produces black spots; if fertilized properly, it can produce strong seedlings and good flowers. The general requirement for fertilizing orchids is small amount, clear, dilute, and light, truly applying thin fertilizer frequently.
5. Pest and disease control: Insect pests are easy to prevent, but fungal diseases are hard to cure. If scale insects and other pests are found on orchid plants, omethoate or decamethrin can be sprayed according to the instructions, preferably used in combination, 2-4 times a year. General fungal diseases such as black spot can also be treated; fungicides such as copper hydroxide, thiophanate-methyl, and chlorothalonil can be used according to the instructions, with regular alternating treatment and preventive spraying every 15-20 days during the growing season. If BRV soft rot (rot-coccus disease) is found, it is an incurable disease among orchids and cannot be cured at all; once found, remove it promptly. Therefore, when buying orchid plants, be sure to pay attention and never buy lower-priced diseased plants and bring them home, thereby affecting other precious orchids.
Different orchid species have different temperature requirements. For the vegetative growth of Chinese orchids, the most suitable temperature is 20-30 degrees, the adaptable temperature is 5-35 degrees, and the temperature for the reproductive period is generally between 5-15 degrees. At night it is 3-5 degrees lower than during the day. When the summer temperature is above 30 degrees, the higher the temperature, the more orchid growth is inhibited. But under ventilated conditions, Chinese orchids are not harmed by short periods of high temperature up to 35-42 degrees. When the temperature is below 12 degrees, growth is slow. When the temperature is below 12 degrees, Chinese orchids turn to reproductive growth. Cymbidium sinense originally grows in subtropical mountain forests; in summer, the daytime temperature can reach about 32 degrees, while at night it is relatively cool, with the temperature generally not exceeding 20 degrees, and the winter temperature does not drop below 10 degrees. Cymbidium kanran and Cymbidium ensifolium originally grow in mountain forests in the subtropical transition zone. Cymbidium goeringii and Cymbidium faberi mostly grow in temperate mountain forests. In temperate regions, the summer temperature reaches about 38 degrees, but in shaded mountain forests the daytime temperature does not exceed 30 degrees, and at night it is about 18 degrees. In winter, under short-term snow cover, the surface temperature still exceeds 5 degrees, and flowering is not affected. Indoors they can also overwinter at about 0 degrees. The suitable growth temperature for Cymbidium goeringii var. longibracteatum is 18-28°C, not exceeding 35°C in summer, and not lower than minus 2°C in winter; the reproductive growth temperature is 8-18°C. The temperature requirements for Cymbidium tortisepalum are generally not lower than -12°C in winter; in the reproductive period in spring and autumn, the temperature should not be lower than 12°C; in the summer growing period, the temperature is mostly suitable between 15°C-32°C, and above 35°C is the critical line for growth; beyond this limit, growth stops again.
The driving force of orchid life--light
"All things grow by the sun." This sentence highly summarizes the enormous role of light in the growth, development, and continuation of generations of living things, especially plants. Orchid plants themselves rely on the photosynthesis of green leaves to obtain energy to maintain and continue life and to reproduce; sunlight is the driving force of orchid life. But for orchids, which require a half-shade and half-sun habit, excessively strong light is also harmful to orchid growth. It is necessary to regulate and control light suitable for orchids according to the temperature, humidity, and growth habits formed under the ecological environments of various orchid plants in different seasons, so as to satisfy and benefit the survival and growth of orchids. Below, I will discuss some immature views on the close relationship between light and orchid plants, to explore somewhat with fellow orchid enthusiasts, which may be of some use for growing orchids well:
The following discussion is from five aspects:
1. The relationship between light and orchid plant growth.
2. The effects of light on orchid leaves, buds, and flowers:
3. The effects of light on fertilizing and sterilizing orchid plants.
4. The light intensity for orchids.
5. Artificial regulation of light.
1. The relationship between light and orchid plant growth.
Suitable light can promote normal orchid growth: orchid growth relies on the photosynthesis of green leaves to obtain energy to maintain and continue life, and the effect of light on photosynthesis in Cymbidium plants is accomplished through light quantity and light quality.
① "Light quantity." That is, light intensity. Plant photosynthesis changes with changes in light intensity, and photosynthetic intensity is directly proportional to light intensity. That is, when light intensity doubles or halves, photosynthetic intensity also doubles or halves. Light, through the chemical action of chlorophyll in orchid leaves, absorbs carbon dioxide and releases oxygen to increase the nutrients needed by the orchid body. The bulbs and roots carry out digestion and decomposition at night, converting carbon dioxide into sugar and then into various needed proteins, which are transported to all parts of the plant by the flow and pressure of water and air, so that potted orchids can grow shoots and bloom. Photosynthesis has a heat limit and a cold limit, that is, the maximum temperature and minimum temperature, also called the critical points of photosynthesis. Too much and too strong sunshine, exceeding the critical point, will cause leaves to become dwarfed, yellowed, and even prematurely aged with no grass growth, gradually declining and dying; conversely, if light is insufficient, although the plant still grows, the nutrients produced are not enough, which is likewise unfavorable to the healthy growth of orchids. Therefore, the height of a plant's light compensation point and light saturation point directly affects the accumulation of organic matter and healthy growth of orchid plants. To make crops grow well, attention should be paid to lowering the light compensation point and raising the light saturation point. The usual measures are: for sun plants, rational close planting, controlling population development, and ensuring the plants have enough light; if natural light is insufficient, increase artificial light; for shade plants, attention should be paid to moderate shading while satisfying their photosynthetic intensity as much as possible. It is beneficial to let orchids have relatively abundant light of sufficient duration.
② "Light quality." When regulating light, one must consider not only light quantity but also light quality. The intensity of plant photosynthesis varies with light quality. Sunlight contains seven kinds of visible light as well as invisible light such as ultraviolet rays. The leaves of orchids, however, respond only to red, orange, yellow, and violet-blue series of light. The different colors of sunlight produce differences in the intensity of plant photosynthesis: red light and blue-violet light are more efficient, while yellow-green light is less so. Not only does the intensity of photosynthesis differ, but the photosynthetic products are not entirely the same either. For example, when plants grow under blue-violet light, the amount of protein and fat in their photosynthetic products increases, while under red light more carbohydrates are formed. Infrared light irradiation favors plant cell division, which manifests in plants as increased thickness; far-infrared light irradiation favors cell elongation, which manifests in plants as increased height; ultraviolet light irradiation favors shortening of the orchid's nodes, which manifests in plants as dwarfing. Therefore, supplemental lighting for orchids should be set to different light qualities according to the specific growth conditions and requirements of the orchid seedlings, (ordinary incandescent lamps have less blue-violet light and more infrared light than the sun; fluorescent lamps have more blue-violet and green light but less red light; the visible light portion of xenon lamps approximates sunlight, but their ultraviolet and infrared light exceed that of the sun). Orchid cultivation generally uses mostly red light and blue-violet light. Experts recommend that supplemental lighting for Chinese orchid cultivation should use more red light. Of course, if conditions permit, choosing plant lamps designed specifically for orchid supplemental lighting is even better.
In summary, one should, according to the type of photosynthetic products needed as described above, comprehensively consider and make up for deficiencies, select suitable light sources, and promote the normal growth of orchids.
II. The effects of light on orchid leaves, shoots, and flowers:
1. The effect of light on orchid leaves.
① Orchid leaves under different light conditions: Orchids have long grown in mountain forests, developing a habit of half shade and half sun; they prefer diffused light and dislike direct strong light. When light is too strong, orchid leaves tend to be shorter, thicker and stiffer, with a rough leaf surface, and the leaf color turns pale green. If suddenly exposed to strong light, the leaf color rapidly turns yellow, the leaf surface becomes rough, and the leaves may even scorch. With moderate light, the leaves are green with a fine texture and luster, and the plant grows robustly. When light is too weak, the leaf color is emerald green, and the leaf texture is thin and long without luster. In short, the stronger the light, the more yellow the leaf color; the weaker the light, the deeper the green. Too strong or too weak light will both affect the perfect growth of orchid plants.
② Changes in light can promote the manifestation of leaf variegation. Plants with the potential for variegation can receive a longer light duration, and for variegated orchids, sunlight from 6 a.m. to 9 a.m. is best. Someone conducted an experiment: before 9 a.m. in summer and before 10 a.m. in winter, place the orchid pot in sunlight, insert a thermometer into the pot, and when it reaches 30°C move it into shade. When the temperature drops to 25°C, move it back out into sunlight. Repeat this over the long term. Alternating shade and sun, cold and heat, favors the appearance of variable factors within the leaves, and over the years, variegated leaves may appear. However, this must be premised on the existence of recessive variegation factors within the orchid leaves; the change in sunlight merely promotes their manifestation and has no inevitable connection. White-spotted cells are the decisive factor and play the decisive role in orchid variegation changes.
2. The effect of light on sprouting. Light can increase the sprouting rate of orchid plants. Orchid sprouting cannot rely solely on water and fertilizer management; appropriately increasing light is crucial. The sprouting rate under strong sunlight is generally high. Strengthening light can not only increase the sprouting rate but also make new shoots stronger.
① Shallow planting of orchids produces more sprouts. Orchid growers generally believe that for orchid plants, "deep planting is not as good as shallow planting." This is because when orchids are planted deep, the pseudobulbs are buried deep and receive less light. Under the same fertilizer, water, and management conditions, deeply buried pseudobulbs are small and produce few sprouts in spring. With shallow planting (with half the pseudobulb exposed above the soil), the pseudobulbs are large and produce many sprouts in spring. This is closely related to the spectrum and the length of light duration. It also demonstrates the principle that light can increase the sprouting rate of orchid plants.
② Light can promote flower bud differentiation, achieving the goal of more blooming. This is because light is the source of nutrients for flower bud differentiation and growth. The intensity of light has a direct impact on the number of leaf buds and flower buds, their emergence period, and their growth condition. Orchids with sufficient light produce more nutrients through photosynthesis, have more flower bud differentiation, bloom more, have deeper flower colors, and have large, fine flower shapes. Conversely, orchids with too weak light may grow luxuriantly, but they produce insufficient nutrients, resulting in more leaf buds and fewer flower buds. Even if they bloom, the flower color is pale, the flower shape is poor, and the growth vigor is poor. Therefore, starting some time before flower bud formation, appropriately increasing light can promote flower bud differentiation and achieve the goal of more blooming.
3. The effect of light on flowering:
① Light intensity and flower color changes. Sunlight is the fundamental source of color for all things in the world. The seven colors of the rainbow can change in infinite ways, and the original colors of orchids are composed of infinitely changing original light. Violet light and ultraviolet light in light are the main light energy that forms orchid pigments. Therefore, sunlight has a direct influence on the colored flowers of orchids. Strong light makes flower colors deeper and more vivid; when light is excessively weak, flower colors are extremely pale. For example, to make the flower colors of the red flower series beautiful, sunlight can be slightly strengthened; to make the blue-green series produce beautiful flowers, sunlight should be reduced. Colored flowers should be appropriately shaded during the flowering season, because under sunlight red light and green light are not absorbed, while petal-form flowers should be kept toward the sun to thicken the petals. When growing colored flowers, paying attention to and controlling light during cultivation can make flower colors more beautiful. Green and white flowers should have reduced light; red, yellow, pink, and purple flowers need increased light. For example, if spring orchids (Cymbidium goeringii) open in cloudy conditions, the flower quality and flower color are better than when they open in sunlight (except for colored flowers), and the flower stalks are also longer. For cymbidiums (Cymbidium faberi) and Jian orchids (Cymbidium ensifolium), stronger light is beneficial for flowering, producing large flowers with good color and fragrance. Therefore, controlling and regulating reasonable light is a maintenance technique that must be mastered to fully express the best flower color.
② The effect of light on orchid opening.
For orchid plants with flower buds, early or delayed flowering can be achieved by regulating the length of light duration. Appropriately extend light and increase temperature. For example, using a 100-watt bulb or infrared lamp in a small room to raise the room temperature by 3°C-5°C can promote earlier flowering. Similarly, orchid plants with flower buds placed in a location with weak light and low temperature can also delay flowering. For orchid plants that have already formed flower buds, appropriately extending sunlight and raising temperature, or using a 100-watt bulb or infrared lamp in a small room to raise the room temperature by 3°C-5°C, can accelerate the flowering period and promote earlier flowering. Conversely, reducing light in a low-temperature environment can delay the flowering period, because raising or lowering temperature can accelerate or slow the physiological activities within the plant. Using this biological characteristic, some people have experimented: extending light duration to 14-16 hours can promote earlier flowering of medium-sized plants and small seedlings; but for mature orchid plants, a light duration of no more than 8 hours is sufficient to promote flowering. Appropriately regulating light intensity can make orchids open at the right time, especially for species that bloom in spring, which generally have already formed flower buds by July-September of the previous year; after they pass through the winter dormancy stage, appropriately increasing light and raising temperature can promote earlier flowering, catching up with the Spring Festival holiday. Conversely, appropriately reducing light and lowering temperature can also delay flowering for timely orchid exhibitions. In short, regulating light intensity can make orchids open at the right time.
III. The role of light in orchid fertilization and sterilization.
1. The relationship between light and fertilization. Generally, for various orchids in different seasons and at various growth stages, how to shade and supplement light so that orchids receive suitable light intensity is a concern for everyone. However, in the process of orchid cultivation, how to correctly handle the relationship between fertilization and light may not necessarily be taken seriously. In fact, this is equally important for the vegetative growth of orchids. The strength or weakness of light leads to the strength or weakness of assimilation. If light is too weak, the assimilation of leaves is also insufficient, leading to poor digestion of nitrogen fertilizer during the day, less accumulation of sugars and starch, and therefore less decrease at night. Over time, leaves will be very long but roots very short. If light is too strong, leaf assimilation is also too strong. Orchid plant respiration increases, consuming excessive nitrogen fertilizer, causing leaves to be short, small, and yellowed. At the same time, abundant sugars and amino acids cause excessive growth of pseudobulbs and roots. The causes of these two adverse growth conditions may be many-sided; light is not the only factor, (such as long-term dryness of the orchid pot, excessive phosphate fertilizer, high-carbon growth, small day-night temperature difference, nitrogen deficiency, etc., can also produce these problems.) However, failure to correctly handle the relationship between fertilization and light is also one of the important reasons, and must be given attention. The maintenance measures for such situations are: when orchids show a "long leaves, short roots" state, light intensity must be gradually strengthened, organic nitrogen continuously supplied, and water supply reduced. After new roots grow out, they will slowly return to normal. When orchids show a "small leaves, strong roots" phenomenon, light should be reduced, and sufficient inorganic nitrogen continuously supplied. This can both lower sugar content and promote protein synthesis, and the new plants produced will return to normal.
Practice has proven that only under conditions of sufficient light can orchids absorb nutrients, so when fertilizing orchids there must be moderate sunlight. The best time to fertilize is in the morning of good weather. When applying chemical fertilizer, the light intensity should be relatively higher; when applying organic fertilizer, it should be relatively lower.
2. Sunlight is a good weapon for sterilizing orchid plants and preventing disease. Light can not only raise temperature, but the ultraviolet rays in the spectrum can kill and prevent the breeding of fungi, pathogens, and viruses. Pathogenic bacteria generally find it difficult to survive under blazing sun exposure. Therefore, exposure to the sun can sterilize and disinfect pots and growing media. But for the sterilization and disinfection of orchid plants, the use of sunlight must be timed. For example, in winter, sun the orchids so that the whole plant bathes in ample sunlight; in summer, avoid the blazing sun at noon and in the west-facing sun. Light can also close the stomata of orchid leaves, blocking pathogenic fungi that easily invade through the stomata. We have found that orchid plants with good light exposure have strong disease resistance, while orchid plants with poor light have stomata that are often open and are susceptible to infection by invading pathogens; orchid plants with insufficient light are prone to pests and diseases. Using sunlight for sterilization and disinfection has always been advocated by orchid growers. Orchid photosynthesis, like other biochemical processes, cannot exist in isolation, and is also constrained and influenced by external environmental conditions. These external factors are: light intensity, carbon dioxide and oxygen concentrations, wind speed, temperature, water supply, inorganic nutrients, and pollutants in the atmosphere and soil, etc. In addition, photosynthesis is also affected by internal factors of the plant itself, such as chlorophyll content, degree of stomatal opening, and the physiological state and structure of the leaves themselves. By improving the above internal and external factors, the goal of increasing plant photosynthetic efficiency can be achieved. This promotes healthy development, growth, and flowering of orchids. In summary, according to the growth habits of orchids, giving appropriate light can improve fertilization efficiency, enhance disease resistance, and benefit the healthy growth of orchid plants. For this reason, for orchid plants that are weak, do not bloom, and are prone to pests and diseases, light must be strengthened.
IV. The light intensity for orchids.
1. Orchids grow in mountain forest areas, and the ecological environment has shaped their need for half-shade, half-sun light conditions. There is a folk flower saying: "Shade for camellias, sun for peonies, half shade and half sun for four-season orchids." This shows that orchids have a half-shade, half-sun light habit, and the growth of all types of orchids cannot be separated from light. This is also a "common characteristic" of orchid plants.
2. The light requirements of various orchid plants are not entirely the same. Due to differences in ecological environments, various orchid plants differ in their light requirements, strong or weak. Generally speaking, the growth of cymbidiums (Cymbidium faberi) and Jian orchids (Cymbidium ensifolium) requires more light and can have less shading. But in the vigorous growth period of summer and early autumn, strong direct light will still scorch some leaves, causing the leaves to turn brown, and even the leaves to scorch yellow and wither; at this time shading is necessary, blocking 70%-80% of sunlight. Cold orchids (Cymbidium kanran) and ink orchids (Cymbidium sinense) relatively require less light, and in summer should block 80%-85% of sunlight. For newly potted plants, diseased and weak seedlings, old plants, particularly delicate plants, and plants that have not been hardened and have long been in half-shade, half-sun conditions, shading must be given during the growth period. For marginal-variegated plants, striped plants, crystal plants, if they are transparent bodies, etc., they cannot receive relatively strong direct light. Shading must be applied when sunlight is strong. The amount of shading is also a rough estimate, because different varieties under the same species do not have absolutely identical light requirements. For example, within the same species, variegated plants, colored flowers, and strong versus weak plants all have different light requirements. This is the "individuality" of orchid plants. The cultivator needs to observe carefully to correctly grasp the appropriate light for each type of orchid plant.
3. Orchids can be roughly divided into three categories: sun-loving, semi-shade, and shade types. As well as long-day and short-day types. Long-day orchids bloom as the day gradually lengthens and the night gradually shortens; such as sword orchids (Cymbidium ensifolium) and summer cold orchids (Cymbidium kanran) that bloom in late spring and summer. Short-day orchids are the opposite, blooming as the day gradually shortens and the night gradually lengthens, such as spring orchids (Cymbidium goeringii), spring swords (Cymbidium goeringii var.), cymbidiums (Cymbidium faberi), and ink orchids (Cymbidium sinense) that bloom in late autumn and winter.
4. Reference values for optimal sunlight intensity for various orchids (unit: LUX)
Orchid species Sunlight range Optimal light intensity Variegated plant light intensity
Four-season orchid 10000-14000 **** 10000
Cymbidium (Cymbidium faberi) 9000-13000 11000 9000
Spring orchid (Cymbidium goeringii) 8000-**** 10000 8000
Spring sword (Cymbidium goeringii var.) 8000-**** 10000 8000
Lianban orchid (Cymbidium tortisepalum) 8000-**** 10000 8000
Cold orchid (Cymbidium kanran) 8000-**** 10000 8000
Ink orchid (Cymbidium sinense) 4000-****5000 4000
"Fairbanks and Prilling point out: no one can propose the best light quality and light quantity for orchid growth and development, because this involves complex factors, including light, temperature, different times, carbon dioxide concentration, day length, nutritional conditions, humidity, and the temperature difference between day and night," etc. ---- Excerpted from Wu Yingxiang's "Chinese Orchids." Therefore, the sunlight intensity values above are only reference values.
5. The light intensity for orchid plants changes with the seasons: In winter and spring, orchids should receive more sunlight and basically need no shading. In summer and autumn, sunlight before 8-9 a.m. should be fully enjoyed, but the west-facing sun in the afternoon must be avoided, otherwise orchids are prone to disease. Sunlight and temperature have a great influence on orchid reproduction. If there is no sunlight for a long time in winter and the temperature is relatively low, it will affect the development of winter buds, leading to few and poor-quality seedlings in spring, affecting the annual plant increase rate.
6. Orchids prefer light in cool environments. Generally, shading begins when spring passes and summer arrives, and continues until late autumn. In summer, shade 40-50%; in late autumn, winter, and spring, fully accept light. Generally speaking: at 20-25°C, under direct sunlight, the chlorophyll in orchid leaves reacts quickly with light, and the plants grow vigorously. Above 30°C, the chlorophyll in the leaves automatically decreases, the leaf color becomes lighter, and a gray visible film gradually forms to reflect sunlight and prevent scorching. This condition can only be maintained for a relatively short time; if it lasts long, it starts from the leaf tips and the whole plant gradually dies, especially old plants which first turn yellow and then scorch. Therefore, the length of light exposure for orchids changes with high and low temperatures, in an inverse relationship.
7. Orchids prefer morning sunlight. When the morning sun first rises, the sunlight angle is low, and the orchid's light-receiving area is large. Also, because morning sunlight is blocked by morning mist, the light is relatively soft, and direct exposure will not scorch orchid leaves. After nighttime nutrient accumulation, orchids have the strongest photosynthetic capacity in the morning.
V. Artificial regulation of light.
Light that is too strong or too weak is detrimental to orchid growth, and orchid light varies greatly with season, weather, region, environment, etc. If light is too strong because of this, artificial shading must be used, adjusting the shade density to reduce the orchid's light. If light is insufficient because of this and affects the healthy growth of orchid plants, artificial lighting must also be used to appropriately supplement light for the orchid plants, giving them relatively abundant light of sufficient duration. In short, to give orchid plants appropriate light, artificial regulation is necessary.
1. The basis for regulating orchid light:
① Regulate the appropriate light for various orchid plants according to the differences in light requirements among orchid species. Different orchid varieties will also differ in photosynthesis and optimal temperature. For example, different orchid species and variegation types will differ at different times and in different regions. In the blazing sun days of midsummer and golden autumn, regarding shading requirements, the shade density for Jian orchids (Cymbidium ensifolium) is 60%-70%, spring orchids (Cymbidium goeringii) and cymbidiums (Cymbidium faberi) require 70%-80% shading in summer, while ink orchids (Cymbidium sinense) need about 80-85%. Ordinary variegated orchids can have about 80%, while high-grade variegated orchids, crystal variegated orchids, and pattern-variegated orchids should have about 90%. Flower-type orchids and ordinary variegated orchids can have full light before 9 a.m. and after 4 p.m. on sunny days; high-grade variegated orchids, crystal variegated orchids, and pattern-variegated orchids should have half shade. In high-temperature "furnace" regions, the shading density should be correspondingly increased by more than 5%. In winter and spring, appropriately increasing light by 20% is more beneficial for orchid growth.
② Adjust the shade density according to light duration and light intensity in different seasons. From late spring to summer and autumn, shade 40%-50%; in winter and early spring, 10%-20% light. Insufficient light will make orchid leaves soft with deeper color and cause the leaves at the rhizome to bend downward or outward. Especially during the leaf-emergence period, it makes leaves grow rapidly. Conversely, excessive light will make leaves turn yellow or chlorophyll be destroyed causing cell death, and excessive light makes leaves shorter and thicker and open or bend outward prematurely. Therefore, except in early winter and midsummer, move orchids outdoors in the morning until 9-10 a.m., so they get sufficient light. As the angle at which sunlight hits the earth shifts, light duration and light intensity will change. In the short and weak light of winter and spring, except for high-grade variegated orchids, crystal variegated orchids, and pattern-variegated orchids which need 60%-70% shading, all other orchids can have full light, or half shade from 10-14 o'clock on sunny days. In the long and strong light of summer and autumn, the shading time and density for orchid plants must also be adjusted accordingly.
③ According to weather changes. Sunny, partly cloudy, cloudy, overcast, rainy and snowy days and other ever-changing weather cause light to change frequently accordingly. Therefore, the shade level must be appropriately adjusted as the weather changes and light intensity varies. In particular, high-grade variegated orchids, crystal variegated orchids, and pattern-variegated orchids cannot tolerate strong light; if the shade level is not adjusted in time, it often leads to sun scorch damage. In addition, if a fixed shade density is maintained regardless of light intensity, the sprouting rate and flowering rate of orchid plants will naturally not be as good as with timely adjustment.
④ According to the changes in sunlight within a day - clear turning cloudy, cloudy turning clear, clear turning rainy, clearing after rain, etc. - morning and evening sunlight can be allowed to shine freely, but the midday blazing sun must be blocked and regulated, and on cloudy days the shade density should be reduced. It is worth noting that after a summer rainstorm, or when it first clears after a long rain, orchid pots must absolutely not be exposed to the sun. Previous generations' experience: "If exposed to the sun right after rain, the water in the pot is hot, which scalds the leaves and damages the roots."
⑤ Regulate specifically according to differences in climate and light intensity in different regions. China has a vast territory, with varying climate cold and heat and light intensity, differing greatly. However, regarding the standards for strong, weak, and appropriate light for orchid growth, the requirements are still unified and can be specifically regulated according to the local climate.
⑥ Regulate according to temperature levels. Orchid photosynthesis is closely related to temperature. Generally speaking, Chinese orchids carry out normal photosynthesis at 5-36°C, with the optimal temperature being 18-28°C. At temperatures as low as 0°C or as high as 40°C, which are the limits, orchid photosynthesis is inhibited. Starting from the low limit, photosynthesis strengthens as temperature rises. Beyond the optimal point, photosynthesis declines; above 36°C photosynthesis is very weak, and at the 40°C limit photosynthesis stops. When temperature is high, use shading to cool down; when temperature is low, use heating equipment to raise the temperature, thereby achieving a more suitable temperature, promoting orchid photosynthesis, and ensuring healthy and rapid growth of orchids.
⑦ According to the phototropism of orchid plants. Orchids have phototropism, so the direction of the orchid pot should be rotated and adjusted at intervals to prevent the plant leaves from leaning to one side. Especially for the side with new growths, during the sprouting period it should face the direction of ample light to favor sprouting and healthy growth of the shoots. If for special needs of shaping or composition, to express a specific poetic and artistic conception, the position of the light source can also be used to strengthen the tendency of flowers and leaves, achieving the beauty of dynamic balance and satisfying appreciation needs.
⑧ Regulate according to the growth condition of orchid plants. Generally speaking, if the leaf color is pale green, and orchid leaves are thin, weak, and leggy, then light is too strong. If they are yellow-white or even scorched yellow and withered, it indicates that light has exceeded the orchid plant's tolerance level. Conversely, if the color is dark green or deep green without luster, it indicates light is too weak. Regulate shading well according to the growth condition of orchid plants. In addition, if stems and leaves are relatively dense and soft, with many leaf buds and few flower buds, then light is insufficient; conversely, if stems and leaves are sparse and firm, with few leaf buds and many flower buds, then light is too strong. Neither is normal and both need timely adjustment.
⑨ Regulate light according to the growth period of orchids. During the growth period, the supplemental light duration should be longer; during the dormancy period, less.
⑩ According to professional testing. (Excerpt)
(1) The light intensity for well-growing orchids is 4000-5000 Lux (lux, the unit of light intensity), and their sprouting rate, flowering rate, leaves, and leaf color are all excellent.
(2) From the practice of professional testing, it has been found that orchids have a saturation point for light requirements. After light reaches the saturation point, more sunlight is harmful rather than beneficial to orchids.
(3) Plants most easily absorb red and blue light, and a balanced combination of red and blue light is especially important for photosynthesis. Experiments have proven that red light can promote orchid growth, while blue light is indispensable for thickening leaves, accelerating plant development, and regulating stomatal opening. Green light also cannot be ignored; it can promote oxygen production, thereby helping orchids better accumulate nutrients.
(4) A certain intensity of long-wave ultraviolet light is also indispensable; it helps form anthocyanins and inhibit the elongation of branches and leaves.
2. Methods for regulating orchid light:
First, shading. In nature, orchids mostly grow in cool, shaded mountain forest environments with scattered sunlight, and semi-shade and shade types account for more than four-fifths of all orchid plants. Therefore, when light is too strong, shading must be used to reduce light.
(i) Plant shading. Imitating the natural environment, using plants for shade is one of the more ideal methods. The method is: on the orchid cultivation site, set up bamboo frames, wooden frames, or reinforced concrete frames, and let vines such as grapes, honeysuckle, morning glory, Chinese trumpet creeper, and cypress vine climb and spread over them, which both provides shade and is attractive. Deciduous vines provide shade in summer and let light through in winter, which is a natural regulation. Trees can also be planted around the orchid garden, using evergreen trees, deciduous trees, and bamboos of different heights planted in combination to regulate light intensity.
(ii) Shade net shading. The shade shed can be built with bamboo, wood, angle steel, etc., with bamboo blinds, plastic film, shade nets, etc. laid on top. A double layer of shade net with 50%-70% shading rate can be set on it; the upper layer is relatively fixed and only rolled up in winter, while the lower layer can be deployed or retracted. Use double layers in midsummer, single layer in spring and autumn; use double layers at noon on sunny days in summer and autumn, single layer on cloudy and rainy days. In winter, it depends on the situation: on sunny days deploy the lower layer, on cloudy days roll up the lower layer. In addition, before orchid flower buds are about to open, there must be moderate scattered sunlight; otherwise the flower color is dull and not showy. It is best to install shade nets as movable types so that the shade density can be increased or decreased as needed. Shade nets should as much as possible not be placed tightly against the plastic film or glass on the shed roof, and there should be a gap of about 30 cm between net layers. Shade nets should be set outside the plastic film or glass for the shading effect to be good. If set inside the shed, the shading effect is greatly reduced. When growing orchids on a balcony, during midday when sunlight is direct, light is strong, and walls have reflected light and radiant heat, and ventilation is also poorer than in a courtyard or orchid farm, so in high-temperature seasons, a 50% shade net should be hung outside the security grille for 3-4 hours around midday to prevent scorching orchid plants. When sunlight is at an angle and the temperature has also dropped, it should be rolled up in time to facilitate ventilation. Orchid shading requires a certain regularity. Generally speaking: large-leaved species require more than small-leaved species, and low-altitude species require more than high-altitude species. More shade is needed in summer, less in winter; more shade at noon, less in the morning and evening; more shade at high temperatures, less when cool, etc.
Second, "supplemental light." Regulating light in orchid growing sites is not just about shading; when natural light is insufficient, artificial lighting must be added to appropriately supplement light for orchid plants, especially for indoor orchid growing and after the beginning of winter when light duration is short, which has a certain impact on orchid growth. Only by supplementing light to meet the orchid's light requirements can orchid plants develop soundly, with sturdy stems, and grow and bloom.
(i) Basis for supplemental light. How to supplement light appropriately and what kind of light to supplement? There must be a scientific basis. Sunlight is a collection of continuous bands of light from red to violet, and artificial simulation of the plant growth environment should also start from this. Artificial supplemental light, in addition to considering the light quality and light intensity necessary for orchid growth, also needs to consider the physiological radiation characteristics of the light source. (Light waves that match the characteristic curve of plant chlorophyll synthesis are called physiological radiation light sources, i.e., photosynthetic light waves.) Under different light qualities, not only does the intensity of photosynthesis differ, but the photosynthetic products are not entirely the same either. For example: plants absorb red light most strongly, followed by blue light. When plants grow under blue-violet light, the amount of protein and fat in their photosynthetic products increases, and it is effective for thickening stems and leaves, accelerating plant development, and regulating stomatal opening. Under red light, more carbohydrates are formed, which can promote orchid growth. Violet light and ultraviolet light mainly form anthocyanins and inhibit the elongation of branches and leaves (ultraviolet light must not be too strong, as it will scorch orchid leaves). Green light also cannot be ignored; it can promote oxygen production, thereby helping orchids better accumulate nutrients. In addition, a certain intensity of long-wave ultraviolet light is also indispensable; it helps form anthocyanins and inhibit the elongation of branches and leaves. Supplemental light must be based on the effects of the above spectrum and the growth condition of orchids to select suitable light sources.
(ii) Light source selection. Since light quality has a clear impact on the composition of photosynthetic products, people should select suitable light sources according to the type of photosynthetic products needed. Ordinary incandescent lamps have less blue-violet light and more infrared light than the sun; fluorescent lamps have more blue-violet and green light but less red light. Generally speaking, orchid cultivation can use a mixed light of red, blue, and white tubes to supplement insufficient light. A complete combination of red and blue spectra can enable orchids to achieve optimal growth. Philips' tri-phosphor 6400K fluorescent lamp can basically meet the growth requirements of orchids, and the price is cheap. Of course, if conditions permit, it is best to choose plant lamps designed specifically for orchid supplemental lighting. They are a bit more expensive, but the effect is better. Using LED lighting, the plant growth rate and photosynthetic rate both increase by more than 20%. LED lamps have far superior durability compared to ordinary lamps and also save electricity, reducing operating costs. When selecting light sources, one should consider not only light quality and light quantity, but also low power consumption, economy, durability, and ease of use.
(iii) Supplemental light duration. After installing artificial lighting equipment in the orchid room, the supplemental light duration should be determined according to the actual light conditions of the orchid growing site, seasonal light changes, weather changes, and the orchid's growth period. The supplemental light duration varies according to different orchid growth periods and orchid growing environments. Indoor orchid growing with weak light but able to receive scattered sunlight should have no less than 5 hours of supplemental light; balconies should have no less than 4 hours of artificial supplemental light; basements and indoor spaces without sunlight should have no less than 10 hours of artificial supplemental light. During the orchid growth period, the supplemental light duration should be longer; during dormancy, it should be less. On cloudy, rainy, and foggy days, there should be no less than about 10 hours of artificial supplemental light. Supplemental light duration involves many factors and requires experimentation in practice to derive a more correct supplemental light duration.
(iv) Light distance. Light intensity is inversely proportional to the distance from the light source to the leaf surface, that is, the closer the distance, the stronger the light, so the height distance of the light tube can be adjusted to regulate light intensity, to adapt to the appropriate light requirements of different orchid species. How to choose the light distance: the installation distance of supplemental light lamps should be set according to the lamp power and the height of the orchids. The closer the lamp is to the orchids, the higher the light utilization, but care should be taken to avoid the lamp being too close to the orchids causing excessive temperature, which would harm the orchids. Fluorescent lamps and plant-specific light sources (40W) should be at a distance of 20-40 cm; incandescent lamps (100W) should be installed at a certain height from the plants, because the large amount of infrared radiation from incandescent lamps converts to heat energy, so 70 cm or more is better; high-pressure sodium lamps (120W-400W) should maintain a vertical distance of 1 m to 1.5 m from the plants, which is more suitable. For LED supplemental light sources, since LEDs produce very little heat, they can be placed at a close distance, and 10 cm is better.
(v) Light direction. To ensure the supplemental light intensity for orchids, the lamps should as much as possible be arranged directly above the orchids. Benefits: First, due to the phototropism of plants, with more overhead light, the orchid leaves have stronger uprightness, which meets the aesthetic requirements of orchid lovers. Second, if the angle of light is consistent with the growth angle of plant stems and leaves, the light intensity received per unit area is higher, which helps improve light energy utilization efficiency.
(vi) Precautions for supplemental light.
① It is best not to supplement light at night, because orchid growth requires a certain period of darkness to regulate the respiratory function within the orchid plant and to carry out the transformation and synthesis of dry matter within the plant.
② Pay attention to ventilation. Most supplemental light lamps generate heat energy, especially in summer, which will raise the temperature of the orchid room or orchid shed, causing orchid diseases. Ventilation can reduce heat.
③ Comprehensive configuration of light sources. To obtain better supplemental light effects, it is necessary to comprehensively configure light fixtures of different light sources, such as using a combined configuration of fluorescent lamps and incandescent lamps, or a combination of low-pressure sodium lamps and incandescent lamps. This satisfies the orchid's needs for various spectra.
④ Pay attention to the installation safety of supplemental light fixtures to prevent accidents.
The above has briefly described the role of artificial supplemental light for orchids and some specific issues. In summary, by appropriately supplementing light for orchids and ensuring that orchids have relatively sufficient light, not only can the cold resistance of orchids during overwintering be improved, but the robust growth and abundant flowering of orchids in the coming year can also be ensured.
Third, "hardening plants." Orchids have relatively strong adaptability to light, which is also related to the number of generations of light intensity received. They will gradually change and adapt. For orchids that have always been grown in shade, if the plant's light conditions are artificially changed, after a period of time, the structure and function of their chloroplasts will undergo a certain degree of change to adapt to the new light conditions. For example, under weaker light conditions, plant leaf structure and function will develop in a shade-tolerant direction, enabling them to maintain relatively high photosynthetic efficiency under weaker light; conversely, under stronger light conditions, plants can also adapt to a certain extent, effectively using ample sunlight for photosynthesis. The folk term "hardening plants" roughly means this - letting orchids adapt to different environments - including light, temperature, etc. Through "hardening plants," they can be strengthened generation by generation.
Fourth, display. In the display of potted orchids, according to the habits of various orchid plants, those with high light requirements should be displayed in places that receive the most light. Those with low light requirements should be displayed in positions with less light. In addition, orchids have phototropism, so it is best to adjust the pot direction once or twice a month to prevent the plant leaves from leaning to one side. Especially for the side with new growths, during the sprouting period it should face the direction of ample light to favor sprouting and healthy growth of the shoots.
In summary, light plays a crucial role in the growth, development, flowering, and reproduction of orchid plants. Although orchid plants prefer shade, if all things in heaven and earth had no sunlight, they could not carry out photosynthesis to produce nutrients. They also could not survive. Therefore, light is the driving force of orchid plant life. Photosynthesis is also a rather complex issue. Orchid photosynthesis, like other biochemical processes, cannot exist in isolation, and is also constrained and influenced by external environmental conditions. These external factors are: light intensity, carbon dioxide and oxygen concentrations, wind speed, temperature, water supply, inorganic nutrients, and pollutants in the atmosphere and soil, etc. At the same time, light is also affected by internal factors of the plant itself: for example, different orchid plants have certain differences in light duration, intensity, and requirements. Another example is the influence of chlorophyll content, degree of stomatal opening, and the physiological state and structure of the leaves themselves. Only by improving the above internal and external factors can the goal of increasing plant photosynthetic efficiency be achieved, promoting healthy development, growth, and flowering of orchids.