Caladium care methods after autumn: follow these 6 steps for better growth next year
Caladium is a plant native to the Amazon River basin in South America, later introduced to China, and today it can be seen in many regions of China. This plant is not tolerant of low temperatures, so caring for caladium after autumn requires great attention. So what are the care methods for caladium after autumn? Let me walk you through them below.
Caladium care methods after autumn: prune promptly after flowering
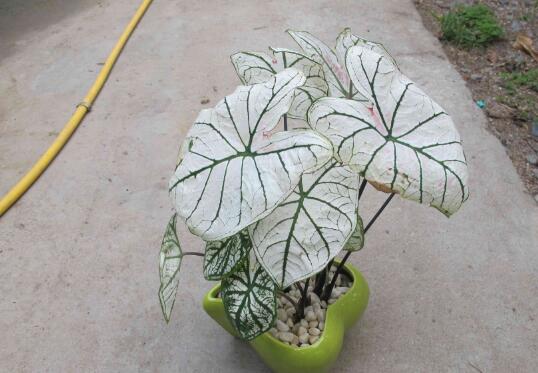
Summer is the ornamental period for caladium. After the ornamental period ends, the leaves will gradually wither. At this time we need to prune some of the yellowed and withered leaves, both to maintain its plant shape and to lay a good foundation for next year's growth. Of course, besides this there are many other points that need attention. Let me introduce them to you one by one below.
1. Pruning methods
Caladium leaves begin to gradually turn yellow starting in October, and the leaf stalks also wilt and droop. At this point we need to prune the wilted and yellowed leaves. Before pruning, we must first sterilize the tools, to avoid bacteria on them infecting the plant. After sterilizing, just prune off the wilted leaves.
2. Pay attention to water control
After caladium leaves begin to turn yellow, we need to control the amount of watering. Once its leaves have completely withered, we can take it out of the flowerpot, then place it in a bright spot to dry for a few days, and then store it in sand. Before sand storage, be careful to sterilize the sand.
3. Sand storage treatment
When storing caladium in sand, it is best to keep the temperature above 10°C, and to spray it with water about once every half month, just enough to make the sand surface slightly moist. Here we should note that when digging out its tubers, be careful not to injure them, otherwise the tubers will rot during winter storage.
4. Early spring treatment
By early spring of the following year, we can take out the caladium tubers, then cut them into several pieces, and afterward apply a little plant ash to the cut surfaces of the cut tuber pieces. This treatment can prevent them from rotting.
5. Tuber planting
When planting the tubers, we can choose humus soil with good drainage, then add an appropriate amount of bone meal as a base fertilizer, which can help it grow better. After planting the tubers, water thoroughly, then place them in a dark spot to grow. Once they sprout, they can be moved to a semi-shaded spot for care. However, there is one thing to note: when growing them, keep the air at a certain humidity.
6. Precautions
When planting the tubers, we can face their front side upward. Planted this way, they will sprout faster, but the growth effect will not be as good. We can also face the back side of the tubers upward; this way the growth will be more uniform.
Caladium care methods after autumn
Caladium care after autumn
Summer is the ornamental period for caladium. After the ornamental period ends, autumn and winter arrive, and winter is the dormant period for caladium.
After dormancy, caladium will sprout again in late spring, but before that it needs post-autumn care, including autumn management, winter storage and spring planting, so that it can grow normally the following year.
Caladium post-autumn care methods
Generally, caladium leaves begin to turn yellow starting in October, and the leaf stalks wilt and droop. At this time, watering needs to be controlled. When the caladium leaves have all withered, take it out of the flowerpot, place it in a bright and dry spot indoors to dry for a few days, and then store it in sand. The sand should first be sterilized.
The temperature for sand storage of caladium should be kept above 10°C. Every half month, spray water once, but it must not be too moist; the sand surface being slightly moist is enough. Note that when digging out the caladium tubers, do not injure them, otherwise the caladium tubers will rot during winter storage.
In the spring of the second year, take out the caladium tubers and cut them into several pieces for planting. The cut tuber pieces can first be treated to prevent rot; simply coat the cut surfaces with plant ash.
When planting, you can choose leaf mold soil, add some bone meal as a base fertilizer, plant the tubers well, then water thoroughly, and place them in a dark spot for care. Once the caladium sprouts, it can be placed in a semi-shaded spot for care. Be careful to maintain a certain air humidity.
In addition, when planting the tubers, you can choose to face the front side of the tubers upward; they will sprout relatively quickly, but the growth effect will not be good. You can also plant the caladium tubers with the back side upward, and the growth will be more uniform.
Home care experience for caladium
Caladium likes a hot and humid environment, and is suited to loose, fertile, well-drained acidic soil. When dividing and potting up, it is best to use sandy loam rich in humus. After planting, as new leaves grow, the amount of watering can be gradually increased. At this time it needs several hours of scattered sunlight each day, and the ambient temperature should be kept between 22-28°C. During the growing period, sufficient moisture should be maintained, and a diluted, fully decomposed liquid fertilizer should be applied once about every 15 days. When fertilizing, do not let the fertilizer liquid stain the leaves. When summer is hot, avoid direct strong sunlight, and shade it at noon to avoid scorching the leaves. Water once each in the morning and afternoon, and be careful to maintain relatively high air humidity; you should often spray water on the plant's leaves and sprinkle water around the flowerpot. During the growing period, also promptly prune old leaves that have turned yellow and droop. If flower stalks emerge, they should also be pruned, so that nutrients are concentrated and new leaves are encouraged.Caladium tubers overwinter safely like this:
① After autumn begins, caladium tubers gradually enter winter dormancy, and the above-ground leaves also wither one after another. At this time they can be tipped out of the pot, the withered leaves of the tubers pruned off, placed in a ventilated spot to dry, and then put into a pot containing sand for dry storage. The sand must not be too dry or too wet, especially not too wet, otherwise they will rot. Place in a shaded spot indoors. After spring the following year, dig the tubers out of the sand pot and plant them in other pots. But before potting and planting, sufficient base fertilizer must be applied; this is very important for future growth and development.
② Without digging them out for sand storage, leave them in the original pot and move it to a ventilated spot indoors to overwinter. The potting soil should be on the dry side and avoid being too wet. After spring the following year, tip them out of the pot and replant them in a new pot (with sufficient base fertilizer).
To make caladium leaves large in shape and brilliant in color: the key to making caladium leaves large in shape and brilliant in color lies in winter storage and spring planting. The main care points:
① Starting in September, caladium leaves begin to yellow, gradually wilting and drooping. At this time, watering should be controlled and fertilizing stopped. When the leaves have all withered, tip the pot over and take out the tubers, place them in a bright, ventilated and dry spot indoors to dry for several days, and store them in sterilized, impurity-free dry sand, keeping the temperature above 10°C, spraying water once every half month with a watering can to keep the sand surface slightly moist. When digging out the tubers, be careful not to damage them, to avoid rot during winter storage.
② In early spring of the following year, take out the tubers and divide them, or peel off the small tubers growing around them and plant them directly, but each piece must have at least one bud, and coat the cut surfaces with charcoal powder or stove ash to prevent rot. For the potting soil, use leaf mold soil mixed with decomposed chicken manure and bone meal. After watering thoroughly, place in a shaded spot. After sprouting, move to a semi-shaded spot for care, and be careful to maintain the surrounding air humidity.
③ There are two methods for planting tubers. One is to face the front side of the tuber upward, which can prompt rapid sprouting, but the growth throughout the year is uneven, and the main bud grows especially vigorously and prominently. The other method is to plant the tuber upside down with the back side upward; although sprouting is slower, there are more sprouts and the growth is balanced.
Fertilizer and water management: when caring for caladium, the potting soil should always be kept moist, and topdressing should be applied in appropriate amounts; never apply concentrated fertilizer. The leaves of caladium live for only 1 year. When the buds on the underground stem mature, they can continuously sprout and send out new leaves. When new leaves are emerging, an appropriate amount of diluted liquid fertilizer can be applied; at other times, no topdressing is needed. Otherwise, the leaf stalks grow too long and are not plump enough; not only are they easy to break, but the plant shape also looks loose. Whenever new leaves have emerged, topdressing should be stopped immediately, and the amount of watering reduced at the same time. In winter, when the plant enters a dormant state, watering should be stopped. It is best not to remove it from the pot; let the tubers overwinter in the potting soil. When the temperature rises the following year, begin watering again to prompt it to send out new leaves.
The entire growth process of caladium is divided into two stages: the growth period and the dormant period. To make caladium leaves colorful and brilliant, careful management and good care work are needed all year round. For households in northern regions growing caladium, the stored tubers can be taken out in early April to May. Peel off the small tubers around the large tubers, let them dry slightly, and then pot them separately. For a flowerpot with a diameter of about 25 cm, it is suitable to plant 3-4 large tubers per pot. If you want to expand propagation, you can also use a sterilized knife to cut a large tuber into small pieces with 1-2 buds each, coat the cut surfaces with charcoal powder or plant ash or soot to prevent rot, and pot them after the cut surfaces have dried. For the potting soil, choose loose, fertile, slightly acidic soil with good drainage. Generally, you can mix 6 parts leaf mold soil or peat soil with 2 parts garden soil and 2 parts river sand, and add a small amount of bone meal or decomposed cake fertilizer residue as a base fertilizer. Watering and fertilizing should be timely and appropriate. In the peak growing seasons of spring and summer, generally apply a compound liquid fertilizer or complete-element flower fertilizer once every 7-10 days, and the colors will be vivid. If too much nitrogen fertilizer is applied, the colored patches on the leaves will fade, affecting the ornamental effect. When applying liquid fertilizer, never let it stain the leaves, to avoid scorching the leaves. In spring and autumn, water to the extent of keeping the potting soil moist. If watered too much and drainage is poor, the tubers are prone to rot; if watered too little and the potting soil is dry, the leaves are prone to wilting. In summer, the temperature is high, water evaporates quickly, and it is also the vigorous growth period of caladium. Besides watering sufficiently, you also need to spray water on the leaf surfaces and sprinkle water on the ground near the flowerpot 2-3 times a day, to help lower the temperature and increase humidity, which is crucial for keeping the leaves beautiful.
Autumn is the stage of tuber growth and development. At this time, more phosphorus and potassium fertilizer is needed to promote tuber growth. In late autumn, when the temperature drops below 15°C, the leaves begin to turn yellow and gradually enter the dormant period. At this time, reduce watering to prompt the tubers to enter dormancy. Caladium likes semi-shade during the growth period and avoids direct strong light. The light intensity it requires is somewhat stronger than that of other shade-tolerant foliage plants. If the light is too weak, the plant tends to grow leggy, the leaves become thin, weak and elongated, and easily lose their brilliant color and luster; but the light must not be too strong either, because if exposed to direct strong light, the tender leaves are often easily scorched. Different varieties require slightly different light conditions. Varieties with red patches and brilliant colors need more light; if the light is insufficient, the colored patches will fade. White varieties with thin leaves need less light; strong light easily damages the leaves. For home cultivation of caladium, in summer it is best to place the flowerpot in a well-ventilated, brightly lit spot indoors, to prevent direct strong sunlight. In spring and autumn, place it in a semi-shaded spot to help maintain brilliant leaf color. If flower stalks emerge, prune them promptly to reduce nutrient consumption, so as not to affect leaf growth. When old leaves that have turned yellow and droop are usually found, prune them at any time to encourage new leaves to sprout. The management work during the dormant period of caladium must not be relaxed in the least. If it is relaxed and the plant suffers cold damage, in mild cases it affects the following year's growth, and in severe cases it cannot sprout the following year. Therefore, experts who grow caladium attach great importance to overwintering management.
The key points of management: first, the temperature must be appropriate; second, the substrate must be appropriately dry or wet. As long as you master these two points, you have laid a good foundation for the following year's growth. The specific method is: after the caladium leaves have withered and yellowed, tip the pot over and take out the tubers, let them dry slightly, and then bury them in river sand for storage. If there are few tubers, you can also leave them in the pot and place the tubers, pot and all, indoors to overwinter. During overwintering, place in a light-proof spot, keep it dry and with appropriate ventilation. The temperature must not be too high or too low; keeping it at 14-17°C is relatively safe. Because within this temperature range they will not sprout and will not freeze, which is conducive to safe overwintering. The substrate in which the tubers are buried must be appropriately dry or wet to keep the tubers in a fresh state. If the substrate is too dry, it easily causes the tubers to shrink, affecting sprouting the following year; if the substrate is too wet, it easily causes the tubers to rot and lose their ability to sprout. It is best to keep the substrate slightly damp at all times.