How to grow Jerusalem cherry? Master the cultivation methods and precautions that don't fear strong light
As a beautiful indoor potted plant, Jerusalem cherry should be familiar to flower lovers. It bears fruit all year round, so it is also called the four-season berry. In daily life, many people choose to keep a pot of Jerusalem cherry at home, so how do you grow Jerusalem cherry? For this, the editor has carefully compiled the cultivation methods and precautions for Jerusalem cherry, very comprehensive, friends who want to grow it must take a look~
1. How to grow Jerusalem cherry, understand its habits
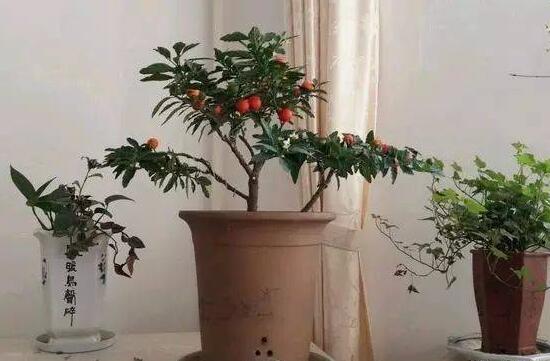
Jerusalem cherry likes sunny, warm environments, and it tolerates high temperatures, with no sunscald above 35°C, and it also tolerates direct light, so even under the strong sun in summer it needs no shading. Therefore, when growing it indoors, it should be placed in a bright place, and cold protection measures should be taken in winter. So how to grow Jerusalem cherry is very simple, just satisfy its growth habits, and for specific requirements let's continue reading below.
2. Cultivation methods and precautions for Jerusalem cherry
1. Pot and soil requirements
How to grow potted Jerusalem cherry? First, of course, is choosing the pot and soil. Although when you buy Jerusalem cherry at a flower shop there are ready-made pots and soil, to grow it well it is very necessary to choose the flower pot and soil yourself again.
Flower pot: just get a pretty one, but note that the size must be appropriate. Soil: although Jerusalem cherry does not have high requirements for soil, to grow it well it is best to choose a fertile, loose, well-draining slightly acidic or neutral soil. When adding soil, you can appropriately add a little base fertilizer to the soil.
2. Light
In the cultivation methods for Jerusalem cherry, light is indispensable. Jerusalem cherry likes light and is not afraid of strong light, so even under the strong sun in summer it can be placed outside.
Precautions: Jerusalem cherry needs sufficient light for growth, at least 4 hours of direct light per day, and no shading is needed; it is best to place it at a bright southeast-facing window or balcony.
3. Temperature
During the growth of Jerusalem cherry, temperature also needs to be adjusted accordingly. Jerusalem cherry likes warmth and tolerates high temperatures; the most suitable growth temperature is between 18-25°C, so to make it grow well, it is best to maintain this temperature range.
Precautions: Jerusalem cherry is not cold-tolerant. When winter temperatures are low, it should be kept indoors for care. And the ambient temperature must not be lower than 5°C, otherwise it will get frostbitten and will not be able to overwinter safely.
4. Watering
How to grow Jerusalem cherry? Watering is naturally indispensable. It is understood that Jerusalem cherry is not drought-tolerant, but it fears waterlogging, so standing water in the pot is taboo. When growing indoors, everyone should water appropriately and just keep the potting soil moist; it should not be too dry or too wet.
Precautions: When Jerusalem cherry is blooming, pay attention to controlling watering to avoid flower and fruit drop. Once the fruit grows to the size of a mung bean, normal watering can be resumed.
5. Fertilizing
Having finished talking about watering, let's talk about fertilizing, which is also very important in the cultivation methods for Jerusalem cherry. Jerusalem cherry likes fertilizer; flower lovers can give it a diluted liquid fertilizer once every half month.
Precautions: Before the flowering period of Jerusalem cherry, it should be given some phosphorus fertilizer, which can make Jerusalem cherry bloom abundantly and bear many fruits.
6. Pests and diseases
During cultivation, beginners often encounter some problems, for example, when temperatures are high, the plant suffers from anthracnose, which harms stems and leaves, and the condition is relatively serious. In addition, due to improper care, Jerusalem cherry can also be attacked by aphids. These will all seriously affect the ornamental value of Jerusalem cherry, so when pests and diseases are found, prevention and control should be carried out immediately; for this, everyone can refer to the pest and disease control for Jerusalem cherry.
Overall, Jerusalem cherry is still quite easy to grow, but to have abundant flowers and fruits, everyone needs to put in more care and pay attention to water and fertilizer, so that Jerusalem cherry can bloom with beautiful flowers. Regarding the cultivation methods for Jerusalem cherry, the editor has introduced them here. Interested flower lovers might as well try growing it. Finally, may everyone's Jerusalem cherry bloom with beautiful flowers.
How to grow Selaginella uncinata? Cultivation methods and precautions for Selaginella uncinata
Called the pioneer on Earth, Selaginella is a plant distributed very widely across the globe. However, as Selaginella uncinata has gone from a wild plant to an ornamental plant grown at home, during the domestication process it may develop dependence on artificial cultivation, so when planting it we also need to adapt to the growth habits of Selaginella uncinata.
How to grow Selaginella uncinata
As a pioneer on Earth, Selaginella uncinata has very strong adaptability; its traces can be found from the tropics to the cold zone. It likes semi-shaded environments and is best grown under scattered light; it likes water, and moist soil is suitable for growth; it can tolerate low temperatures down to -5°C, and its ornamental value is best when air humidity is above 60%.
Cultivation methods and precautions for Selaginella uncinata
1. Soil for Selaginella uncinata
Choose loose peat soil mixed with perlite and vermiculite, keep the potting soil moist, and generally watering once every 2-3 days is enough. When watering, gently pour the water along the flower pot and water thoroughly, avoiding too much force that damages the surface soil structure and affects root growth. In winter, appropriately control water and keep the potting soil slightly moist.
2. Fertilizing Selaginella uncinata
Choosing liquid fertilizer for application is more suitable, but note that the concentration should be halved; during the growing period, fertilize once every two weeks, applying light fertilizer frequently.
3. Temperature for Selaginella uncinata
The suitable growth temperature is 18-28°C, and it grows fastest at around 25°C. In winter keep it above 10°C, and it must not be lower than 5°C. Otherwise it is prone to cold damage.
4. Humidity for Selaginella uncinata
Ferns like warm and humid environments, so air humidity can be appropriately increased by spraying the potted plant, but note that there must absolutely be no standing water on the leaves; some flower lovers report that standing water on the leaf surface can cause the plant's leaves to rot.
5. Sunlight for Selaginella uncinata
Ferns like warm, humid, semi-shaded environments and can be placed in areas with scattered light, such as coffee tables, tabletops and windowsills. Avoid strong direct sun; after receiving light the leaf color becomes more emerald green. But in midsummer pay attention to shading; low air humidity and high temperatures are the main reasons Selaginella uncinata dies in summer.
Cutting propagation of Selaginella uncinata
1. Selecting cuttings
When pruning it every spring, we can use the stems and branches we cut off as cuttings, then process them slightly, and then they can be used for cutting.
2. Cutting
For cutting, first we choose the soil well; generally we choose some relatively loose and fertile soil, then water the soil thoroughly in advance, let it dry a bit, and then we can insert the prepared branches into it. When inserting, be sure not to insert the branches entirely into the soil, otherwise they will not survive. After the cuttings are inserted, we can place them with the pot under strong light and keep the temperature appropriate. In addition, we should water them appropriately. After about 2 weeks, the cuttings will begin to take root, and in this way a new plant will gradually form.
What is Selaginella uncinata
Selaginella is a perennial evergreen herbaceous plant of the Selaginella genus, also called Selaginella martensii, coral selaginella, etc. It is suitable for growing in environments with relative humidity of 70%-90%, scattered light, and moist soil. This primitive and ancient plant was once the earliest life on Earth. It originated in tropical, subtropical, and even cold zones, is extremely widely distributed, and has many varieties. Most tropical varieties are more suitable for indoor cultivation. Its leaves are emerald green and its form is graceful and varied, giving people a fresh and comfortable feeling. It is an indispensable plant for pleasing the eye, beautifying the indoor environment, and freshening and purifying the air.
Selaginella uncinata is a plant that can effectively purify the air, so growing some Selaginella uncinata at home can effectively improve the air quality of our living environment, and at the same time can also help add some green vitality and energy to the household, effectively improving our mood.
How to grow maidenhair fern, cultivation methods and precautions for maidenhair fern
Habits of maidenhair fern: it likes fertile, well-draining calcareous sandy loam soil. For home potting, a mix of loam, leaf mold and river sand can be used. Maidenhair fern originally grows beside flowing streams or on dripping rock walls at an altitude of 100-2800 m, and is an indicator plant of calcareous soil. The suitable growth temperature for maidenhair fern during the day is 21-25°C, and at night 12-15°C. As long as the temperature is above 5°C, the leaves will stay fresh green, but below 5°C the leaves will suffer cold damage. Maidenhair fern likes scattered light and fears direct sun. Indoors it should be placed in a bright place; even if placed there for 1 year it can still grow normally.
How to grow maidenhair fern in water culture (basic method)
Environment: the environment suitable for maidenhair fern survival should be a dark and humid environment. This plant cannot stand cold or drought, and prefers to live in acidic soil, but normally it can also be placed for a short time in a place with scattered sunlight, which can make it grow better.
Soil: in terms of soil, the best combination is mainly a culture soil mixed with half mountain forest soil and half garden soil.
Watering: maidenhair fern very much likes high-humidity environments, so in spring, summer and autumn it should be watered 4-5 times a day, while in winter it can be reduced to 1-2 times, but it still needs frequent spraying to prevent the leaves from becoming too dry. During the growing season, watering must be kept sufficient.
Fertilizing: fertilizing is necessary for maidenhair fern; on average, a thin fertilizer needs to be applied once about every 2 weeks to promote its growth. But grasp the principle of "small amounts, frequent applications"; use a 1000-2000 times diluted solution such as Hyponex.
Temperature: generally speaking, above 5°C the leaves will not show scorched-yellow phenomena, but it also must not exceed 30°C. In water culture, besides controlling the indoor temperature, the water temperature must also be controlled, and the water temperature should be equivalent to room temperature.
Light: be sure to shade it, and avoid direct sunlight; the stronger the light, the better. Placing it in the bathroom and indoors must not exceed 3 days, then move it to the windowsill for 3 days, and pay attention to spraying water, which can ensure the plant grows well.
Humidity: summer weather is often too stuffy and hot, and room ventilation is also not very good. At this time, indoor air humidity should be increased and ventilation strengthened.
Pruning: when the leaf cluster is too dense, scissors can be used to properly prune those old leaves; otherwise the leaves are prone to turning yellow, which hinders ornamentation.
Water culture cultivation of maidenhair fern
First, wash the roots of soil-grown maidenhair fern clean and disinfect with potassium permanganate. Then find a container, add clean water, and match it with a nutrient solution in the appropriate ratio (the nutrient solution can be bought on the market), or fix it at the container mouth or on the water surface with something. Maidenhair fern is suitable for planting on coral stone; directly place the coral stone in water, and after it survives it grows very well.
Precautions for water culture of maidenhair fern: coral stone can be bought at shops in flower and bird markets that make rockeries; there are many styles, so you can choose one. Before using coral stone, it must be soaked in water to remove salt. To make the stone grow moss, it cannot be kept indoors for a long time, and it should appropriately receive sunlight. In water culture, the water should not submerge the head of the maidenhair fern. During maintenance, replenish water in time; water can be changed once every 5-10 days.
Precautions for growing maidenhair fern:
1. Maidenhair fern by nature likes warm, humid and semi-shaded cool environments, and very much dislikes direct sunlight, so it is best to place the plant in a place indoors where sunlight does not reach; after all, too much and too strong light easily causes scorching of the leaf edges.
2. Ferns all grow in humid environments, and for maidenhair fern this is naturally no exception. When cultivating, besides keeping the soil moist, you should also frequently spray water mist on the leaf surface to increase air humidity. When the plant shows yellowing, it is often caused by insufficient humidity. Of course, this may also be caused by cold damage.
3. Every spring it needs repotting once, and at the same time dry leaves and old roots should be pruned away. The potting soil should also be changed to fresh, fertile and loose leaf mold, and it is best to add a small amount of brick crumbs inside.
Four-season care for maidenhair fern
Spring care for maidenhair fern
Maidenhair fern can be repotted every April. Maidenhair fern likes shady and humid environments and fears strong light. In early spring, light can be given in the morning and evening, and it can be placed indoors with bright scattered light. Spring is the growing period for maidenhair fern, so pay attention to water and fertilizer management. Especially when caring for it indoors, attention should be paid to increasing indoor air humidity; suitable air humidity is the key to growing maidenhair fern at home. In addition, once a month you can pour a ferrous sulfate solution to increase the acidity of the soil, which is both beneficial to growth and can make its leaves emerald green.
Summer care for maidenhair fern
In summer maidenhair fern grows normally, but high temperature, hot and dry environments are not conducive to the growth of maidenhair fern. Maidenhair fern should be placed indoors in bright light for care, keep the potting soil moist, water once in the morning and once in the evening, and frequently spray around it to increase air humidity. When the weather is too hot, do not water or fertilize; fertilizing is usually done in the evening, and water the next morning after fertilizing. This is more conducive to the fertilizer effect. Maidenhair fern fears wind, so it should not be placed in front of an electric fan or at an air conditioner outlet. Rooms with air conditioning have lower air humidity, so the number of sprays should be increased.
Autumn care for maidenhair fern
In autumn maidenhair fern grows normally, so pay attention to water and fertilizer management. After temperatures drop in late autumn, attention should be paid to maintaining indoor temperature, gradually reducing the amount of watering so the potting soil stays moist, and gradually moving it to a place with morning and evening light for cultivation. After the temperature drops, do not fertilize anymore.
Winter care for maidenhair fern
Maidenhair fern is not cold-tolerant, and room temperature should be kept above 5°C. Below 5°C maidenhair fern enters a state of growth stagnation, and the leaves are dark green. You can appropriately increase the intensity and duration of morning and evening light (avoid noon light), reduce watering, keep the potting soil on the dry side, and do not fertilize.
If the indoor temperature in winter is on the high side, air humidity will be relatively low, so pay attention to replenishing air humidity.