Bromeliad propagation method: just use a knife to cut and separate the plants
For the bromeliad, 7 parts of its beauty is shown in the flowers, but a bromeliad blooms only once in its lifetime, so we can only admire its beauty once, which is truly a pity. However, propagation provides the conditions; we only need to keep propagating bromeliads, and we can enjoy its beautiful flowers every year. So how do you separate the plants of a bromeliad? Below are the propagation methods for bromeliads; let us take a look together.
I. Four propagation methods for bromeliads
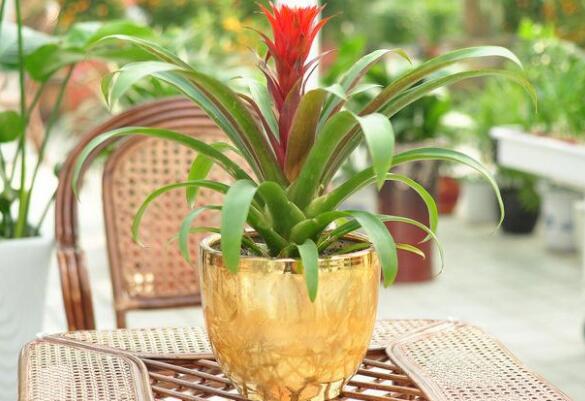
The bromeliad, a flower with a beautiful plant shape and bright flower colors, has strong ornamental value when kept at home and is deeply loved by gardening enthusiasts. Because of the special nature of its flowering, propagation has become very important, and there are mainly 4 propagation methods for bromeliads: cuttings, division, sowing, and tissue culture. Next, let us learn about them in detail.
(1) Bromeliad cutting propagation method
When it comes to flower propagation, the first thing everyone thinks of is naturally cuttings, and bromeliads are no exception. However, in daily life, bromeliad cutting propagation is rarely used; only when the new shoots have not yet grown roots is cutting propagation used. The specific operation method is as follows:
When the new shoots grow to 8-10 cm, gardeners use a sterilized knife to cut them off as cuttings. Then insert the cuttings into the prepared potting soil (a medium of half leaf mold and half coarse sand), keep the indoor temperature at 25-28°C, and after about one month, the new shoots will grow roots.
(2) How to separate the plants of a bromeliad
Division is also one of the propagation methods for bromeliads and is quite common in daily life. Generally speaking, when the new shoots produced by the bromeliad grow to about 10 cm, they are suitable for division. As for how to separate the plants of a bromeliad, the specific operation is as follows:
Dig out the mother plant, then use a sterilized sharp knife to cut off the small plantlets, preferably retaining some old rhizomes. Note: after cutting them off, it is best to soak the plantlets in a fungicide, then dip them in some rooting powder, and then plant them.
(3) Seed propagation
Seed propagation is one of the more commonly used propagation methods for bromeliads, that is, a method of propagation by sowing bromeliad seeds. When sowing, gardeners can choose a mixed soil of river sand, perlite, and peat soil as the medium. If you want a high survival rate from sowing, it is best to disinfect the soil.
When carrying out seed propagation, we should adopt the method of sowing immediately after harvesting, because bromeliad seeds are very small and quickly lose vitality after leaving the mother plant, so they must be sown immediately. The sowing temperature is best between 25-30°C. After sowing, seedlings can emerge in about 4 weeks, and in about 3 to 4 years they can grow into flowering bromeliad plants.
(4) Tissue culture
In addition to the above three methods, tissue culture is also one of the propagation methods for bromeliads, but it is very rare. Method: after disinfecting the shoot-tip tissue of the new shoots, inoculate it on MS medium supplemented with 4 mg/L of 6-benzylaminopurine and 0.1 mg/L of indoleacetic acid (NAA), and adventitious buds can form in 30-40 days.
Morphological characteristics and propagation methods of Cryptanthus; how to cultivate Cryptanthus
Cryptanthus bromelioides, also known as the small-flowered Cryptanthus. The leaves are long elliptic-lanceolate, with relatively long petioles; the leaf surface is greenish-brown with pale green stripes; the scape extends from the leaf axils, and the small flowers are small and white.
Morphological characteristics of Cryptanthus
Perennial evergreen herbaceous plant. The underground part has tuberous rhizomes, and the aboveground part is almost stemless. The leaves grow densely in clusters from the rhizome, with several leaves per cluster, spreading horizontally in a rosette shape. The leaves are hard, with wavy edges and soft spines; the leaves are strap-shaped with acuminate tips, the leaf backs have white scaly material, the mesophyll is thick and leathery, and the surface is greenish-brown. Flowers are bisexual, white, monoecious; the scape is drawn out from the leaf cluster and is short-columnar; the inflorescence is rosette-shaped, with 4 triangular involucral bracts, white and leathery.
Ecological habits of Cryptanthus
It likes a high-temperature, high-humidity, semi-shaded environment, fears direct sunlight, fears waterlogging, is not drought-tolerant, and requires loose, fertile, humus-rich, well-aerated sandy soil.
Propagation methods of Cryptanthus
Cryptanthus is propagated by sowing, cuttings, and division.
Sowing method
Seeds must be obtained through artificial pollination; sow indoors in pots from late April to mid-May in spring. At 25°C, they can germinate in 1-2 weeks, but seedlings grow slowly and can only become mature plants after 3 years.
Cutting method
Cut off the leaf axis growing beside the mother plant from the base, retain the 3 small leaves at the tip, insert it into a sand bed, provide shade for maintenance, maintain relatively high humidity, and at a temperature of about 30°C, it can take root in about 3 weeks, and after 7 weeks the seedlings can be separated.
Division method
This is a commonly used method, carried out in combination with repotting in spring. Separate the suckers among the leaves of the flowering mother plant, cut them with rhizomes, and then plant them. With shade maintenance, they survive very easily. Division propagation is mainly suitable for herbaceous flowers with clumping characteristics.
Division time
It is best to carry it out in early spring (February, March) after the soil thaws.
Division method
Take the mother plant out of the flower pot, shake off excess potting soil, separate the tangled root system as much as possible, and use a sharp knife to split it into two or more plants. Each divided plant must carry a considerable amount of roots, and its leaves should be properly trimmed to help survival.
Potting and disinfection
Soak the divided small plants in a 1500-fold solution of chlorothalonil for five minutes, then take them out and let them dry, and they can be potted. You can also drench the roots with chlorothalonil immediately after potting.
Management after division
After dividing and potting, drench the roots or water once thoroughly. Because its root system is greatly damaged and its water absorption capacity is very weak, it takes about 3-4 weeks to recover and sprout new roots. Therefore, within 3-4 weeks after division, watering should be controlled to avoid root rot. However, the transpiration of its leaves is not affected. In order to maintain the water balance of the leaves, it is necessary to spray the leaf surface 1-3 times a day (spray more when the temperature is high, and spray less or not at all when the temperature is low). Do not apply fertilizer during this period either. After division, also be careful of overly strong sunlight; it is best to place it in a shade shed for maintenance.
Cultivation techniques for Cryptanthus
How to cultivate
Provide shade for maintenance in summer; when placed indoors, it can be put in a place with scattered light by a south-facing window.
The suitable growth temperature is about 30°C. In winter, it can continue to grow normally at about 20°C, and can overwinter safely above 12°C. During the peak growth season, water frequently and spray water on the ground to increase humidity, but do not spray water onto the leaf clusters to prevent leaf rot.
For potted Cryptanthus, use leaf mold or a mixed culture soil of sawdust, coal ash, river sand, and garden soil, and leave ventilated gaps at the bottom of the pot. The aboveground part should be renewed every 2-3 years, removing old leaves and retaining the underground rhizomes. When potting small seedlings, first place a 2-3 cm thick layer of medium at the bottom of the pot, then continue adding medium until about 2-3 cm from the pot rim. The medium used for potting can be selected from one of the following: peat : perlite : ceramsite = 2:2:1; or peat : vermiculite = 1:1; or peat : furnace slag : ceramsite = 2:2:1; sawdust : vermiculite : medium-coarse river sand = 2:2:1. After potting, water once thoroughly and place it in a shaded environment for maintenance.
Cultivation key points
Cryptanthus has a short plant shape, so for newly propagated small seedlings, the pot must be small; a pot with a diameter of 10 cm is enough. The potting soil should be half leaf mold and half sand mixed together. When potting, it is best to place a layer of coal slag or coarse sand at the bottom of the pot, and add a small amount of bone meal or compound fertilizer as a base fertilizer.
Cryptanthus is neither drought-tolerant nor tolerant of waterlogging. If the soil is too dry or the air is too dry, the leaves are prone to curling and shrinking, but if there is too much water and the potting soil stays wet without drying for a long time, it will cause root rot. Therefore, watering should follow the principle of alternating dry and wet, preferring dry over wet; good air permeability should be maintained; in winter, keeping the soil slightly moist is enough; when the air is dry, attention should be paid to spraying water around it to increase air humidity. The suitable growth temperature for Cryptanthus is about 25°C. During the growth period, apply a nitrogen-based fertilizer once every half month. In addition, except in winter when it can receive full sunlight, it should be shaded in the other seasons, with a light transmission rate of 40%-50%.
After 3-5 years of cultivation, Cryptanthus gradually declines in vitality, grows poorly, and may even wither. It is necessary to continuously eliminate and renew it to maintain its growth vitality.
Cultivation and management of Cryptanthus
Temperature management
Because it originates from tropical or subtropical regions and likes high-temperature and high-humidity environments, it has strict requirements for winter temperature. When the temperature is below 3-6°C, it cannot overwinter safely; in summer, when the temperature reaches above 35°C, it can endure it, but growth will be temporarily hindered. The most suitable growth temperature is 18-30°C.
In a growing environment above 34°C, the correct handling methods are: 1. Strengthen air convection as much as possible to help it carry out transpiration and lower its internal temperature; 2. Spray the leaf surface, 2-4 times a day: the higher the temperature, the more times correspondingly. When the temperature is lower or on cloudy and rainy days, spray less or not at all; 3. Spray the ground around it wet, which is very helpful for lowering the ambient temperature around it.
In a growing environment below 6°C, the correct handling methods are: 1. Wrap it with plastic film to overwinter, but uncover the film every two days at noon when the temperature is higher to let it breathe; 2. Move it indoors with heating to overwinter.
Humidity management
It requires the relative air humidity of the growing environment to be above 65%. When the relative air humidity of its growing environment is too low (at this time a person's skin will feel dry and they will easily feel thirsty), for example, when placed in an indoor or air-conditioned environment where doors and windows are often closed, or on a concrete balcony, its branches will droop downward and its leaves will also bend downward. Over time, its entire plant shape will be ruined and lose ornamental value, and at the same time, its growth will also become very weak. When the relative air humidity of its growing environment is too high (above 85% for a long time; at this time people will feel very humid or stuffy and hot), it will cause its leaves to temporarily stop transpiration, and growth will weaken. Over time, this will lead to the occurrence of various diseases. Its favorite relative air humidity is 65%-75%. When the relative air humidity is below 60%, such as in an air-conditioned environment or an unventilated indoor environment, it can be adjusted by spraying the leaf surface, or a dish filled with water can be placed under the flower pot.
Light management
It originally lived in the dappled shade of shrublands from temperate to warm temperate zones or on the northwest side of hillsides, where it could receive partial intermittent direct sunlight every day. In the high-temperature period of summer (daytime temperature above 33°C), if it is placed in direct sunlight for maintenance, it will grow very slowly or enter a semi-dormant state, and the leaves will also be scorched and slowly turn yellow and fall off. Therefore, in the hot summer, it should be shaded from about 50% of the sunlight. In spring, autumn, and winter, because the temperature is not very high, it can appropriately be given direct sunlight to help it carry out photosynthesis and form flower buds and bloom.
Fertilizer and water management
It has high requirements for fertilizer and water, but it is most afraid of indiscriminate fertilization, concentrated fertilizer, and one-sided application of nitrogen, phosphorus, and potassium fertilizers. It is required to follow the fertilization (and watering) principle of "apply dilute fertilizer frequently, use less at a time but more often, and provide complete nutrition."
Spring, summer, and autumn
These three seasons are its peak growth seasons. Fertilizer and water management follows the cycle of "Hua Bao" - "Hua Bao" - clear water - "Hua Bao" - "Hua Bao" - clear water (at least two "Hua Bao" applications must be ensured every week). The interval period is approximately: 1-4 days for outdoor maintenance; shorter intervals on sunny days or during high temperatures, and longer intervals or no watering on cloudy and rainy days or during low temperatures; 2-6 days for indoor maintenance; shorter intervals on sunny days or during high temperatures, and longer intervals or no watering on cloudy and rainy days or during low temperatures. Try to arrange watering in the morning when the temperature is lower. Most notably, when applying fertilizer or watering, the fertilizer water should be poured into the rosette-shaped leaf cup. In summer, water in the morning or evening when the temperature is low, and also spray the plant frequently.
Winter
During the winter dormant period, the main work is to control fertilizer and water. Fertilizer and water management follows the cycle of "Hua Bao" - clear water - clear water - "Hua Bao" - clear water - clear water. The interval period is approximately 7-10 days; shorter intervals on sunny days or during high temperatures, and longer intervals or no watering on cloudy and rainy days or during low temperatures. Try to arrange watering at noon on sunny days when the temperature is higher.
After reading the above introduction to the morphological characteristics and propagation methods of Cryptanthus, do you have a better understanding of the morphological characteristics and propagation methods of Cryptanthus? If you want to know more about Cryptanthus, please continue to follow us.
How to grow Billbergia; four-season care and propagation methods for Billbergia
Billbergia, also known as flame bromeliad, Billbergia, red algae bromeliad, etc., is a perennial evergreen herbaceous plant and also a relatively new indoor ornamental flower. Below, the editor brings you the cultivation methods for Billbergia and the precautions for four-season care of Billbergia.
Basic information about Billbergia
Billbergia (Billbergia pyramidalis), also known as flame bromeliad, Billbergia, red algae bromeliad, water tank bromeliad, and red pen bromeliad, belongs to the Bromeliaceae family, Billbergia genus, and is a perennial evergreen herbaceous plant. It has been introduced and cultivated in China in recent years and is a good indoor foliage plant.
The leaves of Billbergia are broadly lanceolate, acute, with fine serrations at the edges, hard leathery, bright green, and with a thick cuticle and absorptive scales on the surface. The leaves grow in a spiral rosette from the rhizome, with a rosette-shaped base and a tubular center. The leaf tube can hold water without leaking, shaped like a water tower, hence the name "water tower flower." The spike inflorescence is upright, higher than the leaf cluster; the bracts are pink, and the corolla is vermilion, with the petals curling outward and purple edges, mostly blooming in winter and spring.
Cultivation methods for Billbergia
1. Soil: Billbergia does not have high requirements for soil quality. A slightly acidic sandy loam rich in humus and with good drainage and aeration is best, but calcareous soil should be avoided.
2. Sunlight: Billbergia mainly lives in the dappled shade of shrublands or on the northwest side of hillsides, where it can receive partial intermittent direct sunlight every day. Therefore, in summer, if it is placed in direct sunlight for maintenance, it will grow very slowly or enter a semi-dormant state, and the leaves will also be scorched and slowly turn yellow and fall off, so care should be taken to shade 50% of the sunlight. In other seasons, because the temperature is not very high, Billbergia can appropriately be given direct sunlight to help it carry out photosynthesis and form flower buds and bloom.
3. Temperature: Billbergia originates from tropical or subtropical regions and likes high-temperature and high-humidity environments. Therefore, the most suitable growth temperature for Billbergia is 18-30°C. When the summer temperature reaches above 35°C, it can endure it, but growth will be temporarily hindered. However, in winter, when the temperature is below 3-6°C, it cannot overwinter safely.
4. Water: During the peak growth period, Billbergia requires more water, but the potting soil must not be too wet. Normally, in addition to watering to keep the soil moist, the central tube of the Billbergia plant can also be filled with water. In winter, water less, and do not add much water to the central tube either; keeping it moist is enough; normally, spray water around the plant frequently to maintain relatively high environmental humidity, and often wipe the leaf surface with a soft cloth to keep the leaves shiny and clean.
5. Fertilization: It has high requirements for fertilizer and water, but it is most afraid of indiscriminate fertilization, concentrated fertilizer, and one-sided application of nitrogen, phosphorus, and potassium fertilizers. It is required to follow the fertilization (and watering) principle of “apply dilute fertilizer frequently, use less at a time but more often, and provide complete nutrition.”
6. Pests and diseases: Mainly leaf spot disease and viral disease. For leaf spot disease, spray with a 1000-fold solution of 50% thiophanate-methyl wettable powder; for viral disease, spray with 20% moroxydine copper wettable powder, once a week, for 2-3 consecutive sprays.
Four-season care of Billbergia
Billbergia likes warm, humid environments. The suitable growth temperature is 18-28°C, and the culture soil should be loose, fertile, and slightly acidic. At the same time, pay attention to the following technical points:
1. Winter insulation. In winter, it should be placed in a greenhouse; 5-10°C is safe for overwintering, and around 15°C it grows well. For home cultivation, during the day the potted plant should be placed at a south-facing sunny window indoors to fully receive sunlight; in the evening, move the plant away from doors and windows to prevent freezing.
2. Spring repotting. Repotting and soil changing can be carried out in April. The potting soil should preferably be acidic peat soil with good drainage. After repotting, move it to a shade shed outdoors for the summer, and always maintain relatively high air humidity.
3. Summer heat prevention. When the temperature exceeds 30°C in summer, the plant will be in a semi-dormant state. At this time, it should be placed under a shade shed to avoid strong sunlight. At the same time, water should often be sprayed on the ground to increase air humidity and play a role in preventing heat and cooling.
4. Fertilizer and water management. During the spring and autumn growth periods, apply decomposed cake fertilizer water once about every 2 weeks; in autumn before flowering, apply phosphorus fertilizer 1-2 additional times, which can make the flower colors more vivid. Fertilization should be stopped during the hottest days of summer and in severe winter. The potting soil should always be kept moist, and relatively high air humidity should always be maintained, but avoid overly wet potting soil and standing water in the pot to prevent root rot and the death of the whole plant.
Precautions:
Billbergia is a semi-shade flower and requires good ventilation and an acidic sandy loam rich in humus with good drainage and aeration. You can choose leaf mold, moss, and garden soil (sand), mix them, and add a small amount of bone meal as base fertilizer. During the growing season, apply dilute liquid fertilizer once every half month. Before flowering, apply 0.2% monopotassium phosphate 1-2 additional times, and the flower color will be more striking. Fertilization should be stopped during the flowering period, after flowering, and during the dormant period. The suitable growth temperature is 20-28°C. When the summer temperature exceeds 30°C, good ventilation and cooling should be provided. In winter, keep it above 15°C and expose it to more light to promote strong growth.
Propagation methods of Billbergia
1. Division propagation
Division propagation is mainly suitable for herbaceous flowers with clumping characteristics.
Division time: It is best to carry it out in early spring (February, March) after the soil thaws.
Division method: Take the mother plant out of the flower pot, shake off excess potting soil, separate the tangled root system as much as possible, and use a sharp knife to split it into two or more plants. Each divided plant must carry a considerable amount of roots, and its leaves should be properly trimmed to help survival.
Potting and disinfection: Soak the divided small plants in a 1500-fold solution of chlorothalonil for five minutes, then take them out and let them dry, and they can be potted. You can also drench the roots with chlorothalonil immediately after potting.
Management after division: After dividing and potting, drench the roots or water once thoroughly. Because its root system is greatly damaged and its water absorption capacity is very weak, it takes about 3-4 weeks to recover and sprout new roots. Therefore, within 3-4 weeks after division, watering should be controlled to avoid root rot. However, the transpiration of its leaves is not affected. In order to maintain the water balance of the leaves, it is necessary to spray the leaf surface 1-3 times a day (spray more when the temperature is high, and spray less or not at all when the temperature is low). Do not apply fertilizer during this period either. After division, also be careful of overly strong sunlight; it is best to place it in a shade shed for maintenance.
Potting or transplanting: When potting small seedlings, first place a 2-3 cm thick layer of medium at the bottom of the pot, then continue adding medium until about 2-3 cm from the pot rim. The medium used for potting can be selected from one of the following: peat : perlite : ceramsite = 2:2:1; or peat : vermiculite = 1:1; or peat : furnace slag : ceramsite = 2:2:1; sawdust : vermiculite : medium-coarse river sand = 2:2:1. After potting, water once thoroughly and place it in a shaded environment for maintenance.
2. Sucker propagation
Potted Billbergia is commonly propagated by the sucker method, as follows:
① Cultivate suckers. After the plant enters the flowering period each year from September to October, suckers will sprout from the leaf axils at the base of the plant. In winter, the room temperature needs to be kept above 15°C so that the suckers continue to develop and grow.
② Separate the suckers. Wait until the suckers have developed to the same height as the mother plant. At this time, separation can both ensure the survival rate and achieve the result of cutting in spring and blooming in autumn. For separation in a greenhouse, as long as the temperature is 15-30°C and a certain humidity is maintained, it can be done in any season. Outdoor separation is generally carried out in spring in combination with repotting. Method: Cut off the mature and robust suckers from the base of the mother plant with a sharp knife, trim off the relatively long blackened root tips at the base of the suckers, and make the cut smooth to facilitate healing and rooting.
③ Prepare the potting soil. Mix 60% peat soil and 40% garden soil, or mix 1 part leaf mold, 1 part garden soil, half a part barnyard manure soil, and half a part rice husk ash. A fertile, loose, slightly acidic soil is preferable.
④ Plant the suckers. Plant the separated suckers in a pot, keep them moist, avoid strong sunlight, and keep the temperature at 20-30°C. Generally, new roots can sprout in about 20 days.
Billbergia is a relatively new indoor plant. It blooms and is an indoor ornamental flower. The Billbergia flowers it produces are excellent for decorating balconies and halls. However, Billbergia holds a lot of water on it and easily attracts mosquitoes, so everyone should consider this carefully when choosing it.