How to propagate Clivia miniata? Division blooms in 3 years, sowing blooms in 5 years
Clivia miniata is 60% beautiful in its leaves and 40% beautiful in its flowers. It is an extremely ornamental indoor plant that is deeply loved by flower enthusiasts. In daily life, many flower enthusiasts know how to care for Clivia miniata but do not know how it is propagated, which actually takes away a lot of the fun of growing flowers. Buying plants is not as good as propagating them yourself. It is understood that the main propagation methods for Clivia miniata are sowing and division. Let's take a look together.
I. How is Clivia miniata propagated? Sowing/division
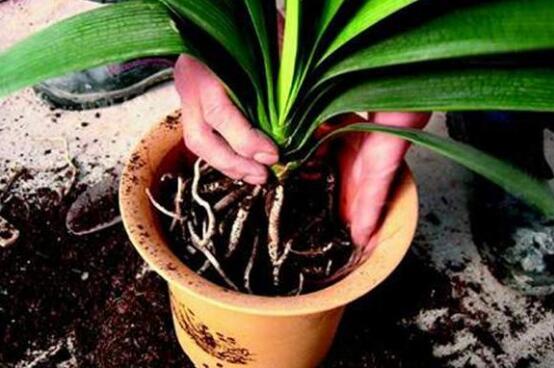
Regarding the propagation methods of Clivia miniata, extensive experiments have proven that there are only two methods with a high survival rate: sowing and division. Among them, division propagation has greater advantages. Not only can you select excellent varieties, but it also only takes 3-4 years to bloom, 2 years earlier than sowing propagation! Of course, besides these two propagation methods, Clivia miniata can also be propagated by cuttings. For details, keep reading below.
(1) Sowing propagation method for Clivia miniata
① Sowing time
Unlike other propagation methods, sowing propagation of Clivia miniata can be carried out in all four seasons, mainly depending on the seed collection time.
② Seed treatment
When the seeds are mature, flower enthusiasts can cut off the scape together with the seeds, place them in a cool and ventilated place for about 10 days, then peel out the seeds and dry them in the sun for one or two days before sowing. After collecting the seeds, it is best to sow them immediately, because the seeds have not yet shriveled and will sprout quickly.
③ Sowing method
After completing the above 2 steps, the sowing propagation of Clivia miniata officially begins. At this point, flower enthusiasts should place the seeds with the rounded back facing up, evenly on the surface of sandy soil and humus soil. Pot soil selection: cover the top with sandy soil, with a soil thickness of one times the diameter of the seed, water thoroughly with a spray bottle, then cover with a piece of transparent glass to maintain the moisture of the covering soil.
④ Environment selection
To achieve a high and fast emergence rate, keep the soil temperature between 20°C and 25°C. Water again when the surface of the covering soil is dry, to prevent excessive watering from causing the seeds to rot. After about 20 days, the radicle can grow out, and after about 3 months, they can be transplanted into separate pots. At this point, the sowing propagation of Clivia miniata is complete. Has everyone learned it?
(2) Division propagation method for Clivia miniata
① Pot soil selection
For division propagation of Clivia miniata, the choice of pot soil is crucial. First is the flowerpot: clay pots with good aeration are best; second is the soil: it must be disinfected. If using humus soil mixed with fine sand, the humus soil should be sprayed and disinfected with a 1000-2000 times aqueous solution of potassium permanganate.
② Division treatment
1. Prepare a small amount of charcoal powder to apply to the wound to absorb moisture and prevent rot; 2. Sharpen the cutting knife, and finally quickly dry-grind it on a whetstone several dozen times, making the blade highly heated to kill pathogens.
③ Offset selection
Selecting offsets: Take the mother plant of Clivia miniata out of the pot, remove the old soil, and find the axillary buds that can be divided. Then use the prepared sharp knife to cut them off. Never forcibly pull them apart, to avoid damaging the young offsets. After the offsets are cut off, immediately apply dry charcoal powder to the wound to absorb the flowing sap and prevent rot. Next, plant the offsets in pots.
④ Division method
When planting, the planting depth should be such that the basal pseudobulb of the offset is buried, with the part near the seedling slightly higher, and cover with disinfected sandy soil. After planting, water thoroughly immediately, and after 2 weeks when the wound has healed, add a layer of potting soil on top. Generally, it takes 1-2 months to grow new roots and 1-2 years to bloom. Propagating Clivia miniata by division has relatively stable heredity and can maintain the various characteristics of the original species.
(3) Cutting propagation method for Clivia miniata
Of course, besides the above two propagation methods, Clivia miniata can also be propagated by cuttings, but the survival rate is very low. However, the method is very simple: prepare a healthy Clivia miniata leaf and insert it into the pot soil. With proper care and a bit of luck, Clivia miniata can take root and survive.
① Environment
The cutting propagation method for Clivia miniata has a low survival rate. To succeed, the choice of environment is important. Temperature: 15-25°C; soil: Clivia miniata prefers fertile, well-drained soil and moist soil, and dislikes excessive water which easily causes root rot. The survival rate of leaf cuttings of Clivia miniata is not high, and rooting is slow, requiring some patience.
② Cutting method
For cutting Clivia miniata leaves, it is best to use half pine needles and half fine sand and gravel, which root very quickly but grow slowly.
③ Cutting rooting
These are the roots grown from Clivia miniata leaf cuttings. Of course, it took several months to grow like this. After Clivia miniata takes root, repot it, and afterward small shoots will grow. When the small shoots also grow up, they will take on a proper appearance, which means the Clivia miniata cutting has succeeded. Interested growers can try it at home themselves~
10 Flowering Plants Suitable for Division Propagation What Is Division Propagation
Floral Bonsai Network introduction: Today the editor will share with everyone an article about 10 flowering plants suitable for division propagation. What is division propagation? Let's take a look.
What is division propagation? Which flowers and trees can be propagated by division?
Propagation by dividing the plant from the mother plant's roots into two or more plants is called division propagation. This propagation method is mostly used for herbaceous flowers with strong suckering ability and clump-forming flowering shrubs.
Whether separating the suckers at the base of the mother plant (such as tree peony, wintersweet, etc.) or splitting a clump of flowers into several clumps (such as orchid, hosta, Chinese peony, Indocalamus leaf, palm grass, etc.), the divided plants must have roots, stems, leaves and other organs to become complete individual plants before it can be called division propagation.
Tree peony
Division propagation of tree peony was already widely adopted in the Ming Dynasty. The specific method is: dig up the entire large, lushly growing tree peony, and separate it from where the root textures intersect. The number of offsets each plant is divided into depends on the size of the original plant; larger ones are divided into more, smaller ones into fewer. Generally, every 3-4 branches form one offset, with a relatively complete root system. Then mix a small amount of sulfur powder with mud. Apply and rub it evenly on the wounds on the roots, and then plant separately. The time for division propagation is from the Autumn Equinox to Frost's Descent each year, and it is best to do it at the appropriate time. At this time, the air temperature and soil temperature are relatively high, and the tree peony is in a semi-dormant state, but there is still a fairly long period of vegetative growth. Carrying out division planting at this time has a not-too-serious effect on root growth, and after division planting, some new roots and a small number of plant buds can still grow. If division planting is too late, root growth that year will be very weak, or no new roots will form, and the following spring the plant will develop even more weakly; weak roots are not drought-tolerant and the plant easily dies. If division is too early, when the air temperature and soil temperature are relatively high, it can still grow rapidly, easily causing autumn growth.
The mother plant for tree peony division is generally a robust clump. On the mother plant used for division propagation, root suckers should be retained as much as possible, and all roots on the new seedlings should be retained, so that after 5 years of growth more new seedlings can be produced. Such seedlings are easy to establish after planting and also grow more vigorously. The more roots retained, the more vigorous the growth.
Division propagation of wintersweet
Carry it out when the leaf buds are just beginning to sprout. First, at the end of the previous year, cut off the tops of all wintersweet branches prepared for division at 20-30 cm above the ground. When dividing, dig out the soil around the mother plant, use a knife to split it into clumps of 2-3 stems each, remove and plant them separately, leaving 2-3 thick, sturdy stems undisturbed in the original spot. The divided wintersweet seedlings are planted with a row spacing of 60 cm x 50 cm. After 2-3 years of cultivation, they can leave the nursery or be divided again for propagation.
Division propagation of orchid
It can be done in both spring and autumn, generally dividing once every three years. Any plant that grows robustly and has densely clustered pseudobulbs can be divided, and after division each clump must retain at least 5 connected pseudobulbs. Before division, reduce watering to make the pot soil relatively dry. When potting after division, first cover the drainage hole at the bottom of the pot with broken tile pieces, then spread coarse gravel to occupy 1/5 to 1/4 of the pot depth, then add coarse-grained soil and a small amount of fine soil, and then plant with sandy loam rich in humus. The planting depth should be such that the pseudobulbs are just buried in the soil, leave a 2 cm rim at the edge of the pot, spread Selaginella uncinata or fine gravel on top, and finally water thoroughly, place in a shady place for 10-15 days, keep the soil moist, gradually reduce watering, and carry out normal care.
Division propagation of hosta
Before sprouting in spring or after the leaves turn yellow in autumn, dig it out, remove the soil at the root zone, and use a knife to cut the underground stem as required. It is best for each clump to have 2-3 pieces of underground stem and retain as many roots as possible, then plant in a pot. This helps survival and does not affect blooming the following year.
Division propagation method for Chinese peony
Division is the most commonly used propagation method for Chinese peony. Seedling production in Chinese peony production areas basically uses this method. It has three advantages: first, it blooms earlier than the sowing method; sown seedlings bloom in 4-5 years, while divided seedlings can bloom the next year; second, the division operation is simple and easy, saves labor in management, and is conducive to wide application; third, it can maintain the excellent traits of the original variety. The disadvantage is that the propagation coefficient is low; a three-year-old mother plant can only be divided into 3-5 offsets, making it difficult to adapt to and meet the needs of modern large-scale production and the continuously rapidly growing domestic and international flower market.
The suitable period for Chinese peony division is generally earlier than that for tree peony. The farming proverb of Heze, "July for Chinese peony, August for tree peony (referring to lunar months)," means that in Heze, Chinese peony can be divided from the end of August until late September (End of Heat to Autumn Equinox). In Yangzhou, division is from late September to early November. After three or four years of growth, divided seedlings can be divided again.
Use a spade to dig a deep hole beside the Chinese peony plant, exposing part of the Chinese peony roots, then use a sharp shovel to cut and divide the Chinese peony plant, minimizing disturbance to the original plant, take out the divided portion, and carry out division planting. The method is the same as above; generally it is appropriate to cut off half of the original plant.
Division propagation method for Indocalamus leaf
Aspidistra is mainly propagated by division. It can be divided in spring when the temperature rises and before new buds have sprouted, in conjunction with repotting. Cut the underground rhizome together with the leaves into several clumps, with each clump having 3-5 leaves, then pot and plant them separately, and place them in a semi-shady environment for care.
Division propagation method for palm grass
Division propagation can be carried out in conjunction with repotting and soil changing in spring. Early spring from March to April is the time for repotting and soil changing. Generally, small plants are repotted and soil-changed once a year, and large plants once every 2-3 years. The commonly used pot soil is 2 parts garden soil, 1 part barnyard manure soil, and 0.5 part each of leaf mold and rice husk ash, mixed for use.
Take the original clump out of the old pot, remove the old mud, but keep some old mud mounds appropriately on the old roots, use mulberry shears to cut apart the root clump of palm grass, and at the same time cut off poorly growing blackened and rotten roots. The cuts should be flat. Each clump should have at least 5-6 stems, or as many as 10-20 stems (determined according to the size of the pot and the number of clumps). Then plant them into the prepared pots. Pad the drainage hole at the bottom of the pot with broken pot pieces to facilitate drainage, put in potting soil, coarse first then fine, until eight-tenths full, and while adding potting soil use small bamboo pieces to press the soil tightly against the roots. Do not plant too deep; keep the original root neck level with the potting soil. After watering thoroughly, place the potted plant in semi-shade for about half a month, and it will then establish.
Division propagation is mostly carried out in early spring or autumn. For example, orchid, dahlia, canna, iris, etc. are all divided in spring. Woody flowering plants such as wintersweet, tree peony, and winter jasmine can be divided in either spring or autumn. As for spider plant, saxifrage, etc. in the greenhouse, small plants produced on runners can be separated and planted at any time.
The division method is relatively simple. For clump-forming flowers and trees such as wintersweet and tree peony, after digging up the plant, divide it into clumps as appropriate according to plant size and amount of suckers; for rose, Lingyun, honeysuckle, etc., just separate rooted branches from beside the mother plant; for dahlia, canna, etc., separate the tuberous roots with buds* or use a knife to divide the rhizome and buds, or the rhizome together with the aboveground part, and then plant; for orchid, Clivia miniata, Phoenix bamboo, palm grass, Indocalamus leaf, Yuejing mountain grass, etc., simply divide into 2-3 clumps when repotting and plant separately.
When propagating by division, note that too many should not be separated from the mother plant at one time; generally 2-3 plants, and the amount of roots on each plant should be appropriate. If there are too many roots, it will affect the growth of the mother plant; if too few roots, it will affect the survival of the new plant. For some precious varieties, consider using sulfur powder or other agents to disinfect the cut surfaces.
The division method produces mature plants quickly, and most can bloom in the same year. But the number propagated is the smallest.
How to propagate Clivia miniata What to do when Clivia miniata leaves turn yellow
There are many kinds of Clivia miniata, and the flower colors are gorgeous. It is an extremely ornamental flower, so many people grow it at home. However, to grow Clivia miniata well, you still need to pay attention to some details. Below, let's talk about how to propagate Clivia miniata and what to do when Clivia miniata leaves turn yellow.
How to propagate Clivia miniata
I. Division propagation
1. Division method: Clivia miniata begins to produce offsets when it grows to two years old, with small Clivia miniata plants growing out around the roots. When the leaves grow to 10-15 cm, use a sharp knife to cut off the small Clivia miniata together with its roots from the mother plant and plant it in a pot. If no root is cut, apply B12 solution to the cut wound (you can also apply sulfur powder or charcoal powder), then plant it in the pot. Spread clean river sand around the roots, and cover the top with a transparent plastic bag. Keep the pot soil at about 50% moisture content, place in a cool place, and new roots can grow in 20-25 days. The advantage of treating with the solution is that it can increase the regeneration ability of root cells, prevent bacterial infection and rot, and promote early new root growth. The advantage of covering with a plastic bag is that it maintains air humidity and soil humidity, promotes root growth, and prevents excessive transpiration from the leaf surface causing leaf wilting.
2. Division time: Division work can be carried out in all four seasons. But spring from February to May and autumn from September to November are most suitable. Small Clivia miniata can only be divided when the leaves have grown to about 10-15 cm. If too small, growth after division is slow; if too large, it affects the growth of the mother plant.
3. Mother plant management: After division, the mother plant should have its care and management strengthened, and wood ash (or sulfur powder) should be applied to the wound of the mother plant. Within one month after division, appropriately control water and increase fertilizer application to promote robust growth.
II. Sowing propagation
1. Sowing time: Sowing Clivia miniata can be carried out at any time throughout the year, mainly depending on the seed collection time (Clivia miniata seeds take about 260 days from pollination to maturity). When the seeds are mature, cut off the scape together with the seeds, place in a cool and ventilated place for about 10 days, then peel out the seeds and dry them in the sun for one or two days before sowing. After collecting the seeds, it is best to sow them immediately, because the seeds have not yet shriveled and will sprout quickly. If for objective reasons they cannot be sown in time, wrap the seeds well in clean gauze and store them in a ventilated, dark, cool place, with the temperature preferably below 15°C. In this environment, they can be stored for 3 months. If stored too long, the emergence rate will continuously decline. Seeds stored for a long time must be soaked in warm water for 24 hours before sowing.
2. Sowing method: Place the seeds with the rounded back facing up, evenly on the surface of sandy soil and humus soil. Cover the top with sandy soil, with a soil thickness of one times the diameter of the seed, water thoroughly with a spray bottle, then cover with a piece of transparent glass to maintain the moisture of the covering soil. To achieve a high and fast emergence rate, place the seed pot in a low-temperature place so that the soil temperature is constantly maintained between 20°C and 25°C. Water again when the surface of the covering soil is dry, to prevent excessive watering from causing the seeds to rot. After about 20 days, the radicle can grow out, and after about 3 months, they can be transplanted into separate pots. If using a 10 cm small flowerpot, 2-3 plants can be transplanted side by side per pot; if using a 15 cm clay pot, 5-7 plants can be transplanted per pot. When two leaves have grown, they can be planted one per pot.
What to do when Clivia miniata leaves turn yellow
I. Temperature
The suitable temperature for Clivia miniata growth is 15-25°C. When the day-night temperature difference is 8-12°C, it is most suitable for Clivia miniata growth. In summer, when the temperature exceeds 30°C for a long time, it enters semi-dormancy. At this time, if the air humidity is below 60%, the leaves of Clivia miniata will become lighter and yellow and even wilt; if the humidity is above 90%, the stems and leaves grow long. To prevent these undesirable phenomena, cooling measures should be taken, then ventilation and light transmission, and humidity control. In winter, when the temperature drops below 8°C, Clivia miniata basically stops growing. If the temperature drops below 6°C, freezing damage will occur, causing the leaf tips and leaf margins to lose green and turn yellow, and even yellow-white necrotic spots to appear.
II. Humidity
Clivia miniata is a moisture-loving plant and has relatively high requirements for the humidity of the growing environment. Its most suitable relative humidity range is 70%-80%. In this humidity environment, Clivia miniata leaves are tender green, the leaf veins are clear, and the leaves are short, wide, and neat, with high ornamental value. If the pot soil is too dry for a long time and the temperature is also high, the leaves easily turn yellow. But long-term excessive watering easily leads to oxygen deficiency, hindering the plant's normal respiration, causing Clivia miniata root rot and even death.
III. Soil and fertilizer
Clivia miniata prefers loose, fertile sandy soil. Soil compaction and insufficient fertilizer supply will make the leaves turn yellow and affect blooming. Generally, fertilizing once in spring and once in autumn within a year is sufficient. Decay-resistant tree leaves must be fermented before use; if not fermented, they easily burn the roots. Clivia miniata must have its soil changed once a year. When the temperature at the care location for Clivia miniata is above 25°C, fertilizer should be appropriately reduced or stopped, to avoid excessive fertilization burning the fleshy roots. If the temperature can be lowered below 20°C, fertilizer can still be applied as usual.
IV. Light
Clivia miniata is a semi-heliophilous flower, liking relatively weak diffused light and not tolerating strong light. Too strong light easily causes sunscald; in mild cases the leaves turn from green to yellow, and in severe cases the leaves dehydrate, dry up, and die. Short-day conditions in winter and spring are more conducive to blooming. Good light is an important condition for ensuring large, brightly colored Clivia miniata flowers. However, if the placement location is too dark and light is insufficient for a long time, the leaves will also lose their luster, the old leaves will become dark green, and the new leaves will become thin and yellow or yellow-green (shade yellowing). At this time, move Clivia miniata to a place with slightly stronger light or supplement the light. Clivia miniata leaves have phototropism, and should be grown facing the light, so as to maintain the shape of forming a line when viewed from the side and a fan when viewed from the front.
V. Ventilation
While the thick fleshy roots of Clivia miniata store sufficient water, they also place higher demands on the soil they depend on for survival. Only nutrient soil with good air permeability, loose texture, and rich humus is suitable for the growth of Clivia miniata's fleshy roots. If Clivia miniata is placed too densely and the surrounding environment is closed, it will hinder air circulation and make the plant thin, weak, yellow, and lean. Therefore, indoor ventilation should be strengthened and excessive placement density should be avoided.
The above is the relevant knowledge about growing Clivia miniata introduced to everyone. Has everyone understood it? For more home knowledge, please stay tuned.