What to Do When Alocasia macrorrhizos Gets Bugs? Pest and Disease Control Methods
Alocasia macrorrhizos, with its large, emerald-green leaves, is a sun-loving houseplant. As flower enthusiasts, I believe everyone is already quite familiar with how to grow Alocasia macrorrhizos. However, during the growing process, improper cultivation or careless maintenance can inevitably lead to pests and diseases. So what should you do when Alocasia macrorrhizos gets bugs? First, flower lovers need to stay calm, then find the cause, and finally address it accordingly. This is exactly what we need to learn about next: pest and disease control for Alocasia macrorrhizos.
I. What to Do When Alocasia macrorrhizos Gets Bugs
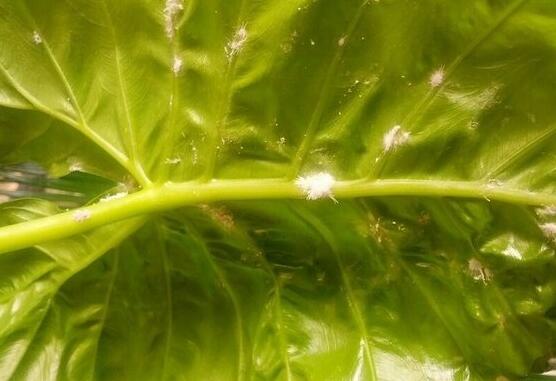
As a common ornamental plant, Alocasia macrorrhizos grows tall and graceful. However, its large size also makes it more susceptible to pest damage. Many flower lovers find that a perfectly healthy Alocasia macrorrhizos becomes sickly after just a few days, with rotten holes all over the leaves, and sometimes small bugs can be seen. This indicates a pest problem. So what should you do when Alocasia macrorrhizos gets bugs? Here are several pests and diseases of Alocasia macrorrhizos along with their control methods. Flower lovers, take note!
II. Pest and Disease Control for Alocasia macrorrhizos
1. Symptoms on the Leaves: Leaf Spot Disease and Anthracnose
Different symptoms on different parts correspond to different diseases. It is understood that if symptoms appear on the leaves, the pests and diseases of Alocasia macrorrhizos are generally of two types: one is leaf spot disease, and the other is anthracnose.
① Leaf Spot Disease
Leaf spot disease, as the name suggests, causes spots on the leaves of Alocasia macrorrhizos affected by this disease.
Solution: Spray the leaf surface with chlorothalonil or carbendazim at 800 times dilution, 2-3 consecutive times, with 7 days between each application.
② Anthracnose
After contracting this disease, the leaves of Alocasia macrorrhizos develop small black or dark brown circular spots, which soon rapidly expand and merge into patches. In 2—3 days, the entire leaf turns black and rots, with large numbers of orange-red sticky granular dots produced on the lesions, namely the fungal acervuli and conidia.
Solution: For anthracnose, spray the leaf surface with 75% thiophanate-methyl at 500 times dilution, once every 7 days, 2-3 consecutive times, which can basically bring it under control. Since Alocasia macrorrhizos is a foliage plant, once the leaves become diseased, it will inevitably affect its ornamental value, so prevention should be the priority.
2. Symptoms on the Stem: Fusarium Wilt
When symptoms appear on the stem, there is a type of fusarium wilt caused by bacterial infection. This disease is not easily detected in its early stages, but once discovered, it is already very serious. If you notice the stem leaning to one side, or wilting spots, it is definitely fusarium wilt.
Solution: You can use a small knife to cut away the diseased parts. The boundary between diseased and healthy tissue is very clear, and generally you can break it off by hand. If the diseased area is less than one-third of the stem, you can apply a layer of chlorothalonil solution to the healthy parts, keep it dry, apply again after ten days, and it can basically heal after 20 days.
4. Symptoms on the Underside of Leaves: Red Spider Mites
The most serious pest problem for Alocasia macrorrhizos is mites, commonly known as red spider mites. Red spider mites generally live on the underside of leaves. They not only suck nutrients from the leaves but also transmit various viruses, greatly affecting plant growth. Therefore, regular inspection is essential, and once discovered, treatment should be immediate.
Solution: It is worth noting that red spider mites have extremely strong reproductive capacity. In summer, they can reproduce one generation in five days. Within ten days, a plant will be basically covered with red spider mites. Therefore, the harm caused by red spider mites cannot be ignored. To protect the normal growth of Alocasia macrorrhizos, red spider mites must be eliminated. Besides using specialized pesticides, another method is to spray with laundry detergent diluted in water.
① Spraying pesticides to prevent and control red spider mite damage. Usually, attention should be paid to observation. When abnormal leaf color is found, the underside of leaves should be carefully checked. If only a few leaves are affected, the infested leaves can be removed. If many leaves are affected, pesticide should be sprayed as early as possible. Commonly used pesticides include propargite, dicofol, dimethoate, huachongjing, fenvalerate, etc.
② Spraying with laundry detergent diluted in water. Laundry detergent is a daily household product whose main ingredient is sodium alkylbenzene sulfonate. The sodium alkylbenzene sulfonate in laundry detergent enters the pest's body through respiration, causing poisoning and death. When applied at 400 times dilution sprayed on the underside of leaves and tender branches, after 1-2 days, the mortality rate of pests such as aphids, whiteflies, red spider mites, inchworms, and slug moths can reach 100%.
5. Root Rot
This means the roots of Alocasia macrorrhizos have completely rotted away. This is mainly caused by the potting soil being too wet. When the potting soil is excessively wet, root and stem rot of Alocasia macrorrhizos is very likely to occur.
Solution: What to do when Alocasia macrorrhizos has root rot? First, keep the water in the container clean. When changing the water or nutrient solution, wash the mucus off the tubers and roots, and cut away the rotten roots.
6. What Disease Causes White Fuzz on Alocasia macrorrhizos?
A flower lover bought a hydroponic Alocasia macrorrhizos on Taobao in early February. Unexpectedly, after having it for five or six days, white fuzz appeared this morning. What should be done?
Solution: Use a knife to cut away the rotten parts cleanly, apply carbendazim or let it dry. This season, there is no need to pot it. Throw it in a dry place and pot it when spring comes. If you must pot it, do not water it.
Alocasia macrorrhizos Growing Tips: What to Do When Alocasia macrorrhizos Leaves Turn Yellow
Under conditions of warm, humid air and sufficient soil moisture, water will drip down from the leaf tips or leaf edges, and its flowers resemble Guanyin, hence the name "Dishuiguanyin" (Dripping Guanyin). Many people are now growing Alocasia macrorrhizos, but what should be done when the leaves turn yellow, and what should we pay attention to during the growing process? Below, we will introduce tips for growing Alocasia macrorrhizos, as well as solutions for yellowing leaves.
Tips for Growing Alocasia macrorrhizos
Since the stem tissue of Alocasia macrorrhizos is relatively loose, poor water quality can easily cause pollution leading to root rot and stem rot. Therefore, the water in the container should be kept clean. At the same time, when changing the water or nutrient solution, wash the mucus off the tubers and roots, and cut away the rotten roots.
Alocasia macrorrhizos is a very common household green potted plant, but because it is a tropical plant, it generally does not bloom in the north. However, if the temperature and other conditions at home are suitable, it will also bloom.
It has low requirements for soil, but grows best in well-drained sandy loam or humus loam containing organic matter. Since Alocasia macrorrhizos naturally prefers warm, humid, and semi-shaded environments and is not cold-tolerant, the potting soil must be kept moist during the growing season.
In summer, the flower pot should be placed in a semi-shaded, ventilated area, and water should be frequently sprayed around it and on the leaf surface to increase air humidity, lower leaf temperature, and keep the leaves clean.
Since Alocasia macrorrhizos grows very quickly, it has relatively high fertilizer requirements. Apply a nitrogen, phosphorus, and potassium compound fertilizer 1-2 times per month (with the nitrogen proportion being appropriately higher). If a little ferrous sulfate can be applied, the leaves will be larger and greener. Long-term fertilizer deficiency can easily cause the lower part of the stem of Alocasia macrorrhizos to become bare, affecting its ornamental value. When the temperature drops and it enters dormancy, fertilizer can be reduced or stopped.
If you want to keep Alocasia macrorrhizos small and compact indoors, simply wait until its seedlings grow to about one chi (approximately 33 cm) and are suitable for home display, then immediately spray the entire plant with a 2% paclobutrazol solution. The stems and leaves that grow afterward will not exceed 40 cm in height, and the leaves will be thick and plump with high ornamental value. Spraying once every six months or so can achieve a good height-control effect. The sap inside the leaves of Alocasia macrorrhizos can cause skin itching upon human contact, so be careful when handling it.
Temperature: Alocasia macrorrhizos can only grow well in environments not below 18°C. If the temperature is below 18°C, Alocasia macrorrhizos will enter a dormant state and stop growing. This is especially important to note for indoor ornamental cultivation.
Fertilizing: Alocasia macrorrhizos likes fertilizer. It should be fertilized every month.
Watering: Alocasia macrorrhizos needs more water in summer, but not excessively. It is suitable to alternate between dry and wet. There should be no standing water in the soil, otherwise the tubers will rot. In winter, it goes dormant, so water less and stop fertilizing.
Sunlight: Alocasia macrorrhizos prefers shade. Do not let direct sunlight hit it. If Alocasia macrorrhizos becomes wilted, it is mainly due to insufficient fertilizing. Pay attention to topdressing.
Winter Care
Alocasia macrorrhizos prefers warm, humid, and slightly shaded environments, but during the flowering period, it needs sufficient sunlight, otherwise the spathe will be greenish, affecting quality. It must receive 3-5 hours of light per day, otherwise the petioles will elongate and affect its ornamental value. Alocasia macrorrhizos is not very cold-tolerant and should be moved into a greenhouse in mid-October. In summer, it needs to be shaded, with frequent water spraying to cool down and maintain humidity.
Alocasia macrorrhizos prefers moist, fertile soil, which is commonly described as needing "heavy fertilizer and heavy water." During the growing period, it needs more water. For topdressing, liquid fertilizers such as decomposed bean cake water can be alternated with chemical fertilizers (compound fertilizer or diammonium phosphate), applied every 2 weeks. When applying liquid fertilizer, never let the fertilizer water pour into the leaf sheaths to avoid rotting. Regarding the use of ferrous sulfate in potted Alocasia macrorrhizos, topdressing with ferrous sulfate can make the leaves larger, thicker, and greener, smooth and glossy, and the petioles less likely to elongate, thus ensuring beautiful leaves. It also promotes flower bud formation and extends the flowering period. The specific method is: dilute ferrous sulfate into a 2% solution and apply it once every month, watering thoroughly each time.
Pest and Disease Control Measures
Diseases of Alocasia macrorrhizos that appear on the leaves are generally of two types: one is leaf spot disease, and the other is anthracnose. For leaf spot disease, chlorothalonil or carbendazim at 800 times dilution can be sprayed on the leaf surface, 2-3 consecutive times, with 7 days between each application. For anthracnose, 75% thiophanate-methyl at 500 times dilution must be sprayed on the leaf surface
, once every 7 days, 2-3 consecutive times, which can basically bring it under control. Since Alocasia macrorrhizos is a foliage plant, once the leaves become diseased, it will inevitably affect its ornamental value, so prevention should be the priority.
When symptoms appear on the stem, there is a type of fusarium wilt caused by bacterial infection. This disease is not easily detected in its early stages, but once discovered, it is already very serious. If you notice the stem leaning to one side, or wilting spots, it is definitely fusarium wilt. You can use a small knife to cut away the diseased parts. The boundary between diseased and healthy tissue is very clear, and generally you can break it off by hand. If the diseased area is less than one-third of the stem, you can apply a layer of chlorothalonil solution to the healthy parts, keep it dry, apply again after ten days, and it can basically heal after 20 days.
The most serious pest problem for Alocasia macrorrhizos is mites, commonly known as red spider mites. Red spider mites generally live on the underside of leaves. They not only suck nutrients from the leaves but also transmit various viruses, seriously affecting plant growth. Therefore, regular inspection is essential, and once discovered, treatment should be immediate. Medications such as mite-killing spray, saomanjing, and imidacloprid can be used for treatment.
What to Do When Alocasia macrorrhizos Leaves Turn Yellow
1. Lighting Issues
Alocasia macrorrhizos needs to grow in a cool environment with light. Long-term lack of adequate light will cause the leaves of Alocasia macrorrhizos to lack chlorophyll, and over time, the leaves will turn yellow. Therefore, pay attention to lighting issues and place it in a well-lit, ventilated area.
2. Insufficient Watering
Alocasia macrorrhizos is quite water-loving. If it is not watered for a long time, the leaves will turn yellow due to drought. Therefore, the soil should be kept moist at all times, and when watering, make sure to water thoroughly, not just wet the soil surface.
3. Insufficient Nutrients
If the soil is too poor and lacks nutrients, it will also cause the leaves to turn yellow. Therefore, it is very necessary to add nutrients to the soil in a timely manner by applying some nitrogen and phosphorus fertilizers and organic fertilizers.
4. Temperature Too Low
Alocasia macrorrhizos is relatively adapted to warm and humid climates. Due to low winter temperatures, if left outside for a long time, the leaves are easily frostbitten and turn yellow. At this time, it should be placed indoors at a constant temperature with sufficient light.
5. Pests
Alocasia macrorrhizos is also prone to insect infestations, especially red spider mites clustering on the leaves, which can cause the leaves to lose nutrients and water and turn yellow. At this time, pesticide sprays can be used for control.
What to Do When Alocasia macrorrhizos Leaves Turn Yellow
6. Excessive Dust
If too much dust accumulates on the leaves, it will block the leaves' light absorption and cause the leaves to turn yellow. Therefore, the leaves should be maintained regularly and can be wiped with clean water.
[Succulents Are So Last Season] Check Out How This One Grows!
[Longan Forest]Longan is actually very easy to grow. When eating longan, why not save the seeds and give it a try. Before soaking longan seeds in water, you need to remove the flesh and white soft tissue from the top cleanly, otherwise it will easily attract insects later.
1. After soaking longan seeds in water for two days, the outer shell has gradually cracked open. The water needs to be changed daily.
2. After about one week of soaking, arrange the seeds with the sprout point facing up, from the outside inward, and plant them in a container.
3. Spray water twice a day, and after one week, they will begin to sprout.
4. After ten or so days, the young shoots begin to "compete for height."
5. After about one month, the small forest has grown. Can you connect it with the longan you ate?
6. The greatest ornamental feature of a potted longan is its color-changing leaves: new leaves are red, then turn yellow, and then turn green.
[Lemon Forest]
1. Soak leftover lemon seeds in water for a bit.
2. Use tweezers to remove the outer shell.
3. Then find a container or cup you like and fill it with moist soil. Arrange all the seeds with the pointed end facing up.
4. Then cover with coarse sand or small pebbles. You can also cover with plastic wrap, spray a little water every 2-3 days, and they will sprout in about one week.
5. After sprouting, also spray a little water every 2-3 days to keep moist and aid growth.
6. This is the finished product. Beautiful, right? Add a touch of green to your office desk or study desk. If it grows this tall and you find it too dense, you can separate a few plants and grow them elsewhere.
[Dragon Fruit Forest]
Ripe dragon fruit has red skin and white or red flesh inside. It is a fleshy berry, with narrow elongated fleshy scale-like segments on the red skin. The flesh contains seeds about the size of sesame seeds, and a single ripe fruit contains approximately a thousand seeds. Just a small amount of seeds separated from dragon fruit flesh is enough to grow a potted plant.
1. Cut the dragon fruit in half and gently scoop the flesh into a container with a stainless steel spoon.
2. Add water to dilute the flesh, then gently rub with your fingers to separate the flesh from the seeds as much as possible.
3. Then pour the mashed flesh into a short stocking, continue rubbing a few times, then soak in water for 1 day. Do not soak for more than two days, otherwise they will sprout. The next day, continue rubbing to squeeze out all the flesh, leaving only the black seeds, which look a bit like black sesame seeds.
4. Lift the stocking to drain the water. You can use toilet paper to absorb the water from the seeds. Take out the seeds and spread them flat on a plate. Use an electric fan to gently blow on them until the seeds are completely dry and separated, then you can start planting.
5-9. Choose a suitable container without drainage holes, or fill the holes of a container that has them. Add sterile potting soil to about nine-tenths full, and spray some water to make the surface soil very moist. Then evenly spread the seeds on the potting soil.
10. After spraying water on the seeds a few times, cover with plastic wrap to keep the surface moist. Then uncover it once a day to spray water, until new sprouts appear, then fully uncover.
Taro is relatively easy to manage, with low requirements for soil, water, fertilizer, and light. It has almost no pests or diseases, a long ornamental period, and edible parts and harvest time are also long. It is very suitable for friends who want to try growing vegetables on a balcony.
The seed taro was edible taro bought from a supermarket. A self-mixed potting soil was used, and no fertilizer was applied after planting. It received only one to two hours of scattered light per day, and sometimes was placed in the living room for several days before being taken out to catch some sun. But it cannot lack water. Water once or twice a day, and also spray water on the leaves and surroundings from time to time. The first pot of taro was planted shortly after the Beginning of Spring, in a white-bottomed blue-flowered porcelain pot with a hole at the bottom, 30 cm in diameter and 26 cm tall. Fill the pot with 2/3 potting soil, place the taro with the sprouts facing up, cover with soil and water. After sprouting, keep moist, and growth is vigorous. The later management focus is watering. Since there is a hole at the bottom, the amount of water each time is limited, so in midsummer, it needs to be watered twice a day. The second pot was planted on June 17, intentionally trying summer planting. It is a pure white polygonal round porcelain pot with no hole at the bottom, using a flower pot originally for growing narcissus, 20 cm in diameter and 16 cm tall. Although the pot is small, since there is no hole at the bottom and taro's characteristic is that it is not afraid of water, it only needs to be watered once a day, simply letting the water cover the soil surface.
[Potato Potted Plant]
When buying potatoes, specifically choose those with many eyes, as these potatoes have a higher sprouting rate. After buying, put them in a plastic bag and let them sprout under natural conditions. Each potato will have several small sprouts, and some have even grown some wildly sprawling white roots. Ah, they are ready to plant!
1. Cut a potato into two to four pieces, each piece must have sprouts, and try to distribute the sprout eyes evenly on each piece;
2. Dig a small hole in a flower pot filled with soil and bury the potato.
3. After planting, level the soil. If too dry, water it.
Images and text from the internet. For more exciting information,
"!
11. After one week, it will cover the entire pot surface, about 1 cm tall. The seed shells will gradually fall off, and the whole pot will feel like green grass, thriving and full of greenery.
12. After two weeks, it grows a bit taller, about 2 cm high. The leaves are denser and thicker, and the color of the two leaves turns yellow-green. It is very suitable for placing in an office or living room, giving a fresh and comfortable feeling.
After about four months, the second layer, like cactus spines, will begin to grow. This is what it looks like after six months, turning into a plump, chubby cactus. Super cute.
[Pomelo Potted Plant]
1. These are the seeds left over from eating pomelo~
2. Use tweezers to remove the outer shell
3. Soak in water for 5-7 days, changing the water every day so it does not smell and the seeds do not rot
4. Find a container or cup you like and fill it with moist soil. Arrange the soaked pomelo seeds in the container with the pointed end facing up.
5. Cover with coarse sand or small pebbles
6. You can also cover with plastic wrap on top. Spray a little water every 2-3 days, and they will sprout in about one week
7. After sprouting, also spray a little water every 2-3 days to keep moist and aid growth
8. This is the finished product. Beautiful, right? Add a touch of green to your office desk or study desk. If it grows this tall and you find it too dense, you can separate a few plants and grow them elsewhere.
Notes:
When peeling, do not damage the inner seed coat. During sprouting, ensure humidity. Do not plant too densely.
[Carrot Potted Plant]
When preparing vegetables, steel yourself and cut off a large piece from the top of a nice, plump carrot, throw it in a water container, and let it grow wildly like this.
Try to grow it in a slender water container so the leaves will shoot straight up relatively tall. Remember to change the water frequently. After growing more leaves, take it out and place it in a suitable decorative container so the shape will be more upright and lively. Otherwise, its leaves will spread apart as they grow, looking listless.
[Taro Potted Plant]
Taro was one of the earliest vegetables grown on the balcony, because taro can be grown both as a vegetable and as an ornamental plant. Its form resembles giant taro and Alocasia macrorrhizos, and it is a beautiful sight placed in the home.