What to Do When the Leaves of the Cat Palm Turn Yellow? Light Fertilizer, Supplemental Water, Shade, and Pest and Disease Prevention
The cat palm (Chamaedorea cataractarum) is a foliage plant native to New South Wales, Australia, later introduced to our country, and today it can be seen in many regions of our country. However, even a highly ornamental plant will lose its overall beauty if its leaves turn yellow, so what should be done when the leaves of the cat palm turn yellow? Let us take a look below.
1. What to Do When the Leaves of the Cat Palm Turn Yellow: Find the Cause
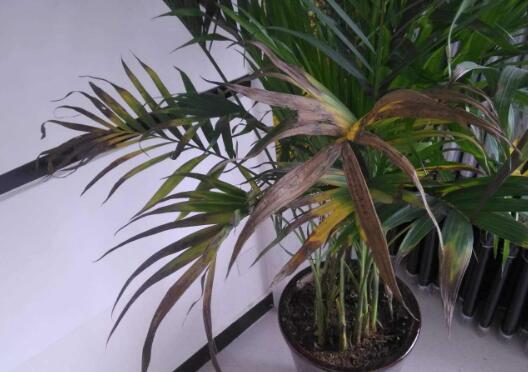
If you want to know what to do when the leaves of the cat palm turn yellow, we must first find the cause of the yellowing, so that we can deal with it in a targeted way. Things like improper watering and fertilizing, and light that is too strong, are all causes of this phenomenon. As for the specific treatment methods, they are described in detail below. Let us take a look.
2. Causes of Yellowing Leaves in the Cat Palm (with Solutions)
1. Improper Fertilizing
Fertilizer is one of the main nutrients in the growth process of the cat palm and is very important, but the frequency and amount of fertilizing still need to be controlled. If fertilizing is too frequent, it is very easy to burn the plant, resulting in the phenomenon of yellowing leaves in the cat palm.
Solution: When we grow the cat palm, during the growing season it is generally enough to fertilize 1-2 times a month, and after late autumn the fertilizing frequency should be reduced. Also, when fertilizing, there is one point we should note: before fertilizing, the fertilizer must first be diluted with water, and do not apply concentrated fertilizer.
2. Improper Watering
The cat palm relatively prefers a warm and humid environment. When we grow it, especially after it enters the growing season, its demand for water is very high. If we always forget to water it and cause the plant to lack water, it will lead to yellowing leaves in the cat palm.
Solution: The cat palm is a water-loving plant. Especially during its peak growing season, we should keep it with sufficient water. When summer temperatures are high, we should also spray its leaves with water at irregular intervals to maintain humidity. However, after entering winter, we should keep the soil on the dry side and water as little as possible, so as not to freeze and damage the plant.
3. Light Too Strong
The cat palm relatively prefers a semi-shaded environment. If we grow it in a place with strong light, it is very easy for it to get sunburned, resulting in the phenomenon of yellowing leaves in the cat palm, so everyone must pay attention in this aspect of light.
Solution: If the yellowing leaves of the cat palm are caused by light that is too strong, we should promptly move it to a semi-shaded spot indoors. After growing it this way for a period, the plant's leaves will slowly turn green again.
4. Pest and Disease Infestation
During the growth process of the cat palm, if we do not care for it carefully enough, problems such as pests and diseases easily appear. This kind of problem is also one of the causes of yellowing leaves in the cat palm, and in severe cases it can also cause the plant to wither and die.
Solution: If this problem is caused by pests and diseases, we must deal with it promptly, because the longer it is delayed, the greater the harm to the plant. For the specific treatment methods, everyone can refer to the article on pest and disease control for the cat palm, which has detailed descriptions.
How to Grow the Parlor Palm: Cultivation Techniques for the Parlor Palm
Everyone surely knows about coconut palms, but how much do you know about the parlor palm? The parlor palm is a plant that relatively loves warm and humid environments. It is also a small evergreen shrub, usually no more than one meter tall, blooms in spring, and its small fruits are orange-yellow in color. Let us learn about it together; perhaps you will fall in love with it.
1. Light: The parlor palm likes semi-shade. Under strong sunlight its leaf color will turn withered yellow; if placed in a place lacking light for a long time, the plant will become thin and elongated. So indoors it is best to place it in a bright spot by a window.
2. Temperature: The parlor palm likes warmth. The suitable growing temperature is 18-24°C, and it enters dormancy at 13°C. In winter it is best not to go below 10°C.
3. Water: The parlor palm likes water. During the growing period, keep the soil moist; during the dormant period, wait until two-thirds of the potting soil is dry before watering. In addition, the parlor palm likes high air humidity. If it is too dry, the leaf tips will turn brown. So during dry periods such as autumn, measures such as frequently spraying water on the leaves should be taken to raise the air humidity around the plant.
4. Fertilizing: During the growing season, apply a compound fertilizer to the plant once a month.
5. Potting Soil: It is best to grow it in loam soil that drains well and is loose and fertile.
6. Propagation: The parlor palm is generally propagated by seeds.
To grow the parlor palm well, you should also pay attention to the following technical issues.
① Beware of scorched edges caused by too much light. Since the parlor palm by nature likes a relatively shaded environment, when grown indoors it should be placed near a north window, an east window, or another place with bright scattered light; the parlor palm fears direct strong light most of all. Even short exposure to the sun will cause the leaves to scorch and the leaf color to turn yellow. Conversely, if it is placed in a too dry and dark place for a long time, the leaf color will also fade and lose its luster.
② Suitable growing temperature. Generally, the most suitable temperature for growth is 20-30°C. In winter the indoor temperature should be between 12-14°C, and the lowest temperature must not be below 10°C.
③ Maintain the surrounding air humidity. It is necessary to frequently spray water on the leaves to increase air humidity.
④ The potting soil must not use acidic soil, and a small amount of clay should also be added.
⑤ Repot once every 3 years.
⑥ During the seedling stage, applying 3-4 times of dilute liquid fertilizer in spring and autumn is enough.
Methods for pest and disease control of the parlor palm.
Under high temperature and high humidity, the parlor palm is prone to brown spot disease. If brown spot disease is found, it should promptly be controlled with 800-1000 times diluted thiophanate or baijunlingqing.
When the air is dry and ventilation is poor, scale insects are also likely to occur. If scale insects are found, besides scraping them off manually, they can also be controlled by spraying with 800-1000 times diluted omethoate.
Cultivation techniques for the parlor palm.
The best cultivation substrate for the parlor palm is well-draining, moist, fertile loam soil. When potting, a substrate made from leaf mold and peat soil plus 1/4 river sand and a small amount of base fertilizer can generally be used. It does not demand much from fertilizer. Generally, during the growing season, apply liquid fertilizer 1-2 times a month, and in late autumn and winter apply a little fertilizer or none at all. Repot once every 2-3 years in spring. Water according to the principle of preferring dry over wet, and just keep the potting soil often moist. When the air is dry in summer and autumn, frequently spray water on the plant to raise the air humidity of the environment, which benefits its growth and at the same time can keep the leaves dark green and glossy; in winter appropriately reduce the amount of watering to help it overwinter. The parlor palm likes semi-shade conditions and fears direct sunlight. Under the blazing sun its leaf color will fade or turn yellow, and scorched leaves and black spots will appear, losing its ornamental value. In addition, under high temperature and high humidity, the parlor palm is prone to brown spot disease. If brown spot disease is found, it should promptly be controlled with 800-1000 times diluted thiophanate or baijunlingqing.
When the air is dry and ventilation is poor, scale insects are also likely to occur. If scale insects are found, besides scraping them off manually, they can also be controlled by spraying with 800-1000 times diluted omethoate. When seedlings grown from seed reach 10 cm in height, they can be transplanted into nutrient pots. The cultivation substrate is peat, perlite, ceramsite, etc. After planting, the first application of nutrient solution should be thorough, until seepage liquid is seen in the tray at the bottom of the pot. For regular supplemental solution, add it once every 10-15 days; replenish water in time according to the moisture condition of the substrate, but do not replenish water on the day of adding solution. Before each water replenishment, first pour out the seepage liquid in the tray. If no disease occurs, it can be reused; otherwise it should be poured out. When there is no seepage liquid in the tray, water should be added promptly. Each time you add solution or water, it is best to use a small spray can for sprinkling irrigation. For large-scale cultivation, sprinkling irrigation facilities can be set up to directly spray nutrient mist. This can both rinse the substrate and at the same time increase the air humidity around the plant, which benefits normal plant growth. From October in winter to February of the following year is the relatively dormant period of the parlor palm (night temperature 12-14°C). The amount of watering should be controlled to prevent symptoms such as root rot, yellow leaves, and necrosis caused by excessively low temperatures. During the winter heating period in northern regions, the room temperature can generally be maintained at 15-20°C or 25°C. At this time the indoor air is dry, so attention should be paid to replenishing water. It is best to spray water on the leaves 1-2 times a day, and the flower pot should not be placed near a stove, radiator, or air conditioner, so as to prevent acute water loss from the leaves, causing dry tips, yellow leaves, or even death. In addition, in winter place the flower pot in a sunny spot indoors to help the plant carry out photosynthesis.
Soilless Cultivation.
The soilless cultivation technique for growing the parlor palm uses an inorganic chemical fertilizer solution, that is, the method of nutrient solution cultivation. The parlor palm prefers a shaded environment and should not be placed near a south window. It should be placed on a north, east, or west windowsill, or a comparable place. In darker places the leaf color grows dark green, and under direct light the leaf color gradually turns yellow-green. Too much strong light can produce scorched leaves and black spots. The most suitable temperature for growth is between 20-30°C, it enters dormancy at 13°C, and in winter it must not be below 10°C. Water according to the principle of preferring wet over dry, and keep the potting soil moist year-round. In winter appropriately reduce the amount of water; it is best to water with cooled boiled water. In summer, clean rainwater may be used. Frequently spray water on the leaves and the surrounding ground to maintain relatively high air humidity.
Management Table.
Growing temperature: between 20-30°C, enters dormancy at 13°C, and in winter must not be below 10°C.
Sunlight: prefers a shaded environment, 60% shade net.
Cultivation substrate: river sand or 1/2 vermiculite + 1/2 perlite
Fertilizing: during the growing period, apply a nutrient solution for hydroponics once every 2-3 weeks. For example, 901 soilless cultivation nutrient solution or Huabao, diluted 1000-1500 times.
Watering: water 2-3 times a day in summer, and control the amount of watering in winter. Wash the fixing substrate every 6-8 weeks, especially in summer. This is to prevent harmful substances from harming the plant. Frequently test the pH value of the nutrient solution; being too alkaline will make the leaves turn yellow. The parlor palm has relatively strong water-absorbing capacity. When the water level drops, promptly replenish water to the specified position.
It is very important to master the management methods for soilless cultivation of the parlor palm. Try to avoid direct sunlight and prevent the nutrient solution from evaporating too quickly; it can be placed in a bright place. After the roots have grown full, remove 1/3 of the roots, and at the same time remove the withered yellow leaves, rinse the substrate, and switch to a flower pot one size larger.
Nutrient Solution.
1. To prepare the nutrient solution, salts that dissolve easily should be used.
2. Mineral nutrient elements should be controlled within 4‰. Control the amount of trace elements used.
3. Promptly measure the pH value of the nutrient solution to maintain the acidity and alkalinity required by the plant.
4. The types of various elements in the nutrient solution vary with different plants and different growing conditions. The parlor palm is called the desk coconut. If it is matched with a plain and elegant container, it appears even more beautiful and unique. Choose a ceramic or glass container with no hole at the bottom or an opening on the side, and it must suit the size of the plant. First spread clean large or medium ceramsite as a fixing substrate, about 2-3 cm thick, then place the plant into the flower pot. Try to let the root system spread out in all directions, then fill it with clean ceramsite, 3-5 cm from the pot rim. Note that during the growing period the roots must be washed clean. Remove the old roots, let the roots spread out, and place them in the center of the flower pot. After transplanting, inject the prepared diluted nutrient solution until it reaches 1/5 of the container's height.
Pre-harvest Management.
The placement density is 6-18 pots per square meter, depending on the size of the plant. The parlor palm likes a slightly moist, on the dry side soil environment. In addition to applying a small amount of leaf mold as base fertilizer at the base of the flower pot when planting, during the vigorous growth stage a thin liquid fertilizer should also be applied once every half month. The parlor palm likes a loosely shaded environment and should avoid direct sunlight. In particular, if a plant that has long been placed in a shaded environment is suddenly placed in a spot with strong direct sunlight, its leaves will be scorched. Just keep the environment properly ventilated. The parlor palm likes a warm environment. Its suitable growing temperature is 16-28°C, and the overwintering temperature should not be below 5°C.
Management and Care.
After being brought out in spring, it should be placed in a shaded spot, avoiding direct sunlight; fairly bright light is enough. When the plant is relatively large, repot it promptly. It has relatively high requirements for environmental humidity, and watering should follow the principle of preferring wet over dry to keep the potting soil moist. When the air is dry, frequently spray water on the plant to increase the air humidity of the environment. This flower and plant does not demand much from fertilizer. From May to October, apply cake fertilizer water twice a month. Seeds should be sown as soon as they are collected. At a temperature of about 25°C, they take about 3 months to germinate. During the seedling stage the parlor palm tillers a lot and should be divided promptly. The plant height should preferably be controlled between 40-60 cm, so fertilizing should not be excessive. Generally, during the seedling stage, applying 3-4 times of dilute liquid fertilizer in spring and autumn is enough; repot once every 2-3 years in spring to facilitate growth.
After reading the above introduction on how to grow the parlor palm and its cultivation techniques, do you have a better understanding of parlor palm cultivation techniques? If you want to know more about the parlor palm, please continue to follow us.
Parlor Palm Chamaedorea elegans Parlor Palm Illustrated Guide: How to Grow the Parlor Palm / How to Propagate the Parlor Palm
Parlor Palm ProfileParlor Palm Chamaedorea elegans
Growing Methods and Precautions for the Parlor Palm Introduction to the Parlor Palm
The parlor palm is a small evergreen shrub, with potted height generally not exceeding 1 meter. Its stem is upright, unbranched, dark green, with irregular markings on it. The leaves generally grow at the top of the stem, pinnately parted, with lanceolate leaflets, alternate, dark green, and glossy. They are 14-22 cm long and 2-3 cm wide; the bases of the top two pinnae are often fused into a fish-tail shape. The young leaves are green, and the old leaves are dark green, with a glossy surface like waxwork. The spadix is axillary, with yellow flowers in small spherical shapes, dioecious. The male inflorescence is slightly upright, and the female inflorescence droops slightly when nutritional conditions are good. The berries are orange-yellow. The flowering period is spring. The leaves are flat and spread out, and mature plants are umbrella-shaped.
The parlor palm (scientific name Chamaedorea elegans), also known as dwarf coconut, parlor palm, and dwarf palm. It belongs to the palm family, genus Chamaedorea, also known as dwarf coconut, etc., and is native to Mexico and Guatemala. In addition, it is shade-tolerant, so it is very suitable as a small to medium indoor potted plant, decorating indoor environments such as living rooms, studies, meeting rooms, and hotel reception desks, and can add a tropical atmosphere and charm to the interior. Placed in a corner of a room or on a coffee table, it can add lively vitality to the interior and give the interior a charming tropical scenery.
Morphological Characteristics of the Parlor Palm
When potted, the parlor palm's plant height does not exceed 1 meter. Its stem is slender and upright, unbranched, dark green, with irregular ring patterns on it. The leaves grow from the top of the stem, are pinnately compound, fully parted, with broadly lanceolate leaflets. There are 20-40 pinnate leaflets, sickle-shaped, dark green, and glossy. The plant blooms in spring, with a spicate inflorescence that is axillary, dioecious. The male flowers are slightly upright, and the female inflorescence droops slightly when nutritional conditions are good. The flowers are yellow and bead-like; the small berries produced are mostly orange-red or yellow.
Plant height 4-5 m, stem slender. Leaves terminal, pinnately compound and arched, with sharp tapering tails and 2 lobes at the tip. Spadix drooping, paniculate, flowers unisexual, monoecious.
The suitable growing temperature for the parlor palm is 20-30°C. It enters dormancy at 13°C, and the overwintering temperature is 10°C.
The parlor palm is a perennial evergreen small shrub of the palm family, genus Chamaedorea, with an upright, solitary, dark green stem that has irregular markings. The leaves are pinnately parted, with lanceolate leaflets, dark green, and glossy. There are about 120 species in the same genus, mainly distributed in the tropical regions of Central America. By nature it likes high temperature, high humidity, and a semi-shaded environment. In plant taxonomy it is an evergreen dwarf shrub or small tree of the palm family, with a small plant size. Its English species name means graceful. Because its plant shape closely resembles a tropical coconut tree and its form is small and exquisite, beautiful and unique, it is named the parlor palm.
Ecological Habits of the Parlor Palm
It likes a warm, humid, and semi-shaded environment. The suitable growing temperature is 20-30°C. It enters dormancy at 13°C, and the lowest winter overwintering temperature is 3°C. The best cultivation substrate for the parlor palm is well-draining, moist, fertile loam soil. When potting, a substrate made from leaf mold and peat soil plus 1/4 river sand and a small amount of base fertilizer can generally be used. It does not demand much from fertilizer. Generally, during the growing season, apply liquid fertilizer 1-2 times a month, and in late autumn and winter apply a little fertilizer or none at all. Repot once every 2-3 years in spring. Water the parlor palm according to the principle of preferring wet over dry, and just keep the potting soil often moist. When the air is dry in summer and autumn, frequently spray water on the plant to raise the air humidity of the environment, which benefits its growth and at the same time can keep the leaves dark green and glossy; in winter appropriately reduce the amount of watering to help it overwinter. The parlor palm likes semi-shade conditions and avoids direct sunlight in hot seasons. Under the blazing sun its leaf color will fade or turn yellow, and scorched leaves and black spots will appear, losing its ornamental value. In addition, under high temperature and high humidity, the parlor palm is prone to brown spot disease. If brown spot disease is found, it should promptly be controlled with 800-1000 times diluted thiophanate or baijunlingqing. When the air is dry and ventilation is poor, scale insects are also likely to occur. If scale insects are found, besides scraping them off manually, they can also be controlled by spraying with 800-1000 times diluted omethoate.
Cultivation Techniques for the Parlor Palm
The best cultivation substrate for the parlor palm is well-draining, moist, fertile loam soil. When potting, a substrate made from leaf mold and peat soil plus 1/4 river sand and a small amount of base fertilizer can generally be used. It does not demand much from fertilizer. Generally, during the growing season, apply liquid fertilizer 1-2 times a month, and in late autumn and winter apply a little fertilizer or none at all. Repot once every 2-3 years in spring. Water according to the principle of preferring dry over wet, and just keep the potting soil often moist. When the air is dry in summer and autumn, frequently spray water on the plant to raise the air humidity of the environment, which benefits its growth and at the same time can keep the leaves dark green and glossy; in winter appropriately reduce the amount of watering to help it overwinter. The parlor palm likes semi-shade conditions and fears direct sunlight. Under the blazing sun its leaf color will fade or turn yellow, and scorched leaves and black spots will appear, losing its ornamental value. In addition, under high temperature and high humidity, the parlor palm is prone to brown spot disease. If brown spot disease is found, it should promptly be controlled with 800-1000 times diluted thiophanate or baijunlingqing. When the air is dry and ventilation is poor, scale insects are also likely to occur. If scale insects are found, besides scraping them off manually, they can also be controlled by spraying with 800-1000 times diluted omethoate. When seedlings grown from seed reach 10 cm in height, they can be transplanted into nutrient pots. The cultivation substrate is peat, perlite, ceramsite, etc. After planting, the first application of nutrient solution should be thorough, until seepage liquid is seen in the tray at the bottom of the pot. For regular supplemental solution, add it once every 10-15 days; replenish water in time according to the moisture condition of the substrate, but do not replenish water on the day of adding solution. Before each water replenishment, first pour out the seepage liquid in the tray. If no disease occurs, it can be reused; otherwise it should be poured out. When there is no seepage liquid in the tray, water should be added promptly. Each time you add solution or water, it is best to use a small spray can for sprinkling irrigation. For large-scale cultivation, sprinkling irrigation facilities can be set up to directly spray nutrient mist. This can both rinse the substrate and at the same time increase the air humidity around the plant, which benefits normal plant growth.
From October in winter to February of the following year is the relatively dormant period of the parlor palm (night temperature 12-14°C). The amount of watering should be controlled to prevent symptoms such as root rot, yellow leaves, and necrosis caused by excessively low temperatures. During the winter heating period in northern regions, the room temperature can generally be maintained at 15-20°C or 25°C. At this time the indoor air is dry, so attention should be paid to replenishing water. It is best to spray water on the leaves 1-2 times a day, and the flower pot should not be placed near a stove, radiator, or air conditioner, so as to prevent acute water loss from the leaves, causing dry tips, yellow leaves, or even death. In addition, in winter place the flower pot in a sunny spot indoors to help the plant carry out photosynthesis.
Soilless Cultivation
The soilless cultivation technique for growing the parlor palm uses an inorganic chemical fertilizer solution, that is, the method of nutrient solution cultivation. The parlor palm prefers a shaded environment and should not be placed near a south window. It should be placed on a north, east, or west windowsill, or a comparable place. In darker places the leaf color grows dark green, and under direct light the leaf color gradually turns yellow-green. Too much strong light can produce scorched leaves and black spots. The most suitable temperature for growth is between 20-30°C, it enters dormancy at 13°C, and in winter it must not be below 10°C.
Water according to the principle of preferring wet over dry, and keep the potting soil moist year-round. In winter appropriately reduce the amount of water; it is best to water with cooled boiled water. In summer, clean rainwater may be used. Frequently spray water on the leaves and the surrounding ground to maintain relatively high air humidity.
Management Table
Growing temperature: between 20-30°C, enters dormancy at 13°C, and in winter must not be below 10°C.
Sunlight: prefers a shaded environment, 60% shade net.
Cultivation substrate: river sand or 1/2 vermiculite + 1/2 perlite
Fertilizing: during the growing period, apply a nutrient solution for hydroponics once every 2-3 weeks. For example, 901 soilless cultivation nutrient solution or Huabao, diluted 1000-1500 times.
Watering: water 2-3 times a day in summer, and control the amount of watering in winter. Wash the fixing substrate every 6-8 weeks, especially in summer. This is to prevent harmful substances from harming the plant. Frequently test the pH value of the nutrient solution; being too alkaline will make the leaves turn yellow. The parlor palm has relatively strong water-absorbing capacity. When the water level drops, promptly replenish water to the specified position.
It is very important to master the management methods for soilless cultivation of the parlor palm. Try to avoid direct sunlight and prevent the nutrient solution from evaporating too quickly; it can be placed in a bright place. After the roots have grown full, remove 1/3 of the roots, and at the same time remove the withered yellow leaves, rinse the substrate, and switch to a flower pot one size larger.
Nutrient Solution
1. To prepare the nutrient solution, salts that dissolve easily should be used.
2. Mineral nutrient elements should be controlled within 4‰. Control the amount of trace elements used.
3. Promptly measure the pH value of the nutrient solution to maintain the acidity and alkalinity required by the plant.
4. The types of various elements in the nutrient solution vary with different plants and different growing conditions.
The parlor palm is called the desk coconut. If it is matched with a plain and elegant container, it appears even more beautiful and unique. Choose a ceramic or glass container with no hole at the bottom or an opening on the side, and it must suit the size of the plant. First spread clean large or medium ceramsite as a fixing substrate, about 2-3 cm thick, then place the plant into the flower pot. Try to let the root system spread out in all directions, then fill it with clean ceramsite, 3-5 cm from the pot rim. Note that during the growing period the roots must be washed clean. Remove the old roots, let the roots spread out, and place them in the center of the flower pot. After transplanting, inject the prepared diluted nutrient solution until it reaches 1/5 of the container's height.
Pre-harvest Management
The placement density is 6-18 pots per square meter, depending on the size of the plant. The parlor palm likes a slightly moist, on the dry side soil environment. In addition to applying a small amount of leaf mold as base fertilizer at the base of the flower pot when planting, during the vigorous growth stage a thin liquid fertilizer should also be applied once every half month. The parlor palm likes a loosely shaded environment and should avoid direct sunlight. In particular, if a plant that has long been placed in a shaded environment is suddenly placed in a spot with strong direct sunlight, its leaves will be scorched. Just keep the environment properly ventilated. The parlor palm likes a warm environment. Its suitable growing temperature is 16-28°C, and the overwintering temperature should not be below 5°C.
Management and Care
After being brought out in spring, it should be placed in a shaded spot, avoiding direct sunlight; fairly bright light is enough. When the plant is relatively large, repot it promptly. It has relatively high requirements for environmental humidity, and watering should follow the principle of preferring wet over dry to keep the potting soil moist. When the air is dry, frequently spray water on the plant to increase the air humidity of the environment. This flower and plant does not demand much from fertilizer. From May to October, apply cake fertilizer water twice a month.
Seeds should be sown as soon as they are collected. At a temperature of about 25°C, they take about 3 months to germinate. During the seedling stage the parlor palm tillers a lot and should be divided promptly. The plant height should preferably be controlled between 40-60 cm, so fertilizing should not be excessive. Generally, during the seedling stage, applying 3-4 times of dilute liquid fertilizer in spring and autumn is enough; repot once every 2-3 years in spring to facilitate growth.
Key Care Points
To grow the parlor palm well, the issues to note include:
Light: The parlor palm likes semi-shade. Under strong sunlight its leaf color will turn withered yellow; if placed in a place lacking light for a long time, the plant will become thin and elongated. So indoors it is best to place it in a bright spot by a window.
Temperature: The parlor palm likes warmth. The suitable growing temperature is 18-24°C, and it enters dormancy at 13°C. In winter it is best not to go below 10°C.
Watering: The parlor palm likes water. During the growing period, keep the soil moist; during the dormant period, wait until two-thirds of the potting soil is dry before watering. In addition, the parlor palm likes high air humidity. If it is too dry, the leaf tips will turn brown. So during dry periods such as autumn, measures such as frequently spraying water on the leaves should be taken to raise the air humidity around the plant.
Fertilizing: During the growing season, apply a compound fertilizer to the plant once a month.
Potting Soil: It is best to grow it in loam soil that drains well and is loose and fertile.
Propagation: The parlor palm is generally propagated by seeds.
Hydroponic Care
1. Avoid direct sunlight, otherwise the leaves will turn withered yellow, but when it is too shady the leaf color will also fade.
2. The parlor palm is at its most beautiful when the plant shape is 30-50 cm; when the plant is too tall, the lower part becomes bare and this reduces its ornamental value. When planting, small plants can be grown below. 3. Obtaining hydroponic material: use the potted root-washing method. After washing with water, new roots can grow in just a few days.
According to current nutrient solution formulations, most plants can be grown hydroponically, but careful care is needed, otherwise it is easy for the flowers to die from nutrition problems! You can refer to turning potted plants into hydroponics [1]
Precautions
To grow the parlor palm well, you should pay attention to the following technical issues:
① Beware of scorched edges caused by too much light. Since the parlor palm by nature likes a relatively shaded environment, when grown indoors it should be placed near a north window, an east window, or another place with bright scattered light; the parlor palm fears direct strong light most of all. Even short exposure to the sun will cause the leaves to scorch and the leaf color to turn yellow. Conversely, if it is placed in a too dry and dark place for a long time, the leaf color will also fade and lose its luster.
② Suitable growing temperature. Generally, the most suitable temperature for growth is 20-30°C. In winter the indoor temperature should be between 12-14°C, and the lowest temperature must not be below 10°C.
③ Maintain the surrounding air humidity. It is necessary to frequently spray water on the leaves to increase air humidity.
④ The potting soil must not use acidic soil, and a small amount of clay should also be added.
⑤ Repot once every 3 years.
⑥ During the seedling stage, applying 3-4 times of dilute liquid fertilizer in spring and autumn is enough.
The parlor palm is also known as dwarf coconut. Its plant shape resembles a tropical coconut tree, evergreen all year round, petite and lovely. Placing one pot indoors can reproduce tropical scenery with plenty of charm. Because the parlor palm's root system is relatively fine, when potting it is advisable to choose loose and fertile cultivation soil; using heavy clay soil easily causes root rot. Because it likes a relatively shaded environment, when grown indoors it should be placed near a north window, an east window, or another place with bright scattered light. The parlor palm fears direct strong light most of all. Even short exposure to the sun will cause the leaves to scorch and the leaf color to turn yellow. Conversely, if it is placed in a too dark place for a long time, the leaf color will also fade and its glossiness will weaken. The suitable growing temperature is 20°C-30°C. In winter the room temperature should be between 12°C-14°C, and the lowest must not be below 10°C. The parlor palm has strong water-absorbing capacity. During the growing period the potting soil needs to be kept moist often, and watering should be controlled during the dormant period. In summer watering should be sufficient, and water should also be frequently sprayed on the leaves to increase air humidity. To meet indoor ornamental needs, the plant height is best controlled between 40 cm and 60 cm, so fertilizing should not be excessive. Generally, during the seedling stage, applying 3-4 times of dilute liquid fertilizer in spring and autumn is enough. The ratio of nitrogen to phosphorus in the fertilizer is best at 1.5:1.2. This ratio can both promote sturdy stems and improve leaf glossiness. Repot once every 2-3 years in spring to facilitate growth. Because the parlor palm is not easy to propagate by cuttings, it is mainly propagated by sowing.
Propagation Methods for the Parlor Palm: Seed Propagation
Selection: Before sowing, the seeds must first be selected. Whether the seeds are chosen well or not directly relates to whether sowing can succeed.
1. It is best to use seeds collected in the current year. The longer the seeds are stored, the lower their germination rate.
2. Choose seeds that are plump and free of damage or deformity.
3. Select seeds free of pests and diseases. Disinfection: Disinfection involves two concepts: one refers to disinfecting the seeds, and the other refers to disinfecting the sowing substrate. For household seed disinfection, it is common to soak the seeds in hot water at about 60°C for a quarter of an hour, then use warm water to promote germination for 12-24 hours. For disinfecting the sowing substrate, the best method is to put it in a pot and heat it by stirring, which will scald any pests and diseases to death.
Germination promotion: Soak the seeds in warm water for 12-24 hours, until the seeds absorb water and swell. For very common seeds that germinate easily, this step can be skipped.
Sowing: For tiny seeds that are difficult to pick up with hands or other tools, you can moisten one end of a toothpick with water and stick the seeds one by one onto the surface of the substrate, then cover with substrate 1 cm thick, then place the sown flower pot into water, with the water depth at 1/2-2/3 of the pot's height, allowing water to slowly soak upward (this method is called the "pot soaking method"); for larger seeds that can be picked up by hand or other tools, place the seeds directly into the substrate and sow them in spots at a spacing of 3 x 5 cm. After sowing, cover with substrate to a thickness of 2-3 times the seed size. After sowing, use a sprayer or a fine-holed watering can to moisten the sowing substrate, and later water again when the pot soil is slightly dry. Still be careful not to water too forcefully, so as not to wash the seeds out;
Management after sowing: After sowing in late autumn, early spring, or winter, when encountering a cold wave with low temperatures, you can wrap the flower pot with plastic film to help keep warm and moist; after the seedlings emerge, promptly uncover the film, and let the seedlings receive sunlight before 9:30 every morning or after 3:30 in the afternoon, otherwise the seedlings will grow very weak and spindly; after most seeds have emerged, appropriate thinning is needed: pull out the diseased and unhealthy seedlings so that the remaining seedlings have a certain amount of space between them; when most seedlings have grown 3 or more leaves, they can be transplanted.
A robustly growing plant can bloom in 3-4 years, and after artificial pollination at flowering it can set seeds; the fruit takes 6-7 months to mature. Sowing is best done immediately after harvest, preferably in spring, choosing plump, large, fresh seeds, washing the berries clean, wiping the seeds, and sowing them directly in a river sand seedbed, using plastic film to keep warm and raise seedlings. The soil should be kept moist, and the temperature should be controlled at 24-26°C. Generally it takes 3-6 months to germinate and emerge. When the seedlings have 3-4 leaves, a light application of decomposed human manure/urine water or 0.3% urea solution can be given, mixed with a small amount of potassium sulfate and applied as a drench to promote robust growth. In the following spring, thinning can be done, and the seedlings can be potted for cultivation and care.
Division propagation
Choose a mixed substrate of peat and perlite, use a plastic flower pot with a diameter of 15 cm to 20 cm, and add ceramic sand granules at the bottom of the pot as a drainage layer. Take a soilless potted miniature coconut palm that is more than one year old, divide it in spring together with repotting, and plant it in the flower pot with the above mixed substrate, with 3 to 4 plants per pot.
From October to February of the following year is the relatively dormant period for the miniature coconut palm. In northern regions, place it indoors in a sunny spot in winter, keeping the temperature at 15°C to 25°C. If the air is dry, spray water on the leaves daily to maintain moisture. When indoor temperatures are low, water less; water again only after the surface layer looks dry, because with low temperatures and too much water, root rot easily occurs. In northern summers, indoor scattered light is suitable for the growth of the miniature coconut palm, but attention should be paid to frequently spraying water on the leaves to maintain moisture.
After planting, the first watering with comprehensive nutrient solution should be thorough, until seepage is seen in the tray. Normally, replenish the solution and water according to routine, but when replenishing the solution, do not replenish water, and keep the substrate moist.
The miniature coconut palm likes a warm and humid environment, and likes to grow in fertile, loose soil with good aggregate structure. The suitable growth temperature is 20-30°C; at 13°C it enters a dormant state, and the overwintering temperature is 10°C. For potting, you can use leaf mold soil, peat soil, or dried pond mud, vegetable garden soil, add 1/4 coarse river sand or coal cinder granules, and add a small amount of decomposed organic fertilizer and a small amount of superphosphate, mix evenly as the culture soil for base fertilizer. For small pots of seedlings, 3 plants are suitable; for medium pots, 5 plants are suitable. After potting, water with settling water, and place in a semi-shaded shed for cultivation. After new leaves emerge, switch to normal management. During the growing period from April to October, apply liquid fertilizer or compound fertilizer 1-2 times a month. The fertilizer should mainly be decomposed peanut bran water, or a compound fertilizer containing nitrogen, phosphorus, and potassium diluted with water and applied as a drench. Every 15-20 days, apply compound fertilizer to promote rapid growth and lush greenness: 5-8 grams for small pots, 10-12 grams for medium pots. The pot soil should preferably be moist; water once only after the pot soil looks dry. Every 10-15 days, spray a solution of 0.2% urea + 0.2% potassium dihydrogen phosphate to promote robust plant growth and deep green leaf color. In late autumn and winter, apply less or no fertilizer. Repotting every 2-3 years in mid-to-late March of spring is suitable. During the growing period, watering should prefer dryness over wetness, and it should be ventilated and cool, which is beneficial to plant growth and can improve disease resistance. Keeping the pot soil moist is sufficient. If there is a lot of rain or excessive watering, the pot soil being too wet can easily cause the lower leaves of the plant to rot and develop disease, leading to the occurrence and spread of black spot disease, causing leaves to turn yellow and even die.
Humidity: Keep the relative humidity of the air at 75-85%. The basic requirement for cuttings to root is that before the cuttings have rooted, it must be ensured that the cuttings remain fresh and tender so they can carry out photosynthesis to produce rooting substances. However, cuttings that have not rooted cannot absorb enough water to maintain their internal water balance. Therefore, misting must be used to reduce water evaporation from the cuttings: under shaded conditions, mist the cuttings 3-5 times a day. The higher the temperature on sunny days, the more times you should mist; the lower the temperature on cloudy and rainy days, the fewer times you should mist, or do not mist at all. But excessive misting makes the cuttings susceptible to infection by pathogens and rot, because many kinds of pathogens exist in water.
Light: It cannot do without sunlight, because the cuttings still need to continue photosynthesis to produce nutrients and rooting substances to supply their rooting needs. However, the stronger the light, the higher the temperature inside the cuttings, the more vigorous the transpiration of the cuttings, and the more water they consume, which is not conducive to the survival of the cuttings. Therefore, after cutting, 50-80% of sunlight must be blocked. After the root system grows out, gradually remove the shade net: on sunny days, remove the shade net at 4:00 every afternoon, and cover it again before 9:00 the next morning.
The miniature coconut palm grows faster in a high-temperature, high-humidity, semi-shaded environment. It is afraid of direct sunlight; under the blazing sun, its leaf color will become lighter or yellow, and scorched leaves and black spots will appear, losing its ornamental value. It is relatively shade-tolerant. During the seedling cultivation period or growing period, especially in summer and autumn, the shade level is generally 60%, but in winter and spring it is better to give brighter scattered light. Placing it indoors for 1-2 months will not have much effect on plant growth and ornamental value, but during the display period attention should be paid to spraying water on the leaves to clean the leaves, making the leaf color deep green, glossy, and bright. Regularly expose it to scattered light and pay attention to fertilizer and water management to improve the ornamental effect.
High temperature, excessive humidity, and poor ventilation easily lead to black spot disease. Especially during the vigorous growth period from April to November, attention must be paid to disease prevention. Once withered and scorched leaf tips are found, promptly spray 50% thiophanate or 50% chlorothalonil at 800-1000 times dilution for control. At the same time, ensure the indoor area is ventilated and cool, breathable, and appropriately increase the application of phosphorus and potassium fertilizers, such as plant ash, to promote robust plant growth. The soil should be well drained, not too dry, and not too wet. During the growing period, the pot soil should remain moist to benefit plant growth and improve disease resistance. Dry air and poor ventilation easily cause scale insect damage. You can spray 40% omethoate at 1000 times dilution or 25% buprofezin wettable powder at 1500-2000 times dilution, or 20% fenvalerate at 1500 times dilution for control. Depending on the insect situation, spray once more after 10-15 days.
Renewal propagation
Advance girdling for callus formation. After late May, keep the stem-tip cutting at a height of 15 cm to 20 cm, then peel off the old leaves below this height completely to expose the stem. Next, use a sharp knife to girdle below a certain stem node on the stem to a width of 0.6 cm to 1 cm, and peel off the stem skin. After that, air-dry for one week to let the wound heal naturally on the mother plant. During this period, mist the leaf surface in the morning and evening to appropriately increase air humidity, and place it in a location with 50% to 70% shading to ensure effective accumulation through photosynthesis.
Timely air layering. One week after the girdling and callus treatment, use plastic film to wrap the girdled area, tie the lower part of the girdle tightly with string, fill it with moderately moist moss mixed with soil, and then tie the upper opening tightly as well. Generally, replenish water about once every 10 days, about 2 to 4 times in total, and rooting can be seen in about one month. After rooting, choose fine weather to cut off the cutting, remove the film, and try to let the roots retain as much moss mixed with soil as possible. After planting, cultivate it in a cool place for a period of time, and then it can be managed normally like the original mother plant. The new plant will bring new vitality.
The role and uses of the miniature coconut palm: household uses
It can simultaneously purify benzene, trichloroethylene, and formaldehyde in the air, and is a "high-efficiency air purifier" among plants. It is very suitable for placement indoors or in newly decorated rooms.
Application value
The miniature coconut palm plant is small and exquisite, with a graceful plant shape, elegant posture, and deep green, glossy leaves. It has strong shade tolerance and is an excellent indoor small-to-medium potted foliage plant. The leaves are flat and spreading, and mature plants are umbrella-shaped, dignified and steady, simple and elegant, with unrestrained leaves, lustrous and crystal-clear, giving people a feeling of sincerity, simplicity, and full vitality. Small plants are suitable for planting in small pots and placing on desks and tabletops as treasures on the stand, and are also suitable for hanging indoors to decorate the space. As a plant, it can be displayed in halls, meeting rooms, airport lounges, and other places. As an important foliage plant for beautifying interiors, it has become popular all over the world.
Pest and disease control of the miniature coconut palm
Common pests and diseases of the miniature coconut palm include the brown soft scale and anthracnose.
1. Brown soft scale. Pest symptoms: leaf color becomes lighter, showing pale spots; in severe cases the plant weakens, affecting growth and losing ornamental value. Control methods: (1) Use the red-spotted ladybird beetle to control pests with pests; (2) When larvae appear in large numbers, spray 40% omethoate at 1000 times dilution once a week.
2. Anthracnose. Disease symptoms: at the beginning of the disease, the leaf tips are blackish brown, and the lesions slowly expand; in the later stage, the leaf lesions merge into one large area. Control methods: (1) Strengthen maintenance, do not bruise the leaves, spray more water to keep the leaves clean; (2) In summer, spray 1% Bordeaux mixture of equal amounts once every 10 days.
In addition, during the high-temperature season, the miniature coconut palm can also suffer from leaf spot disease and root rot, so attention should be paid to ventilation in its growing environment and air permeability of the soil. When necessary, thiophanate and chlorothalonil can be sprayed for control.
Variety classification and similar distinctions of the miniature coconut palm
These two plants are relatively similar in appearance. The specific distinctions are as follows:
(1) Areca palm: The stem is smooth, without hairs or thorns, cylindrical, slightly swollen at the base, up to 3-8 m tall. The leaves are smooth and slender, pinnately divided entirely, with 40-60 pairs of leaflets per leaf, in 2 rows, relatively hard, not drooping, lanceolate, 40-60 cm long, with a long tail-like acuminate tip and unequal short 2-cleft at the apex, bright green. The slender petiole and stem are golden yellow, and the leaf sheath is yellow-green, initially covered with white powder on the upper part, later falling off. The spadix is borne below the leaf sheath bundle, much branched, arranged in a panicle, dioecious, with small golden-yellow flowers. The fruit is top-shaped, purple-black, without an endocarp.
(2) Miniature coconut palm: maximum height 1-3 m; potted plants are mostly about 20-50 cm. The stem is upright, unbranched, and the leaves emerge from the top, pinnately divided entirely, with broad lanceolate leaflets, dark green and glossy. It blooms in spring. The spadix is axillary, dioecious. The male inflorescence is upright, and the female inflorescence droops slightly when nutritional conditions are good. The flowers are yellow and small and spherical. The fruit is orange-red.
Identifying the miniature coconut palm
The miniature coconut palm also has many other names, such as dwarf coconut, miniature palm, miniature areca, and happy palm. It belongs to the genus Chamaedorea in the Arecaceae family and is a perennial evergreen small tree. The plant height is about 1 m, and in warm regions when cultivated in the open ground it can reach more than 2 m. The root system is well developed. The stem is slender and upright, usually solitary, dark green, and has ring marks left by the base of the leaf sheath after the leaves fall off, with the distances between ring marks varying. The leaves are alternate and clustered at the tip of the stem, odd-pinnate and entirely divided, 30-40 cm long, with 20-40 lanceolate leaflets, dark green, leathery. The spadix is much branched and borne in a panicle-like manner. It is monoecious, with male and female flowers in the same inflorescence, and the flowers are yellow. The fruit is nearly round and blue-black when mature. In cultivation it rarely sets fruit.
Miniature coconut palm pictures