How to Propagate the Radermachera sinica? Cutting Survival Rate as High as 100%
As a common indoor potted plant, the Radermachera sinica is not only good-looking, it also carries people's pursuit of happiness. In daily life, many gardening enthusiasts who like the Radermachera sinica keep it at home, but buying one from a flower shop is certainly not as good as propagating it yourself. So how do you propagate the Radermachera sinica? Below are three propagation methods for the Radermachera sinica, among which cuttings are the most convenient. Come and take a look with me!
1. How to Propagate the Radermachera sinica: Cuttings / Seeding / Layering
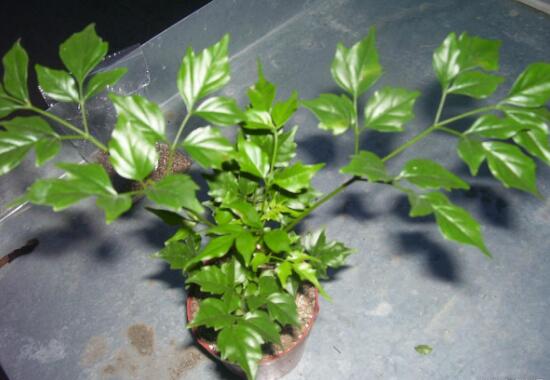
Everyone probably knows about how to grow the Radermachera sinica, but how many people know about its propagation methods? It is said that the Radermachera sinica blooms and bears fruit, so it can be propagated by seeding. In addition, the Radermachera sinica can also be propagated by cuttings and layering, among which cuttings are the most convenient and have the highest survival rate. Let's continue reading for the specific steps.
2. Three Propagation Methods for the Radermachera sinica
(1) Cutting Propagation of the Radermachera sinica
1. Cutting Time
For how to propagate the Radermachera sinica, choosing a reasonable time is very important. Considering the growth temperature of the Radermachera sinica's roots, I recommend choosing March to April for cutting propagation, when the outdoor temperature is around 15°C and the cutting survival rate is high.
2. Selection of Cuttings
After choosing the time, the next step is to select good cuttings, as their quality will directly determine the survival rate of the entire propagation. In March, you can choose 1-2 year old woody branches and cut a 15-20 cm length as the cutting. Then cut off all the leaves on the cutting, with the distance between the cut and the stem node at about 0.5 cm.
3. Starting the Cuttings
After the cuttings are selected, insert them directly into sandy soil (good aeration). The insertion depth should preferably be 1/3 or 1/2 of the branch, because if it is too shallow, the cutting will be difficult to secure, and as a result it will be hard to root after planting.
4. Care After Cutting
For cutting propagation of the Radermachera sinica, the above steps are basically the end of it, and what remains is care. After cutting, water appropriately to keep the soil moist. After 20 days, it will basically have rooted. After that, dig out the entire branch with its soil ball, plant it in a pot, and then care for it normally. If you do the above steps well, the survival rate of the entire cutting propagation can reach 100%!
Judging Rooting: After 20 days, gently pull the Radermachera sinica branch with your hand to check the growth of the root system. If it is relatively firm and hard to pull up, it means it has rooted; otherwise, you still need to wait.
(2) Layering Propagation of the Radermachera sinica
Besides cuttings, layering is another propagation method for the Radermachera sinica, and it is a very labor-saving method. However, layering also has many disadvantages, because once operated improperly, it may result in neither producing a new plant nor allowing the layered branch to grow well. The specific steps are as follows:
1. Layering Time
For choosing layering to propagate the Radermachera sinica, it is best to choose spring, as this is the growing season for the Radermachera sinica, and layering at this time can increase the survival rate. Moreover, layering has another advantage: if layering is unsuccessful, the branch can be cut back in time and regrow.
2. Layering Method
On a clear daytime in spring, choose a two-year-old Radermachera sinica branch and perform girdling at the lower end of the branch, with the girdling width being 2-3 times the diameter. Next, wrap the girdled area with mud and shape it into a mud ball, then wrap the mud ball with plastic film, leaving a small opening at the top for watering. By autumn, relatively complete roots will grow at the girdled area, and at this point it can be cut off and planted separately in a pot.
(3) Seeding Propagation of the Radermachera sinica
The flowering period of the Radermachera sinica is from May to September, and after it finishes blooming it will bear fruit, and after bearing fruit there will be seeds, and with seeds it can be propagated by sowing. So one of the propagation methods for the Radermachera sinica is also seeding. The specific steps are as follows:
1. Seed Selection and Germination
The Radermachera sinica blooms from May to September, and the seeds usually mature around December, at which time the seeds are collected and stored. Then in March of the following year, take out the seeds, soak them in water for 3-4 hours, remove them, and dry them. The seed coat of the Radermachera sinica is not very hard, so do not soak them for too long, lest the soaked seeds rot.
2. Sowing Method
After completing the above steps, evenly sow the treated seeds in the potting soil, keeping a certain distance between each one, and cover with a thin layer of soil. Then cover the flower pot with a protective film to ensure sufficient humidity for seed germination. After the seeds germinate, remove the film and provide appropriate shading. When 4-5 leaves have grown, they can be planted in pots.
Overall, propagating the Radermachera sinica is not difficult, and all three propagation methods are easy to succeed with, but when it comes to survival rate, cuttings are still the best. Of course, methods are fixed while people are flexible, so everyone can choose a method to propagate according to actual conditions. That is all for my introduction to the propagation methods of the Radermachera sinica, and I hope it can be helpful to everyone.
How to Propagate the Cinnamomum kotoense by Cuttings and How to Grow Potted Cinnamomum kotoense
The best season for cutting propagation of the Cinnamomum kotoense is summer. Of course, spring is also acceptable, but the survival rate is higher in summer (22°C to 28°C is the best time for cutting the Cinnamomum kotoense). If conditions permit, it is best to dip it in a little rooting powder, because this will also increase the survival rate.
How to Propagate the Cinnamomum kotoense by Cuttings
Branch selection for the Cinnamomum kotoense: choose relatively robust semi-lignified branches of the current year. At this time, the branches are in the period of transitioning to mature branches, the cells have strong division ability, they easily form callus tissue, and the survival rate is high.
Cutting medium: mix perlite and vermiculite at a ratio of 1:1, then disinfect with a 500-fold carbendazim solution, and it can be used the next day.
The specific operation method for cutting the Cinnamomum kotoense is as follows:
1. Cut the Cinnamomum kotoense branch into 10 cm to 15 cm lengths, leaving 2 to 3 leaves to reduce water loss. Leave 3 cm to 5 cm at the lower end of the cutting and cut it into a slant, then place it in a shady and humid place to wait for cutting.
2. Insert the Cinnamomum kotoense branch into the soil by 2/3 (dipping in rooting agent or powder can be done if conditions permit, and can be skipped if not), then press firm, place it in a shaded place, cover the entire cutting with a plastic bag, maintain 100% humidity, and place it in a cool place, avoiding direct sunlight. During the rooting period, the soil does not need to be too wet. When the medium humidity is high, do not water, but the medium should remain moist, and the relative humidity of the environment should be around 80%. If you water too little, the cutting seedlings will die of drought; if you water too much, it will cause the wound tissue to rot.
3. Remove the plastic bag after about 20 days. After removing the plastic, increase the time of weak sunlight in the morning and evening. Rooting begins after 25 days, and after about one month new roots 1 cm to 2 cm long can grow. After 2 months, roots 5 cm to 6 cm long can grow. If the old leaves do not fall off and new roots are produced, it indicates that the cutting seedling has survived.
How to Grow Potted Cinnamomum kotoense
The Cinnamomum kotoense is a foliage plant. Its flower language is praying for peace, family happiness, and everything going well. It is widely loved by the public because of the name "peace," and its body is rich in cinnamon oil, which can emit a fragrance that corrects odors and purifies the air, making it very suitable for indoor cultivation.
Moderate light: the Cinnamomum kotoense not only likes sunlight but is also very shade-tolerant, but it cannot be placed in direct sunlight, especially in summer when it needs some shading in the sun, preferably shading about 50% of its area, otherwise the sunlight may scorch the leaf surface. In winter, it can be exposed directly to sunlight without shading.
Suitable temperature: the Cinnamomum kotoense likes warmth and heat and is not cold-tolerant. It grows best at 20°C to 30°C. In winter, it is best to move it indoors so that its growing environment is not lower than 5°C. In summer, when the high temperature reaches above 30°C, some protection should also be taken, and water can be sprayed on the leaf surface to lower the temperature.
Correct watering: the Cinnamomum kotoense likes a moist environment and is not drought-tolerant. Its potting soil should be kept relatively moist. In dry weather, spray the leaves with water. In summer, the leaves should be sprayed once a day, and the indoor relative air humidity should be maintained, preferably above 60%. When watering, water once first, then water again after half an hour, which can avoid the appearance of half-watering. The frequency of watering depends on the season; water when the surface soil looks a little dry.
Soil and flower pot: the Cinnamomum kotoense grows better in loose, breathable, organic-rich, fertile acidic leaf mold or culture soil. It needs to be loosened once a month, and the potting soil should be replaced once every two years. The bottom of the flower pot should be breathable and should not be too small, because the Cinnamomum kotoense grows relatively fast, and if it is too small it will hinder its growth.
Fertilizing and pest prevention: fertilize once a month except in winter. Fertilizing in winter may damage the roots and stems. The Cinnamomum kotoense can develop anthracnose, which turns the leaf surface, leaf tips, and leaf margins brown. When discovered, in addition to promptly removing the diseased leaves, increase the application of phosphorus and potassium fertilizers to improve the plant's ability to resist pests and diseases. In addition, aphids and leaf-rolling insects can also endanger the growth of the Cinnamomum kotoense, and should be killed promptly when discovered.
After reading the above introduction on the cutting propagation method of potted Cinnamomum kotoense, do you have a better understanding of cutting propagation of the Cinnamomum kotoense? If you want to know more about the Cinnamomum kotoense, please continue to follow us.
An Introduction to Several Common Propagation Methods for the Radermachera sinica, and Aftercare Following Propagation
The Radermachera sinica: when gardening enthusiasts hear this name, do they feel very happy? Although the plant of the Radermachera sinica is not especially tall, it has luxuriant branches and leaves and is a very good foliage plant. The leaves of the Radermachera sinica sway with the wind, making a rustling sound. Today I will take everyone through an understanding of the propagation methods of the Radermachera sinica.1. Cutting Propagation
1. Cutting Time
Considering the growth temperature of the Radermachera sinica's roots, the cutting time is generally chosen from March to April, when the temperature is around 15°C, the roots can grow relatively quickly, and the survival rate is high.
2. Selection of Branches
Choose 1-2 year old lignified branches, about 15-20 cm long, cut off all the leaves, and keep the distance between the cut and the stem node at about 0.5 cm.
Insert the cut branch directly into sandy soil, with a depth of 1/3 or 1/2 of the branch. If it is too shallow, the branch will not be fixed and it will be difficult to root.
3. Care After Cutting
After cutting, keep the soil moist. After 20 days, gently pull the branch with your hand to check the growth of the root system. If it is relatively firm and hard to pull up, it means it has already rooted. Dig out the entire branch with its soil ball and plant it in a pot. After that, just care for it normally according to the cultivation methods for the Radermachera sinica!
2. Seeding Propagation
1. Selecting Seeds
The seeds of the Radermachera sinica generally mature in December each year. It is recommended not to buy seeds at this time, as beginners who do not know how to store them will find it very difficult to grow the Radermachera sinica.
2. Soaking Seeds to Promote Germination
In early March, purchase plump, dry seeds. Soak the seeds in water for 3-4 hours, remove them, and dry them. The seed coat of the Radermachera sinica is not very hard, so do not soak them for too long, lest the soaked seeds rot.
3. Sowing
Evenly sow the treated seeds in the soil, keeping a certain distance between each one, and cover with a thin layer of soil. Then cover the flower pot with a protective film to ensure sufficient humidity for seed germination.
After the seeds germinate, remove the film and provide appropriate shading. When 4-5 leaves have grown, they can be planted in pots.
3. Layering Propagation
Layering propagation is the most labor-saving method, but its disadvantage is that if layering is improper, it will neither produce a new plant nor allow the layered branch to grow well.
1. Layering Time
Spring each year is the growing season for the Radermachera sinica, and layering at this time can increase the survival rate. In addition, if layering is unsuccessful, the branch can be cut back in time and regrow.
2. Layering Method
Choose a two-year-old branch and perform girdling at the lower end of the branch, with the girdling width being 2-3 times the diameter.
Then wrap the girdled area with mud and shape it into a mud ball with a diameter of 8-10 cm. Then wrap the mud ball with plastic film, leaving a small opening at the top for watering. Then tie the girdled branch against a thick branch to secure it, so as to prevent the branch from breaking and affecting growth.
After three seasons, by autumn, relatively complete roots will grow at the girdled area, and at this point it can be cut off and planted separately in a pot.
The above are several common propagation methods for the Radermachera sinica that I have compiled. I hope it can be helpful to the broad community of gardening enthusiasts, and please continue to follow Succulent Garden to learn more about flower care knowledge.