Propagation Methods for the Cast Iron Plant and Aftercare Tips
The Cast Iron Plant's extremely shade-tolerant nature makes it one of the most popular indoor foliage plants. It is not only easy to grow, but also very simple to propagate. So how do you propagate the Cast Iron Plant so that it survives easily? The answer is division. Below, let's take a detailed look at the propagation methods for growing the Cast Iron Plant.
How to Propagate the Cast Iron Plant
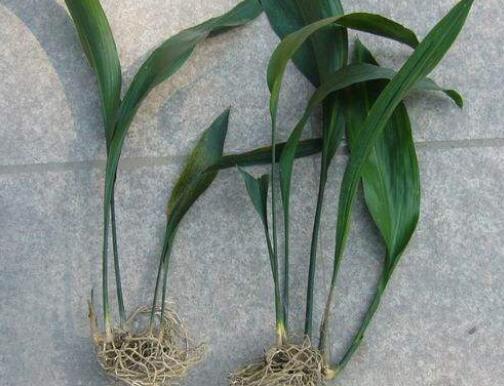
Most plants are generally propagated by division, cuttings, sowing, tissue culture, and so on. The first two are simple to perform and require little skill, so they are used the most. Therefore, the Cast Iron Plant is also generally propagated by division. So when using division, how do you propagate the Cast Iron Plant? The key points are as follows.
Propagation Methods for the Cast Iron Plant
1. Timing for Dividing the Cast Iron Plant
The time is generally chosen for February to March. At this point, temperatures begin to rise again, the soil slowly thaws, and new buds are about to sprout. Division should be carried out before the new buds sprout, so February to March is the most suitable. Any later and it will affect the speed of recovery and growth after propagation.
2. Division Technique for the Cast Iron Plant
Lightly tap the outside of the pot to separate the soil from the pot, then take the mother Cast Iron Plant out of the pot together with the soil. Clear away the excess soil, keeping only the soil around the roots. Use a small knife to cut apart the tangled roots and divide them into several clumps, keeping 2-3 plants per clump.
Properly prune the divided daughter plants, keeping 3-5 new leaves, then cut off the other excess branches and leaves. At the same time, cut away any rotted roots, then place them in a cool spot until needed. This is a detail that cannot be overlooked in the propagation methods for the Cast Iron Plant.
3. Potting and Planting
Replant the daughter plants in the prepared potting soil. During this process, the daughter plants need to be disinfected. If disinfecting before planting, soak the daughter plants in a 1500-times dilution of chlorothalonil solution for 5 minutes; if disinfecting after potting, you can drench the roots with a 1500-times chlorothalonil solution.
Aftercare for the Cast Iron Plant After Propagation
1. Water Thoroughly Once After Potting
Watering is needed after potting. This watering is very important for the Cast Iron Plant because the mother plant's roots suffer some damage during the separation process, and its water-absorbing ability weakens. So ensuring enough water is necessary to help it take root. After that, watering should depend on how moist the soil is. For the method, you can refer to the detailed introduction in How to Water the Cast Iron Plant.
2. Mist the Leaves
Since the roots' ability to absorb water is limited, in order to maintain the water balance of the leaves, you need to mist the leaves about 1-3 times a day. If the location is relatively warm, the frequency should be a little higher. Maintaining higher humidity helps the new leaves sprout.
3. Stop Fertilizing
When using division as the propagation method for the Cast Iron Plant, you must stop fertilizing during the propagation period. You can apply a base fertilizer at the bottom of the soil when potting, but do not fertilize again after potting, because at this time the roots need a period to adapt, and fertilizing may instead cause fertilizer burn.
4. Keep in a Cool Place for Care
After potting, the Cast Iron Plant should be kept in a cool, shaded place for care, not placed in the sun. It generally takes 3-4 weeks to take root. In the sun it may take longer, and it may even affect the survival of the daughter plants after propagation.
How to Propagate the Cast Iron Plant: Points on the Division Propagation Method
The Cast Iron Plant can be propagated by division, and the division process is not difficult. Below is a summary of the steps for division propagation of the Cast Iron Plant to help flower lovers propagate it better.
Division Propagation Method for the Cast Iron Plant 1. Timing of DivisionThe division of the Cast Iron Plant can be done in spring when temperatures rise again. It can generally be combined with repotting, from February to March.
3. Removing from the Pot and DividingFirst, take the mother Cast Iron Plant out of the flower pot, and at the same time shake off the excess potting soil. In addition, flower lovers should separate the tangled root system as much as possible, then use a sharp small knife to cut the Cast Iron Plant apart and divide it into two or more plants.
Remember that each independently divided plant must have roots. At the same time, the leaves of the divided plants need to be properly pruned so that each clump has 3-5 leaves, which is more conducive to survival.
2. Disinfecting the PlantsSoak the divided small plants in a 1500-times dilution of chlorothalonil solution for about five minutes, then take them out and let them dry. Once done, they can be potted and planted.
4. Aftercare After DivisionAfter the Cast Iron Plant is divided and potted, drench the roots or water thoroughly once. Because the root system of the Cast Iron Plant has suffered great damage, its water-absorbing ability is very weak, and it takes about 3-4 weeks to recover and sprout new roots. Therefore, within 3-4 weeks after division, watering needs to be controlled to avoid root rot.
In order to maintain the water balance of the Cast Iron Plant's leaves, it is recommended that flower lovers mist the leaves 1-3 times a day. If the ambient temperature is high, mist a bit more; if the temperature is low, mist less or not at all.
In addition, do not apply fertilizer during this period, and do not expose it to overly strong light. Simply keep it in a shade shed for care.
How to Grow Potted Cast Iron Plant: Propagation Methods for the Cast Iron Plant
The Cast Iron Plant is also known as spider's egg, bamboo-leaf tray, nine-dragon tray, and so on. It is a perennial evergreen herbaceous plant with rhizomes of the genus Aspidistra in the Liliaceae family, with nearly cylindrical rhizomes. It is mainly distributed in the southern provinces and regions of China, as well as Hainan Island, Taiwan, China, and so on. It is suitable for placement in homes and offices, and can be enjoyed on its own or arranged together with other flowering plants. Now let's take a look at how to grow a potted Cast Iron Plant well!
Cultivated Varieties of the Cast Iron Plant
1. Variegated: The variegated Cast Iron Plant is also known as sprinkled-gold spider's egg, variegated spider's egg, star-spotted spider's egg, and so on. It is a cultivated variety of the Cast Iron Plant, with milky white or pale yellow spots on the green leaf surface.
2. Golden Line: The golden-line Cast Iron Plant is also known as golden-veined spider's egg, white-veined spider's egg, and so on. It is a cultivated variety of the Cast Iron Plant, with pale yellow longitudinal line markings on the green leaf surface.
Propagation Methods for the Cast Iron Plant
1. Timing of division: For division propagation of the Cast Iron Plant, it can be done in spring when temperatures rise again and before the new buds have sprouted, combined with repotting. It is generally done in early spring (February, March) after the soil thaws.
2. Division method: Take the mother plant out of the flower pot, shake off the excess potting soil, separate the tangled root system as much as possible, and use a sharp small knife to cut it apart into two or more plants. Each divided plant must have a considerable amount of roots, and its leaves should be properly pruned so that each clump has 3-5 leaves, to help it survive.
3. Potting and disinfection: Soak the divided small plants in a 1500-times dilution of chlorothalonil solution for five minutes, then take them out and let them dry, and they can be potted. You can also drench the roots with chlorothalonil immediately after potting.
4. Aftercare management: After the Cast Iron Plant is divided and potted, drench the roots or water thoroughly once. Because the root system has suffered great damage, its water-absorbing ability is very weak, and it takes about 3-4 weeks to recover and sprout new roots. Therefore, within 3-4 weeks after division, watering should be controlled to avoid root rot. However, the transpiration of its leaves is not affected. In order to maintain the water balance of the leaves, you need to mist the leaves 1-3 times a day. Do not apply fertilizer during this period. After division, also be careful of overly strong sunlight; it is best to keep it in a shade shed for care.
How to Grow a Potted Cast Iron Plant?
1. Soil: The Cast Iron Plant tolerates poor soil and does not have high requirements for soil quality, but it is best to use a well-ventilated, well-drained, slightly acidic sandy soil. When potting, use a shallow pot. For the soil, a mix of peat soil, crushed brick, perlite, charcoal, and so on can be used.
2. Temperature: The Cast Iron Plant mainly prefers a warm environment. Keep the temperature between 7-30°C. In summer during high temperatures, move it to a ventilated, semi-shaded place or one sheltered by a shade shed. In winter, the temperature must not be lower than 0°C, generally 0-3°C.
3. Light: The Cast Iron Plant is shade-tolerant, and in a dark environment it can maintain its form for a long time. However, it is best to regularly let it receive sunlight to promote the development and growth of its new buds. During the growth period of new leaves, try not to place it in a dark place. In summer, do not expose it to strong sunlight; observe the condition of yellow leaves and deal with them promptly. In winter, it should be moved indoors and kept appropriately warm.
4. Watering: The Cast Iron Plant should normally be watered with clean water. During the vigorous growth period, provide enough water, keep it fully moist, and mist the leaves appropriately to promote sprouting. After late autumn, there is no need to water frequently. In winter, you can spray the leaves with a little warm water to clean them and maintain a good appearance.
5. Fertilizing: During spring and summer, apply liquid fertilizer 1-2 times a month on average for the Cast Iron Plant. No fertilizing is needed in winter. For the scorched condition caused by excessive drought, apply a thin liquid fertilizer 1-2 times a month to make the leaves look beautiful. Variegated varieties need only a small amount of fertilizer, to prevent the spots from gradually disappearing.
Pest and Disease Control for the Cast Iron Plant
1. Anthracnose
[Symptoms] On Cast Iron Plant leaves, the disease spots mostly occur at the leaf margins or on the leaf surface. The spots are nearly round, grayish white to grayish brown, with a yellow-brown or red-brown outer edge, and later appear as black small granular dots arranged in rings. Besides the leaves, the petioles and stems also become infected, producing elongated spots. The pathogen overwinters in the soil or on diseased leaf tissue. It spreads via airflow or water splash, causing initial infection and reinfection. In the south there are 2-3 peak periods of disease each year, while in the north there is only 1 peak period. Continuous rain and high rainfall amounts lead to severe disease.
[Control] ① Promptly cut off and burn diseased leaves when found, to reduce the source of infection. ② Before the rainy season arrives, spray 50% Shibaike or Shibaogong wettable powder at 1000 times dilution, or 25% Tanteling wettable powder at 500 times dilution. Once every 10 days, for 3-4 treatments. ③ When necessary, spray 0.5% potassium dihydrogen phosphate or Shuangxiao micronutrient fertilizer at 300 times dilution, which helps enhance disease resistance.
2. Gray Mold
[Symptoms] It often occurs at the leaf margins. Water-soaked spots begin to appear from the leaf margins. When humidity is high, the spots expand very quickly, causing the leaf margins to form irregular-shaped withering, and generally no gray mold layer is seen. But after continuous overcast rain, with high humidity and long duration, sparse gray mold can grow. The gray mold pathogen lives saprophytically as mycelium in diseased plant residues, continuously producing conidia for reinfection. The sclerotia survive for a relatively long period, and when suitable conditions are encountered they grow hyphae and directly invade, or spread via rain splash or along with diseased residues, water flow, farm tools, and so on. Under conditions of high humidity and a temperature of around 20°C, the disease is prone to becoming epidemic.
[Control] ① Careful cultivation. Choose a moist, well-drained, semi-shaded environment for planting. The Cast Iron Plant is a shade-tolerant plant, and the light should not be too strong, otherwise it will cause leaf yellowing or disease. Too much watering, especially in winter, will cause root rot and also leaf yellowing. ② If scattered diseased plants are found, spray 65% Jiameiling wettable powder at 1000 times dilution or 50% Sukeiling wettable powder at 1500 times dilution, 50% Puhaiyin wettable powder, or 50% Nongliling wettable powder at 1000 times dilution. ③ For Cast Iron Plants kept in a shed or room, you can raise the nighttime temperature of the shed or room, increase ventilation time during the day, and reduce the humidity inside the shed and the duration of fog formation, thereby achieving disease control.
3. Leaf Spot
[Symptoms] Leaf spot is also called black spot, brown spot, and so on. First, black spots appear in the middle of the leaves, then the leaf color turns yellow and they fall off. The cause is mostly a stuffy, unventilated, and humid environment.
[Control] Pay attention to improving environmental conditions. At the early stage of the disease, you can remove the affected leaves and burn them. You can spray 1% Bordeaux mixture for control, once every 7 days, for a total of 4-5 sprays over the whole growth period, or spray 50% carbendazim at 1000 times dilution for control.
4. Scale Insects
[Symptoms] They are prone to occur in summer when ventilation is poor, mainly harming the stems and leaves of the Cast Iron Plant.
[Control] When placing it for a long time, keep it ventilated and exposed to light to reduce the incidence rate. If scale insect damage is found, promptly apply aldicarb to the roots. Generally, for a flower pot with a diameter of 20 cm, apply 3-5 grams of domestic 5% aldicarb per pot, and water promptly after burying it. Results can be seen after 1 week.