How to Propagate Caladium? Detailed Guide to Division and Bulb Separation Methods
I. How to Propagate Caladium: Division / Bulb Separation
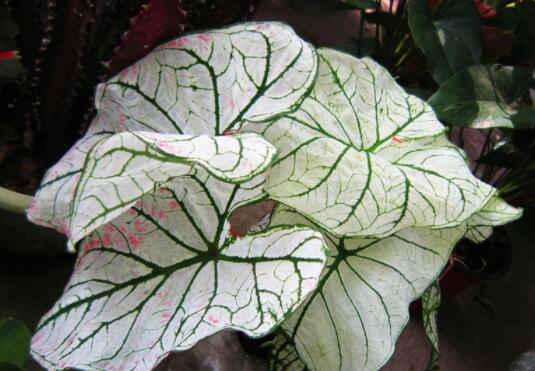
When it comes to how to propagate caladium, there are mainly two methods: division propagation and bulb separation propagation. As long as they are done properly, both methods have a relatively high survival rate. As for how to carry out each method specifically, there are detailed instructions below. Let's take a look.
II. Propagation Methods for Caladium
Division Propagation
When we carry out division propagation of caladium, it is generally combined with repotting. When repotting, we can take out the tubers of the caladium, then place them in a well-ventilated area to dry. After they dry, they can be potted up.
Before dividing, we first need to choose the soil. Caladium prefers to grow in loose leaf mold or peat soil, because these types of soil have good drainage and aeration, allowing it to grow better. It is best not to choose soil that is too dry or too wet, as both are unfavorable for its growth. If the humidity is too high, it can easily cause the rhizomes to rot.
When dividing, we first need to cut the large tubers. When cutting, try to ensure that every piece of tuber has a growth bud, so that we can ensure rapid sprouting after planting. One thing to note here is that the tool used for cutting the tubers must be disinfected before use, to avoid carrying bacteria that could infect the plant.
Bulb Separation Propagation
When we carry out bulb separation propagation of caladium, it is generally best to do it in spring, because the climate in this season is more suitable, allowing the caladium to grow better, and the care after propagation is also easier.
Compared to division propagation, bulb separation propagation is relatively simple. First, we need to use a disinfected tool to separate the small bulbs growing near the caladium, then place them in a cool place to dry in the shade. After about one day, they can be planted.
The bulbs can also be cut before planting, but when doing so, try to make the cut surface as smooth as possible, as this is more beneficial for the bulbs to sprout. After cutting, we can place the prepared bulbs in a container, fill it with the prepared soil, and then wait for them to sprout.
How to Divide and Propagate Caladium
Time for Dividing Caladium
Division can be done year-round, but it is most suitable after winter dormancy and before the tubers sprout in spring from April to May.
Potting Soil for Dividing Caladium
For the potting soil, it is best to use leaf mold mixed with decomposed chicken manure and bone meal, water thoroughly, then place in a dark place. After seedlings emerge, move to a semi-shaded area for care, and be sure to maintain the surrounding air humidity.
Division Method for Caladium
Use a sharp knife to cut the tubers into small tubers. Each small tuber must have one or two growth buds. At the same time, apply wood ash or sulfur powder to the wounds, then place them in a cool place to dry for a few days. After the wounds dry, pot them up and plant. In addition, we can also carry out sprouting treatment before planting, so that the sprouts grow more uniformly. Now let's look at tuber planting. There are mainly two methods. One is to plant the tuber with the front side facing up, which makes it sprout faster, but this also causes the main bud to grow particularly rapidly, resulting in uneven growth overall, some fast and some slow. The other is to plant the tuber with the back side facing up. Although this method sprouts slowly, it produces more sprouts and the growth is more balanced, without appearing uneven.
Management After Dividing Caladium
After the tubers are planted, watering should be controlled until they take root. The room temperature should preferably be kept above 20°C, otherwise the newly planted tubers may easily become damp, making it difficult for them to sprout and ultimately leading to rot and death.
The above is the main content on division propagation of caladium. We hope everyone can master this propagation method.
Caladium Caladium hortulanum Caladium Illustrated Guide: How to Grow Caladium / How to Propagate Caladium
Caladium ProfileCaladium Caladium hortulanum
Caladium Cultivation Methods and Precautions Caladium Introduction
Caladium, perennial herbaceous plant. With tubers, plant height 15-40 cm, with tubers, flattened spherical, with membranous scale leaves. Leaves basal, leaf blades peltate, arrow-shaped ovate, ovate-triangular to round-ovate. Not only are the leaves large, but the leaf color is bright, with high ornamental value. It is a recently popular indoor foliage plant.
Morphological Characteristics of Caladium
Length 8-20 cm, width 5-10 cm; leaf blades textured, dark green, leaf surface with various transparent or opaque spots in red, white or yellow; main veins trichotomous, lateral veins reticulate; petioles slender, cylindrical, base expanded into a sheath, with small brown spots. Spadix inflorescence basal, peduncle 10-13 cm long; spathe lower part tubular, about 3 cm long, green outside, greenish-white inside, base purplish-blue; limb about 5 cm long, white; spadix slightly shorter than spathe, with short stalk; flowers unisexual, without perianth; female flowers born on the lower part of the inflorescence, male flowers on the upper part, separated in the middle by sterile neutral flowers; neutral flowers with staminodes, berries white; flowering period 4-5 months.
Ecological Habits of Caladium
Caladium prefers high temperature, high humidity and semi-shaded environments, and is not cold-tolerant. The growing period is from June to October, with an optimum temperature of 21-27°C; from October to June of the following year is the tuber dormancy period, with an optimum temperature of 18-24°C. During the growing period, if the temperature is below 18°C, the leaves grow without standing upright, and new leaves have difficulty sprouting. If the temperature is above 30°C, new leaves sprout quickly, the leaves become soft and thin, and the foliage viewing period is shortened. During the tuber dormancy period, if the room temperature is below 15°C, the tubers are highly prone to rot. The soil should be fertile, loose and well-drained leaf mold or peat soil. Soil that is too wet or too dry is unfavorable for caladium leaf growth, and tubers with excessive moisture are prone to rot.
Caladium prefers scattered light and should not be exposed to excessively strong light. Direct sun exposure can easily cause leaf scorching, blurred leaf color, dim veins, and poor ornamental value. If the light is insufficient, the leaf variegation becomes darker, and the leaves grow leggy and appear weak. If the shading time is too long, the leaves become soft, the petioles elongate, the leaf color becomes dull, and the petioles break easily.
Light: Prefers sunlight, but not excessively strong. If the light is insufficient, the leaf variegation becomes darker, and the leaves grow leggy and appear weak.
Water: Prefers moisture. In spring and summer, a large amount of watering is needed.
Temperature: Not cold-tolerant. The optimum growing temperature is 25-30°C, and the minimum should not be below 15°C. At 22°C the tubers sprout and grow leaves, and when it drops to 12°C, the leaves turn yellow and wither.
Fertilizer: During the growing period, fertilize once a week, with a combination of nitrogen, phosphorus and potassium, mainly nitrogen fertilizer.
Soil: Requires loose, fertile, well-drained soil.
Variety Classification of Caladium
1. White Caladium: Leaves white, veins emerald green.
2. Bright White Caladium: Leaves white, semi-transparent, semi-bright.
3. Dong Deng: Middle of the leaf is crimson red, edges green.
4. Seagull: Leaves dark green, with prominent broad white veins, bicolor.
5. Red Cloud: Leaves with red spots.
6. Edith Mead: Leaves nearly white, edges green, main vein red.
7. Attala: Leaves dark green, with red spots.
8. Mad Altred Rubra: Leaves large and round, dark green, surface with irregular white spots, main vein red.
9. John Pecd: Thick veins, entire leaf red.
Cultivation Techniques for Caladium
The soil should be fertile, loose and well-drained leaf mold or peat soil. Generally, ordinary garden soil mixed with leaf mold and an appropriate amount of river sand, plus some base fertilizer such as compost, bone meal, oil cake, etc. For soilless cultivation, generally 1 part vermiculite mixed with 1 part perlite, paired with a nutrient solution at a concentration of 0.2%, with a nitrogen-phosphorus-potassium ratio of 3:2:1.
Fertilizer: The growing period of caladium is from April to October. Apply dilute fertilizer water once every half month, such as soaked liquid of bean cake or decomposed sauce residue, or a small amount of compound fertilizer. After fertilizing, water and spray immediately, otherwise the fertilizer can easily burn the roots and leaves. Stop fertilizing after the Beginning of Autumn.
Light: Caladium prefers scattered light and avoids direct strong light. It requires slightly stronger light intensity than other shade-tolerant plants. When the leaves gradually grow larger, they can be moved to a warm, semi-shaded place for cultivation, but direct sunlight must be avoided. Frequently spray water on the leaf surface to keep it moist, which can extend the leaf viewing period.
Temperature and Humidity: During cultivation, in order to achieve uniform sprouting, the tubers should first be sprouted. Place the tubers in a seedbed or large-mouth flower pot covered with substrate, provide water and keep warm. After rooting, pot them up, covering with 2 cm of soil. Do not water too much initially; gradually increase watering after rooting. Maintain a temperature of 25°C, and leaves will emerge after 4-5 weeks. During the growing period, if the temperature is below 18°C, the leaves grow without standing upright, and new leaves have difficulty sprouting. If the temperature is above 30°C, new leaves sprout quickly, the leaves become thinner, and the foliage viewing period is shortened. June to October is the leaf-unfolding viewing period. In midsummer, relatively high air humidity should be maintained. In addition to watering in the morning and evening, spray the leaf surface, ground and surrounding environment 1-2 times. After autumn, the leaves gradually wither and enter the dormancy period. Control watering to make the soil dry.
Winter Care: The growing period of caladium is from June to October. In fact, from September, the leaves begin to turn yellow and gradually wilt and droop. At this point, watering should be controlled. When all the leaves have withered, cut off the above-ground parts, tip the pot out to take out the tubers, shake off the soil, and dry them in a well-lit, ventilated and dry place indoors for several days. Store them in disinfected vermiculite or dry sand. Keep the room temperature at 13°C-16°C. During storage, be careful not to damage the tubers, to avoid tuber rot.
Application Forms: As a currently popular foliage plant, caladium can be used as an indoor potted plant, placed on a desk or windowsill. Using a white plastic cachepot or white porcelain cachepot makes it appear even more elegant. It can also be used as foliage in flower arrangements, with a water cultivation period of about 10 days. In tropical regions, it can be cultivated outdoors for ornamental purposes, decorating flower beds and flower borders.
The following points should be grasped when cultivating caladium indoors:
① The soil should be fertile and loose, and kept moist regularly. Apply dilute fertilizer once every 2-3 weeks. The potting soil is best made by mixing 2 parts soil, 2 parts leaf mold, 1 part decomposed organic fertilizer, and 1 part fine sand or rice husk ash.
② In spring, when the temperature is above 15°C, bury the caladium tubers in a pot filled with wet sandy soil or vermiculite, at a depth of 2.5 cm, water, and cover the pot surface with plastic film to maintain humidity. Uncover once a day for ventilation and air exchange to prevent mold. After the leaves sprout, transplant the young plants into pots filled with culture soil.
④ Suppress reproductive growth and remove flower buds. Since caladium is mainly grown for its foliage, to prevent nutrient consumption, promptly remove flower buds. ⑤ Dormancy period care: After autumn, the leaves gradually wither and enter the dormancy period. Restrict watering to make the soil dry, cut off the above-ground parts, shake off the soil from the tubers, apply carbendazim, and store in dry vermiculite or sand. Keep the room temperature at 13-16°C. After 4-5 months of storage, replant them in spring.
Home Care
Caladium prefers a high-temperature and high-humidity environment, and is suitable for growing in loose, fertile, well-drained acidic soil. When dividing and potting up, sandy loam rich in humus should be used. After planting, as new leaves grow, the amount of watering can be gradually increased. At this time, it needs several hours of scattered sunlight daily, and the ambient temperature should be kept between 22-28°C. During the growing period, sufficient water should be maintained. Apply decomposed dilute liquid fertilizer once every 15 days or so. When fertilizing, the fertilizer liquid should not stain the leaves. In hot summer, avoid direct strong sunlight, and shade at noon to prevent leaf scorching. Water once in the morning and once in the afternoon each day. Pay attention to maintaining relatively high air humidity, and frequently spray water on the plant leaves and sprinkle water around the flower pot. During the growing period, also promptly prune yellowed and drooping old leaves. If flower stems appear, they should also be cut off, so that nutrients are concentrated and new leaves are promoted.
How Caladium Tubers Safely Overwinter:
① After autumn, caladium tubers gradually enter winter dormancy, and the above-ground leaves also wither one after another. At this time, they can be taken out of the pot, the withered leaves of the tubers cut off, placed in a ventilated place to dry, and then placed in a pot with sand for dry storage. The sand should not be too dry or too wet, especially not too wet, otherwise they will rot. Place in a shaded area indoors. After the following spring, dig out the tubers from the sand pot and plant them in other pots. However, before potting and planting, sufficient base fertilizer should be applied, which is very important for future growth and development.
② Without digging out for sand storage, they can remain in the original pot and be moved to a ventilated place indoors for overwintering. The potting soil should preferably be on the dry side and not too wet. After the following spring, tip them out of the pot, repot them (with sufficient base fertilizer) and plant.
To Make Caladium Leaves Large and Brightly Colored: The key to making caladium leaves large and brightly colored lies in winter storage and spring planting. The key care points:
① Starting from September, caladium leaves begin to turn yellow and gradually wilt and droop. At this time, watering should be controlled and fertilizing stopped. When all the leaves have withered, tip the pot out to take out the tubers, place them in a well-lit, ventilated and dry place indoors to dry for several days, and store them in disinfected, impurity-free dry sand, keeping the temperature above 10°C. Spray water once every half month with a watering can to keep the sand surface slightly moist. When digging out the tubers, be careful not to damage them, to avoid rot during winter storage.
② In early spring of the following year, take out the tubers and divide them, or peel off the small tubers growing around them and plant directly, but each piece must have at least one bud. Apply wood ash or stove ash to the cut surfaces for preservation. Use leaf mold mixed with decomposed chicken manure and bone meal as potting soil. Water thoroughly and place in a shaded area. After seedlings emerge, move to a semi-shaded area for care, and pay attention to maintaining the surrounding air humidity.
③ There are two methods of tuber planting. One is to place the tuber with the front side facing up, which can promote rapid sprouting, but the growth throughout the year is unbalanced, and the main bud grows particularly vigorously and prominently. The other method is to plant the tuber upside down with the back side facing up. Although sprouting is slower, there are more sprouts and the growth is balanced. [10]
Fertilizer and Water Management
When caring for caladium, the potting soil should be kept moist regularly. Topdressing should be applied in appropriate amounts, and never apply concentrated fertilizer. The leaves of caladium only live for 1 year. After the growth buds on the underground stems mature, they can continuously sprout and produce new leaves. When new leaves are emerging, an appropriate amount of dilute liquid fertilizer can be applied. At other times, there is no need for topdressing.
Otherwise, the petioles grow too long and are not substantial enough, not only breaking easily, but also making the plant shape appear loose. Whenever new leaves emerge, topdressing should be stopped immediately, and watering should be reduced at the same time. In winter, when the plant enters dormancy, watering should be stopped. The tubers can be left in the pot without taking them out, allowing them to overwinter in the potting soil. When the temperature rises the following year, start watering again to encourage them to produce new leaves.
The entire growth process of caladium is divided into two stages: the growth period and the dormancy period. To make caladium leaf color bright and colorful, careful management and good care work must be done throughout all four seasons.
For households in northern regions cultivating caladium, the stored tubers can be taken out in April to early May. Peel off the small tubers around the large tubers, let them dry slightly, and then pot them up separately. For flower pots with a diameter of about 25 cm, it is suitable to plant 3-4 large tubers per pot. If the purpose is to expand propagation, a disinfected small knife can also be used to cut the large tubers into small pieces with 1-2 growth buds. Apply charcoal powder, wood ash or soot to the cut surfaces for preservation. After the cuts dry, pot them up.
The potting soil should preferably be loose, fertile and well-drained slightly acidic soil. Generally, 6 parts leaf mold or peat soil, 2 parts garden soil, and 2 parts river sand can be mixed evenly, with a small amount of bone meal or decomposed cake fertilizer residue added as base fertilizer. Watering and fertilizing should be timely and appropriate.
In the peak growing seasons of spring and summer, generally apply compound liquid fertilizer or full-element flower fertilizer once every 7-10 days, and the colors will be vibrant. If too much nitrogen fertilizer is applied, the colorful spots on the leaves will fade, affecting the ornamental effect. When applying liquid fertilizer, never let it stain the leaves, to avoid leaf scorching.
In spring and autumn, watering should be done to the extent of keeping the potting soil moist. If watering is excessive and drainage is poor, it can easily cause tuber rot; if watering is too little and the potting soil is dry, it can easily cause leaf wilting. In summer, the temperature is high and water evaporates quickly, and it is also the peak growing period of caladium. In addition to sufficient watering, it is also necessary to spray water on the leaf surface and sprinkle water on the ground near the flower pot 2-3 times a day to help lower the temperature and increase humidity, which is crucial for keeping the leaves beautiful.
Autumn is the stage of tuber growth and development. At this time, additional phosphorus and potassium fertilizers are needed to promote tuber growth. In late autumn, when the temperature drops below 15°C, the leaves begin to turn yellow and gradually enter the dormancy period. At this time, reduce watering to encourage the tubers to enter dormancy. During the growing period, caladium prefers semi-shade and avoids direct strong light. It requires slightly stronger light intensity than other shade-tolerant foliage plants.
If the light is too weak, the plant tends to grow leggy, the leaves become thin and slender, and easily lose their bright colors and luster; but the light should not be too strong either, because exposure to direct strong light often easily scorches the tender leaves. Different varieties require slightly different light conditions. Varieties with red patches and bright colors need more light; if the light is insufficient, the colorful patches will fade. White varieties with thin leaves need less light; strong light easily damages the leaves.
For home cultivation of caladium, in summer the flower pot should be placed indoors in a well-ventilated, brightly lit area, preventing direct strong sunlight. In spring and autumn, place it in a semi-shaded area to help maintain bright leaf color. If flower stems appear, remove them promptly to reduce nutrient consumption, so as not to affect leaf growth. When yellowed and drooping old leaves are found, remove them at any time to promote new leaf growth.
The management work during the dormancy period of caladium must not be relaxed. If relaxed and subjected to freezing damage, in mild cases it affects the growth of the following year, and in severe cases it cannot sprout the next year. Therefore, experts in cultivating caladium place great importance on overwintering management.
Key Management Points
First, the temperature should be appropriate; second, the substrate should be appropriately dry or wet. As long as these two points are mastered, a good foundation is laid for the growth of the following year. The specific method is: after the caladium leaves turn yellow and wither, tip the pot out to take out the tubers, let them dry slightly, and then bury them in river sand for storage. If the number of tubers is small, they can also be left in the pot without taking them out, and the tubers kept in the pot indoors for overwintering. During overwintering, place in a dark place, keep dry and appropriately ventilated. The temperature should not be too high or too low; keeping it at 14-17°C is relatively safe. Because within this temperature range, they will not sprout or freeze, which is beneficial for safe overwintering. The substrate for burying the tubers should be appropriately dry or wet to keep the tubers fresh. If the substrate is too dry, it easily causes the tubers to shrink, affecting sprouting the following year; if the substrate is too wet, it easily causes the tubers to rot and lose the ability to sprout. It is best to keep the substrate slightly moist at all times.
Propagation Methods of Caladium
For pot cultivation, the tubers can be buried in a sand bed to promote rooting. After roots grow, pot them up and plant. It is not tolerant of strong light. During cultivation, place under a shade net. During the growing season, keep the potting soil moist and fertilize 1-2 times a month. In winter, keep the temperature above 15°C. Those without heating conditions can wait until the leaves dry up, dig out the tubers, dry them, remove the residual roots, and store them layered in sand until spring planting. To achieve uniform sprouting, sprouting can be done first. Arrange the tubers on a sand bed, cover with 1 cm of fine sand, keep the sand bed moist, and maintain a room temperature of 20-22°C. After sprouting and rooting, pot them up. If the tubers are large and the mother bulb has many growth buds, division propagation can be carried out. Use a knife to cut the tuber with buds, wait for the cut surface to dry and heal, then pot up.
In the place of origin and for mass propagation of seedlings, seeding and tissue culture propagation can be used. For seeding, sow immediately after collecting seeds. Caladium seeds do not tolerate storage, otherwise the germination rate drops rapidly. At the seedling stage, the leaves are green, and after a certain number of leaves appear, colorful spots begin to appear on the leaf surface. For tissue culture propagation, use MS medium plus 1 mg/L kinetin and 2,4-D to induce callus, use MS medium plus 1.5 mg/L kinetin and 0.1 mg/L naphthaleneacetic acid to differentiate adventitious buds from callus, then transfer to 1/2 MS medium plus 0.5 mg/L naphthaleneacetic acid rooting medium. Explants such as young leaves, petioles and tubers can all induce callus and form adventitious buds. Using tissue culture methods, large quantities of caladium seedlings can be propagated in a short time.
Division: Caladium commonly uses division propagation. In April to May, before the tubers sprout, peel off the small tubers around the tubers. If the tubers are wounded, apply wood ash or sulfur powder, dry for several days until the wounds dry, then pot up.
Cutting Tubers: If the tubers are large and the mother bulb has many growth buds, division propagation can be carried out. Use a knife to cut the tuber with buds, wait for the cut surface to dry and heal, then pot up. Whether it is division propagation or tuber cutting propagation, the room temperature should be kept above 20°C, otherwise the planted tubers easily become damp and difficult to sprout, and may instead rot and die.
Seeds: Because caladium seeds do not tolerate storage, seeding propagation must be carried out immediately after the caladium seeds are harvested, otherwise the germination rate will be greatly reduced.
Tissue Culture: Since 2000, leaves or petioles have been used as explants for tissue culture. Both leaves and petioles can induce callus and form adventitious buds. Using tissue culture methods, the propagation coefficient is large, and offspring rarely show variation. Large quantities of caladium seedlings can be propagated in a short time.
Hydroponics: That is, nutrient solution cultivation, divided into two methods: corm hydroponics and petiole water cuttings. It is a new technique that can make caladium leaves vibrant and achieve effects that soil cultivation cannot. Corm hydroponics is carried out in May when the temperature stabilizes above 22°C. Corms can be directly potted for water cultivation, and after cultivation, they will root and sprout. They can also first be sand-cultured, and after new roots and sprouts grow, switch to hydroponics. Roots can form in 7-10 days, and the roots are white. Petiole water cuttings can propagate caladium during the growing period. When propagating, select mature leaves, peel them off together with the petioles, and insert them into a container filled with clean water. The depth of the petiole in water should be about 1/4 of the petiole length. Change the water every other day to keep the water clean. After about 1 month, corms can form.
Inoculating Explants
Select robust, pest-free caladium (Caladium bicolor) with bright and elegant leaf colors as the mother plant. Cut about 10 cm of newly emerged petioles and cotyledons as explants. Wash with 10% benzalkonium bromide for 20 minutes (placed in a glass bottle with continuous shaking), then rinse clean with tap water. Bring into the inoculation room. On the ultra-clean workbench, use the mercuric chloride double disinfection method (disinfect with 1% mercuric chloride for 5 minutes, rinse with sterilized water 3-5 times, then disinfect with 1% mercuric chloride for 3 minutes, rinse with sterilized water 3-5 times). Then cut the explants into small segments of about 0.5-1 cm each, and inoculate them onto modified MS + 6BA6 + KT induction medium. Place the inoculated explants at room temperature 25-28°C and culture for 25-30 days. The cotyledons and petioles form callus, and adventitious buds continuously sprout from the callus. With continued culture, the number of adventitious buds increases and they grow larger with prolonged culture time.
Test-tube Plantlet Differentiation
Cut the callus into small pieces and inoculate them separately onto differentiation medium modified MS + 6BA (0.5-0.5) + KT (0.5-1.5), which can form large numbers of robust clustered shoots. Divide and transfer to new bottles once every two weeks. Culture under conditions of 26-28°C, light intensity 1500-2000 Lux, and photoperiod 8 hours. The monthly differentiation and proliferation of test-tube plantlets can reach 5.6 times. During the differentiation process, the shootlets can grow large numbers of fibrous roots. Therefore, caladium shootlets can be directly transplanted without the need for strengthening and rooting.
Transplanting Test-tube Plantlets
Place bottle plantlets with relatively thick and strong roots and stems at the planting site (greenhouse) for 3-5 days, so that the bottle plantlets adapt to the planting site environment, then take out the plantlets, wash off the rooting medium, and transplant them into a substrate of fertile sandy loam or peat soil rich in organic matter. Place in a greenhouse. After 3-5 days, the plantlets can be screened for out-planting or potting. After another 3-5 months, they can grow into large seedlings.
From induction, subculture, proliferation to rooting, caladium takes 3-5 months. Adventitious buds proliferate quickly and in large numbers, and large quantities of tissue culture plantlets can be cultured in a short time. When transplanting, care should be taken to transplant the callus and plantlets as a whole clump. Only when they grow to 5-10 cm tall should they be divided and potted separately, until no more small plantlets appear on the callus. This can improve the survival rate and emergence rate of caladium tissue culture plantlets.
Pest and Disease Control of Caladium
Caladium can develop dry rot during the tuber storage period, which can be controlled by soaking or spraying with 50% carbendazim wettable powder 500 times solution. During the growing period, leaf spot disease etc. are prone to occur, which can be controlled with 80% mancozeb 500 times solution, or 50% carbendazim wettable powder 1000 times solution, or 70% thiophanate wettable powder 800-1000 times solution.
Uses and Applications of Caladium: Landscape Use
Caladium is a shade-loving ground cover plant and can be used as a shade-tolerant ornamental plant. Because caladium prefers high temperatures, in warm climate regions it can also be cultivated outdoors for ornamental purposes, but in cold winter regions, it can only be used in gardens in summer. Caladium leaves often have embedded colorful spots or colorful veins, and it is a ground cover plant mainly grown for its foliage.
Caladium Pictures