How Long Can Nasturtiums Live? Pest and Disease Control for Nasturtiums / Strengthening Care Is Key
During the growth of nasturtiums, many factors can affect them, such as nasturtium cultivation methods, climate change, environmental shifts, and so on. Besides these, there is another crucial point: pests and diseases. Once pests or diseases appear and are not controlled in time, it can easily cause the plant to die. So how long can nasturtiums live? What are the methods for pest and disease control in nasturtiums? Let's take a look together.
How Long Can Nasturtiums Live
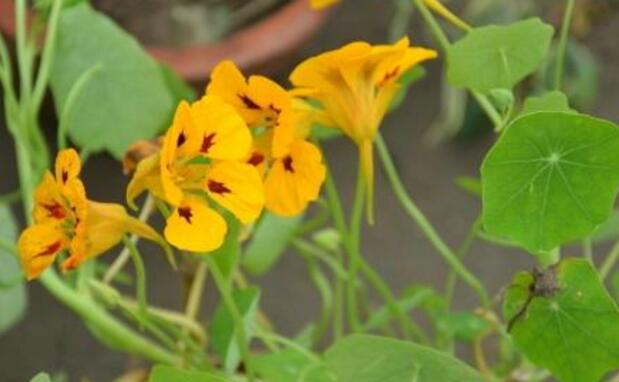
In the botanical world, the nasturtium is a perennial herbaceous plant, so with proper care it can be grown for many years. However, in most places it is grown as a 1-2 year ornamental flower, because its main purpose is flower viewing. But for ordinary gardening enthusiasts, it can be kept for several years or even longer.
Pest and Disease Control for Nasturtiums
1. Leaf miner
It begins infesting nasturtium plants at the larval stage. It burrows into new shoots and tender leaves, damaging the interior between the upper and lower epidermis of various leaves, causing tunnels to appear on the leaves. It also causes the leaves to turn yellow and drop early. What is even more frightening is that it can cause the entire plant to wither.
Control: Cut off and burn the damaged leaves. Apply treatment to the plant on a sunny day. The pesticide can be either 25% carbaryl wettable powder at 500-1000 times dilution, or 25% dimehypo aqueous solution at 500 times dilution. Generally, spraying in the afternoon gives the best results.
2. Mosaic virus
Among nasturtium pest and disease problems, mosaic virus is relatively common. Its symptoms are smaller leaves, stunted plant growth, and a mosaic pattern of light green and dark green on the leaves. It also causes short flower spikes and fewer flowers, and may even prevent nasturtiums from blooming.
Control: Choose varieties with relatively strong disease resistance for planting. Pay attention to scientific watering and fertilizing in daily care. When pests or diseases are detected, spray with 40% dimethoate emulsifiable concentrate at 1000 times dilution or 20% fenvalerate emulsifiable concentrate at 8000 times dilution.
3. Ringspot disease
Dark green or brown disease spots appear on the damaged leaves. The spots are initially elongated oval in shape with relatively narrow pale yellow edges. Then the spots continuously expand, eventually becoming red-brown patches. Sometimes the entire leaf turns red-brown.
Control: Keep the soil environment clean and tidy. When ringspot disease appears, spray with 50% malathion emulsifiable concentrate at 1000 times dilution or 20% fenpropathrin emulsifiable concentrate at 3000 times dilution. Generally, once a week for 2-3 times is sufficient.
Can Nasturtiums Be Eaten? Nasturtium Cultivation Methods and Care Guide
Some gardening enthusiasts may not be familiar with the name nasturtium, but upon seeing it they will surely feel they have seen it before. This is because nasturtiums are often grown in cities for visitors to admire. Another advantage of nasturtiums is that with proper care they can bloom year-round. The flowers of nasturtiums can also be used medicinally, and the flower buds, seeds, and tender shoots can be used as spices. After hearing so many advantages of nasturtiums, don't you want to grow one yourself? Below, the editor of Huinong Network will explain nasturtium cultivation and care for you. Let's learn together.
Nasturtium Cultivation
1. Nasturtium seeds are wrapped in a thick outer coat, so planting them directly will delay the germination rate. Soak them in water for 1-3 days, remove the coat, and then plant them in a flower pot or flower bed for better results.
2. Germination in autumn takes a lot of time. If planted again in early April, new shoots will sprout quickly. Although planting directly in a large flower pot or flower bed is better, it will reduce the germination rate.
3. When roots emerge from the small holes at the bottom of the pot, please divide the plants into separate pots as soon as possible.
4. After it adapts to the new pot, the leaves will become lush. Because it has a trailing habit, growing it in a hanging basket allows you to appreciate its charm. You can also insert a support stake.
5. Nasturtiums are very easy to propagate from cuttings; simply insert them into soil and roots will grow. You can cut off new shoots and insert them into soil for cuttings.
6. If sown in early spring, they will bloom in late spring; if sown in autumn, they will bloom in early spring. If grown indoors, you can use a soft brush or cotton swab to gently brush the stamens to pollinate them.
7. After pollination, blue-green seeds will form. When the seeds turn slightly yellow, they can be harvested. After drying in the sun, a thick outer coat will form on the surface, and they become nasturtium seeds.
8. In midsummer, nasturtiums are very susceptible to leaf-mining wasps, and the leaves will turn yellow and wither accordingly. After blooming several times, there will no longer be pollen.
Nasturtium Care
Although nasturtiums are very easy to grow, insufficient light will cause the leaves to become smaller or grow leggy. Therefore, you must ensure adequate sunlight. Although autumn-sown plants have smaller leaves than spring-sown ones, they bloom earlier and also have a lower chance of developing pests and diseases. Growing nasturtiums in a greenhouse can make them into perennial plants.
The above is the editor of Huinong Network's summary on nasturtium cultivation and care. Nasturtium flowers and leaves are edible. They are rich in vitamin C, iron, and minerals, and have remarkable effects on septicemia, sterilization, antibiotic action, and promoting digestion. So friends who like nasturtiums can try growing them more.
Making Green and Safe Sprays - Pest and Disease Control for the Organic Garden
I have always said I would write a "pest control chapter." Because the probability of pests at home is not high, I rarely have the opportunity to photograph pest damage. So far I have only photographed red spider mites and aphids. Even whiteflies did not pay a visit this time, let alone leaf miners. So I am very sorry that I have very few self-taken photos of pests and diseases. Some pest problems I only encountered in my first year of growing, so I have never collected enough of my own photos and can only use detailed hand-drawn illustrations. There are 3 pages of hand drawings.Does having few pests mean that bugs do not come near my balcony? No. Care is a very important process. In fact, the occurrence of pests is closely related to weather conditions. For example, the generally dry weather this spring created a great opportunity for aphid growth. So the aphids in my home appeared as many as 3 generations in spring alone.
Moreover, this process of pests appearing is often very sudden. One day while watering, you suddenly find stems and leaves covered with aphids. If you do not take measures to pinch off the bugs or use insecticide that day, then on the second and third days, aphid reproduction enters its peak and they will pile up on top of each other. Because the excrement of aphids after sucking leaf sap is sweet, it will also attract ants. So aphids not only harm the plant themselves, but their follow-up damage is also very great. But aphids are actually the least harmful type of pest among plant pests. Red spider mites are the same. Actually, they are not a type of spider; their scientific name is spider mite. They are visible to the naked eye, but much, much smaller than aphids. If you do not pay attention, you may not even notice the tiny red dots on the underside of leaves. Their appearance on the leaf surface is: densely packed tiny dots. Red spider mites survive by sucking chlorophyll. After the chlorophyll on the leaf surface is sucked by numerous red spider mites simultaneously, yellowing and drying characteristics appear. At the same time, if not controlled, red spider mites reproduce recklessly. They can complete one generation in about a week. Spider webs will appear between stems, with red spider mites crawling on them. So red spider mites can be considered a stubborn pest that easily makes a comeback.
There is another equally stubborn pest that basically occurs at high frequency in summer: whiteflies (see hand-drawn illustrations). One reason whiteflies are difficult to control is that they are very strong fliers. Unlike aphids and red spider mites, which move slowly and can be effectively controlled by pinching with your hands, whiteflies will basically fly away immediately when your hand approaches.
The flying ability of whiteflies is related to the amount of waxy powder on their bodies, which is also why they are called "whiteflies." When they are young, there is not much waxy powder on their bodies, so their flying ability is not strong and they can only fly short distances. But when they become adults, because the amount of waxy powder increases and the covering becomes thicker, their flying ability is significantly enhanced.
Generally, plants that self-sow have a very low probability of whiteflies. They basically appear on potted plants purchased in summer. So if you cannot avoid buying potted plants, be sure to check the underside of leaves for small white insects resting there. Or if when you check, you find that resting white insects fly out, then it is basically whiteflies. Even if it flies away, it has most likely already laid eggs on the back of the leaf.
There is another pest that lays eggs and lives within leaf veins: the leaf miner (also called the map bug; see hand-drawn illustrations). It commonly occurs on peas and nasturtiums. If the method for dealing with leaf miners is wrong, even organic sprays cannot fully penetrate into the middle of the leaf. If you do not want to use chemical pesticides, then the best method is to remove the diseased leaves.
Some people may ask, then how do pests also appear on plants you sowed yourself? How can you avoid pest harassment as much as possible?
Apart from the fact that some gardening enthusiasts buy larger potted plants - because nursery management cannot be as careful as at home, so they easily carry viruses, pests, and pest eggs - even plants you sow yourself cannot be completely guaranteed to never have pests. But the quantity and probability are much, much lower than purchased potted plants. This is also why I have always recommended that everyone sow and take cuttings themselves.
The soil we use for planting includes garden soil, peat soil, various prepared nutrient soils, and so on. In fact, no matter how finely packaged the finished soil is, if it has not been truly thoroughly sterilized before packaging, it can very easily carry insect eggs. That is why the instructions on imported large-package peat soil emphasize: the peat soil has undergone thorough high-temperature sterilization, guaranteed not to carry insect eggs. However, after all, few gardening enthusiasts actually buy the original 300L packaging. More people buy repackaged peat soil online, so that guarantee of not carrying insect eggs becomes invalid. During handling and contact with air, it will more or less be contaminated, so there is a possibility of carrying insect eggs.
Similarly, even if you buy original packaged sterilized peat soil yourself, we will not use it all up at once, especially for balcony gardeners. The leftover peat soil, due to storage conditions (the original packaging is vacuum-sealed), including the effects of temperature and humidity - if sealed tightly, moisture easily forms inside, causing the originally dry and sterile peat soil to become damp, so there is instead a risk of mold and pathogen growth. Therefore, when storing peat soil, we must be careful not to tie it completely tight. Leave a small gap to allow proper air circulation. But with a gap, there is a risk of small insects getting in to lay eggs. So no ordinary home storage method can completely prevent the soil from always maintaining the quality it had in the original packaging. Therefore, if you are ready to start on the gardening path, pests will definitely accompany you. Even if you were originally someone very afraid of seeing bugs in all their forms, in this process, you will definitely train yourself.
Besides soil possibly carrying insect eggs, during the growing process, if flying insects pass by and land on the soil surface or plants to lay eggs, or bring bacteria and insect eggs they picked up elsewhere onto your plants, that is also a very important transmission route. So for us, the key to control is to frequently and carefully observe whether your plants are suffering from pest damage, especially the underside of leaves, where insect eggs and pests easily gather. Pests hiding on the underside of leaves and laying eggs there is an innate self-protection mechanism. Because in the open air, the plant itself is subject to washing by dew and rain, and the upper surface of leaves directly receives sunlight, which is not suitable for egg hatching, so the hatching success rate drops greatly. So laying eggs on the underside of leaves is both concealed and cannot be rained on, will not be washed away, will not be dried out by the hot sun, and can still suck the sap of the leaves.
Therefore, when we spray organic sprays, we must remember to spray from the underside of the leaves. Because the effectiveness of self-made organic sprays is not as strong as pesticides with added chemical ingredients. There is indeed a type of chemical pesticide on the market that can kill pests whether sprayed on the front or back, but precisely because it works on both sides, it shows that its toxicity is unusually strong. When choosing insecticides for non-edible plants, you can consider choosing it. But if, like me, you grow edible herbs, vegetables, and fruits, then to be responsible for your own health, you must never use chemical pesticides. You can buy organic sprays on the market, or you can make your own organic sprays.
Regarding the formulas for self-made organic sprays, gardening enthusiasts have always asked, and I have always answered, but I have indeed never discussed it in such specific detail. So in this blog post, I will publish in great detail 3 organic sprays with different functions and pest control formulas. I hope they are helpful to everyone:
1. Two sprays: Garlic Olive Oil Spray & All-Purpose Organic Spray
2. Plant fungicide
3. Eggshell method for preventing mollusks
First let's look at the production process pictures: (because there is a lot of content, there are 3 pages, respectively within the introductions of the 3 organic protection methods)
Detailed explanation:
1. Sprays
Garlic Olive Oil Spray
Materials:
Olive oil 5ml
Garlic 1tsp
Laundry detergent 1tsp
Method:
1. Crush the garlic into a paste, put it into a spray bottle together with 500ml water, laundry detergent, and olive oil, shake well and it is ready.
2. Spray on the front and back of leaves 2-3 times a day.
Note: Because of the self-protection mechanism of insect eggs, they are generally wrapped in a protective membrane. Chemical pesticides can penetrate this protective membrane, but organic sprays cannot. So organic sprays cannot kill insect eggs. Therefore, after discovering pests, you must spray continuously for 3 days, 2-3 times a day, to ensure that insect eggs are killed immediately by the organic spray after hatching. Otherwise, if you only spray once, the adults are killed, but new larvae hatch out, and it still cannot achieve the effect of thorough pest elimination. Therefore, once you spray organic spray, you must spray continuously for 3 days to consolidate the effect.
The left picture shows the situation after spraying garlic olive oil spray; the right picture shows the situation before spraying:
Some gardening enthusiasts have also asked, what is the reason for adding these 3 ingredients?
Because the viscosity of oil will obstruct the insect's respiratory system, garlic has the effect of repelling and paralyzing the insect's nervous system, and laundry detergent water can damage the pest's epidermis and cause dehydration.
So why use olive oil?
Olive oil is used because it is not greasy and does not have high viscosity. Otherwise the leaves would become oily and greasy, and oil with high viscosity would clog the stomata on the leaf surface, preventing the leaves from breathing, which would cause yellowing and dropping. It is the same principle as how bowls used for olive oil are easy to wash clean while other oils need hot water to wash off. This is also why olive oil is healthy.
All-Purpose Organic Spray
This is a relatively "all-purpose" pest-killing spray, and it is very convenient to make, because it uses liquid soap - the kind of liquid soap we use for washing hands will do.
If you do not use liquid soap, you can also use soapy water as a substitute. The principle is the same, it is just that liquid soap is more convenient to use. It can disrupt and penetrate the insect cell membranes, causing pests to dehydrate and die. However, the key to using soapy water or liquid soap is: absolutely do not make the concentration too high, otherwise the plants will also be killed.
This formula also uses a relatively special plant-based insecticidal material: tomato leaves. In fact, tomato leaves contain several toxic alkaloids and are a natural insecticide, especially effective against aphids. Potato leaves also contain toxic alkaloids, but tomatoes are not grown in winter and potatoes are not grown in summer. So they can serve exactly as plant-based insecticidal materials for winter and summer: use tomato leaves in summer and potato leaves in winter.
Materials:
Liquid soap 1tbsp
Water 1L
Garlic 3tbsp
Ginger 3tbsp
Chili pepper (do not use sweet pepper) 50g
Tomato leaves 30g
Boiling water: the amount required is enough to completely cover these materials
Method:
1. Place all the materials in a small pot and cover with boiling water.
2. Leave overnight.
3. Filter out the residue.
4. Put the filtrate, water, and liquid soap into a spray bottle.
5. Shake well and spray on the front and back of leaves.
Note: All homemade sprays should be used the same day in summer, or placed in the refrigerator, otherwise they will ferment.
2. Plant fungicide
Plants do not only suffer from pests; they also get diseases. For example, gray mold, powdery mildew, and black spot are very common plant diseases, and they are highly contagious. If you do not remove the diseased leaves or take measures, then all the leaves on the plant will be infected, as if covered with a layer of white powder. Black spot is also a disease caused by fungi, with irregular black or black-brown round spots appearing on the leaves. Generally, the previous approach was to buy chlorothalonil and thiophanate-methyl fungicides, dilute them with water, and spray the leaf surface.
But although chlorothalonil is an extremely low-toxicity fungicide, it is still a pesticide after all. If we can make our own fungicide, then can we avoid even this low toxicity?
The answer is that fungicides are not difficult to make. We can use materials on hand to mix our own fungicide.
Materials:
Baking soda 1tsp
Water 1L
Soap flakes 1tsp
Method:
1. Put the baking soda, water, and soap flakes into a spray bottle.
2. Shake well and spray on infected leaf surfaces.
Note:
Leaves that are severely infected must be removed. The leaves sprayed must still be normally green, that is, newly infected leaves and uninfected leaves. The purpose of this method is to control the scope of infection, not to remove the white powder.
3. Eggshell method for preventing mollusks
Mollusks are what I fear most, such as slugs, snails, and cutworms. Anything that wriggles around will make my hair stand on end the moment I see it. Moreover, mollusks cause great damage to plants. For example, mollusks all like to chew on leaves, so if you see large hollows and gaps on leaves, you should quickly check whether they are present.
How do you prevent snails and others from crawling onto your balcony and settling in during damp weather?
One good method is to use crushed eggshells.
Materials:
Washed eggshells: any amount
Rolling pin
Method:
1. Put the eggshells into a container and crush them with a rolling pin (no need to pulverize).
2. Place the crushed eggshells on the soil to prevent mollusk invasion.
This is a purely physical method with no impact on the environment whatsoever. The reason the eggshells must first be washed is that unwashed eggshells will have egg white and other residue inside. If left outdoors for a long time, they will deteriorate and give off a bad odor, attracting small flying insects. The crushed eggshells, because they have sharp pointed edges, will harm mollusks, so they dislike crossing any sharp, jagged eggshells. Spreading crushed eggshells on the soil can help block these pests from invading.
These are the most basic organic control methods. Of course, there are other organic protection methods. For example, some people use coffee grounds, and some use milk to kill red spider mites (but personally I strongly do not recommend this, because milk produces heat and odor during decomposition, which is the so-called fermentation process. This will instead trigger other pests, and even seep into the soil and cause root burn).
In fact, there are many plant pests and diseases. A short article has limited content and cannot cover everything clearly, especially regarding the highly requested control method for fungus gnats. Because the methods for the occurrence, control, and elimination of fungus gnats are relatively complex, I plan to write a separate article to explain them. I hope today's content can be helpful to organic gardeners fighting on the front lines of pest control.