Gloxinia likes semi-shade, so how do you care for it? Growing methods and precautions
Gloxinia, a beautiful flower with lush green leaves and brilliantly colorful blooms, is highly ornamental when kept at home. In daily life, because gloxinia has strong benefits, many people want to grow it, so how do you care for gloxinia? Below is a carefully compiled guide to gloxinia growing methods and precautions, very detailed, friends who want to grow it should definitely take a look~
I. How to care for gloxinia, understand its habits
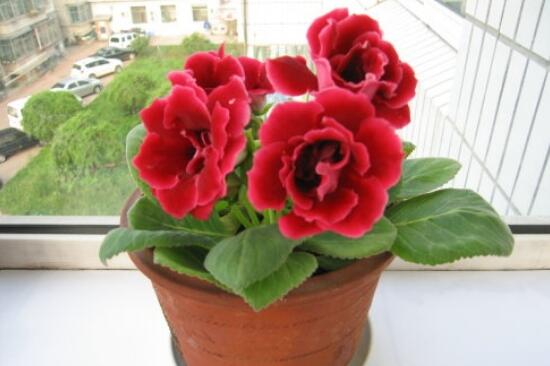
Gloxinia likes a warm, humid, semi-shaded environment. It is not cold-tolerant and dislikes direct sunlight. When grown indoors, it should be placed in a semi-shaded spot, watered moderately, and given good warmth protection in winter. As for the potting soil, it is best to use loose, fertile, slightly acidic soil rich in humus. So how do you care for gloxinia? Very simple, just meet its growing habits.
II. Gloxinia growing methods and precautions
1. Soil
How to care for gloxinia: first of all, you should reselect the potting soil. Nowadays, the potted plants of gardening enthusiasts are basically bought online, but that soil is very cheap. Normal care can ensure the plant grows, but if you want gloxinia to grow well, it is best to reselect the soil.
Soil selection: According to the growing habits of gloxinia, it likes loose, fertile, sandy soil rich in humus. For this, the editor recommends using a soil mix of 1 part perlite, 1 part river sand, and 3 parts leaf mold, plus a small amount of decomposed, sun-dried, finely crushed poultry manure.
2. Light
Plant growth cannot be separated from light, so in gloxinia growing methods, light is an indispensable part. However, gloxinia likes semi-shade and dislikes strong light, so indoors it is best to place it in a semi-shaded spot for care.
Precautions: In summer, gardening enthusiasts must place the potted plant in a ventilated place with scattered light for care; in addition, during the flowering period of gloxinia, the shading time should be appropriately extended.
3. Temperature
How to care for gloxinia: adjusting the temperature at the right time is also very important. It is understood that the most suitable growing temperature for gloxinia is 10-25°C. Everyone should maintain this temperature, which can make the plant's leaves grow lush and emerald green, and the flowers large and vivid.
4. Watering
Water is the source of life, so in gloxinia growing methods and precautions, watering is a very important part. Gloxinia likes a humid environment. When the air is dry, water should be sprayed around the plant frequently. During high temperatures in summer, it should be watered 1-2 times a day.
Precautions: Gloxinia leaves have fine hairs. Once they get water droplets on them, they are extremely prone to rot, so when watering, do not spray water on the plant's flowers or leaves. It is best to use the immersion method for watering. In addition, do not water gloxinia too much, otherwise it will cause symptoms such as yellowing leaves and root rot.
5. Fertilizing
After watering, let's talk about fertilizing, which is also indispensable in the growth process of gloxinia. Gloxinia likes fertilizer. During its growing period, it is best to apply diluted cake fertilizer water once every 10 days or so. From leaf expansion to before flowering, gloxinia has a high fertilizer demand, so fertilizer should be applied once a week, preferably using decomposed diluted organic liquid fertilizer.
Precautions: When fertilizing gloxinia, be sure not to splash it on the leaves. After each fertilizing, spray clean water to keep the leaves clean. However, everyone should also note that gloxinia leaves should not get wet, so after cleaning the leaves, immediately wipe the leaf surface dry to prevent rot.
6. Pests and diseases
In the process of growing gloxinia, due to various reasons, the plant will inevitably suffer from pests and diseases. Among them, damping-off of seedlings is likely to occur at the seedling stage, and during the growing period inchworms often bite the tender buds. Their appearance will affect the growth of gloxinia. So once discovered, pesticide control should be carried out immediately. For details, please refer to gloxinia pest and disease control.
How to propagate gloxinia, gloxinia propagation methods / dividing tubers and cuttings are the most practical
Gloxinia has very good benefits. It not only blooms beautifully, but can also absorb dust, making indoor air fresher. Such a plant is naturally kept by many people at home, but buying one to grow is not as good as planting it yourself, and this requires us to master gloxinia propagation methods. So how do you propagate gloxinia? Below, the editor will introduce it in detail.
I. How to propagate gloxinia
Generally speaking, there are three propagation methods for gloxinia: dividing tubers, sowing, and cuttings. Among them, dividing tubers means burying the gloxinia tuber in soil, and then planting it into a new flowerpot; sowing means spreading the seeds in soil; cuttings are divided into stem cuttings and bud cuttings, that is, inserting gloxinia branches or buds into soil. For the specific operation methods, let's continue reading below.
II. Three propagation methods for gloxinia
(1) How to divide gloxinia tubers
1. Tuber selection: For gloxinia tuber division propagation, it is best to choose 3-4 year old plants. In winter, gloxinia enters dormancy. At this time, dig out its tuber and store it in a cool, dry environment.
2. Potting soil selection: According to the habits of gloxinia, the growing soil selected for planting tubers is generally: a soil mix of 1 part perlite, 1 part river sand, 3 parts leaf mold, plus a small amount of decomposed, sun-dried, finely crushed poultry manure. It is best to spread a layer of coarse sand or coarse coal cinders at the bottom of the flowerpot, which helps drainage and ventilation and prevents tuber rot.
3. Starting division: Water the tuber moderately. In spring, when the temperature warms up, it will sprout. When the sprouts grow to about 5 cm, take out the tuber and cut it into multiple pieces with a knife, each piece must have a sprout. Then smear the cut surfaces with plant ash and plant them in the potting soil. After planting, water thoroughly once, then water sparingly, just keeping the potting soil moist.
(2) Gloxinia sowing propagation
Gloxinia can retain seeds after flowering, so the propagation method can be sowing, and the time can be chosen in spring and autumn. The method is as follows:
First soak gloxinia seeds for one day, then prepare sowing soil, put it into a flowerpot, and then scatter the seeds on top. After sowing, moisten the flowerpot with water, then cover it with glass, and place it in an environment of 18-20°C. It will germinate in about 10 days and bloom after 6 months.
(3) Gloxinia cutting methods
Besides dividing tubers and sowing, cuttings are the most common propagation method for gloxinia. Gloxinia cutting propagation is divided into stem cuttings and bud cuttings. The specific operations are as follows:
1. Stem cutting method: Take newly sprouted tender shoots from the gloxinia bulb, 2-3 cm is enough, and insert them into fine sand or soil. After cutting, place it in a semi-shaded spot, maintain the temperature at 18-20°C, and roots will grow in about 15 days.
2. Leaf cutting method: Take a robustly growing gloxinia leaf together with its petiole, cut off 1/2 of the leaf, and then insert it obliquely into the substrate. After cutting, keep the soil moist, then cover with glass, place it in a semi-shaded spot indoors, maintain a room temperature of 25°C and high humidity, and roots will develop well in about 20 days after cutting.
Overall, gloxinia growing methods are very simple, and its propagation methods are not difficult either. Whether by dividing tubers, sowing, or cuttings, gloxinia can survive. However, methods are fixed, but people are flexible. Everyone can choose a method for propagation according to the actual situation. Regarding the propagation methods of Haworthia cooperi, the editor has introduced them here, hoping to be helpful to everyone.
Gloxinia growing methods, gloxinia propagation methods
Gloxinia is a perennial herbaceous plant, with a plant height of about 15-25 cm. The tuber is flattened and spherical, and the aboveground stem is extremely short. The leaves are opposite, thick and large, ovate, with serrated edges. Flower stalks grow between the leaves. The colors are rich, including pink, red, purple-blue, white, and bicolor, and the flowers are very beautiful. The flowering period is from March to June. Gloxinia is very beautiful and very suitable for indoor cultivation. Below is an introduction to gloxinia cultivation and propagation methods.
Gloxinia growing method substrateA mixed substrate of leaf mold, coarse sand, and vermiculite can be used.
TemperatureThe growing temperature for gloxinia is about 18-25°C, and after winter dormancy the temperature should not be lower than 8°C.
SunlightA semi-positive plant, it likes a semi-shaded environment, should avoid direct strong sunlight, and in summer it must be placed in a ventilated place.
WateringGloxinia does not like heavy watering during its growing period, so rainwater intrusion should be avoided, but air humidity should be high.
FertilizingGloxinia likes fertilizer. During the growing period, generally apply diluted organic liquid fertilizer once every 10-15 days. Generally no fertilizing in winter.
Gloxinia propagation method 1. Gloxinia sowinga. Sowing: Pure peat is fine, peat and perlite at one to one is also fine, and a three-in-one mix will also do, but the peat soil type is best finer, and the substrate should be kept moist as much as possible before true leaves grow. Thoroughly wet the soil, then evenly scatter seeds as small as dust. No need to cover with soil!!! You can place the substrate one centimeter above the bottom in a saucer with water, letting water wick upward to keep the growing substrate constantly moist until four true leaves grow out. Cover with a transparent lid and wait quietly for germination in a place with sufficient scattered light. b. Transplanting seedlings: Generally gloxinia needs to be transplanted twice to grow quickly. I still cannot figure out the reason. Transplant once at four true leaves, and then it is better to transplant once more when a single true leaf grows beyond 10CM. In this way it grows very fast.
c. Final planting: When final planting, an appropriate amount of base fertilizer can be applied to help fully build up its flowering capacity.
(1) Robust leaves are better as propagation leaves. Too old ones have poor vitality, too tender ones are immature. A petiole of 2-3CM is enough. The method is similar to that for violets. When the soil is wet, poke a hole, insert the leaf, and press lightly. For larger leaves, they can be split in two for insertion.
(2) After the leaves are inserted, maintain appropriate humidity, and they will sprout in about 1.5 months. If the leaves have not rotted and still have not sprouted after more than two months, you can remove the leaf blade, leaving only a short petiole at the soil surface, control watering, and let the soil dry slightly. This may speed up germination.
(3) Once buds appear and four true leaves are present, they can be transplanted and finally planted. After the seedlings recover, place them in a place with relatively sufficient light for growing.
b. Bud cuttings
Removing excess side buds or terminal buds from gloxinia can provide propagation material. In this way, growth speed and survival are better than with leaf cuttings. When doing bud cuttings, remove the terminal flower buds to reduce nutrient consumption. Do not rush to see flowers. If grown well, the flowers will surely come, and they will be fuller and more brilliant. 3. Bulb cultivation
a. Decapitating gloxinia is exactly the opposite of violets: keep the lower part and not the upper part. It is best to do it on a sunny day after the flowers have completely finished blooming, leaving a stem of 1-2 cm. After decapitation, do not water for 3 or 5 days to avoid wound infection causing bulb rot. After decapitation, new sprouts generally appear within ten days. When the sprouts grow to four true leaves, you can change the soil and repot for transplanting, or continue growing in the original pot. Try not to repot and change soil right after decapitation, as this easily causes bulb rot.
b. After decapitation, the bulb usually sends up multiple sprouts at once. If not for propagation, you can keep only one among all the sprouts and remove the weak ones. This helps concentrate nutrients, and the flowers will be more numerous and fuller.