How to prune an Australian pine bonsai? Three techniques to create the perfect shape
The Australian pine (Norfolk Island pine, Araucaria heterophylla), an evergreen plant with an elegant form, is often grown indoors as a bonsai. It not only looks great as decoration but also purifies the air very well! However, if you want your Australian pine to look beautiful, timely pruning is just as important as routine care. So how do you prune an Australian pine bonsai? Let's take a look at the pruning methods for the Australian pine.
I. How to prune an Australian pine bonsai
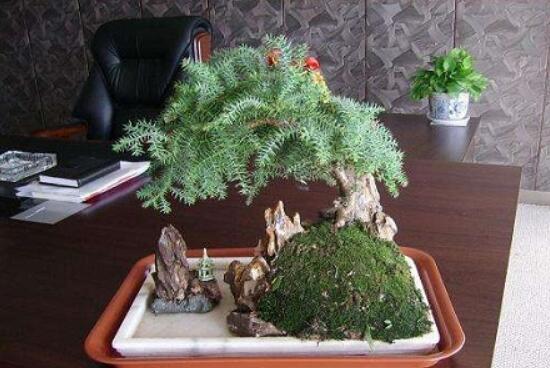
When growing an Australian pine indoors, pruning is unavoidable. As for how to prune an Australian pine bonsai, simply put, there are three techniques: heading back (cutting long branches shorter), thinning (removing withered and overly dense branches), and removing suckers (cutting off new shoots that regrow near the roots). As long as you follow these methods, you can create a perfect Australian pine bonsai shape.
II. Pruning methods for the Australian pine
(1) Pruning time
How do you prune an Australian pine bonsai? First, you should choose the right time, so that the damage to the plant after pruning is minimized. To do this, you first need to understand the growing habits of the Australian pine: its optimal growing temperature is 10-25°C, and it likes diffused light. So pruning can be done in spring or autumn; for the specific weather, you can choose a sunny midday.
(2) Pruning techniques
1. Heading back
With adequate water, nutrients and light, the Australian pine will grow vigorously, and some branches will grow very fast, which breaks the plant's overall good looks. So for how to prune an Australian pine bonsai, the first step is heading back: cut off part of the branches that have grown too long.
Pruning effect: After heading back the Australian pine, not only does the plant form gain more layers, but it also stimulates its lateral buds to sprout quickly and grow new branches, greatly enhancing the Australian pine's ornamental effect.
2. Thinning
Many growers' Australian pines grow lush and leafy, but this has a downside: the leaves inside can't receive light. So for how to prune an Australian pine bonsai, the second step is thinning: cut the branches off at the fork.
Pruning effect: After thinning, the Australian pine's branches are distributed more evenly, which increases air circulation and light penetration and helps the inner branches and leaves grow quickly.
3. Removing suckers
The beauty of an Australian pine bonsai lies in its overall form: the upper part is lush and leafy, while the lower part highlights a clean trunk. But sometimes, tender shoots or root suckers (small plants formed by adventitious buds growing from the roots and emerging above the ground) grow from the base of the trunk. So for how to prune an Australian pine bonsai, the third step is removing suckers: cut off all the large branches or small plants growing near the roots.
(3) Pruning precautions
When pruning an Australian pine, besides knowing the timing and mastering the techniques, you should also pay attention to two details:
1. The pruning shears must be sharp and smooth;
2. When pruning, the blade should be at a 45-degree angle to the branch, so the cut will be much smaller, which helps the wound heal.
How to grow an Australian pine and how to prune an Australian pine bonsai
The Australian pine is an evergreen tree, also called the slender-leaved Norfolk Island pine, among other names. It can be placed in the living room, study, office, shop, and so on, and is one of the precious indoor decorative plants. Large Australian pine bonsai are majestic, while small ones have their own delicate charm. You can choose and prune them according to each person's preferences. Below, the editor will share with you knowledge on how to grow an Australian pine and how to prune an Australian pine bonsai.
How to grow an Australian pine - Growing methods for the Australian pine
1. Soil: The Australian pine is suited to well-drained, humus-rich, slightly acidic sandy loam. When potting, a substrate mixed from garden soil, leaf mold and peat moss is best.
2. Watering: From spring to autumn, the Australian pine should be watered more, but waterlogging in the pot must be avoided. In high temperature and dry conditions, spray water on the potted plant and the nearby ground to lower the temperature and increase humidity. Water promptly; do not wait until the soil dries out before watering. From late autumn onward, gradually reduce watering to enhance its cold resistance.
3. Light: The Australian pine likes diffused light and should be placed in a bright spot inside a shed or greenhouse. If kept in a dark place for a long time, move it into the sun for appropriate exposure every few weeks, which can keep the dark green leaves a beautiful color.
4. Temperature: Its growing season is long; except when the summer temperature exceeds 32°C, the Australian pine can grow all year round.
5. Fertilizing: During the growing season, apply fertilizer every 2 weeks, preferably a compound fertilizer containing nitrogen and potassium. Insufficient fertilizer can easily make the branches and leaves turn yellow.
6. Pests and diseases: The Australian pine has very few pests and diseases. When grown indoors, scale insects are the most common problem; spraying methidathion, chlorpyrifos emulsifiable concentrate, or Guoguang Jie Bisi and similar products gives good control results.
How to grow an Australian pine - Precautions for growing the Australian pine
1. Summer and autumn are the growing seasons. Potted plants can be placed in a semi-shaded spot outdoors, or kept in a ventilated spot with light by a window. Avoid exposure to blazing sun above 35°C, and do not leave it for long in a lightless, shaded place. Either of these will cause the branches and leaves to turn yellow or grow leggy, reducing its ornamental value.
2. During growth, to prevent the trunk from leaning to one side, it is best to turn the pot once every half month so the plant receives light evenly. In addition, young tree trunks are fragile and easily bent out of shape, so from the seedling stage you should set up a support to fix the main trunk. To prevent the plant from growing too tall, repot once every 2-3 years after the weather warms in spring. Usually, take care to protect the side branches so they are not damaged and affect the plant's shape.
3. Under normal conditions, the Australian pine does not need branch pruning; let it grow naturally. Its optimal growing temperature is 10-25°C, and its overwintering temperature is above 5°C. In the winter season, give it some light, do not let the potting soil get too dry, and spray water on sunny days to increase humidity.
How to prune an Australian pine bonsai
1. Heading back. This pruning method means cutting off part of the branches that have grown too long on the Australian pine. The purpose is to stimulate its lateral buds to sprout quickly and grow new branches, improving the visual ornamental effect of the Australian pine.
2. Thinning. This pruning method means cutting the Australian pine's branches off at the fork. This makes the branches distribute more evenly, increases air circulation and light penetration, and helps the inner branches of the Australian pine grow quickly. This method mainly removes withered branches and overly dense branches.
3. Removing suckers. This pruning method removes the tender shoots or root suckers growing from the base of the Australian pine trunk or near the ground, preventing these root suckers from affecting the overall appearance.
Finally, a reminder: when pruning, note that the pruning shears must be sharp and smooth, and the blade should be at a 45-degree angle to the branch, so the cut will be smaller, which helps the cut heal and lets new tender buds grow out quickly. If you want to suppress branches that are growing too vigorously, you can choose a small tender bud of the Australian pine as the cutting point, which can promote the growth of strong buds!
How to prune an Australian pine and what to do when its leaves turn yellow
The Australian pine has very strong vitality, is evergreen all year round, and is also one of the masters of air purification. It is very suitable for long-term indoor care in places with insufficient light. So do you know how to prune an Australian pine? What should you do when its leaves turn yellow? Here we will tell you.
How to prune an Australian pine?
Australian pine pruning can be done in spring at the same time as repotting. By April and May, you can prune appropriately according to your own preferences, and before long you will see tender green new leaves emerge, giving high ornamental value. During the growing season, watering more is fine, and spraying water on the leaves will make it grow better. Fertilizer is mainly nitrogen-based, along with phosphorus and potassium fertilizers. Inorganic compound fertilizers from the flower market, or cake fertilizer, can both be used. During the growing season, fertilize the Australian pine about once every half month, or spray the leaves with 0.2% urea or potassium nitrate, which can make the leaf color dark green.
What to do when Australian pine leaves turn yellow:
1. Leaves turn yellow from strong direct sun. In summer, strong direct sunlight causes the leaves to turn yellow with yellow spots (sunscald). Spray water promptly to lower the temperature and increase humidity. Add a shade net so the plant can grow normally.
2. Leaves burn yellow from too much fertilizer. Applying too much concentrated fertilizer means the plant cannot absorb it, the roots get burned, and it cannot take up water, so the leaves turn yellow and drop. In summer, apply a dilute fertilizer once a week; never apply too much concentrated fertilizer. If too much fertilizer has been applied, water more to flush the fertilizer out.
3. Leaves become thin and yellow from lack of fertilizer. With a fertilizer deficiency, the leaves turn yellow, thin and drop, and the branches become slender, yellow and tender. Fertilize immediately; results appear within a week. Fertilize on schedule so the plant grows normally and blooms more.
4. Leaves turn yellow from excessive alkalinity soaking them. Because potted flowers are watered for a long time, salt and alkali accumulate in the potting soil. In severe cases, an alkali crust forms on the potting soil, causing the leaves to drop. This is especially true in the north, where both water and soil contain alkali. The solution is to change the soil or apply a ferrous sulfate solution.
How often should an Australian pine be watered?
During care, how often to water an Australian pine depends on the moisture of the potting soil. In summer, generally watering twice a week is enough. In winter, watering can be reduced by one time compared with summer.
From spring to autumn, an Australian pine bonsai should be watered more, but waterlogging in the pot must be avoided. In high temperature and dry conditions, spray water on the potted plant and the nearby ground to lower the temperature and increase humidity. Water promptly; do not wait until the soil dries out before watering. From late autumn onward, gradually reduce watering to enhance its cold resistance.
In summer, water when the potting soil is half dry; when watering, just water in a circle along the edge of the pot. If the weather is very dry, spray water around the Australian pine bonsai to increase the air humidity, creating a humid and suitable environment for it.
Propagation methods for the Australian pine:
The Australian pine is mainly propagated by seed, but it can also be propagated into new plants by cuttings.
1. Seedlings grown from seed are sturdy and strong with vigorous growth, suitable for propagation in batches. Generally, from July to August, first scarify the seed coat of freshly collected seeds to promote germination; otherwise, leaving them in the soil too long easily makes the seeds rot. Then sow the treated seeds in a sand bed, covering with fine sand about 1.5-2 cm. Under conditions of 25-28°C and a certain humidity, they will germinate in about 2-3 weeks; plant them out immediately after germination.
2. When taking cuttings, if you choose the main axis or a leggy branch as the cutting, it easily causes the plant's crown to be misshapen and only grow sideways, affecting its ornamental value. Cut the tip 2-3 nodes of a healthy, easy-to-root branch as the cutting, remove some leaves, soak it in clean water overnight, then insert it into a sand bed with coarse sand or vermiculite as the substrate. Keep the temperature at 20-25°C and the air humidity high; it will root in about 3 months.