How to propagate Chaenomeles speciosa (flowering quince) by cuttings? Master the method and it will bloom more abundantly
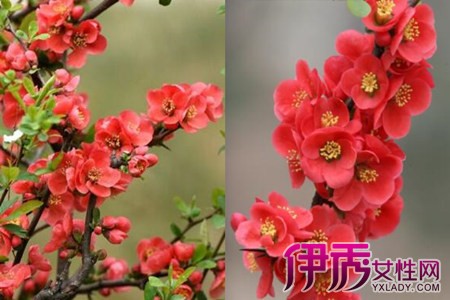
For taking cuttings of this plant, you must first choose the right season. Many people do not know which season is suitable and just casually cut off branches and stick them in the soil. The chance of survival this way is basically zero. The correct time is in spring. This season can increase the chance of survival, and they will normally begin to take root and grow.
When taking cuttings, be sure not to choose branches that are too tender, because tender branches are prone to blackening and rotting at the base. Choosing older branches and first rooting them in a pot, then moving them into the ground after they survive, is a very good method. When choosing a pot, do not pick one that is especially large; about 20cm is enough.
Also, find loose soil for growing them, and do not use very hard yellow soil. Before taking cuttings, cut the bottom of the branch into a pointed shape, so that after it is inserted into the pot it can root better. When starting the cuttings, be sure to keep moisture sufficient. Because if water cannot be supplied, they will wilt, making survival very difficult.
After the cuttings are taken, place them in a cool spot indoors, and absolutely do not let direct sunlight hit them. Under direct sunlight, the roots tend to dry out and lose water, which greatly reduces the chance of survival. So be sure to pay attention to this point. Indoors, it takes about half a month before they can normally take root and begin to grow. One month after new buds grow, they can be moved into the ground for growing.
When growing them in the ground, water more, about once every 2 days. In the second year you can see beautiful flowers, but when they bloom they attract small insects. Then you must spray insecticide, otherwise the leaves will curl, which looks very unsightly.
How to make tree bonsai
Tree bonsai is made by selecting young trees or old stumps of ornamental trees and, after cultivation, artistic processing, and planting arrangement, placing them in exquisite pots. In making them, the most important thing is to master the biological characteristics of various trees and fully bring out their natural beauty of posture, charm, and color. For example, the lush vigor of pines and cypresses, the antique elegance and quiet fragrance of plum stumps, the plain and ancient simplicity of elms and maples, the unrestrained elegance of green bamboo, and the clear branches and leaves of Japanese bush cherry and boxwood. The cultivation, making, and management of tree bonsai is meticulous work that is both highly artistic and highly scientific. A good bonsai with a graceful shape and lasting appeal is formed through the aesthetic conception and superb artistic techniques of skilled craftsmen, and it also requires careful maintenance and management to ensure lush growth and graceful posture. The production and management techniques of tree bonsai generally include the following aspects: selection of tree species, cultivation of tree stock, processing and shaping, potting and scene arrangement, and maintenance management. Maintenance management also includes: placement location, watering, fertilizing, pruning and posture adjustment, repotting and soil changing, and pest and disease control.
1. Selection of tree species
There are many materials suitable for making tree bonsai. Generally, those with tangled roots, dense branches and fine leaves, graceful posture, and brilliant flowers or fruit are preferred. At the same time, they are required to have biological characteristics such as strong budding ability, tolerance to pruning, and long life.
The selection of materials for tree bonsai in our country has a long history and tradition. During the Jiaqing period of the Qing Dynasty (1796-1820), Su Ling of Wuxi wrote "Random Records of Bonsai," which recorded many tree bonsai and divided bonsai plants into the Four Great Masters, Seven Worthies, Eighteen Scholars, and Four Elegants of Flowers and Plants.
Four Great Masters: Caragana sinica, boxwood, winter jasmine, and needle juniper.
Seven Worthies: Huangshan pine, Juniperus chinensis 'Kaizuka', elm, maple, holly, ginkgo, and Japanese bush cherry.
Eighteen Scholars: plum, peach, Damnacanthus indicus, Jasminum nudiflorum var. nudiflorum, goji, rhododendron, emerald cypress, Chinese quince, wintersweet, nandina, camellia, Buddhist pine, Malus spectabilis, bamboo, crape myrtle, pomegranate, Serissa japonica, and gardenia.
Four Elegants of Flowers and Plants: orchid, chrysanthemum, narcissus, and acorus.
Among the tree species selected for ancient tree bonsai mentioned above, many are still commonly used materials for making bonsai today. However, with continuous introduction and discovery, there are now as many as one to two hundred materials suitable for tree bonsai, generally divided into the following categories:
Pine and cypress category: Japanese white pine, Huangshan pine, black pine, Pinus thunbergii 'Umbraculifera', Japanese cedar, dawn redwood, Chinese swamp cypress, Chinese juniper, Sabina procumbens, Juniperus chinensis 'Aurea', emerald cypress, shoreline juniper, Juniperus chinensis 'Plumosa', Juniperus chinensis 'Filifera', Juniperus chinensis 'Kaizuka', Chinese juniper, Buddhist pine, yew, etc.
Mixed wood category: Chinese elm, boxwood, Japanese bush cherry, Syzygium buxifolium, Chinese loropetalum, orange jasmine, Chinese hackberry, Fujian tea, tamarisk, small-leaf privet, etc. Leafy tree category: trident maple, red maple, ginkgo, Ilex cornuta, bamboo, black bamboo, Buddha belly bamboo, palm bamboo, sago palm, etc.
Flowering tree category: camellia, tea camellia, Caragana sinica, Chaenomeles speciosa, plum, ornamental peach, crape myrtle, Malus halliana, Malus spectabilis, winter jasmine, osmanthus, rhododendron, Serissa japonica, Jasminum floridum, etc.
Fruit tree category: fruiting pomegranate, pyracantha, nandina, kumquat, finger citron, hawthorn, Ilex cornuta, Diospyros cathayensis, Elaeagnus pungens, Ardisia japonica, Diospyros rhombifolia, persimmon, goji, coral cherry, etc. Vine category: Chinese trumpet creeper, ivy, star jasmine, Euonymus fortunei, wisteria, honeysuckle, etc.
2. Collection and cultivation of tree stumps
The materials for tree bonsai mainly come from two sources: propagation and seedling raising, and collecting tree stumps. The former uses propagation methods such as sowing, cutting, layering, grafting, and division to obtain saplings, which are cultivated from a young age; shaping is relatively free, and the thickness of trunk and branches is relatively even, but it takes a long time. The latter collects tree stumps that have grown for many years from the mountains and fields, treats them according to the material, and cultivates and processes them, which can greatly shorten the time. Often one can also select old stumps with natural, graceful forms and antique, rustic simplicity, and make them into fine bonsai. The disadvantage is that it is limited by the inherent form of the stump, and the thickness ratio between the trunk and side branches is not easy to make even. In addition, some precious tree species such as Japanese white pine, sappanwood, and red maple cannot be collected in the mountains and fields, so they can only be obtained by artificial propagation.
Techniques for propagation and seedling raising are introduced in many horticultural books, so this book will not repeat them. Here, methods for collecting and cultivating tree stumps are introduced.
Collecting tree stumps requires mastering certain scientific methods; otherwise, it is difficult for them to survive, even more difficult to become finished products, and it wastes time, manpower, and natural resources.
In selecting tree stumps for collection, one should consider comprehensively from aspects such as tree species, tree age, form, and future potential. The selection of tree species has been introduced earlier. As for tree age, old stumps that have grown for many years are valued, but they must also be vigorous in growth. As for the form of the stump, do not blindly pursue the bizarre or pictorial likeness (pictorial likeness is not a selection standard for bonsai art); rather, those with antique singularity and vigorous twists and turns are preferred, and special attention should be paid to the form of the roots and trunk. Generally, tree stumps should not be too tall or too large, so as to facilitate survival, processing, potting, and display. Although some tree stumps have certain defects, from a developmental perspective, as long as they can be improved by processing, they can still be used.
The time for collecting tree stumps is generally after the trees enter dormancy and before the trees sprout in early spring when the ground thaws. Collection in late autumn and early winter is also possible, but winter maintenance is more troublesome, especially in the north, where greenhouse maintenance is required. As for the severe cold months, because the soil layer is frozen, collection is difficult and roots are easily damaged, so it is not very suitable. The time for collecting tree stumps must also be adapted to local conditions and determined according to the habits of the tree species. For species that are not cold-resistant, collection should be done between March and April to avoid frost damage.
When collecting, the main root can generally be cut off, but more lateral roots and fibrous roots should be retained. For pines and cypresses and some taproot species, it is better to retain more of the main root appropriately; otherwise, survival is difficult. After the stump is dug up, a heavy pruning can be carried out once. Pruning should be based on the form of the stump and should preliminarily take future shaping into account. Generally, retain a portion of the main branches and trunks and shorten them, and cut off all the rest. For evergreen species with weak budding ability, such as pines and cypresses, the branches and leaves must not be cut completely bare. For collected tree stumps, the roots do not need to retain soil; it is best to dip them in mud, put them into baskets, and fill in moss to protect the fibrous roots from drying out and withering due to water loss. After bringing them back, they must be planted as soon as possible.
No matter how graceful the natural form of a tree stump collected from the mountains and fields may be, to make it into bonsai it must still undergo a certain period of cultivation, called "raising the stock." Some bonsai enthusiasts are eager for quick success and plant freshly collected stumps into relatively shallow glazed pots or purple clay pots, or even expose the roots and claws, trying to complete the bonsai in one go. As a result, most are difficult to keep alive, and even harder to shape. This is what is meant by haste makes waste.
For raising the stock, it is best to choose a place with loose, fertile soil, good drainage, and ample sunlight for ground planting, or use clay pots for planting, so as to facilitate shaping and processing later. When planting, bury them appropriately deep, preferably leaving only the bud eyes above the soil. For stumps with taller trunks, moss can be wrapped around the trunk. After planting, water thoroughly once, and cover the stump with a little straw to maintain humidity. In high summer temperatures, build a shade shed and spray water frequently. In winter, surround them with straw curtains to prevent freezing. Usually pay attention to replenishing water; during the vigorous growth period, water must not be lacking, but also be careful not to water too much, to prevent root rot. In dry weather, it is best to spray water on the leaves often. To make the stock take shape as quickly as possible, fertilizing is very important. Newly planted stumps have relatively tender roots, so apply thin fertilizer frequently. Fertilizer can be decomposed cake fertilizer or manure, diluted before use. During stock raising, pruning, bud removal, and pest and disease control must also be done well.
Pruning mainly refers to cutting off branches and trunks not needed for future shaping, so as to avoid consuming nutrients. Dead branches and diseased branches must also be cut off; otherwise, they will affect the sprouting of new buds or cause the spread of pests and diseases.
Bud removal mainly refers to removing excess buds. Generally, retain the buds needed for future shaping (including spare buds), and remove all the rest, so as to avoid growing useless branches and trunks. When the retained buds grow into branches and trunks, further selection can be made, cutting off unused branches and trunks and removing the terminal buds of the retained branches and trunks to encourage axillary buds to sprout side branches and increase the layers and density of branches and leaves.
3. Processing and shaping of tree stock
Saplings cultivated from a young age generally begin processing and shaping after 3-5 years; tree stumps collected from the mountains and fields can mostly be processed and shaped after one year of stock raising.
Before processing, ground-planted stock can be dug up and temporarily planted in pots of basically suitable size, to facilitate handling and shaping. Large stock can also be processed and shaped in place.
Processing and production must follow a series of artistic techniques for bonsai creation. First carefully observe and deliberate on the stock material, and decide what theme to express and how to shape it according to the characteristics of the material, which is "treating according to the material." Arrange the skeleton of the roots, trunk, and branches of the stock according to the rules of bonsai art, so that it becomes a living bonsai artwork with coordination and evenness, graceful lines, and profound artistic conception. For example, if pine is chosen as the material, it is suitable to express the vigor and uprightness of its main root, with branches and leaves spread flat in cloud-like layers; cypress is suitable to express its antique, unusual main trunk, with branches and leaves in clustered form; plum shaping is suitable for sparse branches slanting across; winter jasmine is suitable for drooping branches and arching curves; ... This is considered from the natural characteristics of the tree species. In addition, it must also be considered from the inherent shape of the stump. For example, some stumps have straight trunks and can follow their natural form to make a formal upright style; some stumps have naturally curved trunks and are suitable for making a curved-trunk style or cascade style; some stumps have withered, bare trunks and are suitable for making a dead-peak style... Treating according to the material can save labor in bonsai making while also giving natural wild charm. If one completely lets it grow naturally, then there is no talk of bonsai art; but if the traces of artificial work are too excessive, then the beauty of nature is lost. Therefore, for the shaping of tree stumps, one must never rigidly adhere to conventions or apply fixed patterns.
Shaping and processing methods also have a certain sequence, usually first the trunk and then the branches, from bottom to top, by bending, pruning, or carving, which can be determined according to the needs of the tree species and shaping. Different regions have different processing methods due to different customs. Generally, for pines and cypresses and tree species with weak budding ability, bending is the main method. For tree species with strong budding ability such as Chinese elm, Japanese bush cherry, Fujian tea, and trident maple, pruning can be the main method. Stumps processed by bending are freely shaped, with many twists and turns, and take shape relatively quickly; stumps processed by pruning are vigorous and natural, but take shape more slowly. In southern regions, the climate is warm and trees grow quickly, so bending is suitable for shaping; in northern regions, the climate is cold and trees grow more slowly, so bending is suitable for shaping. Of course, these are only general situations. The styles and schools of bonsai in different places are different, and shaping methods are vastly different. For example, the Lingnan school uses the pruning and shaping method of "storing branches and truncating trunks"; the Yangzhou school uses the bending and shaping method of "one inch, three bends"; the Suzhou school uses the shaping method of "coarse bending and fine pruning"; the Huizhou school uses the shaping method of "zigzag bending"; the Sichuan school uses the "square bend" or "drooping bend" method for shaping, and so on. If we master the most basic methods of pruning and bending and apply them flexibly according to specific circumstances, ideal results can often be produced.
(1) Bending method: that is, using binding materials such as palm fiber, hemp skin, or metal wire to bend tree branches and trunks into various shapes.
Metal wire binding method: This method is simple and easy to carry out, and bends freely, but removal is somewhat troublesome. It is best to use iron wire that has been heated over fire, but usually more economical lead wire is used, and wire of appropriate thickness is selected according to the thickness of the branch or trunk being bent. Metal wire is generally selected from sizes 12-24, used according to the match. Table for selecting iron wire thickness
Iron wire No. 12 No. 12 No. 16 No. 18 No. 20 No. 22 No. 24
Branch or trunk diameter 15 mm 10 mm 6 mm 4 mm 3 mm 2 mm 1 A5 mm
When bending, first fix one end of the metal wire to the base or crossing point of the branch or trunk, then slowly wrap it closely against the bark, so that the metal wire forms about a 45° angle with the branch or trunk. If the branch or trunk is to be twisted to the right and bent downward, the metal wire is wrapped clockwise; otherwise, wrap counterclockwise. Note that while twisting, bend at the same time, so that the metal wire stays close to the bark and the branch or trunk is less likely to break. Do not use too much force, to prevent damaging the bark or breaking the branch or trunk. For tree species with thin bark that is easily damaged, such as pomegranate and red maple, first wrap the branch or trunk with hemp skin, then bind with metal wire. If repeated metal wire wrapping occurs on one branch, pay attention to keeping the wrapping direction consistent and try to avoid crossing.
Palm fiber binding method: This is a traditional shaping method in Chinese bonsai. Its advantages are: the palm fiber blends with the color of the branches and trunks, it can be appreciated immediately after processing, it is not easy to damage the bark, and removal is convenient, but binding is relatively difficult. Generally, first twist palm fiber into palm rope of different thicknesses, tie the middle section of the palm rope around the lower end of the trunk to be bent (or make a loop knot), twist the two ends together a few times, place them on the upper end of the branch or trunk to be bent, tie a slip knot, then slowly bend the branch or trunk to the required curvature, then tighten the palm rope and tie a dead knot, thus completing one bend. Generally, the bend should not be excessive; otherwise, it easily loses the natural form. The key to palm fiber binding lies in mastering the force points. According to the needs of shaping, choose the positions for tying the palm fiber and making the knot.
The order of palm fiber binding: at the beginning, first bind the main trunk, then bind the branches and leaves; when binding branches and leaves, first bind the top, then bind the lower part; when binding each part, first bind the large branches, then bind the small branches; when binding the main trunk, proceed from the base to the top.
In long-term practice, old bonsai artists in various places have summarized many kinds of palm fiber binding methods, called palm methods. These palm methods differ slightly by region or school, but the basic principles are the same, and the purpose is to use palm fiber to tie tree branches and trunks into the required forms. The palm method is a means, not an end. After mastering the basic principles, it can be handled flexibly according to shaping needs.
For relatively thick branches or trunks to be bent, first wrap them with hemp skin, and place a strip of hemp fiber on the outer side of the bend to increase the toughness of the trunk. If the branch or trunk is too thick and difficult to bend, the "knife-opening method" can also be used, that is, use a sharp small knife to cut a deep opening 3-5 cm long at the bend of the trunk, and then wrap the cut surface with hemp skin as above, which both facilitates bending and makes it less likely to break. To help the cut heal, it is best to make the cut surface perpendicular to the plane of the bend.
Whether metal wire or palm fiber is used for binding, it can generally be removed after one year to set the shape. If not removed in time, as the branch grows thicker, the metal wire or palm fiber will sink into the bark, affecting the growth and appearance of the tree. However, for slower-growing tree species and thicker branches or trunks, the time can be extended by half a year to a year.
Binding time for various tree species: pay attention to timely binding, then the branches are soft and easy to bend, and after binding, they develop and grow well. If binding is not timely, the branches are easy to break, and development and growth are also affected. Tree species bound in winter and spring include: Chinese juniper, magnolia, Chinese viburnum, butterfly tree, wintersweet, plum, peach, cherry, Japanese bush cherry, elm-leaved spirea, Malus spectabilis, Malus halliana, pomegranate, crape myrtle, Chinese elm, Chinese hackberry, Vitex negundo, etc. For the species from wintersweet onward, before they are fully shaped, they should also be bound once in summer on newly lignified branches. Tree species bound in summer and autumn include: Buddhist pine, Huashan pine, Diospyros cathayensis, Elaeagnus pungens, Serissa japonica, osmanthus, etc. Tree species bound in winter and autumn include: Chaenomeles speciosa, pyracantha, Japanese bush cherry, boxwood, etc. Some tree species such as Euonymus alatus, winter jasmine, and goji can be bound at any time. Flower-viewing tree species such as camellia and rhododendron are all suitable for binding before flowering.
(2) Pruning method: that is, through pruning of branches and trunks, removing excess parts and retaining the essence, so as to make the tree shape beautiful. This is one of the main means of shaping tree bonsai. The effects of pruning include weakening, dwarfing, and changing the tree shape. When pruning, adjust and cut off messy crossing branches, overlapping branches, parallel branches, and opposite branches. For the retained branches, nutrients are concentrated and they grow thick and strong. When the cultivated branch grows to a suitable thickness, carry out severe pruning to shorten it and produce the second section of branches; when the second section of branches grows to a suitable thickness, cut again, and do the same in turn for the third and fourth sections. Generally, keep two small branches on each section of branch, one long and one short. After many years of pruning, the branches and trunks become shortened, thick, and vigorous, gradually forming the required tree shape.
Pruning methods: there are measures such as pinching, cutting, thinning, and wounding. Pinching refers to pinching off the growing point and removing leaves. Removing the tip of new shoots during the growing period is called pinching. Pinching can promote axillary bud growth, produce more branches, inhibit height growth, and help make the bonsai shape beautiful. Removing leaves can promote the sprouting of new leaves. For example, removing old leaves from elm during the growing period will make the new leaves smaller and more delicate, which is good for viewing; removing old leaves from maples and pomegranates will make the sprouting new leaves red and brightly pleasing. Cutting refers to shortening current-year branches; after shortening, medium and short branches increase and the mother branch thickens. So-called when branches are sparse, cut; when cut, branches become dense, which is beneficial for shaping branch layers. Retrenchment refers to shortening perennial branches, the main technique of the Lingnan school's "storing branches and truncating trunks," which is beneficial for renewing and rejuvenating old trees. When collecting wild tree stumps, during stock raising, the method of retrenchment and trunk truncation is often used, which is both a dwarfing measure for the stump and a means of renewing and rejuvenating old stumps. Thinning refers to thinning pruning, cutting away part of overly dense branches from the base, which helps improve ventilation and light conditions and promotes vigorous growth of the remaining branches. Wounding refers to measures such as scoring, girdling, twisting branches, twisting shoots, and bending branches on tree branches and trunks. Flower-viewing and fruit-viewing bonsai often adopt this method to promote flowering and fruiting.
The pruning period should be timely and suitable for the tree. Generally, deciduous tree species can be pruned in all four seasons, but pruning after leaf fall and before bud break is preferable. Pines and cypresses tend to bleed resin after pruning, so they are suitable for winter pruning; fast-growing tree species with strong budding ability such as tamarisk and elm can be pruned several times a year; for flower-viewing tree species, those that bloom on current-year new branches such as crabapple, apple, crape myrtle, and pomegranate are suitable for pruning before sprouting; tree species that bloom on one-year-old branches such as ornamental peach, plum, and winter jasmine are suitable for pruning after flowering.
(3) Carving method: In order to show the antiquity of trees, sometimes a chisel or sharp carving knife can be used to carve the trunk according to shaping techniques, creating natural uneven changes. Part of the bark can also be peeled off, or even half the trunk split away (such as the split-trunk style for plum stumps), so that the tree presents a naturally withered and aged posture. But when carving, artificial traces of knife and axe cuts must not be revealed. This method is mostly used for pines and cypresses and relatively large old stumps.
(4) Root-lifting method: Tree stump bonsai emphasizes exposed roots and claws and tangled roots, which is also one of the important contents of bonsai appreciation. The root-lifting technique usually plants the tree first in a deep pot, and then year by year removes the soil mounded above, so that thick roots are raised above the soil surface. At the same time, the roots can also be artistically coiled and curved to make them appear more antique, unusual, simple, and wild. But when lifting roots, one must maintain moderation and must not expose too many roots at once, so as not to affect the growth of the stump or even cause death. The root systems of tree species such as elm and Caragana sinica are slender and soft. When lifting roots, long roots can be coiled into antique and elegant shapes, but the coiling of the root system must be orderly and aesthetically pleasing; it cannot be tangled randomly and lose naturalness, which would instead affect the effect.
The forms of trees in nature are ever-changing, and as a miniature of them, bonsai should of course also be diverse. Therefore, it is difficult to set specific standards for tree shaping. But it must conform to nature and be rich in pictorial quality. Arbitrary artificiality loses the natural form of the tree. However, merely conforming to nature is not enough; artistic processing must also be carried out on the basis of nature. This is the same principle as painting. To reach a certain artistic level, one must usually observe various trees in nature more and accumulate perceptual understanding. In particular, one must be good at mastering the typical postures of trees commonly used in bonsai, such as the natural form characteristics of pine, cypress, willow, plum, and common mixed trees. At the same time, observe more tree painting methods in landscape paintings and learn techniques from them. In addition, improve artistic accomplishment from aspects such as aesthetics and literature.
4. Planting of trees
Stock that has been processed and shaped, if it cannot yet be fully formed, can continue to be cultivated in the ground; if it is close to being formed, it can be potted and arranged in a scene.
(1) Choosing a pot: Only when a gracefully shaped tree is matched with a pot of moderate size, appropriate depth, matching style, harmonious color, and suitable texture can it become a perfect bonsai artwork.
When choosing a pot, first pay attention to moderate size. If the pot is too large, the inside of the pot appears empty, the tree appears short, and at the same time a large pot holds much soil and thus retains too much water, which at best causes excessive vegetative growth and affects shaping, and at worst causes root rot; if the pot is too small, the bonsai appears top-heavy and lacks stability, and it is also easy to cause insufficient water and nutrients, affecting tree growth. Generally speaking, for short and sturdy trees, when planted singly, the pot opening must be smaller than the crown spread, and the pot length must be greater than the height of the trunk; for tall and upright trees, when planted singly, the pot opening must be larger than the crown spread, and the pot length must be smaller than the height of the trunk; for combined planting styles, it is better to use a slightly larger pot to express a certain spatial environment. In addition, when using a shallow pot, the pot opening should preferably be large rather than small; when using a deep pot, it should preferably be small rather than large.
The depth of the pot has a great influence on bonsai shaping and also a certain influence on plant growth. If the pot is too deep, the trees in the pot appear low and short, and it is not conducive to the growth of drought-loving plants; if the pot is too shallow, trees with relatively thick and tall trunks appear unstable, and it is difficult to plant them, and it is not conducive to the growth of moisture-loving plants and flower and fruit trees. Generally speaking, combined planting styles should use the shallowest pots; formal upright style should use relatively shallow pots; slanting trunk style, reclining trunk style, and curved trunk style should use pots of moderate depth; cascade style should use the deepest cylindrical pots, but large cascade style sometimes instead uses medium-deep pots to contrast and show the length of the drooping branches. In addition, for regular-style tree bonsai, deeper pots are customarily used; for natural-style tree bonsai, especially those with accessories placed in the pot, the pot must not be deep.
When selecting and matching pots, the style must be consistent in tone with the content of the scene in order to be harmonious. At the same time, consideration must also be given to benefiting plant growth. If the tree's posture is vigorous and upright, then the lines of the pot should also be firm and straight, using square, rectangular, and various angular pots to concentrate the expression of a masculine beauty; if the tree's posture is twisted and gentle, then the outline of the pot should preferably use curved lines, using round, oval, and various rounded pots to show a feminine beauty. It must be explained that this method of choosing pots is not absolute; sometimes, in order to create a contrast, the opposite approach is also used. Upright trees use low-footed pots; elegant slanting trees use high-footed pots.
Fast-growing trees with well-developed root systems should use pots with flared or straight openings, to facilitate repotting; slow-growing trees with less developed root systems can use pots with various opening forms.
For trees in traditional regular-style shaping, it is suitable to use square or round pots whose length, width, and height differ little, and pots in styles such as crabapple shape, hexagonal shape, and plum blossom shape can also be used; trees without obvious directionality should use relatively shallow pots such as round or square; slanting trunk style should use relatively shallow pots such as rectangular or oval; multi-trunk style, forest style, connected-root style, and stone-attached style bonsai have more complex content, so simple-shaped shallow pots such as rectangular or oval should be used.
The texture of the pot has a certain influence on both viewing and plant cultivation. Pines and cypresses are generally suitable for purple clay pottery pots; mixed wood species generally use glazed pottery pots; flower-viewing and fruit-viewing species are suitable for cultivation in tile pots, which is good for flowering and fruiting, and when viewing, an outer porcelain pot or glazed pottery pot can be added; miniature bonsai are suitable for purple clay pottery pots or glazed pottery pots; extra-large bonsai can use carved stone pots or cement pots.
The colors of the pot and the tree scene should both contrast and harmonize. Pines and cypresses are verdant in all four seasons, and matching them with dark purple clay pottery pots such as red or purple makes them appear even more antique and simple. Flower and fruit species are rich in color, so they should be matched with brightly colored glazed pottery pots to make the colors of the flowers and fruit even more gorgeous. For example, red plum, Chaenomeles speciosa, wisteria, and pyracantha can be matched with white, light blue, light green, or light yellow glazed pottery pots; yellow-flowered rhododendron, white plum, Caragana sinica, and winter jasmine can be matched with darker-colored glazed pottery pots; for foliage-viewing and mixed wood species, even more attention must be paid to the color of the pot, such as red maple suitable for a light-colored pot and ginkgo suitable for a dark-colored pot. In addition, when matching pots, the color of the tree trunk must also be considered.
The above introduces the main points to note in selecting and matching pots. They cannot be regarded as absolute rules and should be applied flexibly according to specific circumstances. Selecting and matching pots is an important step in bonsai artistic creation and has a great bearing on the success or failure of a bonsai work. Serious exploration and research are needed, and only through a great deal of practice can one become proficient.
(2) Soil: The potting soil for tree bonsai should be selected according to the biological characteristics of each tree species. Different tree species have different requirements for the physical and chemical properties of the soil. Some require acidic soil, such as rhododendron, camellia, Chinese loropetalum, and gardenia; some require neutral soil or calcareous soil, such as Chinese elm, zelkova, and Chinese hackberry; tamarisk and goji can tolerate alkaline soil. This shows that different bonsai trees should use different potting soils. But generally, bonsai plants all need fertile, loose sandy loam rich in humus.
There are many kinds of potting soil, such as humus soil, paddy field soil, mountain soil, leaf mold, pond mud, and river sand, all suitable for bonsai soil. Culture soil can also be prepared according to different situations. Ordinary culture soil is usually prepared from the following materials: 4 parts fertile field soil (garden soil), 4 parts leaf mold (soil formed by piling up and decomposing large amounts of leaves and weeds), 2 parts coarse sand, then mix evenly with a small amount of rice husk ash and sieve. Fertilized culture soil is ordinary culture soil mixed with 1-2 parts cake fertilizer.
(3) Planting: When planting, first choose the pot and soil well, and use broken tile pieces and iron wire mesh (plastic mesh is better) to plug the drainage hole at the bottom of the pot. Shallow pots mostly use iron wire mesh; deeper pots can use broken tile pieces, with two pieces overlapped to fill one hole; the deepest cylindrical pots need more tile pieces and sandy soil placed at the bottom of the pot to facilitate drainage. The work of filling the hole is very important and bears on the survival of the bonsai plant, so it must not be done carelessly. If not handled properly, the water hole will be blocked, water cannot drain out after watering, and the potting soil will accumulate water, causing root rot in the plant. When using a shallow pot to plant a relatively large tree, metal wire must be used to tie the tree roots firmly to the bottom of the pot. First place an iron rod at the bottom of the pot, pass the metal wire through the pot hole and tie it around the iron rod, so that the tree roots can be fixed when planting and will not shake because the potting soil is shallow and affect root development and growth.
After the position of the tree is determined, put the previously sieved culture soil into the pot. If the potting soil is divided into coarse and fine, first put the coarse-grained soil at the bottom of the pot, then put the fine-grained soil to cover the roots and fill firmly. When adding soil, put it in while using a bamboo stick to press the soil close to the roots, but do not press the soil too tightly; as long as there are no large gaps, it is fine. This is good for aeration and drainage. When the soil is added to near the pot opening, leave a little watering space to facilitate watering. If it is a shallow pot, then no watering space may be left, and sometimes soil must be mounded for planting. The depth of planting the tree should also be based on shaping needs; generally, the roots can be slightly exposed above the soil surface.
After the tree is planted, it can be watered. Newly planted soil is relatively loose, so it is best to use a fine watering can to spray water. The first watering must be thorough. After watering, place it in a windless, semi-shaded place, pay attention to watering frequently, and keep the potting soil moist. After about half a month, new roots will grow, and only then can normal management begin.
For planting stone-attached style bonsai, there are roughly two situations: one is to plant the tree in a hole in the rock, which is relatively simple, but care must be taken to use a bamboo stick to press the soil close to the tree roots; the other is to wrap the tree's root system around the four sides of the stone, which is relatively difficult. Carefully insert the tree roots into the cracks of the selected rock, smear the whole outside with mud, then wrap and tie it with moss, and plant it together with the stone into the soil. After two or three years, when the roots have grown fully and become tightly embedded in the stone cracks, it can be taken out and planted in a shallow pot.
5. Stone matching and accessories for tree bonsai
In tree bonsai, rocks or accessories are often used in combination with trees. This is a unique scene-making technique of Chinese bonsai art. In a pine and cypress bonsai, arranging some rocks will make a tree of only a foot appear to have the momentum of reaching the sky. In a cascade-style bonsai, placing a pointed peak stone at the base of the roots makes it seem as if the tree is growing on a cliff. When tree bonsai is dotted with rocks, it adds poetic and pictorial charm and natural interest. Pine-and-stone bonsai and bamboo-and-stone bonsai are both techniques of support and contrast.
Stone matching can be divided into natural style and garden style: natural-style stone matching imitates the natural combination of wild trees and strange peaks and rocks; garden-style stone matching imitates the artificial arrangement of trees and stones in gardens.
Accessories refer to small ceramic or stone models such as pavilions, terraces, towers, chambers, animals, and figures. Adding accessories to tree bonsai can add a flavor of life. When using accessories, pay attention to conformity with the natural environment and scenic interest, attention to proportion of distance and size, and harmony of color. Accessories are usually placed on the soil surface of the bonsai or on matched stones. For temporary decorative treatment for display or exhibition, accessories are generally not placed at ordinary times, so as not to affect management work such as watering and fertilizing the trees.
Practical Guide to Home Flower Growing (Middle Volume)
31.What are the benefits of root-outside fertilization?
Root-outside fertilization, also called foliar fertilization, is a fertilization method in which a diluted solution of chemical fertilizer or trace elements is sprayed on the leaf surface and absorbed and utilized by the plant through leaf stomata. The main advantages of root-outside fertilization are: small dosage, remarkable and rapid fertilizer effect, not fixed by the soil, and not affected by the absorptive function of the root system.
32.Why can't un-decomposed fertilizer be applied?
Some flower enthusiasts often bury rotten eggs, internal organs of chickens, ducks, and fish, meat skins, raw horse manure, cake fertilizer, and the like into the potting soil. They think this can increase nutrients and make flowers bloom profusely and leaves flourish, but the result is contrary to their wishes and instead harms the flowers. Why is this? Because the growth and development of flowers rely on absorbing various nutrient elements such as nitrogen, phosphorus, potassium, magnesium, and iron that have been fermented in the soil and dissolved in water. The above rotten foods, if directly buried in the pot without fermentation, will ferment upon contact with water after application and produce high temperature, which will directly scald the flower root system. In addition, microbial activity causes soil oxygen deficiency, leading to the death of the flowers. At the same time, un-decomposed fertilizer produces a foul odor during fermentation, attracting flies to lay eggs; maggots can also bite the root system, harming flower growth, and the foul odor can also pollute the environment. Therefore, when growing flowers, one must pay attention to applying fully decomposed fertilizer to ensure good flower growth.
33.What harm is there in applying concentrated fertilizer?
If the concentration of liquid fertilizer applied is too high, it often causes flower branches and leaves to turn yellow and wither, and even the whole plant to die. What is the reason? Because under normal conditions, the concentration of the cell sap in plant root hair cells is greater than the concentration of the soil solution, so the osmotic pressures of the two differ. At this time, the soil solution can continuously permeate into the root hair cells, and the root hairs can absorb water and nutrients from the soil to supply flower growth and development. If the concentration of liquid fertilizer applied is too high (its concentration greater than the cell sap concentration), a reverse phenomenon occurs, that is, the cell sap instead permeates into the soil solution, causing root cells to lose water and causing plasmolysis, and in severe cases causing the plant to wither and die. The principle is similar to pickling vegetables at home: put salt and vegetables into a water vat, and before long the salt water becomes dilute and the vegetables become wilted. This phenomenon mostly occurs when too much chemical fertilizer is applied; a similar phenomenon also occurs if fermented liquid fertilizer is applied too concentrated. Therefore, the concentration of chemical fertilizer solution applied to potted flowers must not be too high, generally about 0.1% is suitable. When applying fermented liquid fertilizer, it also needs to be diluted 5-10 times.
Practical Guide to Home Flower Growing (Middle Volume)
34.Why are eggshells and tea residue harmful to flowers?
In daily life, some people like to put eggshells upside down in flower pots or use leftover tea to water flowers, thinking this is beneficial to flower growth, but in fact it often has the opposite effect. Because when eggshells are placed upside down on flower pots, the residual egg white inside the shells flows into the surface layer of the potting soil and, after fermentation, produces heat that directly burns the plant roots. At the same time, after the egg white ferments, it produces a foul odor that attracts flies to lay eggs; the maggots bite the roots, and then it is also easy to induce pests and diseases, affecting flower growth. Tea contains theophylline, caffeine, and other alkaloids, which have a relative destructive effect on organic nutrients in the soil. At the same time, when tea residue covers the pot surface, over time it will gradually ferment and rot, hindering aeration of the potting soil, causing oxygen deficiency in the pot, affecting root respiration, and being unfavorable to flower growth. However, decomposed eggshells, if their supernatant liquid is used as top dressing, or if the eggshells are baked dry and crushed and applied into the potting soil, are beneficial to flower growth and development. Fermented tea residue used as base fertilizer is also beneficial for soil improvement. The flower-growing proverb "seven parts rely on management, three parts rely on pruning" is an important experience in growing flowers. Through pruning, not only can flower branches be evenly distributed, nutrients saved, plant vigor regulated, and excessive growth controlled, thereby making the flowers neat in shape and graceful in posture, but more importantly it is beneficial for producing more flowers. The flowers of most flowers bloom on new branches; only by constantly pruning old branches can new branches be promoted and more flowers and more fruit be produced.35.What effect does air humidity have on the growth of foliage plants?
The water needed by foliage plants is easy to solve in the process of watering; what is difficult is their special requirement for air humidity. Because most of them originate from tropical rainforests and require air humidity of at least about 60%. Therefore, air humidity is an important factor in keeping the plants green and glossy. In northern homes, relative humidity is mostly below 60%. Under general conditions, as long as it is not below 50%, most varieties can still grow normally. On the contrary, if the humidity is less than 40%, the leaves of the plants will show scorched edges and yellowing. At this time, measures such as frequent spraying, covering with a plastic cover, or using the deep-pot evaporation method should be taken to increase air humidity. If foliage plants are in a dry environment for a long time, not only will the leaves lose their luster, but the growth vigor of the whole plant will also weaken, growing slowly or stagnating, until it withers and dies. Foliage plants bought home from flower shops often grow poorly, mostly because they cannot adapt to the dry air in the home. Therefore, controlling humidity well is another key to the maintenance and management of foliage plants.36.Why should air humidity be increased when growing flowers on a balcony?
All physiological activities of flowers require the participation of water to proceed. Without water, the metabolic functions of flowers will stop, leading to death. Flowers absorb water through two channels, namely from soil moisture and from air humidity. In hot seasons, high air humidity correspondingly lowers air temperature, which is beneficial to flower growth. Some flowers that like shade and moisture can survive only in relatively high air humidity. For example, orchids, Monstera deliciosa, ferns, and begonias require relative humidity between 80%-85% in summer, and in winter it cannot be lower than 65%-75%; evergreen ornamental flowers such as Chinese hibiscus, white orchid, Lantana camara, jasmine, rubber tree, and poinsettia require relative humidity no lower than 70% in summer and no lower than 60% in winter; even drought-loving cacti or succulent plants must have relative humidity above 60% in the peak growing season in summer to grow well. Balconies are high up in buildings; in hot seasons the light is strong, causing the balcony floor, railings, walls, and other places to absorb much heat and release it slowly, so the balcony temperature is high and air humidity is reduced; ordinarily, because buildings are high and winds are strong, air humidity is also not great. When balcony air humidity remains low for a long time, flower plants appear dim and lusterless, lacking vitality, and even new buds dry at the tips and leaves have scorched edges and scorched spots, seriously affecting the growth and development of flowers and their flowering and fruiting. Therefore, growing flowers on a balcony requires increasing air humidity.Practical Guide to Home Flower Growing (Middle Volume)
37.What soils are commonly used for potted flowers?
Various flowers and their different growth and development stages have different requirements for soil. The potting soil materials commonly used are roughly the following: Plain sandy soil. This is a fine sandy soil with a pure texture, low clay content, and smooth drainage. This soil is often used for sowing general flowers, or for cutting herbaceous flower branches and buds and for cutting tender branches of woody flowers, and is also the main material for preparing culture soil. Peat soil. Also called turf soil, it is collected from peat bogland. It is formed after organic matter continuously accumulates under flooded and anaerobic conditions. Its organic matter content varies, with some as high as more than 80%-90%, and it contains large amounts of fiber and humic acid. It is soft in texture, has strong fertilizer adsorption and water retention capacity, and good water and air permeability. Peat soil is acidic or neutral, contains organic matter, and is suitable for cutting slow-rooting evergreen flowering trees, or mixed half-and-half with plain sandy soil for sowing and cutting general flowers. It can also be used to prepare culture soil. Garden soil. The mature loam on the surface layer of gardens can be used for flowerbeds or to prepare culture soil. Furnace ash soil. Furnace ash soil has strong drainage and air permeability and can be used to prepare culture soil. Sieved furnace ash residue can be placed at the bottom of pots as a drainage layer. Mountain forest humus soil. It is formed by the natural accumulation and fermentative decomposition of mountain forest dead branches and fallen leaves, moss, and windblown sand. Humus soil can be made into culture soil with slight preparation. River mud. It is sediment from fish ponds and lotus ponds, containing large amounts of organic matter. After being dug out in autumn or winter, dried and weathered over winter, and mixed half-and-half with yellow clay, it can be used as cultivation soil for aquatic flowers such as lotus and water lily. After river mud is dried and repeatedly turned and broken up, after one year it can be used to prepare culture soil. Mountain soil. This soil is commonly called orchid soil. It is natural humus soil produced in the mountainous areas of Zhejiang, formed by the decay of fallen leaves accumulated over many years. It is light in texture, both air-permeable and drainage-capable, and also water- and fertilizer-retentive. It is a good potting soil, slightly acidic, suitable for cultivating acid-loving orchids, rhododendrons, camellias, and the like, and can also be used as cultivation soil for tree stump bonsai. Guangdong pond mud. It is fertile pond mud clumps from South China, the surface soil deposited at the bottom of fish ponds over many years. It is gray-black in color, contains decomposed remains and excrement of aquatic animals, is rich in organic matter, has sufficient nutrients, and drains well. When ponds dry in winter, dig it out, dry it in the sun, crush it, and sieve it for later use. Large particles can be placed at the bottom of pots; because they are not easy to disintegrate, there is absolutely no risk of water stagnation. It is neutral or slightly acidic.
38.What are acidic soil and alkaline soil?
Soil acidity and alkalinity is a term for measuring how much acid or alkali soil contains. pH is the symbol that indicates the degree of acidity or alkalinity, and its corresponding values are shown below: pH value 3-4, 5, 6, 7, 8, 9, 10-11; meaning strongly acidic, acidic, weakly acidic, neutral, weakly alkaline, alkaline, strongly alkaline. Soil with a pH below 7 is acidic soil, and soil with a pH above 7 is alkaline soil. Table of how various flowers and trees adapt to soil acidity and alkalinity: Acid-tolerant flowers and trees (pH 4-5): rhododendron, cyclamen, gardenia, coleus, purple spiderwort, ferns, orchid family plants, etc. Flowers and trees suited to weakly acidic soil (pH 5-6): cyclamen, begonia, amaryllis, primrose, camellia, jasmine, Aglaia, five-needle pine, lily, gladiolus, palm family, white orchid, gloxinia, etc. Flowers and trees adapted to neutral to slightly acidic soil (pH 6-7): chrysanthemum, asparagus fern, Chinese rose, narcissus, hyacinth, osmanthus, four-season primrose, asparagus, poinsettia, fuchsia, taro, clivia, purple magnolia, Chaenomeles, etc. Flowers and trees suited to neutral to slightly alkaline soil (pH 7-8): rose, dianthus, geranium, cactus family, winter jasmine, boxwood, nandina, sweet pea, elm-leaved spirea, sabina, etc.
39.How can the acidity and alkalinity of potted soil be measured by a simple method?
The simplest method for measuring pH is to buy some pH test paper, litmus paper and a standard color chart from a chemical reagent store and use them for testing. When testing, take one small spoonful of potted soil and place it in the bottom of a clean bowl. Add a small amount of distilled water until it just covers the test soil, and do not add too much. Then stir evenly and let it clear; this is the soil extract. Dip a bamboo stick into a little of the soil extract and put it on a small piece of test paper. If it turns red, it is acidic; if it turns yellow, it is alkaline. Compare the color shown on the test paper with the standard color chart, find the color card number closest to that color, and that is the pH value of the potted soil being tested.
Practical Complete Guide to Home Flower Growing (Middle Volume)
40.What role do the three major fertilizer elements play in potted flowers??
Among the various mineral elements required for plant growth and development, those needed in the largest amounts and most important are nitrogen, phosphorus and potassium. Therefore, nitrogen, phosphorus and potassium are called the three major fertilizer elements. Their roles are:Nitrogen fertilizer is also called leaf fertilizer.
It can make plants grow rapidly, with luxuriant branches and leaves and dark green leaf color. At the seedling stage and for foliage flowers, nitrogen fertilizer should be applied mainly. In the early stage of plant growth, that is, the vegetative growth period, nitrogen must not be lacking. It is generally applied mostly from spring to early summer. If nitrogen fertilizer continues to be applied when plant growth and development have stopped (after summer), it will cause excessive growth of stems and leaves, making it difficult for the plant to mature in the end and seriously affecting flowering and fruiting. Moreover, the stems and leaves will be weak and prone to damage by pests and diseases. Therefore, before the plant enters the reproductive growth period (flower bud differentiation period), nitrogen fertilizer should be stopped. Human excrement and urine, soybean cake, ammonium sulfate, urea and so on are all nitrogen fertilizers.
Phosphorus fertilizer is also called fruit fertilizer.
It can promote flower bud differentiation and bud formation, make flowers brightly colored and strongly fragrant, make fruits large and of good quality, and also promote robust plant growth. It is most effective when applied in the later stage of plant growth and development (reproductive growth period). Therefore, before flowering and after fruit set, more phosphorus fertilizer can be applied. Plants have the ability to store phosphorus fertilizer in their bodies and can regulate its use according to growth needs, so it can be applied once in sufficient quantity as a base fertilizer. Plants have a certain limit to their ability to absorb phosphorus fertilizer. Calcium phosphate, monopotassium phosphate, phosphate rock powder and so on are all phosphorus fertilizers.
Potassium fertilizer is also called root fertilizer.
It can make stems and root systems grow robustly, make plants less likely to lodge, and enhance resistance to pests, diseases and cold. It is indispensable in the early stage of plant development. During the seedling stage, shoot-growing stage and after transplanting seedlings, more potassium fertilizer can be applied. In the later stage of plant development, potassium fertilizer helps complete photosynthesis and plays an important role in the production of carbohydrates, especially for bulbous flowers that can store large amounts of carbohydrates, where its effect is even more significant. Therefore, throughout the entire process of plant growth, potassium fertilizer is indispensable. For potted flowers kept indoors for a long time, because insufficient light weakens photosynthesis, a large amount of potassium fertilizer can be applied. Potassium fertilizer will also not cause fertilizer damage due to excessive application. Plant ash, potassium chloride, potassium sulfate and so on are all potassium fertilizers.
41.What adverse phenomena appear in plant growth when potted soil lacks fertilizer??
When potted soil lacks fertilizer, plants become short and weak, with few branches and abnormal leaves, showing a failure to grow robustly. Because different fertilizer elements are lacking, the poor growth phenomena are also different: when potted soil lacks nitrogen, the leaves are small and pale yellow, with lower leaves yellowing first, then gradually spreading until the whole plant loses its green color, and the lower leaves are paler yellow than the upper leaves; when potted soil lacks phosphorus, the leaves curl, the leaf color is dark green, the lower leaves become yellow between the veins and bronze-colored, flowering is reduced, the root system is underdeveloped, and young buds sprout slowly; when potted soil lacks potassium, the edges of the lower leaves turn brown, and from the leaf tip downward the edges and middle of the leaves lose green and turn white, with various colored spots appearing between the veins; when potted soil lacks iron, scorched brown spots and drying appear along both sides of the veins, inside the leaf margins and at the leaf tips, sometimes expanding to form large areas of drying, with only the larger veins remaining green.Practical Complete Guide to Home Flower Growing (Middle Volume)
42There are three methods of fertilizing potted flowers.:
(1) Applying base fertilizerApplying base fertilizer to potted flowers is very important. If the base fertilizer is sufficient, less topdressing may be needed, and even chemical fertilizer alone may be used for topdressing, because repotting will be done after 1-2 years, so the quality of the potted soil will not be affected.
Organic fertilizer made from fully fermented rotted dried human excrement, barnyard manure, crushed bones, fish, poultry offal, rotten vegetables and other household waste is suitable as base fertilizer for potted flowers. The method of use is to mix 10% to 30% into the growing soil, keep it moist, turn it over frequently, so that the fertilizer and soil blend fully, and use it after one winter or 2-3 months in a high-temperature season. According to different compositions, it can be used separately for potting, repotting or changing soil for different flowers. For base fertilizer made from hoof and horn materials and poultry feathers, it can be placed directly at the bottom of the pot when potting flowers. Oil cake fertilizers such as sesame paste residue and soybean cake, and bone meal used as base fertilizer, are used in the same way as manure fertilizer, and the amount mixed into the growing soil is 3%-5%.
For flowers and trees not repotted that year, during dormancy a ring-shaped trench can be opened along the pot edge, or symmetrical short trenches can be opened, and some of the above fermented organic fertilizer can be applied, then covered with new growing soil. This can also replace applying base fertilizer.
For inorganic fertilizers (chemical fertilizers), for example, phosphorus fertilizer can use superphosphate and phosphate rock powder at 0.5%, nitrogen fertilizer can use ammonium sulfate at 0.2% or urea at 0.1%, and potassium fertilizer can use potassium sulfate and potassium chloride at 0.1%, mixed into the growing soil two weeks beforehand as base fertilizer.
(2) Applying topdressing
During the growing season of flowers and trees, applying dilute liquid fertilizer to make up for the shortage of base fertilizer is called topdressing. For fermented urine, soybean cake water, fish intestine water, rice-washing water and other liquids, mix 1 part liquid with 10-20 times water, or use urea or monopotassium phosphate to make a 0.1%-0.2% aqueous solution, and apply 1-2 times a week, then once every half month after the Beginning of Autumn.
When applying topdressing, the following should be mastered: during the vegetative growth period apply more nitrogen and potassium fertilizer, during flower bud formation apply more phosphorus fertilizer; loosen the soil the day before fertilizing, and water the next morning after fertilizing; apply after the beginning of spring, do not apply after the Autumn Equinox; apply when buds appear, do not apply when buds crack; apply before rain and on clear days, do not apply after rain; apply in dry weather, do not apply in the mold-rain season; apply when the pot soil is dry, do not apply when the pot soil is wet; apply more when the climate is suitable and growth is vigorous, do not apply when the climate is hot and growth stagnates; do not apply when newly planted, excessively growing, or dormant; apply thin fertilizer frequently, do not apply concentrated fertilizer; for fertilizer-loving chrysanthemum and jasmine, apply more from dilute to concentrated; for barren-tolerant five-needle pine and other conifer and cypress types, better to apply less and prefer dilute over concentrated; apply before and after flowering, do not apply during full bloom; apply in the morning and evening, do not apply at noon; apply more to strong seedlings, apply less to weak seedlings; do not let them go too hungry, do not let them be too full; do not apply if not decomposed or not diluted.
(3) Foliar topdressing
Spraying a chemical fertilizer solution on the upper and lower surfaces of leaves to make up for the shortage of root fertilization is called foliar topdressing. Because the fertilizer content increases, plants grow robustly, with many branches and green leaves, abundant and brilliant flowers, and enhanced disease resistance, but it cannot replace soil fertilization. Only inorganic fertilizers easily soluble in water, such as urea, ammonium sulfate, potassium chloride, superphosphate, monopotassium phosphate and so on, can be used, and they should be applied in the morning and evening in weather with low temperature and high humidity. In high temperature it dries easily and cannot be absorbed. A concentration of 0.1%-0.2% is unsuitable; too dilute gives low fertilizer effect, and too concentrated is difficult to absorb.
43.What issues should be noted when fertilizing potted flowers??
There is a flower proverb: "Whether it lives or not depends on water; whether it grows or not depends on fertilizer." Reasonable fertilization is one of the key issues in the care of potted flowers. With proper fertilization, seedlings are strong and leaves luxuriant, flowers are brilliant and fruits large; with improper fertilization, branches and leaves shrink, the plant declines, and it may even die. When fertilizing home potted flowers, the following points should be noted:(1) Fertilize according to different flowers and trees and different growth stages. There is a flower proverb: "Clear orchid, turbid jasmine." This means orchids like light fertilizer and jasmine likes concentrated fertilizer. Most flowers and trees prefer dilute fertilizer, and few like concentrated fertilizer. Although jasmine likes concentrated fertilizer, it is only in the dog days, and only with abundant sunlight and abundant water, that heavy fertilizer can be used. If concentrated fertilizer is applied as soon as it is brought out of the room, that would be terrible. Although chrysanthemum likes heavy fertilizer, in the early growth stage too much nitrogen fertilizer causes excessive growth and makes it difficult to form flower buds; only during the process of flower bud formation can the amount and concentration of fertilization be gradually increased. Acidic-soil-loving flowers and trees such as gardenia, rhododendron, camellia and jasmine must not be given alkaline fertilizers such as ammonia water and sodium nitrate. Bulbous flowers and flowers and trees that need heavy pruning every year should be given more phosphorus and potassium fertilizer. About half a month before frost, overwintering fertilizer should be applied to improve cold resistance; before sprouting in early spring, sprouting-promoting fertilizer should be applied to make buds plump and sprout quickly; when spring shoots are about to mature, bud-promoting fertilizer should be applied to promote flower bud differentiation and full buds; after flowering, apply dilute nutrient fertilizer to restore tree vigor for flowering or fruiting again. During full bloom and the early fruit-setting stage, fertilizer and water should be controlled, otherwise flowers and fruits easily drop. During the seedling stage, growth is rapid, so apply more nitrogen and potassium fertilizer. Before flowering and when buds appear, apply more phosphorus fertilizer.
(2) Loosen the soil before fertilizing, so that fertilizer water penetrates quickly and is easily absorbed. Also be careful not to let fertilizer water fall on leaves and buds, which would affect growth. Acidic fertilizers such as human excrement and urine, superphosphate and ammonium carbonate must not be mixed with alkaline fertilizers such as plant ash and ammonia water, otherwise they will neutralize and lose their fertilizer effect. Alkaline potted soil should use acidic fertilizer, and acidic potted soil should use alkaline fertilizer. Fertilization must absolutely not be single; applying nitrogen fertilizer together with phosphorus and potassium can improve fertilizer efficiency; applying inorganic fertilizer together with organic fertilizer can prolong fertilizer efficiency, and can also prevent the potted soil from compacting and improve the potted soil's properties of aeration, water permeability, water retention and fertilizer retention.
(3) When fertilizing on a balcony, pay attention to environmental hygiene, and at the same time be careful not to dirty clothes drying on the balcony below, which would affect neighborly relations.
Practical Complete Guide to Home Flower Growing (Middle Volume)44.How are flower seedlings potted??
Potting refers to flowers beginning to be cultivated in pots, also called planting in pots. Large seedlings of woody flowers are generally potted from early December to the end of March, when the flowers and trees are dormant or just sprouting; otherwise normal growth and development will be affected and tree vigor weakened, so it will take a longer time to restore vigor. For centralized cutting propagation, after rooting and leafing, the seedlings should be divided and potted in time. Newly sown seedlings should preferably be potted when they become mature plants. For most perennial flowers, potting should be done when young buds just begin to sprout.
When potting bare-root seedlings (roots without soil), delicate seedlings or those with large root damage should first be planted for a period in plain sandy soil, paying attention to wind protection in spring and shading when necessary in summer; after the root system becomes strong, repot them with growing soil for final planting. For strong bare-root seedlings or those with soil around the roots, as well as perennial flowers, potting can be done with growing soil according to seedling vigor and habits, with an appropriate addition of base fertilizer.
Before potting, choose a suitable flower pot according to the size of the seedling and the speed of growth, and be careful not to put small seedlings into large pots. New pots should first be soaked thoroughly with water; old pots often have water stains and debris and should be scrubbed clean. Cover the drainage hole with a potsherd or block it with weeds. For flowers afraid of waterlogging, according to the size of the pot, place 1-4 cm of residue sifted from the growing soil or coarser sand and gravel at the bottom of the pot as a drainage layer. Ceramic and porcelain flower pots need broken potsherds for the drainage layer, and it should be thicker than in clay pots. On top of the drainage layer, spread a layer of bottom soil, whose thickness depends on the depth of the pot and the size of the plant; generally when potting, fill soil to the plant's original planting depth. Those with strong stems and fibrous roots can be planted deep; those with fleshy stems and roots must not be planted too deep. Leave a watering space at the upper part of the pot; the depth of the watering space should be such that a normal full watering can penetrate to the bottom of the pot.
When potting bare-root seedlings, pile the bottom soil into a small mound in the center of the pot. With one hand, place the seedling upright and straight, and spread the fibrous roots evenly; with the other hand, fill in soil, lifting the seedling gently as you fill, so that the fibrous roots extend downward at a 45° angle. For flowers with longer fibrous roots, when potting, the seedling can be rotated so that the long roots coil evenly in the pot. After any flower is potted, the soil must be firmed, and the pot soil must not be empty below and solid above or have cavities. Pressing firmly by hand easily injures the roots. The soil used for potting should be moist, that is, it forms a clump when squeezed and breaks apart when rubbed. After potting, it should be placed in a wind-sheltered, shady and moist place and not watered for the time being; in dry weather, water can be sprayed at any time to keep the seedling alive. Generally after 4-48 hours, water thoroughly again. This can not only prevent the fibrous roots from rotting and shrinking, but also promote the rapid growth and recovery of new roots. After placing in a shady place for about 7 days, move it according to the habits of the flower seedling to a place with sufficient sunlight or under a shade shed, and turn to normal care.
In conjunction with potting, the plant should be pruned, and overly long fibrous roots, diseased and dead branches, overly dense branches and leaves should all be cut off. For excessively weak plants and flowers and trees that bloom on current-year branches, they can be cut 10 cm from the stem base to promote the growth and development of robust new branches.
45Why do potted flowers need repotting? How to repot and change pots?
After 1-3 years of cultivation, the root mass of potted flowers and trees fills the pot, the nutrients in the pot soil are exhausted, and because of long-term watering the pot soil becomes alkalized, the soil compacts, aeration is poor, and it does not retain water. Even if topdressing is often applied, the flowers and trees will not grow well. At the same time, as the flowers and trees grow larger, the original pot no longer suits their growth and development, so repotting and changing pots are necessary.Repotting and changing pots are routine work in flower growing. If potted flowers are not repotted or changed for many years, they will not grow well. Through repotting and changing pots, the pot size can match the seedling and nutritional conditions can be improved.
Repotting generally means moving flower seedlings that have grown for some time after potting into a pot one size larger, or moving flower seedlings originally potted bare-root in plain sandy soil into growing soil for planting. When repotting, the original soil ball is not disturbed, so there is no damage to the roots or aboveground parts; therefore the time for repotting is generally not restricted by season.
When repotting, the original pot soil must not be too wet or too dry. When removing the plant from the pot, use the index finger and middle finger of one hand to hold the base of the plant, with the palm pressed close to the soil surface; with the other hand, support the bottom of the pot and turn it over, tap the pot edge lightly with the palm, and the whole soil ball can be removed. Then immediately scrape away the drainage layer at the bottom of the soil ball, slightly loosen and arrange the outer fibrous roots, and plant it in a larger pot.
Changing pots refers to potted flowers that have already been cultivated to shape being treated before spring sprouting in combination with operations such as shaping and pruning, in order to maintain a beautiful plant shape and long-lasting vigorous growth. Changing pots is generally carried out before spring germination; for wintersweet, camellia, plum blossom, winter jasmine and others that bloom in early spring, pots can be changed after flowering. For potted flowers that grow quickly and bloom abundantly, such as jasmine, Chinese rose, hibiscus and pomegranate, pots should be changed every year; for potted flowers that grow slowly, such as camellia, rhododendron, citrus types and conifer and cypress types, pots can be changed once every 2-3 years. Do not water for a few days before changing pots, so that the pot soil separates from the pot wall. Cut away 1/3 of the old soil of the original soil ball, and prune some coiled roots and old roots. For potted flowers whose shape is already fixed, the same plant can be changed into the same pot; generally a pot one size larger is used. After removing from the pot, cut away tangled fibrous roots and rotten roots, remove part of the original soil, and replace it with growing soil. Some flowers can also be divided in conjunction with changing pots.
Practical Complete Guide to Home Flower Growing (Middle Volume)46What should be done if the plant root system fills the pot??
To what state must potted foliage plants grow before they should be repotted? Observe whether the surface soil in the pot has bulged up, or whether roots have emerged from the bottom hole of the pot. This shows that the root system in the pot has already filled it, and at this time the pot should be turned and the soil changed in time; otherwise the plant will decline due to malnutrition or poor aeration and other reasons.
First, remove the plant from the flower pot, cut off old roots and rotten roots, and also shake off some of the old soil attached to the root system. Find a pot one size larger, place a few small stones at the bottom of the pot, first add a small amount of new soil, put the plant into the pot, then gradually add new soil until it is filled and firmed.
If you only want to change the soil and do not change the size of the flower pot, shake off 1/3 of the old soil on the root system, and also cut off 1/3 of the old leaves, so that the water absorbed by the roots and the water evaporated by the leaves can maintain a balance.
47.Why are some herbaceous flowers unsuitable for transplanting??
Herbaceous flowers unsuitable for transplanting are taproot-type flowers, whose main root extends straight down and has very few lateral roots. When transplanting cuts off the main root, the lateral roots grow poorly and the ability to absorb nutrients decreases, so transplanting mostly results in poor survival or poor growth and development. Morning glory, corn poppy, California poppy and the like belong to this category. Such herbaceous flowers are best cultivated by direct sowing. If transplanting is needed, they can be moved into small pots for cultivation soon after germination, and after the seedlings grow, they can be removed from the pots and transplanted, taking care not to injure the main root.Some herbaceous flowers are not tolerant of transplanting, such as stock and sweet osmanthus, and cannot be transplanted multiple times or bare-root transplanted. When transplanting, take as large a soil ball as possible and do not let the soil ball break apart.
48.Why do some herbaceous flowers need to be transplanted several times??
Cultivated herbaceous flowers are usually raised in batches as seedlings, used to beautify the environment or arrange flower beds, and are required to be neat and beautiful. But it often happens that some herbaceous flowers planted into flower beds have a low survival rate or grow very weakly, failing to achieve the ideal beautifying effect. The main reason is that during the seedling-raising process, the measures for transplanting and root-pruning to harden seedlings are inadequate. Some herbaceous flowers, such as garden balsam, China aster, zinnia and marigold, easily grow tall and lodge. To cultivate short, sturdy, uniform, drought-resistant and waterlogging-tolerant flower seedlings, they must go through several transplantings and hardening during cultivation. When sown seedlings grow 2 true leaves, they should be divided bare-root in time, with a plant and row spacing of 10 cm. After planting, water, and water again 2-3 days later to help them recover. Then, when the surface soil is no longer sticky, loosen the soil in time to harden the seedlings. The hardening time depends on the weather, generally about 1 week. When the seedlings show wilting at noon, begin watering, and combine it with fertilizing. After fertilizing, the young seedlings visibly grow, then water once more. When the branches and leaves of adjacent plants begin to touch, transplant and divide them again. When transplanting, cut off the main root to promote the proliferation of lateral roots, cut soil blocks 8-10 cm in diameter, and after planting water twice in the same way to help them recover. Thereafter, whenever watering is done, loosen the soil in time, and combine watering with fertilizing. From sowing to final planting in the flower bed, herbaceous flowers that have gone through 2-3 transplantings grow robustly, do not wilt after final planting, and are neat and uniform. Herbaceous flowers grown at home must also not be planted too densely. During the seedling growth stage there must also be a hardening process, and the soil should be loosened and fertilizer applied frequently so that they can grow robustly. For cutting-propagated scarlet sage, chrysanthemum and so on, cultivation must also be done in the same way to produce ideal flower seedlings.Practical Complete Guide to Home Flower Growing (Middle Volume)
49.What tasks does the pruning of flowers and trees include??
Pruning is one of the important means of growing flowers and trees well. If all flowers and trees are allowed to grow naturally, they will lose their proper ornamental value. Pruning can not only create a good plant shape, but also regulate the reasonable distribution and supply of nutrients within the plant, prevent excessive growth of branches and leaves, help flower bud differentiation and bud formation, and create good ventilation and light conditions, reducing the occurrence of pests and diseases.
50.How are foliage plants pruned and shaped??
Some large foliage plants, such as rubber tree, bamboo palm, coconut palm, Monstera deliciosa and Schefflera, have relatively large plants. If pruned frequently, plant growth can be promoted, making them strong and beautiful. Topping can make the plant's leaves dense and the plant shape well balanced, and prevent excessive growth; cutting off excess lateral buds can make the plant upright and straight.
Some smaller plants, such as Pilea, Peperomia and aloe, need pruning to appear beautiful and luxuriant. Therefore, before new buds begin to grow, poor branches must be cut off to maintain a graceful shape.
In order not to let foliage plants grow excessively at will, a certain height must be determined, so the terminal buds of stems or branches must often be cut off to inhibit growth and make the plant dwarf or bushy. This is different from the general pruning principles for outdoor plants.
51.Does keeping flowers indoors for a long time affect health??
Some people worry that keeping plants indoors for a long time may affect human health, but this is actually unnecessary worry. During the day, plants carry out photosynthesis and release far more oxygen than they themselves need for respiration. At night, although photosynthesis stops, their respiration is also extremely weak. Especially foliage plants, whose respiration is even weaker than that of flowering plants (flowering plants have the greatest respiration during the bud and flowering stages), need even less oxygen.
Someone once did such an experiment: through respiration, 1 molecule of oxygen can produce 1 molecule of carbon dioxide, while the amount of oxygen needed to light 2 matches is equivalent to the respiration of two or three indoor plants in one night. It can be seen that the carbon dioxide exhaled by ornamental plants is negligible. From this point of view, indoor plants have no effect on human health. On the contrary, many indoor ornamental plants are also beneficial to people. For example, begonia, asparagus fern and asparagus can not only absorb carbon dioxide gas, but also secrete bactericidal substances, which help prevent colds, typhoid, laryngitis and other diseases. In addition, plants can also reduce indoor dust, clean the air, and increase negative oxygen ions, enabling people to live in a fresh and healthy environment.
Practical Complete Guide to Home Flower Growing (Middle Volume)
52.Why are most modern indoor ornamental plants mainly foliage plants??
People cannot be separated from nature. In today's world, in cities full of high-rise buildings, people cannot have courtyard green space and can only use indoor plants to bring the freshness of nature into their homes, and it is precisely foliage plants that occupy an absolute advantage among indoor plants. In a bedroom, study or reception room, placing a few pots of ornamental plants not only adds color to the home, but also, after work or in a break from writing, a glance at the green "artworks" of varied and verdant beauty that one has cultivated oneself makes fatigue vanish and brings relaxation and joy.
Foliage plants have leaves of different shapes and brilliant variety, and can remain evergreen through the four seasons, so they can be enjoyed all year round without being limited by season, with appreciation mainly focused on the posture and color of their leaves. Second, foliage plants are relatively shade-tolerant and prefer warm, humid environments; in terms of light and nutrients, their requirements are much lower than those of flowering and fruiting plants.
Some flowering plants also have the characteristics of foliage plants, for example: oleander, orchid, clivia, anthurium, bird of paradise, dwarf Kalanchoe and so on.
Foliage plants are mostly ideal materials for indoor greening and decoration. In our country, foliage plants are still in a rising stage. Although they have already occupied major hotels and restaurants, they have not yet become widespread in family homes. It is believed that in the not-too-distant future, foliage plants will enter thousands of households.
53.Which foliage plants are suitable for home cultivation??
Some plants do not stand out for their flowers but win by their leaves. Their greatest characteristic is that they are not limited by flowering and can be enjoyed at any time throughout the year. Among them are those appreciated for form, such as Monstera deliciosa, Fatsia japonica, rhapis palm, asparagus fern and sword fern. There are also those appreciated for color, such as redwood, red maple, red-backed excoecaria and purple spiderwort. There are also those with both beautiful form and color, such as coleus, purple velvet plant and variegated dieffenbachia. There are also those that are enjoyed both for flowers and leaves, such as clivia, bead orchid and four-season orchid cactus. Placing a few pots in a family room gives a unique, beautiful and novel pleasure. The following introduces several easy-to-grow species suitable for the home:
54.Which flowers are suitable for hanging basket cultivation??
Hanging basket flowers are decorations for beautifying balconies and interiors. They can make full use of space and are most suitable for environments with small balconies and rooms. When flower pots are hung indoors, outside balcony railings, or at windows, their branches and leaves sway in the wind, giving a unique charm. Hanging basket installations must be firm. The height of the hanging basket should be based on the principle of not interfering with daily life. For hanging cords, besides nylon rope, using the chains used for hanging lamps is even more beautiful. For the care of hanging basket flowers, in addition to referring to the care of potted flowers, the direction of the hanging basket should also be changed frequently so that different parts can receive sunlight. Sun-loving types cannot be hung indoors for a long time. Flowers suitable for hanging basket cultivation must have soft, drooping branches or flower scapes. For example: purple spiderwort, stringy stonecrop, wandering Jew and strawberry geranium are all easy-to-grow species. The last three are introduced below:
Practical Complete Guide to Home Flower Growing (Middle Volume)
55.What characteristics do climbing plants have? Are they suitable for home cultivation??
In the wonderful natural world, plant shapes are diverse. Some plants have soft stems that cannot stand upright and need to twine around or attach to other objects to grow upward, so they are called climbing plants. Various climbing plants can be divided according to their climbing methods into:
(1) Twining climbers, such as morning glory, cypress vine, fleeceflower, honeysuckle and wisteria, which can twine around other objects and climb upward.
(2) Attachment climbers, such as grape and loofah, which climb by tendrils; Boston ivy and American ivy, which climb by suckers; and trumpet creeper and ivy, which climb by aerial roots.
56.How should foliage plants be selected for purchase??
When selecting foliage plants for purchase, decide according to the actual conditions and requirements of the exhibition room, hall or living room, such as the size of the room, light, temperature and the decorative effect desired. When first starting to grow them, buy easy-to-cultivate varieties; after accumulating rich experience, choose those that are more difficult to grow. For example, Pilea and red-edged cordyline can quickly adapt to the environment and are easy to grow well; while Philodendron and Maranta plants require extra care.
When buying at the market, choose plants with bright, glossy leaves and no yellow leaves or disease spots. Also turn over and look at the bottom hole of the pot, and choose those with no roots growing out of the bottom hole. In addition, plants with a neat and beautiful shape, vigorous growth and no excessively long branches are better.
On the way home, wrap the newly bought plant in a plastic bag to prevent wind damage or injury. Because of the bumps on the road, the swaying of the plant may loosen the fibrous roots. After returning home, place the plant in a humid area without strong light and with good ventilation, keep the pot soil moist to encourage rooting, and after a few days place it in the position where it is to be displayed. This is called the seedling-acclimation treatment. After this treatment, the plant can adapt to the indoor growing environment and begin to grow.
57.How should flower pots be selected??
For potted flowers and trees, the material of the flower pot and the size of its volume greatly affect growth, so choosing flower pots reasonably is very important. An ideal flower pot should have the following conditions: light material, easy to carry; durable, not easily broken; color, shape, thickness and size suitable for the needs of flower and tree growth, and available in many specifications and models; low price, and so on.
Practical Complete Guide to Home Flower Growing (Middle Volume) 58.What safety issues should be noted when installing balcony flower racks??Balcony flower racks are generally installed on balcony railings. In order to use space, they also extend outward beyond the balcony, so only the side resting on the balcony railing is a load-bearing point, while the other side extending outside the balcony is supported by wire hanging. For safety, it is best to add support under the part of the flower rack extending outside the balcony, so that it is firmer, safer and more reliable.
The three outer sides of the flower rack extending outside the balcony should be fitted with a barrier about 15 cm high made of steel bars or wooden boards to prevent flower pots from falling. Some balcony flower racks do not have this barrier, and when clothes are being dried on the balcony or other household activities are being done, it is easy to accidentally knock flower pots down, and cases of injuring people have been heard. Balcony flower growers must pay attention to this point.
59.How should a shade shed be set up for growing flowers on a balcony??
Growing flowers also requires the arrangement of a shade shed. The balcony area is small, and if only a small number of strongly sun-loving flowers are grown, such as crape myrtle, jasmine, peach blossom, citrus types, succulents and cacti, and annual and biennial herbaceous flowers, a shade shed may not be set up. If some shade-loving flowers are also to be grown, then a shade shed is needed; moreover, in the scorching summer, some sun-loving flowers such as wintersweet, osmanthus, gardenia and hibiscus also need appropriate shading; and some sun-loving flowers such as Chinese rose and fine varieties among cacti also need shading at noon.The shade shed can be installed at the window side near the balcony. Installing a flower rack below the window, although it holds only a few potted flowers, makes planting and maintenance operations very convenient, and the shade shed can also serve as a sunshade curtain, cooling the room in summer. If a shade shed is set up on the balcony flower rack, it will hinder drying clothes and bedding on the balcony and also affect doing other household activities on the balcony. For this reason, it is better to install the shade shed at the window next to the balcony. In this way, sun-loving flowers are grown exclusively on the balcony flower rack, and shade-loving flowers are grown exclusively under the window shade shed, without interfering with each other.
The shade shed does not need special materials such as bamboo or reed stems to build it; the rack used for planting climbing flowers and trees can also serve the purpose, thus both providing shade and beautifying the balcony and window. The balcony shade shed must not be too high. Apart from the shade shed on the window, which must be installed according to the window height, the shade shed on the flower rack should preferably be below 1.2 m. Balcony potted flowers are all controlled at about 80 cm; too high blocks the wind and is not easy to set up, while too low makes maintenance operations inconvenient. In addition to shading the top of the shade shed, the west-facing side should also be shaded, but ventilation must also be considered. In the shade shed, it is better to plant small vines and climbing plants with smaller leaves, because the shade shed area is not large; thus honeysuckle and banksia rose are most ideal. Although trumpet creeper is a large vine, its leaves are relatively small, and the gaps through which sunlight enters are also small, so its shading effect is better than that of large-leaved grape. If a higher degree of shading is desired, some herbaceous climbing plants can also be planted, such as cypress vine, morning glory and hyacinth bean, and the beautifying effect is even better.
60.Where is a good position indoors for large foliage plants??
Plants growing above 1.2 m are generally called large foliage plants, and most of them are woody types.Common large foliage plants include: sago palm, Norfolk Island pine, rubber tree, Monstera deliciosa, nandina, croton, Fatsia japonica, oleander, rhapis palm, cordyline, dracaena, pothos made into a totem pole, ivy and so on. These plants have elegant shapes, are full of spirit, cover a large decorative range, and are suitable for placement in larger rooms. Small rooms are not suitable for arranging large plants, because in that way the plant not only takes up a lot of space, but also fails to produce a decorative effect, making the room appear even more crowded.
Large foliage plants are placed on the ground, or beside a writing desk, or in a certain corner, or at the turning point of a corner sofa. When placing them, it is best to put a more attractive pot over the outside of the clay pot, such as a porcelain pot, ceramic pot or plastic pot, or even a fiberglass-reinforced plastic pot. The color of the outer pot should harmonize with the indoor furniture.
Of course, when placing these foliage plants, attention must be paid to satisfying their ecological conditions. If the room does not have the conditions for plant growth, but for the sake of some happy event or entertaining guests it is necessary to create atmosphere and produce an elegant, peaceful and comfortable environment, then it is best to place these large plants for only one or two days and then remove them. Many flower businesses have rental and placement services; they rent out flowers externally, which for many customers is both economical and practical.
Recommended reading:Practical Complete Guide to Home Flower Growing (First Volume)