How to grow Amaryllis seeds? Easily grow beautiful flowers
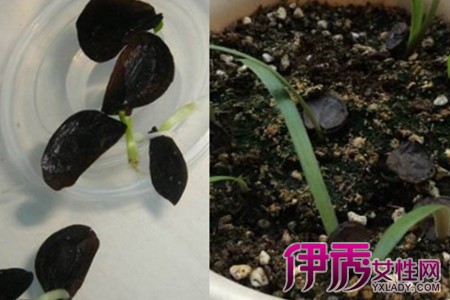
To sow amaryllis, you first need to collect the seeds. Amaryllis seeds are harvested one year and planted the next. Dry the harvested seeds and store them. Because amaryllis seeds have a thick coat, soak them in warm water for three to five days before sowing. Once the amaryllis seeds have sprouted small white shoots, they can be planted in soil.
Before planting, prepare the flower pot and potting soil. The pot should be well ventilated, and the soil should be loose and breathable. The best is soil from a park that contains leaf litter and rotted roots, because leaf litter and rotted roots can serve as natural base fertilizer. When planting amaryllis seeds at home, it is best to plant one seed per pot, so that after sprouting you avoid having to separate them into different pots.
After the seeds are planted, water them, and be sure to water thoroughly. Newly planted seeds rely entirely on sufficient moisture to grow. But do not water too frequently; after the first watering, wait until the surface of the soil is dry before watering a second time. Because the seeds we planted have already sprouted a little, do not let them receive direct sunlight; a semi-shaded, cool location is most suitable for amaryllis growth.
If amaryllis grows normally after sowing, it can reach a height of more than ten cm after one month, and after that you can fertilize the amaryllis regularly. It needs fertilizing once a month; you can use soybean cake fertilizer or a flower nutrient solution. Apply one more round of fertilizer before the flowering season arrives, and do not fertilize after flowering, because the flowers are delicate and too much fertilizer will force the flowers off.
After amaryllis blooms, be sure to water on time, but do not spray water on the flowers. Because if moisture remains on the flowers for a long time, the flowers will rot, which affects the length of the flowering period and also looks bad. The above is the whole process from sowing amaryllis to flowering. We hope everyone can grow the flowers they love with their own hands.
How to grow amaryllis seeds
Preparation before sowing
For sowing amaryllis, the recommended soil is peat + perlite at a ratio of 1:1, which is very beneficial for sowing and for growth within half a year. If you want to use other soil, pay attention to breathability and moisture retention. The seeds usually received are fairly dry, and if sown directly, they absorb insufficient water, which affects the germination rate. It is recommended to float them in water for 2-3 days, then proceed to the next step. Flower pots should be arranged according to the amount of seeds. It is recommended that 30 seeds use a pot 20-25 cm in diameter and about 20 cm deep, filled with soil to 80%. The plastic bag should be a transparent food bag 35 cm in diameter.
Sowing method
First place the received seeds in a container and float them in water for 2-3 days, with a water depth of about 3 cm. Fill the pot with the mixed soil up to the 75% mark, spray it moist and set it aside (humidity above 70%). Then distribute the seeds evenly over the surface of the pot, doing it with the patience of embroidery, with at least 1 cm between seeds. Then place dry mixed soil on top of the seeds, adding about 1 cm of thickness, then spray it moist (use a sprayer, do not pour water, otherwise the seeds will float on top of the soil). After spraying, put on a plastic bag to seal it (it does not matter if it is not breathable), then place it in a semi-shaded spot where direct sunlight cannot reach but there is light.
The above is about how to grow amaryllis seeds. Below let us look at the precautions for growing amaryllis!
How to grow amaryllis seeds
Amaryllis seeds are generally sown rarely, because most flower lovers directly buy bulbs, though some flower lovers collect or share amaryllis seeds, and are not especially familiar with how to grow amaryllis seeds. This article is the ultimate sowing method compiled from years of experience accumulated by flower lovers, for everyone to learn from.
I. Introduction to amaryllis seeds
Amaryllis seeds are usually flat and wing-shaped, very light; the large ones are one square cm, and the small ones are only 5 mm in diameter. They are easily moved by wind and easily spread by wind. The seeds dry out easily, and their vitality is not strong; they must be freshly harvested and freshly sown. Seeds sown within three days have a very good germination rate, while the worst is after 1 month. Therefore, it is usually said that amaryllis seeds die after 1 month.
II. What are hybrid seeds
By using two different parents and cross-breeding to recombine traits from different genes, hybrid seeds can be obtained. The seeds I shared this year all had double-flowered cultivars as the father parent and single-flowered cultivars as the mother parent, so the seeds have relatively strong hybrid vigor: they are both strong and likely to produce double flowers. The expected probability of double flowers from the seeds is 50%, the germination rate can usually exceed 70%, and the success rate can reach 60%. That is, it is expected that from every 30 seeds, over three years, about 18 hybrid amaryllis plants can be obtained, and it is expected that 8-9 of them will have double flowers. Is that not very worthwhile?
III. Preparation for sowing
Sowing amaryllis mainly requires care, and you need sufficient preparation before sowing for the results to be good. Therefore, we should:
(1) Soil preparation: I recommend peat + perlite at a ratio of 1:1, which is very beneficial for sowing amaryllis and for growth within half a year. If you want to use other soil, pay attention to breathability and moisture retention.
(2) Pretreatment by floating in water: the seeds usually received are fairly dry, and if sown directly, they absorb insufficient water, which affects the germination rate. I recommend floating them in water for 2-3 days, then proceeding to the next step.
(3) Flower pot and plastic bag: arrange the pot according to the amount of seeds. I recommend that 30 seeds use a pot 20-25 cm in diameter and about 20 cm deep. Fill with soil to 80%. The plastic bag should be a transparent food bag 35 cm in diameter.
IV. Sowing method
(1) First place the received seeds in a container and float them in water for 2-3 days, with a water depth of about 3 cm.
(2) Fill the pot with the mixed soil (peat + perlite 1:1) up to the 75% mark, spray it moist and set it aside (humidity above 70%).
(3) Distribute the seeds evenly over the surface of the pot, doing it with the patience of embroidery. There should be at least 1 cm between seeds.
(4) Place dry mixed soil on top of the seeds, adding about 1 cm of thickness, then spray it moist (note: use a sprayer, do not pour water, otherwise the seeds will float on top of the soil).
(5) After spraying, put on a plastic bag to seal it (it does not matter if it is not breathable), then place it in a semi-shaded spot where direct sunlight cannot reach but there is light.
V. Management after sowing
After completing the fourth major item, there is no need to manage it for one month, nor to water, nor to open the plastic bag. After one month, open it to check whether the first leaf has grown. If the first leaf has grown to about 3 cm tall, the plastic bag can be completely removed and normal management can begin. During the first 1-3 months of the seedlings, use spraying to replenish water, about 2-3 times a week, and be sure to place them in a semi-shaded spot. Once the seedlings have grown three leaves, they will then speed up growth, and during this period you should spray fertilizer (I recommend a high-quality Flower Treasure from the market). At about half a year or six leaves, the seedlings can be transplanted. To ensure no repotting within 1 year, if the pot is 25 cm in diameter, you can plant 6-10 plants per pot. After one year, change the pot again; a 25 cm pot holds three plants. I rather like the 3, 5, 9 arrangement, depending on the size of the pot. The larger the plant, the larger the pot should be, and the effect of group growing is better than growing single seedlings.
VI. Time of flowering
With careful management and a fertilizer spray once a week, it is expected that the fastest plants will flower after 18 months of continuous growth (continuous growth cannot include dormancy time). For the latest varieties, it cannot be ruled out that they will only flower at 30-38 months. Before flowering, try not to separate all the small seedlings that have grown; let them grow alongside the mother bulb, and after flowering, once the quality of the varieties is determined, then deal with them.