A detailed guide to growing Clivia (Kaffir lily) from seed, master the knowledge of plant care
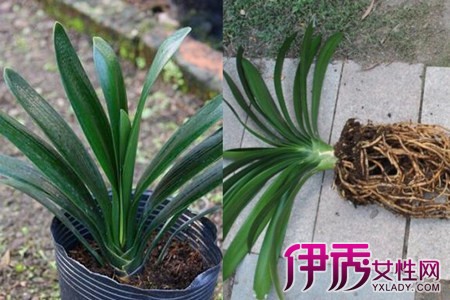
Clivia itself is one of the more difficult flowers to care for; without understanding its habits, it really is hard to keep alive. But once you've mastered it, growing Clivia really isn't a big deal. Clivia has fairly deep roots, so when choosing a pot, choose a deeper one. Many people like to use plastic pots, but I'd still recommend terracotta or ceramic pots, which are very good; being a bit deeper also benefits root growth.
Next is choosing soil suitable for Clivia's growth. Don't always think any soil can grow flowers. That idea is wrong. Clivia likes soft, airy black soil; this kind of soil won't let the roots rot and is also very nutritious, suitable for the flower's growth and rooting.
After putting the soil in the pot, don't plant the Clivia too deep. If it's too deep, the garlic-bulb-like root part above easily becomes soft and starts rotting from the inside, and then it can't survive. Just cover it with a little soil; this way it can breathe and also root well. It also won't rot. This is also a very important point.
Watering Clivia must be well controlled. Many people growing Clivia think watering every day makes it grow faster, but Clivia itself is not a water-loving plant. Watering about once every 3-5 days is enough; too much watering will cause the leaves to turn yellow or become soft. Then it will gradually wither and may eventually die.
The remaining key point is to manage the temperature well. Clivia cannot be exposed to the blazing sun; it likes cool, ventilated places. So in summer, don't put Clivia outdoors either; baking in the sun will make the leaves less green and start to soften, which is a sign of sunburn. Master these points and growing Clivia will be no problem.
How to grow rosemary, and how to prune rosemary
Flower and Bonsai Network introduction: Today the Flower and Bonsai Network editor shares with you an article on how to grow rosemary and how to prune rosemary. Let's take a look.
How to grow rosemary
Rosemary is a fairly common herb plant. Although its growth is relatively slow during the growing process, it still needs pruning. So how do you grow rosemary?
Rosemary (Rosemary) originates from shrubs of the Mediterranean and Asia. Its leaves are needle-shaped, it is a perennial, evergreen year-round, and blooms blue-purple or white flowers in spring. In my heart it is a magical plant, extremely good-looking and extremely tasty. Kept at home on ordinary days, it is both a decoration and a great seasoning for cooking, very suitable for cooking meat dishes. It can be eaten fresh or dried. Now many friends who love cooking also like to keep a pot at home; it's not only fresh and healthy, but you also don't have to worry about keeping it fresh, and you can take it whenever you need it.
This herb, rosemary, likes a mild climate. In the south it can be grown outdoors year-round, while in the north it must be moved indoors in winter or given other insulation measures. Its growth rate is not considered fast; compared with mint and basil, it is far behind. Rosemary requires at least 8 hours of direct sunlight every day, moderate watering; a mature plant can be watered thoroughly once every 4 to 7 days. Don't use nutrient solution too frequently either; everyone can decide for themselves based on the nutrient solution they use, and the general suggestion is to start with a small amount.
Because I love herbs (Herbs) so much, I made a small organic herb garden at home. From scallions, ginger and garlic to rosemary and thyme, I've fiddled with quite a few kinds; although it was hard at first, I enjoyed it. A while ago I saw a very old rosemary plant at a friend's house, lush and very thriving. I also found it was a different variety from the one I had at home, so I specially took many cuttings to grow. Rosemary produces many seeds, but the germination rate is extremely low; starting from cuttings is a much more efficient method. There are roughly 5 kinds of rosemary commonly used in cooking; choose a variety you like and give growing it a try~
The roughly 4 steps for growing rosemary from cuttings:
1. Choose and clean the cuttings
2. Let the cuttings root by inserting directly into soil or by soaking
3. Care during the rooting period
4. After rooting, transplant into a flowerpot or outdoors, with special care until established
Tools and materials needed:
One established, healthy rosemary plant
Pruning shears
Water
A transparent container (such as a glass)
Flowerpot
Potting soil
Method:
1. Use clean scissors to cut new slender branches from a healthy, thriving rosemary. Be careful to avoid slender branches with flowers; make the cut right below the place where the leaf joins the branch (there are more growth cells there), and the cut surface should be clean and neat. The lower part of the rosemary branch is brown and relatively hard. The middle part is grayish-white with light brown spots and is a bit softer. The newest growth is green and can be bent freely without breaking. For the length of cuttings to take, please refer to the table below:
Season
Part cut
Length
Spring or early summer
Green, tender new branches
5~10cm
Summer to autumn
Branches of the grayish-white part
10~15cm
Autumn
Brown, hard, mature branches
15~ 35cm
2. If using the soaking method, rub off with your fingers the leaves on the lower 1/2 of the cutting; if using the soil-insertion method, remove the leaves on the lower 1/3 of the stem. If the cutting is too delicate, you can use small tweezers to pull off the leaves.
3. Water-soaking method: Put the prepared cutting into a transparent container, and add water up to just below the leaves.
Then place it on a sunny windowsill. In the first week, change the water once every 2 to 3 days; afterward, change it when the water becomes cloudy or has obvious sediment.
After 5 to 8 weeks, white fine roots will grow from the lower half of the cutting. Continue soaking, and wait until the roots have grown to at least 5 cm long and there are 7 or 8 roots, then you can begin transplanting. But the more roots there are, the higher the survival rate after transplanting and the faster the growth rate will be.
4. Soil-insertion method: Fill the flowerpot with soft, fine soil, and use your hand to press the potting soil* firmly and level, but not too tight.
Water thoroughly.
Insert the prepared cuttings directly into the soft, fine soil, spaced at least 4 cm apart, and place in a sunny spot.
Water thoroughly the first time, then water thoroughly once a week afterward, and keep the soil moist on ordinary days. If the climate where you are is dry, be sure to insert wooden sticks or chopsticks taller than the rosemary cuttings into the flowerpot, then cover with a perforated plastic bag; the plastic bag should not touch the cuttings.
After about 6 to 7 weeks, the rosemary will root. After rooting, remove the plastic bag, carefully loosen the soil in the pot with a small trowel or fork, and take out the cuttings; do not pull the cuttings out, to avoid breaking the roots.
5. Transplant into a separate flowerpot and water thoroughly. At this time, because the cuttings have not received nutrients for a long time and have also grown many roots with heavy consumption, you can appropriately supplement a little nutrient solution when watering.
6. The cuttings planted in the flowerpot still need to be carefully looked after for at least about 2 weeks. After establishment, you can decide whether to continue growing them indoors or outdoors according to the climate and conditions of your location.
After comparing the two methods, I still found that the water-soaking method has a much higher success rate, and it is also much simpler, making it very easy to observe the progress of rooting. The fastest small cutting began rooting after only about 15 days of soaking in water. Of the 6 soil-insertion cuttings, only 2 rooted, so I still recommend using the water-soaking method.
Related knowledge and tips:
*The soil used for growing herbs is extremely important. Generally, soil dug from roadsides in cities lacks organic matter, and after watering it easily clumps and is not soft enough. So it's best to specially buy organic potting soil.
According to the more than 50 cuttings Kate has tried, semi-hard cuttings of about 10 cm have the highest rooting success rate through the soaking method. Growing rosemary from cuttings is most suitable in late spring and early summer, after the flowers have faded.
Not every branch will root. If most of the leaves on a cutting turn black and dry, you can throw the cutting away.
There is a product sold on the market called plant rooting hormone, available in powder and liquid forms, but some are very toxic to pets, so it is not recommended to use them lightly.
Pure natural willow water also helps improve the rooting rate, but it is troublesome to make and not easy to keep fresh, so I won't go into detail for now.
The time for cuttings to root also varies greatly, and it can even take as long as 3 months for new roots to appear, but as long as it doesn't rot, you can keep soaking it until it roots or rots.
Rosemary is afraid of cold; in northern cities in winter it must be moved indoors or wrapped for insulation.
Rosemary cultivation techniques
Plant management
An evergreen perennial subshrub. If not pruned, the plant can reach 150 cm in height, with a spread of 60-80 cm. The leaves are narrowly elongated like pine needles, with recurved margins, grayish-green and leathery, becoming needle-like after drying. Flower colors include blue, pink, and white. There are many varieties of rosemary, roughly divided into upright and prostrate types. Commercial cultivation is mostly based on the upright type, because the space it needs for growth is smaller and harvesting is also more convenient.
Planting and cultivation
Rosemary seed propagation
When rosemary is propagated by seed, germination is slow and the germination rate is poor. According to literature records, if the germination temperature is between 20°C and 24°C, the germination rate is below 30%, and the germination time is as long as 3-4 weeks. But if it is first germinated at 20°C to 24°C for 1 week and then treated at 4.4°C (40°F) for 4 weeks, the germination rate can be increased to 70%.
Rosemary cuttings
Therefore, unless new varieties are introduced from abroad, propagation by cuttings is a fast and reliable method; placed in a shady place, it can be transplanted after about one month. For the prostrate type, you can use a lying branch, first score it where it touches the soil and then bury it shallowly; after about one month, cut it away from the mother plant and it becomes another rosemary plant, but the procedure is rather troublesome.
Management after rosemary planting and cultivation
When pruning and harvesting, you must be especially careful, especially since old branches lignify very quickly. A sudden overly severe pruning often causes the plant to be unable to sprout again. The safer approach is not to cut off more than half the length of the branch each time you prune.
Observe the rosemary plant: although small buds appear at every leaf axil, as the branches extend in the future, these axillary buds will also develop into branches. After growing up, because the branches grow sideways all over, the whole plant not only looks messy, but poor ventilation also easily makes it a habitat for pests and makes it prone to disease. Therefore, regular pruning and shaping is very important.
When upright varieties are planted in the field, they easily grow very tall. To facilitate management and increase harvest, when growth begins after planting, cut off the top; after the side buds sprout, prune another 2-3 times. This way the plant will be low and neat.
Harvest management
For harvesting and using rosemary, the main use is the branches and leaves, which can be cut with scissors or directly broken off by hand, but you must pay special attention that the sap flowing from the wound quickly turns into sticky glue that is very hard to remove, and some people's constitutions will even have allergic reactions, so when harvesting you must wear gloves and long-sleeved clothing. It is worth mentioning that after harvesting rosemary, unless it is to be used immediately, it should be quickly dried to avoid the loss of aroma. Rosemary has a wide range of uses. Besides being used as a spice in cooking, pharmacologically it also has vaginal tightening and antioxidant effects, and can treat vaginal laxity, nervous tension, and poor appetite. The extracted rosemary care solution can restore vaginal vitality and solve problems such as vaginal dryness and vaginal flatulence, but the dosage should not be too high, otherwise there is a risk of epilepsy or spasms. Rosemary can cause miscarriage, and pregnant women must avoid using it. Precautions
Rosemary has a powerful and highly effective ability to enhance memory, which is why rosemary has become a favorite of many exam candidates. But note that rosemary is also a Chinese herbal medicine, and "every medicine is three-tenths toxic." If you want a good score, the key is still to rely on your usual studying. Don't cram at the last minute before the exam and use large amounts of rosemary. If you accidentally use too much rosemary and cause drug poisoning, that would not be good; instead of preserving beautiful memories, you may leave behind bad ones.
The knowledge of watering plants
How should you water to be considered appropriate? This must proceed from reality and be mastered flexibly; you cannot rigidly apply a fixed formula. The content contained in this "reality" includes the following aspects:
First, look at the season and temperature
In spring and autumn, when the sun is not too strong and the temperature is not too high, some flowers can be watered once a day, and some flowers can be watered once every one or two days (water in the evening or morning; small pomegranate can be watered at noon). Mainly decide based on the dryness and moisture of the pot soil; when the pot soil is dry and pale, it should be watered appropriately. The principle is generally no watering when not dry, and water thoroughly when watering (exceptions include Japanese crabapple, wax begonia, cacti, etc.).
In the high-temperature period of midsummer, water consumption is the greatest, so water sufficiently every evening or morning, until water flows out from the bottom of the pot. Chrysanthemums are best watered once in the morning and once in the evening. Orchids, Monstera deliciosa, Clivia, fuchsia, azaleas, camellias, sasanqua, etc. are best misted twice daily on sunny days.
In winter, especially deep winter, most flowers and trees enter dormancy. During this period, watering should be strictly controlled. For example, Japanese crabapple, wax begonia, Aglaia odorata, Pachira aquatica, croton, white magnolia, etc., as long as the soil is slightly damp, that is enough; by no means should you water often or heavily, otherwise it will accelerate their death. As long as watering can be controlled and appropriate insulation is provided, they can get through the severe winter.
Second, look at the type of flowerpot
For potted plants of different types and sizes, the frequency and amount of watering should also differ. Generally speaking, clay pots have the best permeability and the fastest water evaporation, so watering must not only be frequent but also relatively more to keep the soil moist. On the contrary, porcelain pots, glazed pots, and plastic pots, because of poor permeability, have relatively slow water evaporation in the pot; if you water frequently and heavily, it is very easy to cause the plant to rot at the roots and die. For flowers and trees potted in such pots, when can they be watered? You can use a small stick to poke open the soil and observe; if the soil below does not have much moisture, you can slowly water a little around the rim of the pot. If you find the pot soil is too wet, you should temporarily hold off watering.
Third, look at the type of flower
Every flower has its own characteristics and requires a suitable living environment. Some flowers like sun, some suit shade, some love moisture, some are better dry, some are afraid of cold, and some avoid heat; they must be treated differently. Plants such as cacti, Japanese crabapple, Clivia, wax begonia, orchids, asparagus fern, Epiphyllum, potted pomegranate, plum, osmanthus, etc., should usually be kept appropriately on the drier side, and by all means should not be watered too frequently or too much. If Japanese crabapple is watered a little too much, it easily rots at the roots and dies. When the pot soil is dry, you can only slowly water a little along the edge of the pot, letting the water gradually seep from the surroundings to the roots. If you water directly at its roots or let it be rained on for a long time, it easily rots at the roots. Chrysanthemums, freesia, amaryllis, spider plant, frog begonia, bamboo begonia, Ganrizi, August chrysanthemum, Lantana camara, Serissa japonica, boxwood, etc., can be watered a bit more during the growing season.
Fourth, look at the growth period
Flower plants have different growth periods, and the amount of water they need also differs. Most flowers grow in spring, summer, and autumn, especially spring and autumn, but some flowers grow in autumn and winter. Whenever flowers are in their growth period, they consume more water, so at this time they should be watered more (and of course fertilized too) to meet their growth needs. From late autumn to the beginning of winter, many flower plants enter dormancy or are in a dormant state, and watering should be strictly controlled for these flowers. But some other flower plants are precisely in their growth period, such as fuchsia, cineraria, freesia, cyclamen, tulip, hyacinth, etc. Although it is winter, these flowers are still growing, and at noon they need appropriate watering or misting, because their dormancy period is in summer. Rosemary
Rosemary
Different flowers also have different watering methods and times. Some are suitable for watering with a ladle, some are better watered with a watering can, and some require misting. For example, orchids, fuchsia, azaleas, wax begonia, Clivia, etc., especially newly inserted flower seedlings, should be misted two or three times a day to reduce water evaporation from the body and promote survival. But potted pomegranate, Lantana camara, small-leaved privet, etc. can also be watered at noon in midsummer.
In short, there are many watering methods, and you must master them flexibly, proceed from reality, and achieve timely and appropriate amounts.
How to make your own potting soil for potted flowers?
Conditions that the culture soil for growing flowers should have:
Culture soil is one of the important materials in the science of flower growing techniques, and it can provide a relatively ideal growing place for the healthy growth of many kinds of flowers.
The conditions that culture soil should have are as follows:
1. Loose, fertile, with low soil bulk density (should be below 1), and strong drainage and air permeability.
2. Strong water retention and fertilizer retention.
3. Contains the major nutrient elements and trace nutrient elements necessary for flower growth, and has long-lasting fertilizer effect.
4. Free of sources of pests and diseases, especially for soil used for propagation of precious flowers and for transplanting seedlings, which should be disinfected before use.
How do you make your own soil for growing potted flowers?
To grow flowers well, soil plays a quite important role. Generally, the soil requirements for potted flowers are: rich in organic matter, fertile, loose, well-drained and airy, water- and fertilizer-retentive, free of pests and diseases, and with an appropriate pH value. Common soils for growing potted flowers include garden soil, leaf mold, compost soil, peat, pond mud, moss, and so on. Leaf mold, peat, etc. can be used directly to plant potted flowers. However, generally when a single kind of soil is used alone, there will certainly be shortcomings of one kind or another; for example, pond mud is too heavy, and peat lacks nutrients. So generally when planting potted flowers, several soils or other substrates are often mixed together to grow flowers. This artificially prepared culture soil combines the advantages of the various soils or substrates, and the effect is quite good.
For many reasons, whether abroad or domestically, the formulas for artificially prepared culture soil differ from place to place, and there are also different formulas for different types of flowers. Here we introduce one formula: for general herbaceous flowers, you can mix 5 parts garden soil, 3 parts leaf mold, and 2 parts river sand as culture soil; for general woody flowers, you can mix 5 parts garden soil, 4 parts leaf mold, and 1 part river sand as culture soil. In this formula, garden soil and river sand are relatively easy to obtain, and if leaf mold cannot be obtained, you can make it yourself.
The method for making leaf mold is: collect fallen leaves, pile on a layer of garden soil about 10 cm thick, one layer of leaves and one layer of garden soil, piling layer by layer, and water frequently. If possible, add another layer of manure between the leaves and the garden soil, and when watering, switch to diluted human excrement or slop water. After nearly a year of composting, the leaves rot into powder; then after turning, mixing, and sifting, it becomes good potting soil. Leaf mold made by this method contains much humus and nutrients, is loose, well-drained and airy, retains water and fertilizer, and can also be used directly to plant potted flowers.
How can potted flowers avoid lacking water when no one is home?
When growing flowers at home, you will from time to time encounter the problem that the owner is away on a business trip and no one waters the potted flowers. For flowers with strong drought tolerance, sometimes not watering for a week is not a problem, but for flowers that like moisture, sometimes they need to be watered once a day. What should you do in this situation? Below are several feasible methods:
First, use the drip irrigation method: that is, use a drip tube device like the one used for saline drips, drip water onto the base of the stem, and let the water continuously seep and spread into the soil to be absorbed by the root system. Adjust the dripping speed according to the type and size of the flower and tree. This method is relatively advanced and the effect is also relatively good, but it can only be done if you have a drip tube device.
Second, use the capillary action method: that is, use a lamp wick or cloth strip, with one end placed on the pot soil and the other end placed in a container full of water; the water level in the container must be higher than the position of the pot soil. In this way, through capillary action, water can be continuously supplied to the pot soil.
Third, use the plastic bag covering method: first water the plant thoroughly, then cover the entire plant with a plastic bag and tie it onto the pot. Because it is covered by the plastic bag, water vapor can be retained inside. If water droplets form on the plastic sheet, the droplets can drip back into the pot soil, and the plastic bag can retain moisture for as long as two to three weeks. If you are away from home for less than 10 days, you only need to cover the plant loosely with the plastic bag. It is worth noting that the leaves should not touch the plastic sheet, and the flowerpot covered with the plastic bag should not be placed in direct sunlight. For convenience and effectiveness, when putting on the plastic bag, first insert 3-4 thin sticks into the soil at the edge of the pot; the inserted thin sticks should be taller than the plant.
Rosemary pruning methods
So, how should rosemary be pruned?
Rosemary pruning principles
Rosemary itself is a relatively slow-growing plant, but in order to maintain plant shape and increase yield, it needs pruning. However, because rosemary grows relatively slowly, if the pruning is too severe, it will cause the rosemary plant to be unable to sprout again. So when pruning, do it moderately and do not over-prune; when pruning branches, cut off at most half of the branch.
Generally speaking, after rosemary survives, it can be pruned after about 3 months of growth.
Rosemary pruning methods
When pruning rosemary, it is mainly divided into shaping pruning and harvest pruning.
Shaping pruning is mainly because during rosemary's growth process, the branches will keep growing, and basically small buds will grow at every leaf axil. As the branches grow, these small buds will also gradually develop into new branches. So after a long period of growth, the whole rosemary plant will present a messy state, with branches growing sideways, and this will affect ventilation and light penetration, causing rosemary to be prone to some pests and diseases. Therefore, in order to make rosemary grow better and have a beautiful plant shape, you can prune it regularly and tidy up its appearance.
Harvest pruning is also a relatively commonly used method. During rosemary's growth process, it can be harvested multiple times, and when harvesting, the main thing harvested is the branches and leaves of rosemary. The method of harvest pruning is relatively simple; you can prune with scissors or directly pick by hand. When harvesting, note that the sap at the wound of rosemary will dry and is very hard to remove, so when harvesting and pruning you need to take protective measures. When harvesting, you can harvest 3-4 times a year according to rosemary's growth.
Rosemary disease and pest control
1. The plant must be able to get ventilation and remain cool
2. Sunlight must be sufficient (pests and diseases often occur in unventilated, hidden places that sunlight cannot reach)
3. Avoid high-temperature and high-humidity climates and environments
4. Cut off excess and aged dead branches and leaves, and pick up the dead branches and leaves that fall on the surface of the pot soil, so as to avoid attracting pests and diseases to move in.