How to grow clivia from seed: sow beautiful flowers yourself
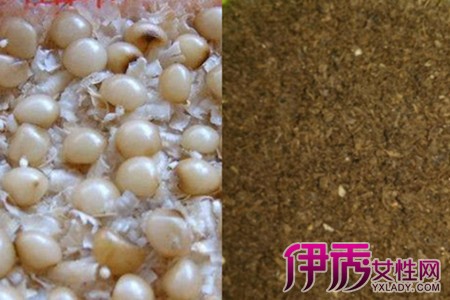
Clivia seeds are harvested from large clivia plants that have set seed after flowering, but they cannot be planted right after harvesting. They must be dried and air-cured until the following spring before planting. Clivia seeds can be planted in both spring and summer, but before planting they must be soaked in warm water first, otherwise the seed coat is too thick and they will not germinate.
Soak until the seeds swell and the coat is no longer very hard, then take them out, let them dry, and they are ready to plant. For planting clivia seeds, it is best to use a soil mix specially made for clivia. Do not bury them too deep when planting; a layer of sawdust should be placed on the very top of the soil surface, which makes the clivia seeds germinate more easily.
After the clivia seeds are planted, water them thoroughly the first time, then place them in a spot with light and good ventilation. But do not let them be scorched by the midday sun. Because clivia seeds have a thick coat, they germinate rather slowly, usually sending out small tender sprouts only after half a month to twenty days. After germination, water less, and when watering do not pour directly from above with a container; you can use a spray bottle to moisten the soil little by little, which protects the young sprouts from damage.
Once the clivia seedlings have grown to more than 5 cm, do not water too frequently; reduce the number of waterings, because at this stage its roots have just begun to grow and are not yet very large, and if they sit in water they rot easily. In addition, clivia pots easily attract small black flies. Small black flies are a kind of parasitic fungus in flower pots; as long as you regularly water once with flower insecticide or garlic juice, they can be dealt with.
Clivia needs fertilizing once a month, using either a fertilizer specially made for clivia or an organic fertilizer. The amount of fertilizer each time should not be too much; too much fertilizer makes it harder to bloom. The above is the whole process of growing clivia from seed; we hope it can help friends who need it.
How to plant wintersweet seeds: wintersweet seed growing method
?Related reading recommendations? Guava pictures
? Dendrobium pictures
? Rose pictures
? Crabapple flower meaning
? How to grow peonies
(????) For flowers and bonsai, and plant cultivation, please follow the Meilele Flowers and Bonsai section!
.........................
"When deep winter arrives, the traces of a hundred flowers are gone; only wintersweet breaks through, opening alone in the snow." At this time the golden, translucent wintersweet attracts countless people to brave the severe cold to see it. So would you like to enjoy this wintersweet, which "opens alone in the cold," in your own home? Today the editor will teach you how to plant wintersweet seeds..........................If you want to know how to plant wintersweet seeds, you first need to understand what environment it likes to grow in so it can be planted well. Wintersweet likes sunlight and can tolerate shade, cold and drought, but dislikes waterlogging. Wintersweet flowers bloom proudly in frost and snowy cold weather, with yellow flowers like wax and a rich fragrance that greets the nose; it is a major ornamental flowering tree in winter. Wintersweet fears wind but is relatively cold-hardy, and can overwinter safely when temperatures are not below -15°C. It can be cultivated in the open ground in areas south of Beijing, and grows best on deep, fertile, loose, well-drained, slightly acidic sandy loam; it grows poorly on saline-alkali soil.
..................................................So how do you plant wintersweet seeds? Generally, the fruit is harvested in July-August when it turns yellow; the seeds are taken out and stored dry until sowing in February-March of the following spring, with a soil covering about 4-5 cm thick. If the seeds are soaked in warm water before sowing, germination can be promoted. After the seedlings emerge in April, take care to prevent damage from cutworms and strengthen management; shading is not necessary. The seedlings grow slowly, reaching only 10-15 cm tall in the first year. The sowing method can be used to raise wintersweet rootstock in large quantities, but it requires a relatively long growing time.
..................................................After understanding how to plant wintersweet seeds, do not forget the more important care work that follows.
Watering
For wintersweet, watering normally should preferably maintain the soil in a half-moist state; in the rainy season pay attention to drainage to prevent water accumulation in the soil. In dry seasons replenish water in time. During the flowering period, keep the soil moderately dry and do not water too much. For potted wintersweet in spring and autumn, do not water unless the potting soil is dry; in summer, water once each morning and evening, with the amount controlled according to how wet or dry the potting soil is.
..................................................
Fertilizing
For potted wintersweet, no additional fertilizer water is applied in the early potting stage. In spring, apply a leaf-growth fertilizer. After the flowers fade each year, apply one application of fully decomposed organic fertilizer. From the growth season after new leaves sprout in spring until June, apply decomposed cake fertilizer water once every 10-15 days. During the flower bud differentiation period in July-August, apply a mixed liquid of decomposed organic fertilizer and phosphorus-potassium fertilizer. After autumn, apply organic fertilizer once more. After each fertilizing, water and loosen the soil promptly to keep the soil loose. Do not fertilize during the flowering period.
..................................................Now that you understand how to plant wintersweet seeds, do not just leave it at that. If you want wintersweet to grow well, later-stage management is the most important thing.
Pruning before flowering
After leaf fall and before the flower buds swell, for long branches leave an extra pair of leaf buds above the flower buds, cut off the upper part without flower buds, and thin out dead branches, diseased and pest-infested branches, overly weak branches, and dense or excessively vigorous non-flowering branches and root suckers not used for renewal. Operate carefully to avoid knocking off flower buds.
..................................................
Supplementary pruning after flowering
For wintersweet, thin out aged branches, dead branches, overly dense branches and excessively vigorous branches, and cut back weakened main branches or branch groups. For main branches that are too tall, too long or too vigorous, cut back at a relatively large, moderate, slanting branch to lead with a weaker branch, controlling branch height, branch length and branch vigor. Shorten one-year-old branches: leave 30-40 cm on extension branches of main branches, leave 10-20 cm on other relatively strong branches, and leave one pair of buds on weak branches or thin them out. After the flowers fade, remove the spent flowers promptly.
.........................Wintersweet is not only an ornamental flowering tree; its flowers contain various aromatic substances such as linalool, borneol, eucalyptol, pinene and sesquiterpene alcohols, and it is one of the fragrant flowers used to make high-grade scented tea. Today the editor's introduction to how to plant wintersweet seeds ends here. Thank you all for reading.
Article source: Flowers and Bonsai
[Flowers and Bonsai]
? How to grow rhododendrons? How to grow peace lilies? How to grow lucky bamboo? How to grow fragrant wood? How to grow clivia
? How to grow bamboo palm? How to grow asparagus fern? How to grow snapdragons? How to grow pennywort ? How to grow lucky bamboo
New techniques for growing clivia
Clivia (scientific name: Clivia miniata), also known as sword-leaf lycoris and large-leaf lycoris, is an ornamental flower in the genus Clivia of the amaryllis family. It is native to southern South Africa. It is a perennial herbaceous plant, with a flowering period lasting 30-50 days, mainly in winter and spring, and it also blooms around New Year's Day to the Spring Festival. It dislikes strong light and is a semi-shade plant, preferring cool conditions and disliking high temperatures. The optimum growth temperature is 15-25°C, and growth stops below 5°C. It likes fertile, well-drained and moist soil, and dislikes dry environments. Clivia has very high ornamental value, and in China it is often grown in pots in greenhouses for viewing. It is propagated by division or seed. The closely related Clivia nobilis has the same uses and is cultivated in greenhouses in various places, with diverse flower colors. The lifespan of clivia reaches several decades or longer. Clivia is the city flower of Changchun City.
Clivia has fleshy roots, and its flowers are funnel-shaped, in affectionate red or yellow-red. The flowering period is in spring and winter; the flower shape is elegant and the flower color is vivid.
I. Propagation methods
(1) Sowing method. The sowing period is from October to mid-November. To obtain clivia seeds, artificial supplementary pollination is needed during the flowering period in February-March, at least 3 times. After the fruit ripens and is harvested in October-November, it should be sown immediately by spot sowing in a shallow pot, with plain sand as the substrate, and a soil covering thickness 2 times the diameter of the seed. After sowing, cover with plastic film or glass, place the sowing pot in a 20°; C greenhouse, keep the potting soil moist, and seedlings can emerge after about 40 days.
(2) Division method. Generally in April-May after the flowers fade, together with repotting, separate the small plants, preferably with 2-3 roots, and after cutting, apply fungicide to the wounds on the mother plant and the small shoots. After the small plants emerge, control watering and place them in a shaded spot; after half a month, return to normal management. The sturdy ones can be planted 1 per pot, while the weak and small ones can be planted 2-3 per pot.
II. Key cultivation points
(1) Light. In the northwest region, July-September is the dormant period of clivia, and it should be placed under a ventilated, cool shade frame, avoiding direct sunlight; bring it indoors in October, and it is best placed in a spot with ample sunlight.
(2) Temperature. Move it outdoors in early May and indoors in October. The optimum temperature is 18-21°C. In summer, by shading, cooling, controlling water and controlling fertilizer, root rot and excessive leaf growth can be prevented. The suitable overwintering temperature is 8-5°C.
(3) Repotting. Generally repot once every 2-3 years, moving it from a smaller pot into a larger pot, using fertilized culture soil and appropriately adding some coarse sand. When repotting, be careful to protect the old roots, and add decomposed organic fertilizer at the bottom of the pot as a base fertilizer.
(4) Watering. Generally water when the potting soil is dry, and do not water when the potting soil is not dry; do not allow water to accumulate in the pot. Do not pour water onto the leaves, especially not onto the central leaves.
(5) Soil. It has strict soil requirements, and aeration and drainage are the most critical; loose, fertile, humus-rich, slightly acidic soil is best.
(6) Fertilizing. Apply phosphorus fertilizer as a top dressing before flowering; during the growth season, apply decomposed fermented liquid fertilizer once every 7-10 days; do not fertilize during the dormant period.
(7) Pest and disease control. If rot disease occurs, strengthen ventilation and shading and spray a 1500-2000 times dilution of thiophanate solution; if harmed by scale insects, spray a 1000-1500 times dilution of dimethoate, or brush off the insects with a brush.