How to deal with root rot in clivia? These little tips help you solve it easily
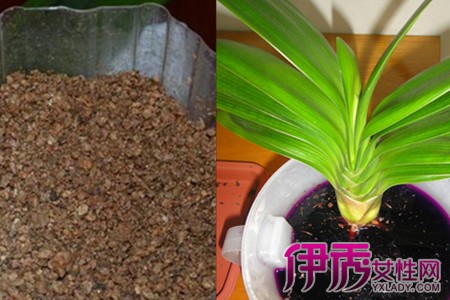
Clivia prefers slightly acidic soil. The best planting soil is a mix of sandy soil and some humus soil combined with some pine leaves; a mix of river sand soil with furnace ash slag plus some leaf mold soil is also quite good. If the soil has good air permeability and water permeability when planting, and the growing materials are disinfected and sterilized before use, clivia will develop fewer diseases.
Some flower growers water clivia with a little beer to supplement nutrients. Note that when watering clivia with beer, it must be diluted with water and applied once a week.
Do not always water it at ordinary times. If you water too frequently, the water in the flowerpot cannot drain out, causing water to accumulate in the pot and rot the roots. After the roots rot, the leaves of the clivia will turn yellow and develop some small spots. At this point it needs to be dealt with in time; if ignored, the entire leaves will fall off.
When watering clivia at ordinary times, water only after you find the soil in the pot has dried. It is best to use a small watering spray bottle to spray the water, but do not water from the center of the leaf rosette, to prevent the core from rotting.
If clivia develops leaf spot disease due to root rot, spray it promptly with carbendazim, or mix some medicine with water into a paste and apply it to the affected parts. When fertilizing clivia at ordinary times, the fertilizer must be fully fermented; if fertilizer that has not been composted is applied, the clivia will develop root rot and leaf spots.
After the clivia roots rot, promptly replace the potting soil, carefully remove all the potting soil, and remove the rotten roots. Soak in potassium permanganate water for 60 minutes; after soaking, coat with a layer of plant ash and leave for one day, then replant into new soil. At ordinary times, do not place it in an environment with excessively high temperatures to grow; at noon when the sun is too strong, it needs to be placed in a ventilated spot to grow.
What to do about clivia root rot? How to deal with clivia root rot
Clivia is one of the most common indoor flowers. Part of the reason is that its appearance is rather elegant; placed indoors it not only has a decorative effect but also brings some green visual enjoyment, making it most suitable for decorating the home. Another part of the reason is the symbolism of clivia: the gentleman is noble and cannot be bullied. Even in modern society, many people use clivia to symbolize their own character. Compared with some ordinary flowers and plants, clivia appears elegant and grand. But in daily cultivation, clivia often develops some root rot, which looks very unpleasant. So what to do about clivia root rot? The answers are all below.
What to do about clivia root rot? How to deal with clivia root rot1. In general, because the overall growing conditions clivia requires are fairly ordinary, and it is also a plant with very strong vitality, unless some relatively major mistakes occur during cultivation, such as too much water, clivia may develop root rot and its growth will be affected. Generally, as long as you master the corresponding cultivation methods, you can reasonably avoid clivia developing this condition.
2. But if clivia root rot really does occur, is there no way to remedy it? Of course there is. We have already said that clivia is a plant with very strong vitality. So even if root rot occurs, there are still ways to remedy it. Only in this way will a life not be wasted, and you can continue to grow it and enjoy the beauty clivia brings us.
3. The remedy for clivia root rot is roughly to tip the whole clivia out, then wash away the soil on the roots, and then remove the rotten roots. Dry the moisture in the sun until the orchid roots are slightly soft, take new soil and repot, water thoroughly, and place in a shady spot. Here we must pay special attention that the soil must be dry soil; wet soil not only cannot save the clivia but may also worsen the root rot.
[Clivia root rot]How to deal with clivia root rot
Clivia is very easy to grow, but clivia root rot also exists. I believe many flower growers who grow clivia have encountered it. Below, the clivia root rot phenomenon is analyzed from several aspects, including overwatering during clivia cultivation, high temperatures, too concentrated fertilizer, and poor indoor ventilation. The specific analysis is as follows:
Analysis of causes of clivia root rot 1. Clivia root rot: temperature too highHigh temperature, high humidity, and poor ventilation make the plant's fleshy roots very prone to rotting.
2. Clivia root rot: watering too muchToo much watering, high water content in the nutrient soil, poor air permeability, and roots soaked in water for a long time cause the roots to discolor and rot.
3. Clivia root rot: too much fertilizerToo much fertilizer, fertilizer in the nutrient soil that has not fully fermented, causing heat that burns the roots and leads to root rot. Improper fertilizing during the growing period and too large a fertilizing amount cause the fertilizer to contact the roots, burning the roots, affecting the roots' absorption capacity, destroying root tissue and causing root rot. Pay attention to applying thin fertilizer frequently.
4. Clivia root rot: root injuryRoots suffer external injury. When repotting or dividing the pot, because the roots are knocked and broken or rot, the rotten fleshy roots must be thoroughly removed, then coated with charcoal or fine furnace ash and dried, and then earthed up and potted, to prevent the injured roots from directly contacting the nutrient soil's pathogens and rotting.
5. Clivia root rot: poor indoor ventilationPoor air permeability. Using porcelain pots, plastic pots, etc. leads to poor air and water permeability of the potting soil and thus root rot.
6. Clivia root rot: poor soilPoor soil quality, with bacterial diseases eroding the fleshy roots and causing decay.
What to do about clivia root rot 1. How to handle a small area of clivia root rota. After discovering root rot, immediately knock it out of the pot, remove the attached soil, rinse the root system clean with clear water, and then cut off the rotten roots with a sterilized blade.
b. Use a potassium permanganate solution, or a fungicide solution such as carbendazim, and put the roots in to soak for 20 minutes, then take them out and dry the wounds in the shade.
c. Prepare cultivation soil again and disinfect it. After the wounds on the clivia roots have dried in the shade, plant them into the new cultivation soil.
d. For the replanted clivia, put a transparent plastic bag over the pot opening, place it in a semi-shady spot, and keep the potting soil slightly moist; do not water too much. Every 5-7 days, spray the leaf surface once with a 2‰ potassium dihydrogen phosphate water solution to increase nutrients and promote rooting. After two or three weeks of care, new roots can grow; at this point remove the plastic bag and gradually transition to normal care.
2. How to handle a large area of clivia root rotMethods for handling clivia whose root system is entirely rotten or mostly rotten:
a. First rinse the base of the stem clean with water, then use a sharp blade to cut off the rotten part horizontally. Note that the cut should be as flat and smooth as possible.
b. After cutting, immediately apply sulfur powder or charcoal powder to the cut to prevent wound infection. Place it in a cool, ventilated spot and let the wound dry in the shade. Also cut off most of the leaves to reduce transpiration.
c. After the surface of the cut has dried in the shade, plant it in plain sand. Water once after two days, and afterward just keep the potting soil warm and moist; do not fertilize. At a temperature of 20-25 degrees, after about half a month new roots will grow around the cut. After two months it can be transplanted into a new pot with cultivation soil and gradually brought into normal care.