Spider Plant Hydroponic Growing Method Shared: Clean, Beautiful, and Air-Purifying
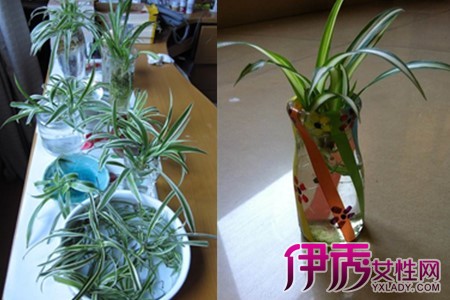
Modern people are more willing to spend extra energy, time, and money on their interests; for example, they are happy to grow some flowers and tend some plants in their spare time outside work and study. As an ornamental plant widely recognized as elegant in taste, graceful in form, easy to grow, and powerful at purifying air, the spider plant is one of the first choices for many households.
For spider plants there are two growing methods: soil culture and hydroponics. As the traditional growing method, soil culture occupied most of the history of spider plant cultivation, but with the arrival of hydroponics, the drawbacks of soil culture, such as being hard to manage and dirtying the floor, gradually became apparent. So for modern people, the clean and easy-to-manage hydroponic method is the best choice for growing spider plants indoors, and this growing method also lets people admire the spider plant's pure white, plump, and dense roots.
Now let's look at the specific cultivation process for hydroponic spider plants.
Before doing anything, only with thorough preparation will you avoid being in a flurry during the process. So before we formally begin growing, let's first look at the tools and materials we need to prepare: small scissors, a bottle, a decorative pot, glass marbles, cooled boiled water, prepared nutrient solution, and a healthy spider plant.
Point one: choosing the spider plant. For growing spider plants hydroponically, it is best to choose aerial roots that have grown on the stolons of a large spider plant, because these are more suitable for hydroponics and easier to manage. A plant selected this way, when placed in water, will sprout young roots in about 5 days. In addition, it is best not to choose a variegated spider plant with silver lines for hydroponics.
Point two: water for hydroponics. The water used for hydroponics matters; it is best to use cooled boiled water, since water treated by boiling can make the spider plant's roots grow white and tender rather than turning green.
Point three: choosing the container. Compared with soil-grown spider plants, hydroponic spider plants, besides being easy to manage and not dirtying the place, have the greatest advantage of letting you see through the water the spider plant's pure white, plump, and dense roots, with green and white complementing each other beautifully. Therefore, as for the material of the container, whether ceramic, peat, or plastic, none is the best choice; the best choice is transparent glass that has weight and texture.
Point four: preparing the spider plant. If what you finally choose is not the kind mentioned in point one but a spider plant dug directly out of the soil, then some processing is needed for it to grow well. First, rinse the soil clinging to the dug-out spider plant clean with gentle running water; then deal with the roots, cutting off the old and rotten roots with scissors; finally deal with the leaves, removing diseased leaves, rotten leaves, and half-withered leaves without harming the intact leaves.
Point five: securing the spider plant. Place the prepared spider plant into the glass container you have chosen, and secure it with some glass marbles or pretty small stones. The key points of securing are: make sure the spider plant is vertical with not the slightest tilt. At the same time, when securing it, be careful not to let the glass marbles and stones injure the spider plant's young tender roots, and also make sure the roots are evenly distributed.
Point six: changing the water and the nutrient solution. For the nutrient solution, it is best to choose a special nutrient solution suitable for spider plants, which is easy to buy on the market; of course, you can also prepare it yourself. Generally speaking, the cycle for changing the water and replacing the nutrient solution for hydroponic spider plants is about 7 days, but it can also be adjusted according to the specific condition of the spider plant. In addition, if you find some slippery, sticky fluid on the roots, be sure to wash the roots thoroughly.
Sharing the method and taboos for hydroponic Variegated Spider Plant
Because of its green appearance and air-purifying function, the spider plant has become a favorite of office workers. In particular, the variegated spider plant among spider plants is loved by people for its uniquely beautiful appearance. Recently, I have seen many people asking how to hydroponically grow variegated spider plants, and whether they are suitable for hydroponics. Indeed, hydroponically grown plants are cleaner and more ornamental than soil-grown ones. So I also tried hydroponic spider plants early on, and experience tells me that variegated spider plants can be grown hydroponically. I have been growing my variegated spider plant hydroponically for more than a year, and it is currently growing well. Now I will share my hydroponic experience and steps with everyone.
To do hydroponics, you need a container for it. Choose a glass bottle or ceramic bottle according to your own habits and preferences, but it must be a container without a drainage hole. Once we have the container, we next choose a plant suitable for hydroponics; the plant must not have rotten roots, and the roots of the chosen plant must be cleaned of old and rotten roots, and leaves with pests or diseases must also be cut off. Generally, 6 to 10 healthy leaves need to be kept.
After preparing the container and the plant, wash the soil off the plant's roots and carefully plant it in a plastic basket filled with ceramic granules or stone grains, keeping the spider plant upright with its roots reaching into the bottle of clean water.
Next, place the planted spider plant indoors and change the water every two or three days. When the newly grown roots reach 3 cm long, add nutrient solution to the clean water, but do not pour in large amounts of nutrient solution, because a large amount of nutrient solution will breed lots of mold and bacteria, causing root rot. At the beginning of hydroponics, the spider plant's roots will have some rotten parts; there is no need to worry about this, just cut them off and disinfect when changing the water.
According to my experience with hydroponic spider plants, if you grow spider plants hydroponically, do not put craft items and ornaments in the hydroponic container, as this is not good for the spider plant's growth. If you really must beautify the container, just put in some natural stone materials such as pebbles, which are both attractive and won't harm the spider plant.
At present, the spider plants grown at home by this method are growing well, with plump and sturdy leaves; the glass bottle paired with threads of green makes people feel relaxed and happy, and also makes the friends who come to admire them envious, as they ask one after another about the cultivation method. During this time, because I was overly protective of the spider plant, I sprayed it with too much nutrient solution, which caused the leaves to suddenly show signs of yellowing and withering. Fortunately, I found the cause in time, so my spider plant was not lost due to excess nutrients. So I suggest that when growing spider plants hydroponically, as for spraying nutrient solution, more is not better; about 2 to 3 sprays per week is enough, and it must be diluted before use.
An introduction to the specific method and steps for hydroponic spider plants, and the care after hydroponics
The spider plant is a common and very popular houseplant among our home flowers. The spider plant's leaves are slender, both crisp and graceful. The spider plant is a very good foliage plant; placed at home it adds a fresh touch and can also purify the air. Today, I will take everyone through understanding the specific method and steps for hydroponic spider plants.1. Choosing a container
Any container that can hold water can be used to grow spider plants in water; it is best to use a transparent vessel for water culture, so you can admire the dazzling white roots in the water. Glass wine glasses, teacups, and mineral water bottles around you are all containers for hydroponic spider plants, both economical and attractive. The container for hydroponic spider plants can be single-layer or double-layer. A single-layer container is a bottomless glass bottle or plastic bottle in which the spider plant is planted directly. A double-layer container uses a plastic basket as the upper layer and a bottomless bottle as the lower layer, planting the spider plant in the upper plastic basket and letting the spider plant's roots extend into the lower bottle.
2. Take a potted spider plant with a graceful shape out of the pot and wash off the soil
3. Cut off old roots and cut off withered yellow leaves
4. Insert it into a plastic basket and fill in orchid stone or maifan stone to increase permeability, which also has a securing effect on the plant. Then place it into a wide-mouthed transparent glass bottle for water culture
Spider plants can also be grown in water by division; the specific steps:
1. Cut from the mother plant the small spider plants with aerial roots on the creeping stolons and separate them for water culture.
2. After a few days, snow-white new roots sprout.
Care and management
1. When growing spider plants in water, just let the bottom one-third of the roots touch the water surface; do not submerge all of the spider plant's white fleshy roots in water, otherwise water accumulation will cause root rot.
2. For a spider plant just placed in water, change the water once a day; after it has rooted, reduce the frequency of changing the water.
3. Placing it in a spot with good light helps new roots sprout.
The above is the specific hydroponic method and steps for spider plants that I have compiled. I hope it can help the many flower lovers, and please continue to follow Duorou Huapu to learn more about flower care knowledge.