To make hydroponic camellias easy to root, these five cultivation steps must be done well
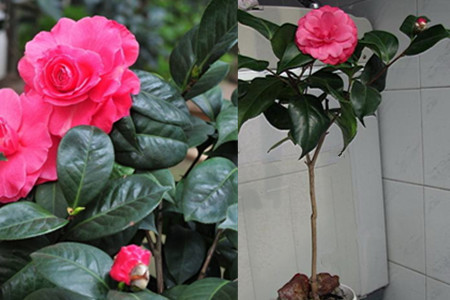
Camellia is a highly ornamental flower; whether grown in masses in a courtyard or as a single plant indoors, the decorative effect is excellent. Camellia cultivation methods are generally divided into two types: cuttings and hydroponics, and if growing indoors, the hydroponic method is more suitable. But for beginners, succeeding with hydroponic camellias on the first try is actually quite difficult. If you want to improve the survival rate of hydroponic camellias, you must first learn the following five hydroponic steps to help the camellia branches root as quickly as possible.
Step one, select the branches for hydroponics.
The camellia branches used for hydroponics must be cut from healthy, pest-free branches, and you should choose those that are darker green and relatively sturdy. If there are branches with buds on them, even better, as these branches have higher cell activity, are easier to root when cultivated, and will bloom quickly after rooting. When cutting the branches, try to complete the cut in one go and keep the cut surface neat.
Step two, treat the cut end.
First spray a little water on the cut end of the branch, roll it a few times in carbendazim powder, then spray a little water again and roll it a few times in nutrient soil. This way the cut end will be covered with carbendazim powder and nutrient soil. Then lay the treated branch flat for about half an hour so the cut end can fully absorb nutrients. The carbendazim powder can kill bacteria at the cut end and prevent the roots from rotting quickly, while the nutrient soil can provide the camellia with sufficient nutrients needed for rooting.
Step three, prepare the container and water.
For the container holding the camellia branch, choose a narrow-mouthed one if possible, so that after the branch is placed inside it can stand steady with the support of the bottle mouth. If you really do not have a narrow-mouthed container, you can also put a layer of pebbles at the bottom to help the branch stand upright in the water. The water used for hydroponic camellias must be tap water, and the water depth is best at 5cm-10cm. Never make it too deep, so the branch is not soaked excessively in water, which can also cause the branch to rot.
Step four, secure the branch and add nutrient solution.
Put the prepared camellia branch into the water, and gently prop a few pebbles against the cut end position so the camellia is secured in the water. If you do not have pebbles, you can also use a piece of foam board and insert the branch into the foam board to help secure it. After securing it, remember to drip a few drops of nutrient solution specially for hydroponic plants into the water, so the water contains enough nutrients and the camellia can be prevented from withering or rotting due to insufficient nutrients.
Step five, change the water regularly and clean the roots.
Do not think that once the camellia branch is placed in, you can just leave it alone. We also need to take the branch out about every seven days and rinse off the surface slime with clean water. Because if the roots are wrapped by this slime, it will hinder nutrient absorption, and over time the branch will lack nutrients and be unable to root. At the same time, all the water in the container also needs to be replaced with clean tap water, nutrient solution dripped in again, and then the branch put back.
For camellias grown hydroponically through these five steps, most will show fine root hairs growing at the roots in about ten days, and after one month the root hairs will become dense, which means the camellia has successfully rooted and survived. In daily care, we should also note that before the camellia branch roots, it should be placed in a spot with plenty of light but not direct sunlight, which can also increase the success rate of hydroponic camellias.
Is hydroponic asparagus fern easy to root? Key points for hydroponic asparagus fern
Asparagus fern, also known as cloud bamboo, belongs to the Liliaceae family. Its form is light and graceful, its leaves are green all year round, and it has an elegant posture, so it has won many people's affection. When growing asparagus fern, some people like soil culture and some like hydroponics. So is hydroponic asparagus fern easy to keep alive? What are the key points for hydroponic asparagus fern?
Key points for hydroponics:
1) Material selection: choose a soil-grown plant with a good plant shape and vigorous growth, wash off the soil and cut off rotten roots, then plant it in a hydroponic container, and add clean water up to one-third to one-half of the root system.
2) Care: at first, change the clean water once every 2-3 days and remove rotten roots promptly. After two weeks, the root system has basically adapted to the environment and has grown water roots. After that, change the clean water once every 5-6 days. When the plant shows strong growth vigor, switch to nutrient solution culture. The nutrient solution should be shallow rather than deep. In summer, replenish it about once every 10 days. When the sediment in the nutrient solution increases, replace the nutrient solution again, generally once every 1-2 months. In summer, avoid direct strong light; in winter, it is best to place it in a warm place with strong light. Keep the room temperature above 5°C. When the air is dry, often spray water on the leaf surface to maintain higher air humidity and keep the branches and leaves clean.
Hydroponic asparagus fern is not difficult to keep alive. Whether it can thrive depends on whether we flower lovers can become thoroughly familiar with the key points of hydroponic asparagus fern and then carefully grow it hydroponically. The above are the key points for hydroponic asparagus fern, and I hope this can be helpful to flower lovers.
Hydroponic method for ZZ plant, completed in 5 steps
ZZ plant hydroponic method step 1: prepare the hydroponic bottlePrepare a bottle for water-propagating the ZZ plant. It is best if the bottle mouth is a little smaller and the bottle body a little taller, so the ZZ plant is not easy to fall over when placed inside, which is good for growth. A glass bottle similar to a beer bottle is most suitable.
2. Selection of hydroponic branchesFrom a well-growing potted ZZ plant, cut a section of ZZ plant stem about 30 cm long as the water-propagated branch.
3. Soak in rooting waterYou can prepare rooting water and first soak the stem for 3—5 seconds, which can help it root and survive more quickly. If you do not have rooting water, first soak it in water, then place it in a cool place for half a day to dry off the moisture, and then put it in the bottle.
4. Insert the branch into the bottleAdd the necessary amount of water to the bottle. The amount of water should be about enough to submerge 5 cm of the ZZ plant stem. Do not make it too deep, then let it grow quietly. After about one month, you will see the ZZ plant grow roots of the following length, and after that it can be transplanted into soil for cultivation, or you can continue hydroponics, only it will grow more slowly.
5. Wait for rootingAs long as the indoor temperature is suitable, around 25°C, you can put the ZZ plant in water. After waiting about 1 month, roots will emerge from the bottom of the ZZ plant stem, and gradually root hairs, root tubers and new branches will grow.
Notes on water propagation of ZZ plant 1: avoid picking up the bottle to check for rootingDuring water propagation, do not keep looking to see whether roots have grown, especially do not pick up the bottle to check, as this will affect the ZZ plant rooting.
2. Try to soak in rooting waterBefore water propagation of the ZZ plant, it is best to soak it in rooting water for about 3—5 seconds, which will greatly increase the survival rate of water propagation.
3. Choose healthy branchesBe sure to choose a well-growing mother plant as the water-propagated cutting, so it is easy to survive.