Tulip bulb hydroponics: change the water promptly for better growth
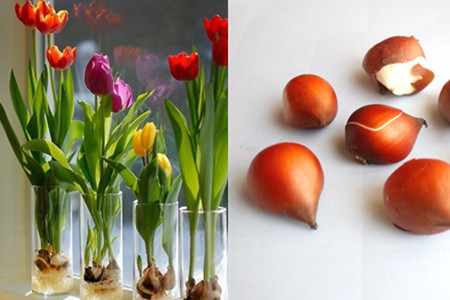
The tulip can be considered a fairly common plant. Its flowers are like little wine glasses, in red, yellow, purple and white, and now there are even single flowers showing two or three colors at once. This plant originally grew in Europe and later spread to our part of the world; today it has become an important member of the flower shop, with tens of thousands of stems sold every day. It is loved not only for its brilliant flowers but also because it is very easy to grow.
This plant is generally propagated by dividing the roots, and its roots look like a larger, rounder garlic clove, so people often call them "bulbs." As for planting it, there are generally only two ways: one is to plant it in soil, and the other is to place it in water. Next we introduce how to grow it hydroponically.
1. Selecting bulbs
Before planting, you must carefully select the bulbs, because some cannot be grown by the water culture method. When choosing, try to pick those that are plump and firm.
2. Choosing the container
You should not be too casual when choosing a container either. Do not choose one that is too deep, because then the bulb is very likely to rot; nor one that is too shallow, because then the fibrous roots will not have enough space to grow.
3. Change the water in the container frequently
If you want your plant to grow more and sturdier roots, you need to change the water inside frequently, so that it can obtain enough nutrients.
Although this plant can bloom relatively early when grown hydroponically, it is still a bit more complicated to manage.
How to grow tulips hydroponically and how to store tulip bulbs
With the continuous development of techniques, tulips can also be grown hydroponically, which makes them look more attractive and tidy placed in the home. But many people still do not quite understand how to grow them hydroponically, so today we will explain the hydroponic method for tulips, as well as how to store tulip bulbs.
How to grow tulips hydroponically
1. Bulb selection: Choosing suitable, disease-free bulbs is the key to hydroponic production of cut tulips. Hydroponic tulips require cold treatment of the bulbs: before the end of October keep the temperature at 9°C, then gradually lower it; from December to January keep the temperature at about 2°C and the humidity at 85-95%.
2. Planting method:
① According to the time when flowers are needed, choose and determine the cultivation time and planting method. For hydroponic cut-flower cultivation, the bulbs should be planted in disinfected, leak-proof pin trays, keeping the rooting temperature steady at 8°C and the humidity between 60% and 70%.
② After about two weeks of rooting, once the roots are ensured to be more than 3 cm long, move the pin trays to the greenhouse. The relevant greenhouse conditions are: humidity at 60%-70%, adding nutrient solution so that the Ec value of the water is 1.5 ms to 2.0 ms, and temperature controlled at 15-20°C; such values favor rapid growth of the tulips.
③ The early growth stage is very prone to disease, so in the early growth stage, to prevent diseases caused by filamentous fungi, spray 2 to 3 times. Choose low-toxicity agents, thiophanate-methyl, highly effective chlorothalonil, Tuzet, etc., at a concentration of 750-1000 times.
④ Spray foliar fertilizer at the appropriate time according to the growth situation, to coordinate vegetative growth and reproductive growth. During growth, due to root exudates and other environmental conditions, an oily film forms on the water surface of the pin tray, which will leave the roots short of nutrient supply and cause the roots to turn brown. Therefore, change the water 2 to 3 times as the situation requires.
3. Culture solution: Place the planting trays in a rooting room at 5°C with a small amount of air movement. Replenish water in good time; you can use tap water or rainwater with a conductivity value of 1.5 ms/cm. For varieties prone to leaf cracking, water with a conductivity value of 2 ms/cm should be used during the rooting stage.
4. Care: When the tulip roots grow to 100 px, place the planting trays on a relatively flat surface in the greenhouse, and remove diseased bulbs or those that have not sprouted. At this stage, make sure the water level reaches the overflow outlet, keep the temperature at 16-18°C and the humidity at 60-80%. At the end of planting, the number of waterings can be reduced to half of the previous amount; before harvest, provide the plants with enough water, which can extend the tulip flowering period.
How to store tulip bulbs
After the flowers fade, do not take out the bulbs immediately; wait until the stems and leaves have completely withered naturally before taking them out. The specific method is as follows:
Pruning:
After the flowers fade, cut 2-3 cm below the flower. Keep the leaves; do not cut them too short.
Care:
Water normally and apply a small amount of fertilizer. Watch out on cloudy and rainy days; do not expose them to wind and rain, to avoid root rot.
In September, stop water and fertilizer, and place the plant in a cool spot to let it enter natural dormancy.
Storage:
In October, when the leaves and stems have all turned yellow, dig out the bulbs before the rainy season and remove all the stems and leaves from the bulbs, taking care not to damage the bulbs.
You can find a large box and fill it with sand, line the bottom with a layer of plastic film to prevent leakage, put the bulbs in, and place the box in a cool, dry place; do not put the lid on the box, leave it open. The soil in the box should not be too dry; you can spray a little water. Alternatively, take out the bulbs, wrap them in a thick layer of newspaper, and put them in the refrigerator's crisper.
In November, take out the bulbs and plant them in soil. At first do not place them in sunlight; after a week, move them into the sun and care for them normally.
Notes:
Having already undergone low-temperature treatment, they will bloom more easily than other bulbs, but they can still bloom repeatedly. If they do not bloom and show "blind flower" symptoms, the temperature may be too high. At this point the bulbs must be stored well, and they can bloom year after year!
After the flowers fade, fertilize and water diligently to promote the development and strengthening of the roots and stems, which is better for bulb storage. Compared with growing from seed, planting bulbs directly is easier to care for and blooms faster.
The above is our introduction to the hydroponic method for tulips and how to store tulip bulbs. We hope it can help you; for more home knowledge, please stay tuned.
Home planting and hydroponic methods for tulips
Tulips are bulbous flowers planted in autumn and blooming in spring; they like cool conditions and fear heat. Under natural conditions, planting in autumn at a depth of about 15 cm where the temperature is around 10°C is most suitable, because this temperature suits root growth. In North China this temperature occurs around the "National Day" (October 1), while in the middle and lower reaches of the Yangtze River it is from late October to early November. Before the cold winter arrives, good root development is extremely important for good growth the following spring. In winter, the planted bulbs undergo further development at low temperatures; through the long winter cold they break dormancy and sprout in early spring, and as the temperature rises they unfold leaves and bloom.Tulips grown at home are usually imported bulbs bought from flower markets. They have generally undergone low-temperature treatment, usually 2 to 3 months of treatment at 5°C or 9°C, commonly called "5°C bulbs" and "9°C bulbs," and can be planted directly. For potting soil you can use fertile sandy loam. Before planting, peel off the hard yellowish-brown outer skin of the bulb, which favors root growth, and bury two-thirds of the bulb in the soil, placing it in an environment of 7°C to 10°C; this temperature favors root formation but is unfavorable to bud growth and pathogen reproduction. If the temperature is lower, roots form slowly and later stem and leaf growth is delayed; if the temperature is high, the stems and leaves grow early before the roots have formed, which easily produces "blind flower" symptoms, that is, only buds grow but no flowers open. During the rooting stage, no light is needed; you can put them in a cardboard box and place it on an enclosed balcony or similar spot at about 9°C. After the roots have formed in about a month, they can be moved to a bright spot indoors to promote stem and leaf growth and flowering. If the room temperature exceeds 20°C and the light is weak, they tend to grow leggy; 15°C to 20°C is fairly suitable. Usually they can bloom in about 1 month, depending on the variety's early or late flowering. If the bulbs you bought have not yet undergone low-temperature treatment, plant them by the method for untreated bulbs: pot them up in autumn, then bury the pot outdoors in the ground and cover with 10 cm of soil. Generally after 1 month you can take out the pot and keep it indoors to grow, and it can bloom in about a month. The nutrition tulips need for growth and flowering comes mainly from the bulb, while the formation of offset bulbs depends more on nutrients in the soil. Therefore, to get sturdy plants with large flowers, the quality of the bulb is also very important. Generally speaking, bulbs with a circumference greater than 10 cm are top quality; this is something to note when buying bulbs. Of course, whether there is any damage at the base plate is also something to check when selecting bulbs. For potted tulips, after flowering, top-dress in good time to promote growth and the formation of new bulbs.
Hydroponic tulips are also grown according to the tulip's growth habits. Since hydroponic tulips use the bulb only once, it is even more important to buy top-quality bulbs, and the bulbs bought must have undergone low-temperature treatment. Fill a vase or other container with water, place the bulb in the mouth of the container so that the water covers half of the bulb, then place the hydroponic container in an environment of 7°C to 10°C to encourage rooting. After the roots have formed, in about 15 to 20 days, it can be moved to a bright spot indoors. During the rooting stage, since water is consumed quickly, check for water loss every 2 to 3 days and replenish it in time, to prevent the roots from drying out from lack of water. If the bulbs are small, you can also add some nutrient solution; you can use 0.15 g of nitrogen-phosphorus-potassium compound fertilizer per liter plus an equal amount of calcium nitrate. If there is no calcium nitrate, compound fertilizer alone will also do. During the hydroponic stage, you can replace half of the water or nutrient solution every 3 to 4 days; if you replace all the water at once, the roots tend to grow thin and long rather than sturdy.